Adding Speech Navigation to a Website

As technology evolves, so do the methods of interaction with websites. One such advancement is the integration of speech navigation, allowing users to interact with web content hands-free using their voice. JavaScript’s Web Speech API empowers developers to implement this functionality seamlessly, enhancing accessibility and convenience for a diverse range of users. This article explores how we can utilize it to incorporate speech navigation into a website, enabling seamless navigation for users through the power of voice commands.

Discover how at OpenReplay.com.
To effectively follow along with this guide, it is recommended that you have a solid understanding of HTML, CSS, and JavaScript fundamentals. Familiarity with DOM manipulation and event handling will be beneficial as we dive into the implementation details. However, this guide is structured with clear explanations and step-by-step instructions, making it accessible to learners at various skill levels.
Here’s a demonstration of what we’ll be creating in this article.
You can also check it out on the live website.
Importance and benefits of speech navigation in a website
Speech navigation functionality in a website offers several benefits to users, such as:
-
Accessibility Enhancement: Speech navigation is a vital accessibility feature, particularly for individuals with disabilities such as motor impairments or visual challenges. It provides an alternative means of interaction, allowing users to navigate a website using their voice, overcoming barriers that conventional input methods may pose.
-
Hands-Free Browsing: One of the primary benefits of speech navigation is browsing a website entirely hands-free. This is particularly valuable in situations where users may have limited or no use of their hands, enabling them to access and interact with digital content seamlessly.
-
Inclusive User Experience: Web developers create a more inclusive user experience by integrating speech navigation into websites. This inclusivity extends beyond disability considerations to cater to a broader audience, including users who prefer a hands-free or voice-driven approach to browsing, enhancing the website’s overall usability.
-
Efficient Interaction: Speech navigation can be more efficient for certain tasks or commands than traditional methods. Users can express complex instructions naturally, potentially reducing the steps required to accomplish specific actions on the website.
Overview of the Web Speech API
The Web Speech API is a browser standard that enables web developers to integrate speech functionalities into web applications. This API consists of two distinct interfaces:
- Speech recognition API
- Speech synthesis (commonly known as text-to-speech [tts]) API.
We will focus more on the Speech Recognition API, as this is what we need to achieve speech navigation in our project.
Understanding the Speech Recognition API
The SpeechRecognition API programmatically turns voice inputs into text. It works by requesting access to the device microphone. Once granted, the user can speak, and the speech-to-text algorithm converts the speech into text that the application can process.
This API offers a range of properties, methods, and events for detecting and processing speech input. It provides developers with comprehensive control over the configuration of the Speech Recognition functionality, allowing the seamless integration of voice-based interactions into web applications.
When using this API in the Chrome browser, the speech input data is sent to a server-based recognition engine for processing. This means that the Speech Recognition service would not be accessible offline.
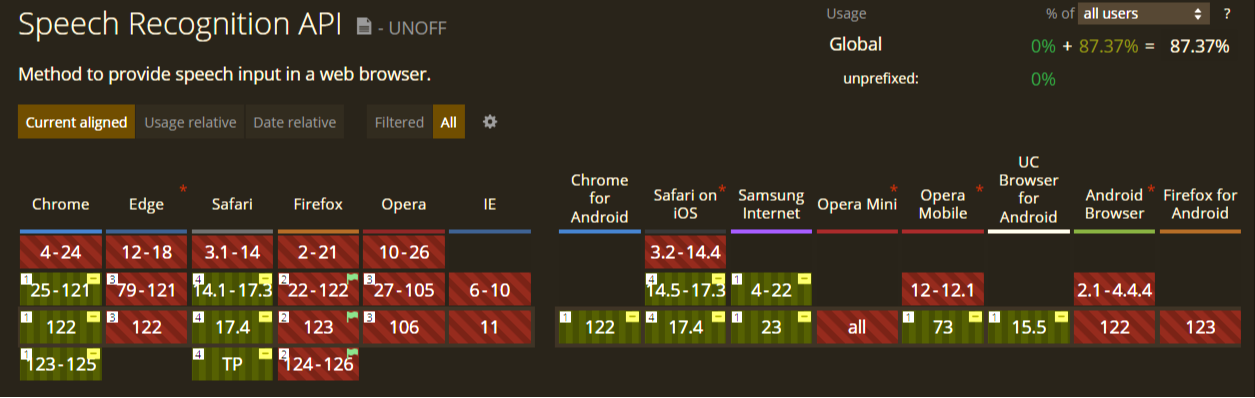
The browser support table below indicates that the Speech Recognition API has an 87.37% global browser usage as of the time of writing this article. This indicates that the API is not supported by all browsers yet, and browser compatibility should be checked before being used.
Now that we understand the Speech Recognition API and the importance of speech navigation in a website, let’s explore how you can implement one.
Setting up the website’s HTML structure
To get started, let’s set up the project’s structure. We need just three files for this project: HTML, CSS, and JavaScript.
Let’s begin with setting up the HTML structure of our project. Inside the HTML file, start by including the standard HTML boilerplate and the link and script tags to link the CSS and JS files.
<!DOCTYPE html>
<html lang="en">
  <head>
    <meta charset="UTF-8" />
    <meta name="viewport" content="width=device-width, initial-scale=1" />
    <link rel="stylesheet" href="./styles.css" />
    <title>Website speech navigation</title>
  </head>
  <body>
    <script src="./index.js"></script>
  </body>
</html>
Now that we have our boilerplate in place, let’s create the website’s structure. Add a header, nav, main, and footer tags inside the body tag.
<header></header>

<nav></nav>

<main></main>

<footer> </footer>
Inside the header tag, we place a menu icon to toggle the navigation menu and a microphone icon for toggling the speech recognition state.
<header>
  <ion-icon name="menu" id="menu-icon"></ion-icon>
  <ion-icon name="mic-outline" class="mic-icon"></ion-icon>
</header>
All icons were obtained from the Ionicons website.
Before the icons can become visible on the page, we need to include the following script tags at the end of the body tag
<script type="module" src="https://unpkg.com/ionicons@7.1.0/dist/ionicons/ionicons.esm.js"></script>
<script nomodule src="https://unpkg.com/ionicons@7.1.0/dist/ionicons/ionicons.js"></script>
Moving on, inside the nav tag, we add the links to manually navigate to sections on the website.
<nav class="nav-menu">
  <li>
    <a href="#home">Home</a>
  </li>
  <li>
    <a href="#about">About</a>
  </li>
  <li>
    <a href="#contact">Contact</a>
  </li>
</nav>
Next, inside the main tag, we set up the website’s various sections.
<main>
  <p id="info"></p>

  <section id="home">Home section</section>
  <section id="about">About section</section>
  <section id="contact">Contact section</section>
</main>
The empty p tag will be used to display the speech recognition status to the user later in JavaScript.
Lastly, let’s add a little content to the footer element
<footer id="footer">Footer section</footer>That is all for the HTML file. The overall code should look like this:
<!DOCTYPE html>
<html lang="en">
  <head>
    <meta charset="UTF-8" />
    <meta name="viewport" content="width=device-width, initial-scale=1.0" />
    <link rel="stylesheet" href="styles.css" />
    <title>Website Speech Navigation</title>
  </head>
  <body>
    <header>
      <ion-icon name="menu" id="menu-icon"></ion-icon>
      <ion-icon name="mic-outline" class="mic-icon"></ion-icon>
    </header>

    <nav class="nav-menu">
      <li>
        <a href="#home">Home</a>
      </li>
      <li>
        <a href="#about">About</a>
      </li>
      <li>
        <a href="#contact">Contact</a>
      </li>
    </nav>

    <main>
      <p id="info"></p>

      <section id="home">Home section</section>
      <section id="about">About section</section>
      <section id="contact">Contact section</section>
    </main>

    <footer id="footer">Footer section</footer>

    <script type="module" src="https://unpkg.com/ionicons@7.1.0/dist/ionicons/ionicons.esm.js"></script>
    <script nomodule src="https://unpkg.com/ionicons@7.1.0/dist/ionicons/ionicons.js"></script>
    <script src="index.js"></script>
  </body>
</html>Styling the website with CSS
Now that we have set up the HTML structure, it’s time to apply styles to give our website a visual appeal.
Let’s get started with some general styling for the page.
html {
  scroll-behavior: smooth;
}

* {
  margin: 0;
  padding: 0;
  box-sizing: border-box;
}
Styling the header, home, about, contacts, and footer sections.
header {
  padding: 10px;
  background-color: rgb(1, 22, 29);
  display: flex;
  justify-content: space-between;
  position: sticky;
  top: 0;
}

section {
  width: 100vw;
  height: 100vh;
  display: grid;
  place-items: center;
}

#home {
  background-color: rgb(102, 24, 67);
}

#about {
  background-color: rgb(31, 15, 90);
}

#contact {
  background-color: rgb(131, 4, 131);
}

footer {
  background-color: rgb(31, 1, 17);
  text-align: center;
  padding: 30px;
}
Adding styles to the menu-icon and the nav-menu classes.
#menu-icon {
  color: white;
  font-size: 35px;
  margin-top: 10px;
}

.nav-menu {
  height: 100vh;
  width: 0; /* makes the nav-menu closed by default */
  background-color: rgb(1, 22, 29);
  position: fixed;
  transition: .5s;
  overflow: hidden;
}

.nav-menu > li {
  list-style: none;
  margin: 50px 25px;
}

.nav-menu > li > a {
  text-decoration: none;
}

.nav-menu > li > a:hover {
  color: white;
}

/* opens the nav-menu */
.show-nav {
  width: 200px;
}
Apply styling to the mic-icon and assign a class, which will set the pulse animation for the listening state of the mic-icon.
.mic-icon {
  background-color: rgb(255, 0, 140);
  padding: 15px;
  border-radius: 50%;
  font-size: 25px;
}

.listening{
  animation: pulse 1s linear infinite alternate;
}

@keyframes pulse{
  100% {
    transform: scale(1.2);
  }
}
Lastly, let’s style the info element responsible for displaying the speech recognition status to the user.
#info {
  position: fixed;
  top: 80px;
  right: 0;
  background-color: #eeeeeebd;
  border-radius: 20px;
  padding: 5px 12px;
  z-index: 100;
  display: none; /* display is hidden until revealed through JavaScript */
  color: #000;
}
After we’re done styling the website, It should look like this:
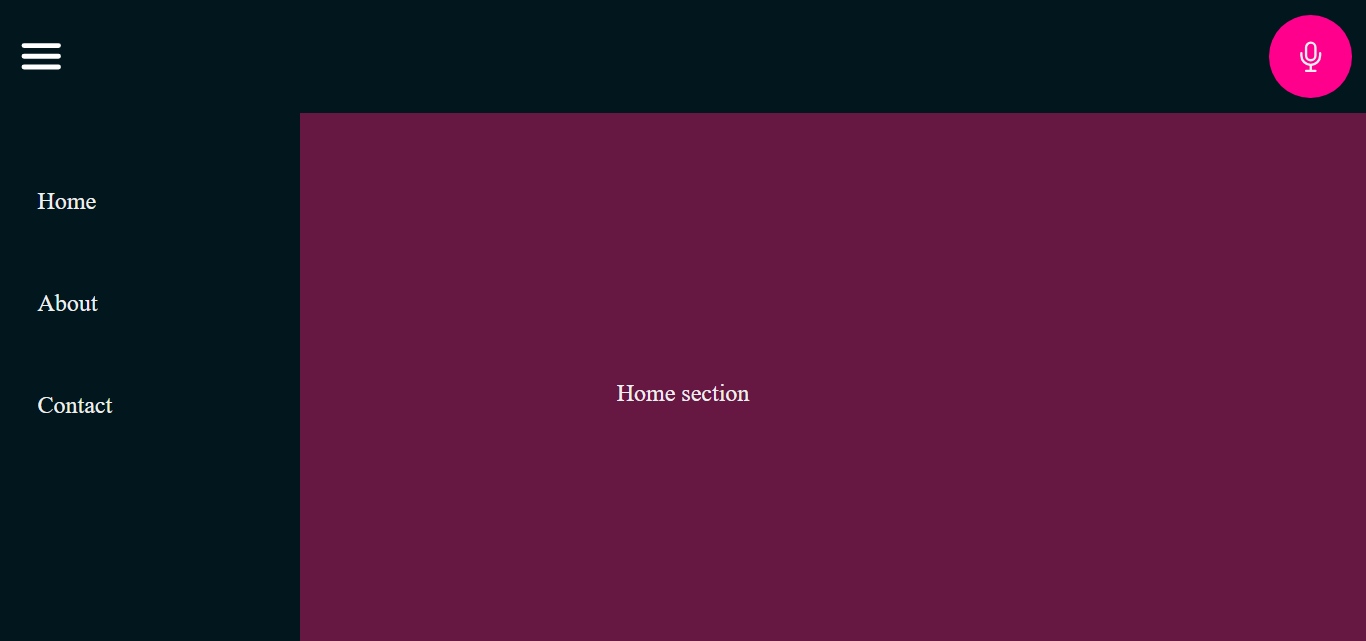
Now, let’s begin implementing the speech navigation functionality for our website.
Configuring the Speech Recognition functionality in JavaScript
Inside the JavaScript file, we first need to declare a few variables that we will use later on and the function to toggle the nav-menu.
const mic = document.querySelector(".mic-icon");
const info = document.getElementById('info');
const menuIcon = document.getElementById("menu-icon");
const navMenu = document.querySelector(".nav-menu");

menuIcon.onclick = () => {
  navMenu.classList.toggle("show-nav")
}
Before initializing the Speech Recognition API, we need to verify the availability of either the SpeechRecognition or webkitSpeechRecognition properties in the browser’s window object.
if (window.SpeechRecognition || window.webkitSpeechRecognition) {
  //speech navigation logic
}
else {
  //display error to the user
}
The code above applies the speech navigation logic only if the browser supports the Speech Recognition API, and displays an error message if the browser doesn’t support the API.
Inside the if block, we create a new SpeechRecognition instance.
const recognition = new (window.SpeechRecognition || window.webkitSpeechRecognition)();The code above creates a new SpeechRecognition instance, ensuring the use of the correct constructor for browser support. It prompts the user to grant microphone access to the application to receive voice commands.
Next, we create a flag for handling when the speech recognition service is listening for speech input and when it has stopped.
let isListening = false;Below this, we create two functions to start and stop the speech recognition service
// stops the speech recognition service
const startRecognition = () => {
  recognition.start(); // starts speech recognition service

  mic.classList.add('listening'); // adds the pulse animation to mic-icon

  isListening = true; // Indicate the speech recognition service is currently listening.
}


// starts the speech recognition service
const stopRecognition = () => {
  recognition.stop(); // stops the speech recognition service

  mic.classList.remove('listening'); // removes the pulse animation on the mic-icon

  isListening = false; // Indicates the speech recognition service is currently not listening
}
Next, a third function will display the speech recognition status to the user.
const displayInfo = (message, textColor) => {
  info.style.display = "inline-block";
  info.style.color = textColor;
  info.innerText = message;

  setTimeout(() => {info.style.display = "none"}, 3000);
}
In the code above, the info element is set to display a message to the user for 3 seconds.
Next, we must link the start and stop functionality to the mic icon.
mic.onclick = () => {
  if (!isListening) {
    startRecognition();
    displayInfo("Speech navigation enabled", "#000");
  } else {
    stopRecognition();
    displayInfo("Speech navigation disabled", "#000");
  }
}
In the above code, once the mic icon is clicked, the isListening variable is checked, if its value is set to false indicating a speech recognition session is not in progress, we start a new speech recognition session. Otherwise, we stop the ongoing recognition session if its value is set to true.
The speech recognition service automatically stops each time a result is sent. To ensure it stays active to receive commands, we are going to utilize the onend event to listen for when the speech recognition service has ended and call the start() instance method all over again until the user clicks the mic icon to manually stop it.
recognition.onend = () => {
  if(isListening == true){
    recognition.start();
  }
}
Finally, if the browser does not support the Speech Recognition API, we set the display property of the mic-icon to none.
else {
  mic.style.display = "none";
}
This removes the mic icon from the document, making it inaccessible for browsers without support for this API.
Mapping user’s speech commands to website navigation actions
After initializing the Speech Recognition API, the speech recognition service listens for speech inputs when the start() instance method is called. The onresult event is triggered when a word or phrase has been recognized, and the results are returned to the application.
recognition.onresult = (event) => {
  // Perform actions based on the recognized command
}
Inside the onresult code block, add the following code:
const command = event.results[event.results.length - 1][0];
const transcript = command.transcript.toLowerCase();
In the code above, the first line retrieves the last recognized speech input from the event.results array and then retrieves the first alternative within that last result.
The results read-only property of the onresult event represents an array of recognition results received from the speech recognition service for the current session. Each result is an object containing an array of multiple recognition alternatives objects, where each alternatives object contains two properties: transcript and confidence.
The second line uses the recognition transcript property to retrieve the recognized text (the transcription of the spoken input)and set it to lowercase, making it easier to handle and compare later.
Next, we retrieve and map these results to the various navigation actions on the website.
if (transcript.includes('home')) {
  const homeSection = document.getElementById('home');
  if (homeSection) {
    homeSection.scrollIntoView({ behavior: 'smooth' });
  }
} else if (transcript.includes('about')) {
  const aboutSection = document.getElementById('about');
  if (aboutSection) {
    aboutSection.scrollIntoView({ behavior: 'smooth' });
  }
} else if (transcript.includes('contact')) {
  const contactSection = document.getElementById('contact');
  if (contactSection) {
    contactSection.scrollIntoView({ behavior: 'smooth' });
  }
} else if (transcript.includes('footer')) {
  const footerSection = document.getElementById('footer');
  if (footerSection) {
    footerSection.scrollIntoView({ behavior: 'smooth' });
  }
} else if (transcript.includes('down')) {
  window.scroll(0, window.scrollY + window.innerHeight);
} else if (transcript.includes('up')) {
  window.scroll(0, window.scrollY - window.innerHeight);
} else if (transcript.includes('open menu')) {
  navMenu.classList.add('show-nav');
} else if (transcript.includes('close menu')) {
  navMenu.classList.remove('show-nav');
} else if (transcript.includes('stop')) {
  stopRecognition();
  displayInfo("Speech navigation disabled");
} else {
  displayInfo("Unrecognized command: Try again", "#000");
}
In the above code, we’ve mapped speech commands to website navigation actions, including scrolling, menu control, section navigation, and stopping speech recognition. Each command is checked against specific keywords, triggering corresponding actions. The user is notified with ”Unrecognized command” if a command isn’t recognized.
Handling Speech Recognition Errors
There would be cases where errors would be encountered when using the recognition service. The speech recognition API provides us with the onerror event. This event triggers when an error is encountered such as network and no-speech errors.
recognition.onerror = (event) => {
  // code to handle errors
}
The Speech Recognition API may continue to encounter network errors while attempting to establish or maintain a connection, triggering multiple error events within a second.
To address this issue and ensure that the error message is displayed only once for network errors, above the onerror event code block, add a variable to track whether the error has already been handled and set it to false.
let errorHandled = false;Moving back into the onerror code block, we declare a conditional statement that checks if the error has been handled
if (!errorHandled) {
  // Check if the error has not been handled yet
}
Inside this block, we declare another conditional statement that checks if the error encountered is a network error, in which case we stop the recognition session, set the isListening variable to false, and remove the pulse animation on the mic icon.
if (event.error == "network") {
  recognition.stop();
  isListening= false;
  mic.classList.remove('listening');
}
Below this if block, we call the displayInfo() function to display the different error messages to the user.
displayInfo(`Speech recognition error: ${event.error}`, "#800000")Next, we set the errorHandled variable to true, indicating the error has been handled for the current recognition session.
errorHandled = true;To ensure that the error message is displayed in the next session if occurred again, we would need to set the errorHandled variable back to false, indicating that any error encountered in the next recognition session is yet to be handled. We can do this using the onstart event
recognition.onstart = () => {
  errorHandled = false;
}
Providing feedback when an error is encountered allows users to understand the cause of the issue and guides them toward potential solutions or alternative actions.
Enhancing efficiency through code optimization
When implementing Speech Navigation in a Website with JavaScript’s Web Speech API, reviewing and optimizing your code for efficiency is important. Identify and eliminate redundant operations. That being said, let’s take a look at how we can optimize our JavaScript code.
Using multiple else if statements may not be problematic for small applications, but for larger ones processing over 100 commands, this approach can lead to lengthy, hard-to-maintain, and repetitive code. To mitigate this, we can use an object to map commands to their respective navigation actions. This makes updating, deleting, or adding new commands to the application easier.
const commands = {
  'about': () => navigateToSection('about'),
  'home': () => navigateToSection('home'),
  'contact': () => navigateToSection('contact'),
  'footer': () => navigateToSection('footer'),
  'down': () => window.scrollBy(0, window.innerHeight),
  'up': () => window.scrollBy(0, -window.innerHeight),
  'stop': () => {stopRecognition(); displayInfo("Speech navigation disabled","#000")},
  'open menu': () => navMenu.classList.add('show-nav'),
  'close menu': () => navMenu.classList.remove('show-nav')
};
Next, we iterate over the commands and check if the transcript includes any of the keywords.
let commandFound = false;
for (const command in commands) {
  if (transcript.includes(command)) {
    commands[command]();
    commandFound = true;
    break; // Stop searching after the first match
  }
}
If no command is found, we execute the default action
if (!commandFound) {
  displayInfo("Unrecognized command: Try again", "#000");
}
Next, we create the function that handles the scrolling to the website’s various sections.
function navigateToSection(sectionId) {
  const section = document.getElementById(sectionId);
  if (section) {
    section.scrollIntoView({ behavior: 'smooth' });
  }
}
By optimizing your code, you can significantly improve performance, enhance efficiency, reduce resource consumption, and ultimately create a more responsive and scalable software solution.
The overall JavaScript code for our application should look like this now:
const mic = document.querySelector(".mic-icon");
const info = document.getElementById("info");
const menuIcon = document.getElementById("menu-icon");
const navMenu = document.querySelector(".nav-menu");

menuIcon.onclick = () => {
  navMenu.classList.toggle("show-nav");
};

if (window.SpeechRecognition || window.webkitSpeechRecognition) {
  const recognition = new (window.SpeechRecognition ||
    window.webkitSpeechRecognition)();
  let isListening = false;

  // stops the speech recognition service
  const startRecognition = () => {
    recognition.start(); // starts speech recognition service

    mic.classList.add("listening"); // adds the pulse animation to mic-icon

    isListening = true; // Indicate the speech recognition service is currently listening.
  };

  // starts the speech recogniiton service
  const stopRecognition = () => {
    recognition.stop(); // stops the speech recognition service

    mic.classList.remove("listening"); // removes the pulse animation on the mic-icon

    isListening = false; // Indicates the speech recognition service is currently not listening
  };

  const displayInfo = (message, textColor) => {
    info.style.display = "inline-block";
    info.style.color = textColor;
    info.innerText = message;

    setTimeout(() => {
      info.style.display = "none";
    }, 3000);
  };

  mic.onclick = () => {
    if (isListening == false) {
      startRecognition();
      displayInfo("Speech navigation enabled", "#000");
    } else if (isListening == true) {
      stopRecognition();
      displayInfo("Speech navigation disabled", "#000");
    }
  };

  recognition.onend = () => {
    if (isListening == true) {
      recognition.start();
    }
  };

  recognition.onresult = (event) => {
    const command = event.results[event.results.length - 1][0];
    const transcript = command.transcript.toLowerCase();

    const commands = {
      about: () => navigateToSection("about"),
      home: () => navigateToSection("home"),
      contact: () => navigateToSection("contact"),
      footer: () => navigateToSection("footer"),
      down: () => window.scrollBy(0, window.innerHeight),
      up: () => window.scrollBy(0, -window.innerHeight),
      stop: () => {
        stopRecognition();
        displayInfo("Speech navigation disabled", "#000");
      },
      "open menu": () => navMenu.classList.add("show-nav"),
      "close menu": () => navMenu.classList.remove("show-nav")
    }

    let commandFound = false;
    for (const command in commands) {
      if (transcript.includes(command)) {
        commands[command]();
        commandFound = true;
        break; // Stop searching after the first match
      }
    }

    if (!commandFound) {
      displayInfo("Unrecognized command: Try again", "#000");
    }

    function navigateToSection(sectionId) {
      const section = document.getElementById(sectionId);
      if (section) {
        section.scrollIntoView({ behavior: "smooth" });
      }
    }
  };

  let errorHandled = false;
  recognition.onerror = (event) => {
    if (!errorHandled) {
      if (event.error == "network") {
        recognition.stop();
        isListening = false;
        mic.classList.remove("listening");
      }
    }
    displayInfo(`Speech recognition error: ${event.error}`, "#800000");
    errorHandled = true;
  };

  recognition.onstart = () => {
    errorHandled = false;
  };

} else {
  mic.style.display = "none";
}
Potential pitfalls and considerations
Implementing speech navigation with JavaScript’s Web Speech API in our application offers numerous benefits. While this is a great way to add a modern and interactive element to our website and enhance user accessibility, it also comes with its own set of challenges that need to be considered for optimal implementation. Some of these challenges include:
-
Limited number of predefined commands: Because the application only works with a limited number of predefined commands, it restricts users to interact using only the keywords defined in the
commandsobject. For instance, the user could say “show links section”, while the application only listens for the words “open menu” in the sentence to be able to open the navigation menu. This rigidity can lead to issues when users use synonyms or alternative phrases for navigation commands. To mitigate this, we can provide user education through tutorials or tooltips on how to use the speech navigation feature on the website with a list of all the valid command -
Speech Recognition Accuracy: The Speech recognition accuracy can vary depending on factors such as background noise, accent, and speech clarity. It’s crucial to test speech navigation extensively in various environments and with different user demographics to ensure reliable performance.
-
Negation statements: If a user negates a valid command in their sentence (e.g., “Don’t go home”), the application recognizes only the “home” command in the sentence and navigates to the home section, contrary to the user’s intent. One way we handle this is by listening for negation keywords (e.g., “Don’t”, “Do not”), and if present, stop the execution of any valid command found in the sentence and provide a context-based response to the user to ensure the correct navigation pattern is used.
By considering these potential pitfalls, we can enhance the usability and robustness of the speech navigation feature in our application. Furthermore, continuous testing, user feedback, and iteration are essential for refining the speech navigation functionality and ensuring a seamless user experience on the website.
Conclusion
In conclusion, integrating Speech Navigation in websites with the Web Speech API empowers users by giving them greater control over their online experience. Users can effortlessly navigate to specific sections, trigger actions, or access information on a website simply through voice commands, making it a valuable tool for individuals with disabilities and those seeking a hands-free website navigation experience. Developers can create more inclusive and user-friendly websites by leveraging the Web Speech API.
This speech navigation feature can also be used to navigate much more complex websites than those covered in this article. I hope that with the knowledge gained from this guide, you will be well-equipped to implement speech navigation functionality effectively on your websites, creating a seamless user experience that will leave a lasting impression.
The complete source code of this project can be found on my website speech navigation GitHub repository
Happy coding!
References
Web Speech API - MDN
Speech to text in the browser with the Web Speech API - Phil Nash
Web Speech API - W3C community group
Speech recognition in browsers - Seoul Engineer
Web Speech API Specification - W3C unofficial draft
Understand every bug
Uncover frustrations, understand bugs and fix slowdowns like never before with OpenReplay — the open-source session replay tool for developers. Self-host it in minutes, and have complete control over your customer data. Check our GitHub repo and join the thousands of developers in our community.