Top 5 IoT Libraries for JavaScript Developers
IoT is everywhere, and with JavaScript you can join this world too

IoT or the Internet of Things is a term that’s been around for a while now, but do you know exactly what it means? Because it’s not really a new activity, it’s just a formalized definition of something we’ve been doing for years and years now: connecting devices.
Mind you, back when I started, “devices” meant computers, and now the word is used for literally anything that works on batteries (from a watch, to the fridge, your TV or even the toaster because, why not?).
The problem is that when you start having so many devices sending data in different formats, you start seeing the need to standardize your protocols, and that is why the term IoT was born: to bring order to chaos.
In this article, I’m going to quickly cover the top 5 libraries you can use from within your JavaScript code to connect with these devices. What you do with the data, and how you handle it, that’s completely up to you.
#1 Cylon.js
As a fan of Battlestar Galactica, I must say I love the name of this library. I also fear it because of the same reason, but that’s another thing.
More than “just an IoT” library, Cylon.js is a full robotics framework with support for more than 43 different platforms. That’s right 43 different places or ways for you to connect with machines.
You can use Cylon.js to connect to your keyword and listen for events sent by it, or your Arduino board, or perhaps provide an HTTP API interface and get data through there (they also support socket.io and MQTT). Do you want to control a freaking drone through JavaScript? Sure, just install:
npm install cylon cylon-ardroneAnd the run a little script like this (taken from their documentation):
var Cylon = require('cylon');

Cylon.robot({
  connections: {
    ardrone: { adaptor: 'ardrone', port: '192.168.1.1' }
  },

  devices: {
    drone: { driver: 'ardrone' }
  },

  work: function(my) {
    my.drone.takeoff();
    after((10).seconds(), function() {
      my.drone.land();
    });
    after((15).seconds(), function() {
      my.drone.stop();
    });
  }
}).start();
Just call takeoff() and land(), simple right?
Or perhaps you want to connect to your Philips Hue lights? Sure, give it a try
The way Cylon.js works, is by allowing others to provide connectors through a plug-in system, which means there are no limitations to what this library offers. And on top of that, the documentation itself is very detailed and well written, filled with examples, so check them out right now.
#2 IoT.js
If you’re looking to perform some IoT from within a connected device (instead of being on the receiving end inside a buffy, strong and filled-with-resources server), then maybe you need something optimized for that environment.
Enter IoT.js
This IoT framework runs on top of the JerryScript engine, which is a JavaScript runtime optimized for small devices. This means that while you don’t have the full might of the state-of-the-art JS at your disposal, you do count with:
- Full support for ECMAScript 5.1 syntax.
- Optimization for low-memory consumption.
- The ability to pre-compile your JS code into byte code.
However, the number of compatible platforms is not as big as Cylon.js, instead IoT.js is only compatible with:
- Raspberry Pi (both versions 2 and 3)
- STM32F4-Discovery
Regarding their documentation, which should be one of the measures of how good a library is, is decent at best. They do have some basic examples and getting started guides. But that’s probably it. Considering how IoT.js is meant to be a low-level interface into the hardware, right now it looks like it’s expecting developers to already have experience using other products instead of being aimed at JS developers looking to get into IoT.
Open Source Session Replay
OpenReplay is an open-source, session replay suite that lets you see what users do on your web app, helping you troubleshoot issues faster. OpenReplay is self-hosted for full control over your data.

Start enjoying your debugging experience - start using OpenReplay for free.
#3 Johnny-Five
Johnny Five is one of the oldest platforms for robotics and IoT available for JavaScript developers. It was originally released in 2012 and since then it’s been growing both in features and compatibility. If you know you’re interacting with Arduino-based hardware, then this is most likely the library you need. And even if you’re not going with Arduino, they boast a very extensible plug-in system where many other platforms have already developed their own IO plugins.
Their documentation is very detailed, filled with examples and diagrams focusing on the hardware connections as well. It’s definitely a great learning resource. For example, the following code is taken from them and shows you how easy it is for you to read temperature from a sensor:
const { Board, Thermometer } = require("johnny-five");
const board = new Board();

board.on("ready", () => {
  const thermometer = new Thermometer({
    controller: "LM35",
    pin: "A0"
  });

  thermometer.on("change", () => {
    const {celsius, fahrenheit, kelvin} = thermometer;
    console.log("Thermometer");
    console.log("  celsius      : ", celsius);
    console.log("  fahrenheit   : ", fahrenheit);
    console.log("  kelvin       : ", kelvin);
    console.log("--------------------------------------");
  });
});
#4 NodeRed
And now we go from the low-level interfaces that represent the above libraries into a high level, low-code solution that is NodeRed.
This platform allows you to set dataflows and workflows graphically from the browser before deploying them.
In an ideal scenario, you don’t need to code anything, perhaps setting a few platform credentials, but that’s about it. NodeRed also acts as a centralized platform for you and others to share the flows they create, which is a great way to keep you from re-creating the wheel every time, even if you’re not really writing code.
Now, the interesting part about this concept, is that you create the flow on your browser, and then deploy it for it to run. But where? NodeRed is compatible with a multitude of platforms, going from the Raspberry Pi, all the way to AWS cloud, without skipping over things like Docker (which let’s be honest, allows you to practically put it wherever you want), Android devices and others. This is definitely a very versatile platform and the fact that you can “code” it graphically from the browser makes it even more accessible.
You can literally create a back-end platform, getting data from your remote devices and transforming it without having to do practically any code and then run it wherever you want. There are “nodes” which you can use to do pretty much anything from generating a message every second, to transforming data, interacting with external APIs or even saving your data into databases.
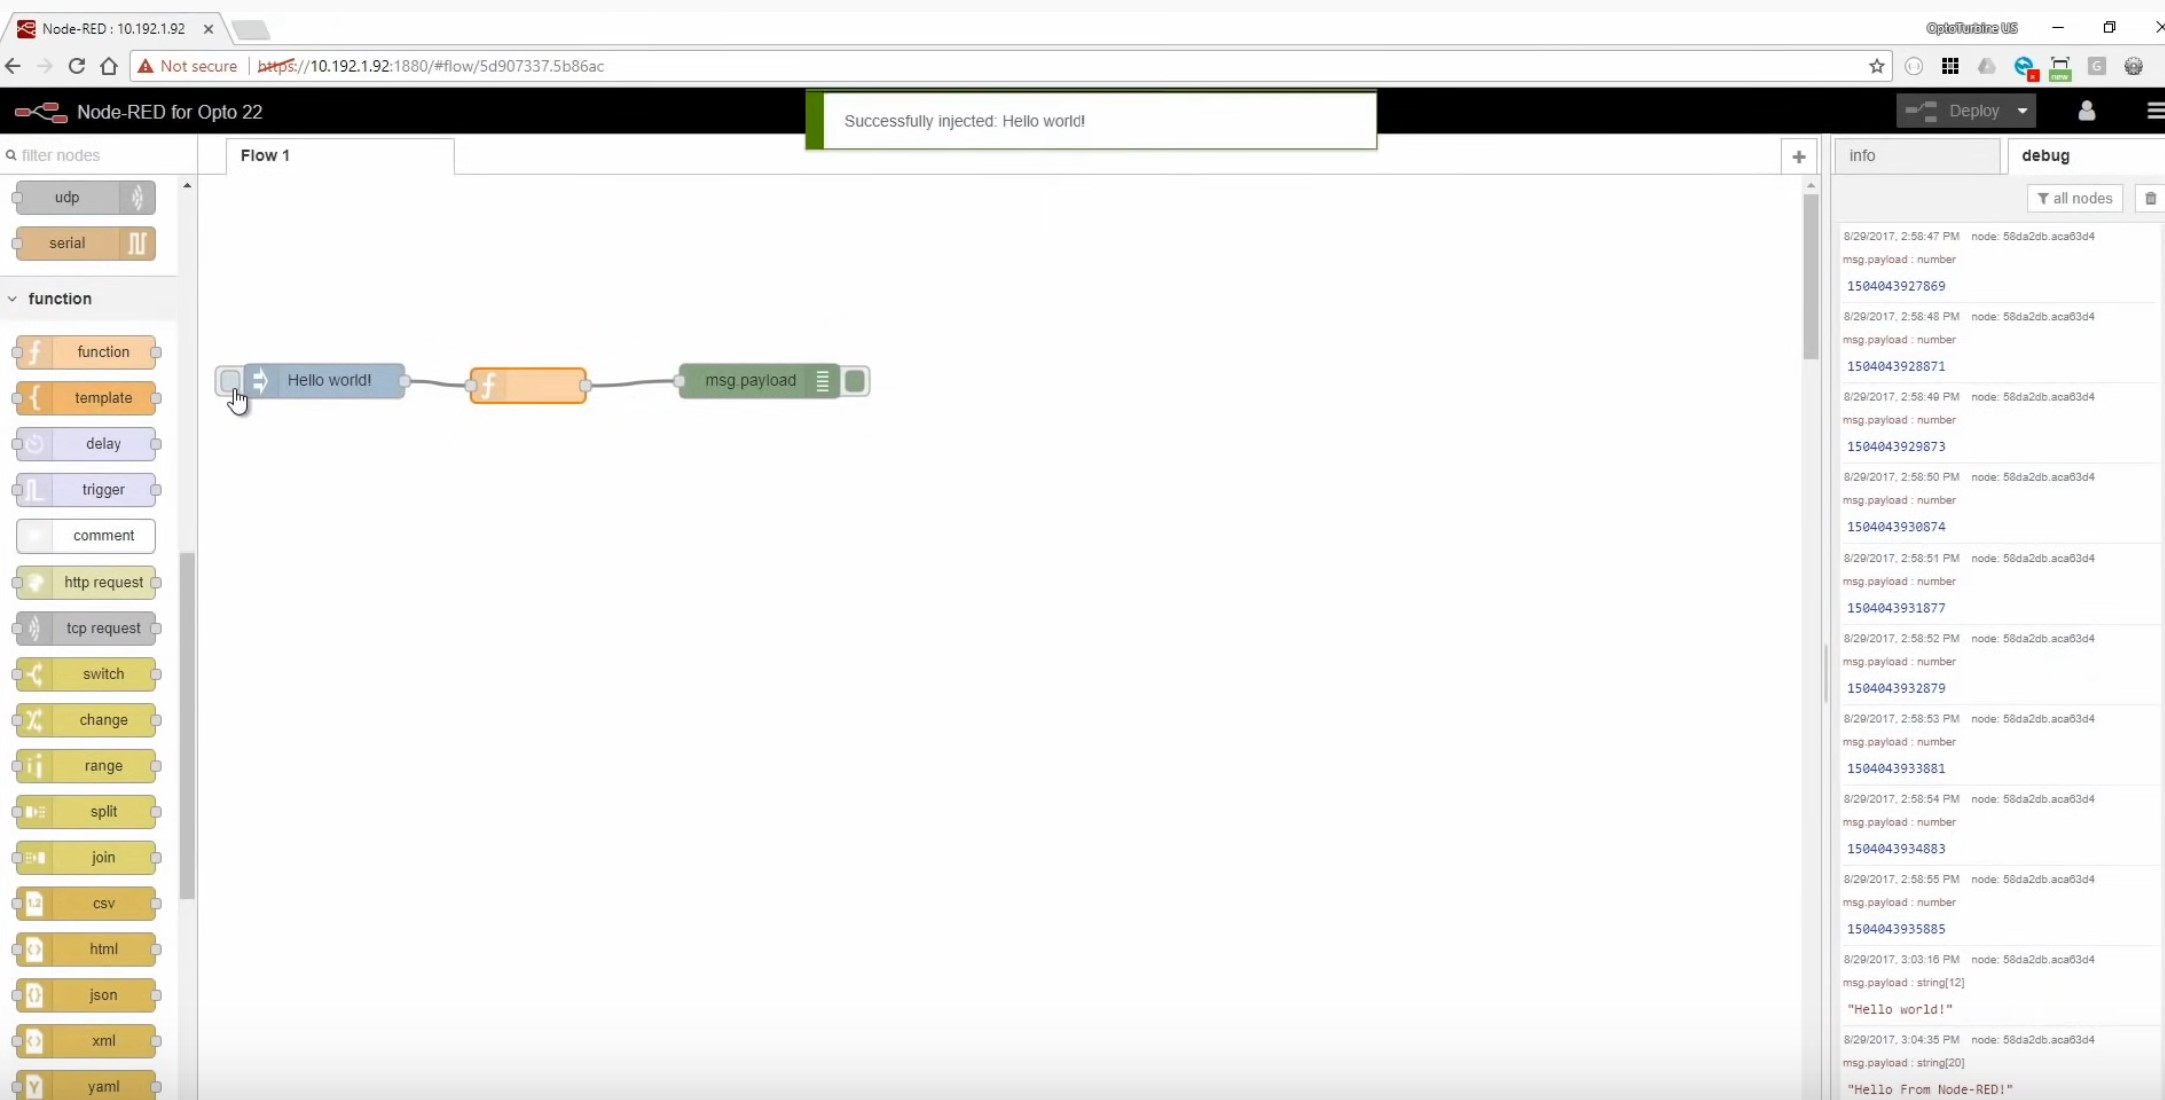
The above example (taken from one of their tutorials) shows you the main editor. You can see how you can visually connect nodes to generate your business logic. In the above example the blue node is generating an input every 1 second, the orange one is allowing you to write a function that transforms that input, and the green node is showing the data on the debug section (far right side of the screen).
Their documentation is very good, but the best part is that they have multiple videos on YouTube where you can get a first-hand look at how to use the editor and how to run your programs afterward. If you’re looking into building a complex IoT-based logic I highly encourage you to try them out!
#5 Zetta
Finally ZettaJS is yet another way of interacting with remote devices through JavaScript. The main difference here is that Zetta’s goal is to turn every device into an API, which if you think about it is a great way to generalize IoT into a common concept.
Right now the number of devices and their interfaces is growing without a lot of control. Zetta is attempting to help in that regard. Through a very intuitive way of coding, you can simply install drivers for your devices and enable a public interface into them as well as interact with them through code.
For example, take a look at the following code taken from their documentation:
var zetta = require('zetta');
var LED = require('zetta-led-mock-driver');
var Photocell = require('zetta-photocell-mock-driver');
var duskToDawnLight = require('./apps/dusk_to_dawn_light');
zetta()
  .name('FirstName-LastName')
  .use(LED)
  .use(Photocell)
  .use(duskToDawnLight)
  .link('http://hello-zetta.herokuapp.com/')
  .listen(1337, function(){
    console.log('Zetta is running at http://127.0.0.1:1337');
});
This code is importing the Zetta library (obviously), 2 mock drivers that represent a light sensor and an LDE, and finally a custom-code logic that interacts with both. Ignore the mock drivers, assume they’re what they represent: a light sensor and an LDE light. The custom logic looks like this:
module.exports = function(server) {
  var photocellQuery = server.where({ type: 'photocell' });
  var ledQuery = server.where({ type: 'led' });
  server.observe([photocellQuery, ledQuery], function(photocell, led){
    photocell.streams.intensity.on('data', function(m) {
      if(m.data < 0.5) {
        if (led.available('turn-on')) {
          led.call('turn-on');
        }
      } else {
        if (led.available('turn-off')) {
          led.call('turn-off');
       }
     }
   });
});}
As you can see, it’s treating both remote devices as servers and constantly observing them. Then through a simple if-else logic, it’s deciding to turn on the LDE if the light data from the sensor is too low, or turn it off if it’s too high. In other words, it’s automatically deciding whether or not to turn on the lights.
And it’s doing so reactively without us having to worry about how to query such a device.
Finally, thanks to the whole API-for-everything mindset of Zetta, you can monitor what’s happening with your devices through a web UI:
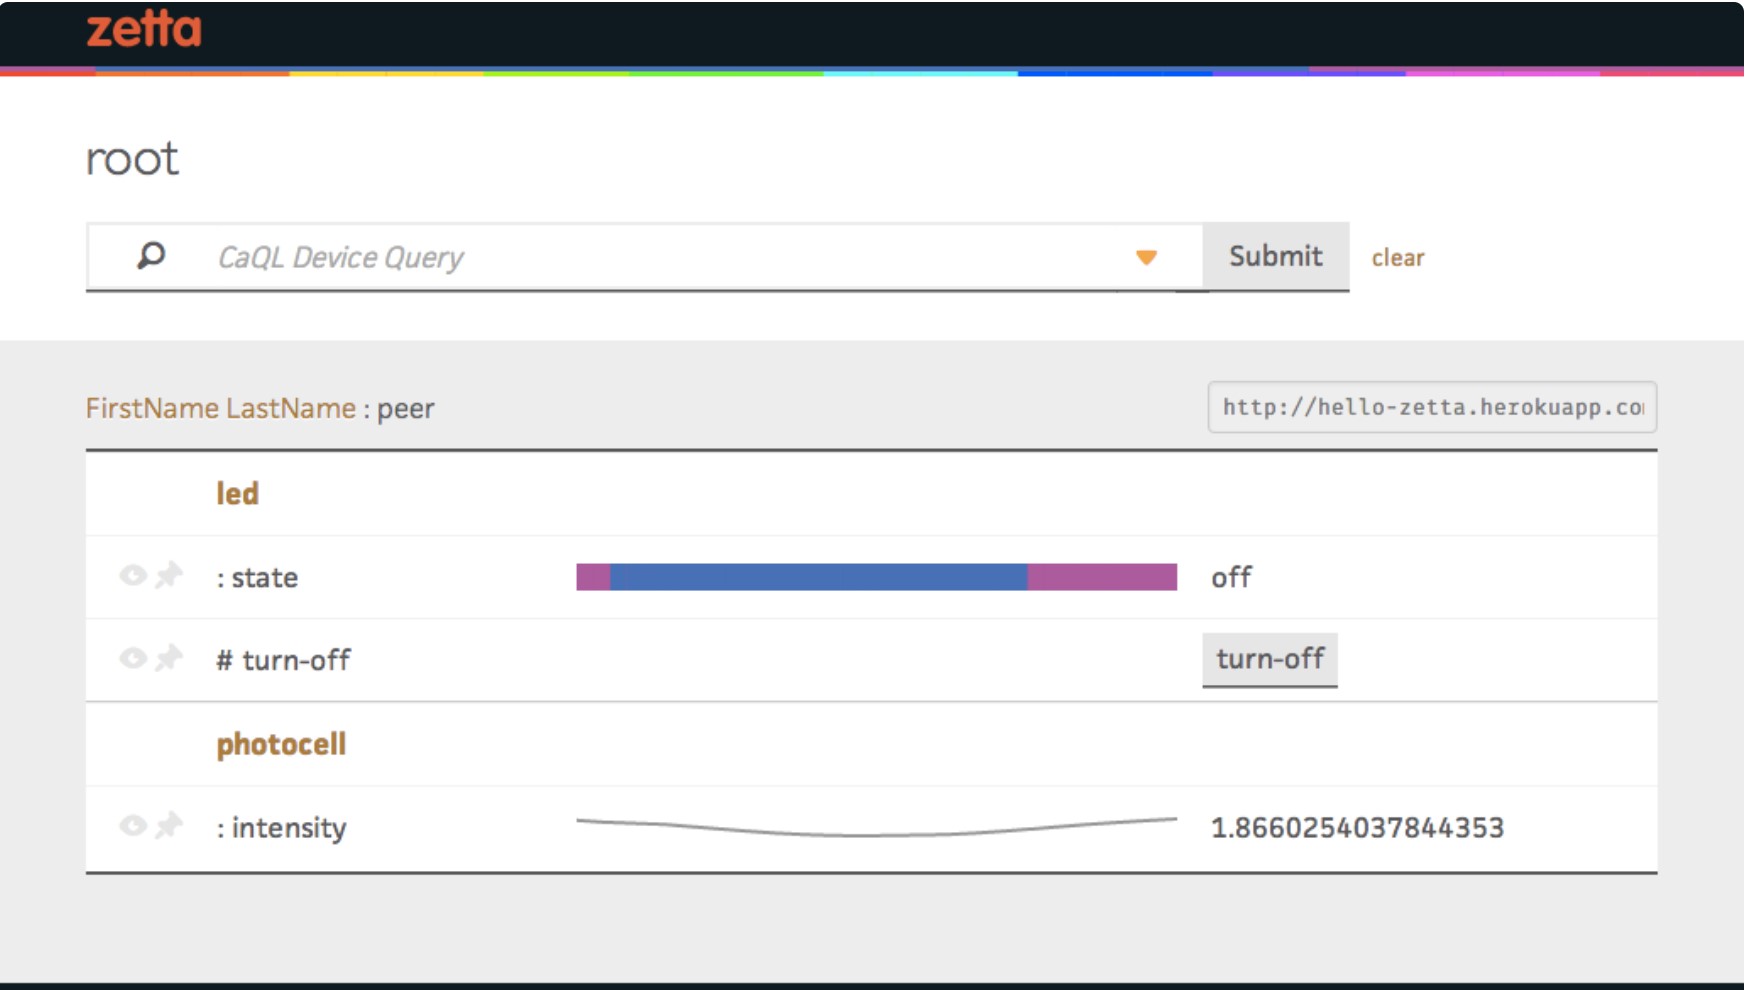
Granted, you’re just monitoring, but this is nevertheless an amazing way of understanding how many devices you’re dealing with and what you’re doing with them. Zetta’s documentation is very well designed, and the examples are well explained. I highly recommend this library if you’re looking to create a reactive architecture around your devices.
IoT for everyone!
As you can see, JavaScript is not limited to the browser, or even the API-based back-end development. You can go as high level as you want and pull data from a device or considerably lower and control it with almost the exact language.
Of course, depending on the needs you have around your particular project some of these libraries will not be useful to you but others might be exactly what you’re looking for.
If you’re a JavaScript developer, your potential is limitless, don’t forget that!