Payment Integration Made Easy: Paystack with Angular 17

If you’ve ever shopped online and noticed that the website uses a third-party system like Flutterwave or Paystack to handle payments, you might be curious about how they set it up. Suppose you’re interested in learning how to create a similar payment system using Angular 17. In that case, you’re just in the right place because this article will show how to integrate a Paystack payment system with Angular 17.

Discover how at OpenReplay.com.
Integrating payment gateways into web applications is vital for supporting secure and easy online transactions. With payment gateways, businesses can accept various payment methods, increasing customer ease and happiness. When payment gateways are integrated, the checkout process becomes smoother, which means fewer people will leave their shopping carts without completing what they bought, which in turn will help increase sales for businesses. Lastly, this integration builds trust between businesses and customers, establishing long-term relationships and increasing overall growth.
Introduction to the Paystack Payment System
Paystack is one of the various payment systems we have that makes it easy for businesses in Africa to receive online payments from their customers from anywhere in the world. These customers can pay through channels like USSD (Unstructured Supplementary Service Data), cards, mobile money, bank transfers, and a lot more.
Features of the Paystack Payment System
Due to its numerous attractive features, Paystack has emerged as one of the most popular payment systems in the African market. Paystack offers businesses a stress-free solution for accepting online payments, resulting in increased growth and better customer payment experiences.
Below are some of its features:
- Well-documented APIs: Paystack APIs contain clear instructions for developers to easily integrate Paystack payment gateways into their websites.
- Easy Payment Experience: Paystack offers businesses the opportunity to get paid through channels like Visa QR (Quick Response) codes, bank transfers, USSD, and POS, making it easy for customers to checkout with no stress.
- Transaction Success Rates: Paystack allows you to experience high success rates with your transactions. They ensure your payments go through smoothly by choosing the best channels to process them, which means you’ll have fewer problems completing transactions.
Benefits of Using the Paystack Payment System for Online Payments
Using Paystack for online payments provides businesses safe transactions and quicker checkout processes. In this part, we’ll examine some key benefits of using Paystack’s payment gateway for online transactions.
Below are some benefits of using the Paystack payment system:
- Paystack enables businesses to easily accept customer payments, whether a one-time purchase or a recurring subscription.
- With Paystack, businesses can see exactly what their customers are buying and when they’re buying it. Plus, Paystack makes it easy to organize and understand all this information, which helps with keeping track of sales and ensuring everything adds up correctly.
- Paystack enhances security by ensuring that transactions are conducted with authenticated users, reducing the risk of fraudulent activities and enhancing trust in the payment process.
Integrating the Paystack Payment System into an Existing Application
Here, we’ll see, in practical terms, how we can integrate the Paystack payment system into an application. Here is a repository containing an existing application we’ll use in this article.
So, scaffold the project, and let’s get into the fun part.
Here is what our application looks like without Paystack system integration:
Set up your Paystack Account and Get your API Keys
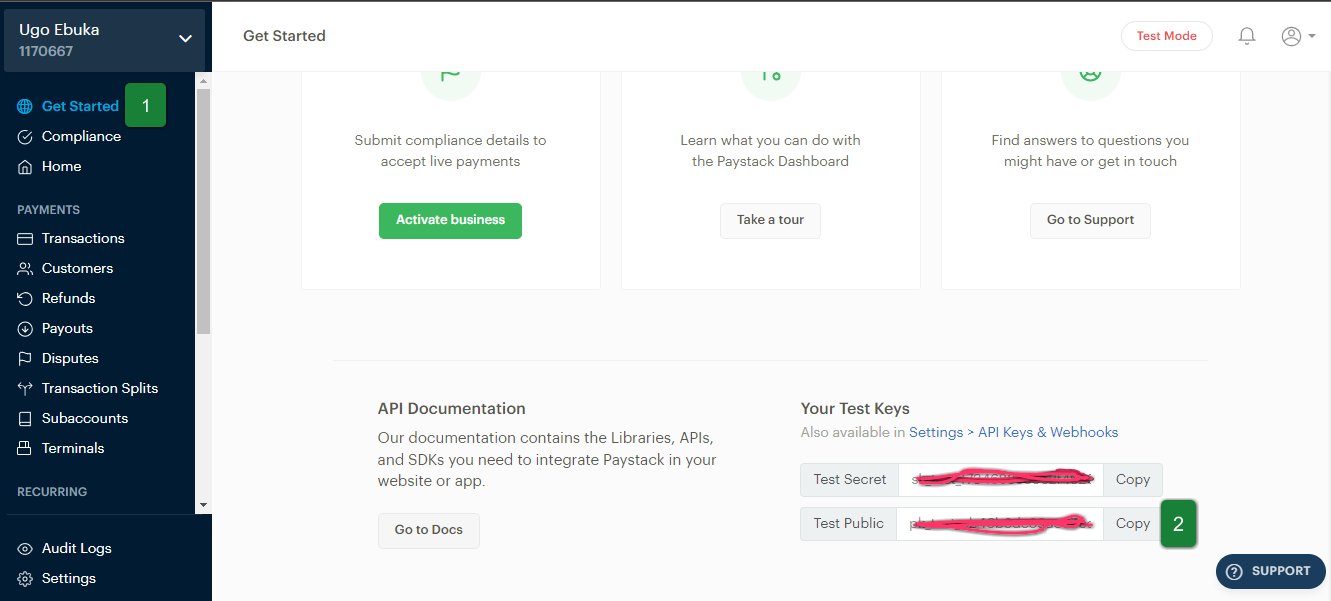
Now, to integrate, we first need to open a free account with Paystack’s website; then, we can get our test keys, which will be used to authenticate our requests to the Paystack API (Application Programming Interface).
To get them, in your dashboard on the sidebar, click on “Get Started,” scroll below, and then you’ll see your test keys at the bottom of the page, as follows:
Getting Started: Integrate a Paystack Payment Gateway into an Existing Application
Here, we’ll see how to integrate the Paystack system into the existing application.
Install the angular4-paystack module to use Paystack in our application, as follows:
npm install --save angular4-paystackIn app.module.ts, enter the following code:
import { NgModule } from "@angular/core";
import { BrowserModule } from "@angular/platform-browser";

import { AppRoutingModule } from "./app-routing.module";
import { AppComponent } from "./app.component";
import { PaystackComponent } from "./paystack/paystack.component";
import { Angular4PaystackModule } from "angular4-paystack";

@NgModule({
  declarations: [AppComponent, PaystackComponent],
  imports: [
    BrowserModule,
    AppRoutingModule,
    Angular4PaystackModule.forRoot("Enter_your_public_key_here"),
  ],
  providers: [],
  bootstrap: [AppComponent],
})
export class AppModule {}
Code breakdown:
- We imported
PaystackComponentand added it to thedeclarationsarray because that’s where the content of our application is. - We added
Angular4PaystackModuleto theimportsarray because it integrates with the Paystack payment gateway in Angular applications. So, we provide our public key to authenticate our application with the Paystack API.
Update paystack.component.html with the code snippet below:
<section>
  <div>
    <nav class="p-4">
      <p>Stells Collections</p>
      <div>
        <i class="bi bi-search"></i>
        <i class="bi bi-cart4"></i>
      </div>
    </nav>
  </div>
  @if (!show) {
  <main class="grid mt-5 p-4">
    @for (item of data; track item.id) {
    <div>
      <img class="bagImage" src="{{ item.image }}" alt="bag img" />
      <p class="mt-3 fw-bold">{{ item.name }}</p>
      <p class="fs-5">Price: NGN{{ item.price }}</p>
      <button (click)="getBagDetailById(item.id)" class="fs-5 fw-semibold">
        See More
      </button>
    </div>
    }
  </main>

  }

  <!-- individual bag detail -->
  <section>
    @if (show) {
    <div class="mt-3 d-flex">
      @for (item of bagDetail; track item.id) {
      <img class="indBagImage" src="{{ item.image }}" alt="bag img" />
      <div class="ms-4 mt-5">
        <p class="mt-3 fw-bold">{{ item.name }}</p>
        <div>
          <button class="d-flex buttn justify-content-between">
            <i class="bi bi-dash"></i>
            <p>1</p>
            <i class="bi bi-plus"></i>
          </button>
        </div>
        <p class="fs-5 mt-3">Price: NGN{{ item.price }}</p>

        <angular4-paystack
          [paystackOptions]="options"
          [class]="'btn btn-primary'"
          (paymentInit)="paymentInit()"
          (onClose)="paymentFailed()"
          (callback)="paymentSuccess($event)"
        >
          Pay with Paystack
        </angular4-paystack>
      </div>
      }
    </div>
    }
  </section>
</section>Code breakdown:
- The code
[paystackOptions]="options"is an input binding that passes theoptionsobject to thepaystackOptionsproperty. Theoptionsobject contains configuration settings for the Paystack payment gateway, such as email, channels, amount, etc. We defined this object inpaystack.component.ts, which we’ll look at later. - The code
(paymentInit)="paymentInit()"triggers thepaymentInit()method in the component class, which therefore initializes or starts the payment. - When the event
(onClose)="paymentFailed()"occurs, it means the payment dialog is closed and then will call thepaymentFailed()function in the component class. - When the payment is completed, the event
(callback)="paymentSuccess($event)"occurs, which in turn calls thepaymentSuccess($event)function in the component class.
Update paystack.component.ts as follows:
import { Component } from "@angular/core";
import { BagDetails } from "./interface";
import { PaystackOptions } from "angular4-paystack";

@Component({
  selector: "app-paystack",
  templateUrl: "./paystack.component.html",
  styleUrl: "./paystack.component.css",
})
export class PaystackComponent {
  bagDetail: any;
  price!: number;
  show: boolean = false;
  message!: string;
  reference: string = "";

  data: BagDetails[] = [
    {
      id: 1,
      name: "Ella Purse",
      image: "./assets/bag01.jpg",
      price: 5000,
    },
    {
      id: 2,
      name: "Crystal 2in1 Bag",
      image: "./assets/bag02.jpg",
      price: 20000,
    },
    {
      id: 3,
      name: "holloids 3in1 Bag",
      image: "./assets/bag03.jpg",
      price: 14000,
    },
    {
      id: 4,
      name: "Jasmine Bag",
      image: "./assets/bag04.jpg",
      price: 35007,
    },
  ];

  options: PaystackOptions = {
    amount: 0,
    email: "Your Paystack account email here",
    ref: `${Math.ceil(Math.random() * 10e10)}`,
    channels: ["USSD", "bank", "card"],
    quantity: 1,
    currency: "NGN",
  };

  constructor() {}

  ngOnInit(): void {
    console.log(this.data);
    this.reference = `ref-${Math.ceil(Math.random() * 10e13)}`;
  }
  getBagDetailById(id: number) {
    console.log(id);
    this.bagDetail = this.data.filter((item) => {
      return item.id === id;
    });
    this.price = this.bagDetail[0].price;
    this.options.amount = this.price;
    console.log(this.price);

    if (this.bagDetail) {
      this.show = true;
    }
    console.log(this.bagDetail);
    console.log(this.show);
  }

  paymentInit() {
    console.log("Payment is Initialized");
  }

  paymentSuccess(ref: any) {
    this.message = "Payment is successful";
    console.log(this.message, ref);
  }

  paymentFailed() {
    console.log("Payment Failed");
  }
}
The object options, which is of type PaystackOptions, takes in properties like:
amount: This specifies the amount to be charged in the transaction. We initialized it to0but will change it in thegetBagDetailById(id: number)method, depending on the price of the selected bag.email: This represents your email address associated with your Paystack account.ref: This is an identifier for the transaction. When a transaction happens, Paystack assigns arefvalue. With therefvalue, your transaction can be quickly tracked or identified.channels: These are ways a transaction can be made. So, you can make a transaction through a bank transfer, USSD, or card.quantity: This refers to the number of items you purchase.currency: This specifies the currency used for the transaction. In this case, we set it toNGN, the Nigerian currency.
Explanation of methods to handle payment responses:
- The
paymentInit()method is called when you want to start a transaction. - The
paymentSuccess()method is called when a transaction is successful. So, a message will be logged on your console showing that the payment transaction was completed successfully, coupled with arefobject containing transaction-related details such asmessage,redirecturl,status,reference, etc. - The
paymentFailed()method is called when a transaction fails or is canceled.
We’ve completed integrating the Paystack payment system into our application. Here is our final result:
Conclusion
This was a short but interesting walk-through on how a Paystack payment system can be integrated into an Angular application. There are other methods for performing this integration. You’ll notice we were in test mode, but you can change it to production mode when you want to deploy live. If you’re deploying live, remember to use your secret key rather than the public key.
You can also learn how to integrate Paystack with React, Flutter, and React Native.
Here is the Github repository for the completed application. Enjoy!
Scale Seamlessly with OpenReplay Cloud
Maximize front-end efficiency with OpenReplay Cloud: Session replay, performance monitoring and issue resolution, all with the simplicity of a cloud-based service.