Integrating the Paystack payment gateway into your Flutter app
How to allow payment via Paystack at your Flutter apps.

A Payment Gateway is a software application that uses a payment processing network to enable and process online payments from customers using debit and credit cards. It also handles the safe transfer of payment data from the customer’s device to the merchant’s server and from the merchant’s server to the payment processor. Card validation, card eligibility, and other fraud checks are also made to ensure payments are legitimate and authorized.
In this article, we’ll be integrating the Paystack payment gateway into our Flutter application.
What is Paystack?
Paystack is a Fintech company that provides online payment and financial services. It offers a range of payment solutions for businesses, including online and mobile payments, direct debit, and recurring billing. Paystack also provides tools for businesses to manage and track their transactions, fraud prevention, security features, and payment gateway integration.
Paystack is a payment gateway that enables businesses to accept payments online from customers worldwide. It is a popular choice for businesses in Nigeria and other countries in Africa, but businesses also use it in other parts of the world. Paystack provides a simple and secure way for businesses to process online payments, and it offers a range of features and tools to help businesses manage their online payment process. Some of the reasons why businesses might choose to use Paystack include the following:
- It is easy to set up and use: Paystack provides a simple, intuitive interface that makes it easy for businesses to start accepting online payments quickly.
- It is secure: Paystack uses industry-leading security measures to protect businesses and customers from fraud and other online threats.
- It supports a wide range of payment methods: Paystack supports a variety of payment methods, including credit and debit cards, bank transfers, mobile money, and more. This makes it easy for businesses to accept payments from customers worldwide.
- It offers a range of helpful features: Paystack provides a range of features to help businesses manage their online payment process, including invoicing, recurring payments, and more.
Overall, Paystack is a convenient and secure choice for businesses looking to accept online payments from customers around the world.
Creating our app
Let’s begin with scaffolding our Flutter application. To do this, run the command below in the terminal.
flutter create paystack_appWith the command above done running, let’s immediately install the dependencies needed for this application. To achieve this, run the command below to change the directory into the flutter app.
cd paystack_appNext, run the command below to install the flutter_paystack package.
flutter pub add flutter_paystackFinally, before we build our user interfaces, let’s run some configuration on our build Gradle file. Head to the android/app/build.gradle file and update the following variables.
    android {
        compileSdkVersion 32  // ---> changed to 32

        ... // other code blocks here
        defaultConfig {

          ...

            minSdkVersion 19   // ---> Changed to 10
            targetSdkVersion flutter.targetSdkVersion
            versionCode flutterVersionCode.toInteger()
            versionName flutterVersionName
        }
    }
In the code block above, we’re changing the compileSdkVersion and minSdkVersion to a more suitable version required by our plugin to run the application.
User Interface
With our app created and our Paystack package installed, Let’s move forward by creating an interactive interface.
Building the Checkout page
Let’s build a simple Checkout page with two form text fields for our price and user’s email. To achieve this, create a checkout.dart file in the **lib/** folder and paste the code below into it.
    import 'package:flutter/material.dart';

    class CheckoutPage extends StatefulWidget {
      const CheckoutPage({Key? key}) : super(key: key);
      @override
      State<CheckoutPage> createState() => _CheckoutPageState();
    }

    class _CheckoutPageState extends State<CheckoutPage> {
      TextEditingController amountController = TextEditingController();
      TextEditingController emailController = TextEditingController();
      final _formKey = GlobalKey<FormState>();

      @override
      Widget build(BuildContext context) {
          return Scaffold(
            appBar: AppBar(centerTitle: true, title: const Text('Checkout Page')),
            body: SingleChildScrollView(
              child: Padding(
                padding: const EdgeInsets.symmetric(horizontal: 30.0),
                child: Form(
                  key: _formKey,
                  child: Column(
                    children: <Widget>[
                      const SizedBox(height: 30),
                      TextFormField(
                        controller: amountController,
                        autovalidateMode: AutovalidateMode.onUserInteraction,
                        keyboardType: TextInputType.number,
                        validator: (value) {
                          if (value == null || value.isEmpty) {
                            return 'Please enter amount';
                          }
                          return null;
                        },
                        decoration: const InputDecoration(
                          prefix: Text(
                            '₦',
                            style: TextStyle(color: Colors.black)),
                          hintText: '2000',
                          labelText: 'Amount',
                          border: OutlineInputBorder()),
                      ),
                      const SizedBox(height: 30),
                      TextFormField(
                        controller: emailController,
                        keyboardType: TextInputType.emailAddress,
                        autovalidateMode: AutovalidateMode.onUserInteraction,
                        validator: (value) {
                          if (value == null || value.isEmpty) {
                            return 'Please enter email';
                          }
                          return null;
                        },
                        decoration: const InputDecoration(
                          hintText: 'janedoe@who.com',
                          labelText: 'Email',
                          border: OutlineInputBorder())),
                      const SizedBox(height: 50),
                      SizedBox(
                        width: MediaQuery.of(context).size.width,
                        child: ElevatedButton(
                          onPressed: () {
                            if (_formKey.currentState!.validate()) {
                            }
                          },
                          style: ElevatedButton.styleFrom(
                            foregroundColor: Colors.white, //change background color of button
                            backgroundColor: Colors.teal, //change text color of button
                            shape: RoundedRectangleBorder(
                              borderRadius: BorderRadius.circular(25)),
                            elevation: 5.0,
                          ),
                          child: const Padding(
                            padding: EdgeInsets.all(15.0),
                            child: Text(
                              'Proceed to Pay',
                              style: TextStyle(fontSize: 20))),
                        )),
                    ],
                  )))));
      }
    }
In the code block above, we’ve created our checkout page with two text fields (for amount and email) and a button. We’ve also added some form validation to our text fields.
Building the Success page
Create a payment_success.dart file in the lib/ folder and paste the code below into it.
    import 'package:flutter/material.dart';
    import 'package:paystack_app/main.dart';

    class PaymentSuccess extends StatelessWidget {
      const PaymentSuccess({super.key, required this.successMessage});
      final String successMessage;

      @override
      Widget build(BuildContext context) {
        return Scaffold(
            body: SafeArea(
                child: Padding(
                    padding: const EdgeInsets.symmetric(horizontal: 20.0),
                    child: Column(
                      children: [
                        SizedBox(height: MediaQuery.of(context).size.height * 0.1),
                        Image.network(
                          "https://res.cloudinary.com/iamvictorsam/image/upload/v1671834054/Capture_inlcff.png",
                          height: MediaQuery.of(context).size.height * 0.4, //40%
                        ),
                        SizedBox(height: MediaQuery.of(context).size.height * 0.08),
                        const Text(successMessage,
                            style: TextStyle(
                              fontSize: 25,
                              fontWeight: FontWeight.bold,
                              color: Colors.black,
                            )),
                        const Spacer(),
                        SizedBox(
                          width: MediaQuery.of(context).size.width,
                          child: ElevatedButton(
                              onPressed: () {
                                Navigator.push(
                                    context,
                                    MaterialPageRoute(
                                        builder: (context) =>
                                            const CheckoutPage()));
                              },
                              style: ElevatedButton.styleFrom(
                                  foregroundColor: Colors.white,
                                  backgroundColor: Colors.teal,
                                  shape: RoundedRectangleBorder(
                                    borderRadius: BorderRadius.circular(25),
                                  ),
                                  elevation: 5.0),
                              child: const Padding(
                                  padding: EdgeInsets.all(15.0),
                                  child: Text('Back to Checkout Screen',
                                      style: TextStyle(fontSize: 20)))),
                        ),
                        const Spacer(),
                      ],
                    ))));
      }
    }
In the code block above, we’re displaying an image from the web using the Image.network widget. We’ve also provided a button for routing users back to the checkout page.
Session Replay for Developers
Uncover frustrations, understand bugs and fix slowdowns like never before with OpenReplay — an open-source session replay tool for developers. Self-host it in minutes, and have complete control over your customer data. Check our GitHub repo and join the thousands of developers in our community.
Integrating Paystack
Before Integrating Paystack into our application, let’s get our public key. Head to https://paystack.com/ and sign up if you don’t have an account. Next, click on Settings at the bottom left of the item bar.
On the Settings page, click on the API Keys & Webhooks tab and scroll down to the Test Public key, copy it, and store it somewhere for usage.

Finally, Let’s integrate Paystack into our app using the flutter_paystack package. Head over to checkout.dart and import the package below into the file.
import 'package:flutter_paystack/flutter_paystack.dart';Next, copy and paste the code block below into CheckoutPageState before the @override Widget build function.
    class _CheckoutPageState extends State<CheckoutPage> {
      ... // other initialized variable

    //////// --> copy from here
      String publicKey = 'YOUR PAYSTACK PUBLIC KEY';
      final plugin = PaystackPlugin();
      String successMessage = '';

      @override
      void initState() {
        super.initState();
        plugin.initialize(publicKey: publicKey);
      }

      checkout() async {
        int price = int.parse(amountController.text) * 100;
        Charge charge = Charge()
          ..amount = price
          ..reference = 'ref_${DateTime.now().millisecondsSinceEpoch}'
          ..email = emailController.text
          ..currency = "NGN";
        CheckoutResponse response = await plugin.checkout(
          context,
          method: CheckoutMethod.card,
          charge: charge,
        );
        print(response);
        if (response.status == true) {
          print(response);
          successMessage = 'Payment was successful. Ref: ${response.reference}';
          Navigator.pushAndRemoveUntil(
              context,
              MaterialPageRoute(
                  builder: (context) =>
                      PaymentSuccess(successMessage: successMessage)),
              ModalRoute.withName('/'));
        } else {
          print(response.message);

        }
      }
    //////// --> to here

      @override
      Widget build(BuildContext context) {
In the code block above, we created some variables and instantiated the PaystackPlugin with our Paystack public key when the screen initializes. We also created a checkout function that accepts a price, reference, and an email address.
Finally, we’re routing and passing the reference to the Success page once the payment is completed successfully.
With all this done, run the app on an emulator or device using the command below.
flutter run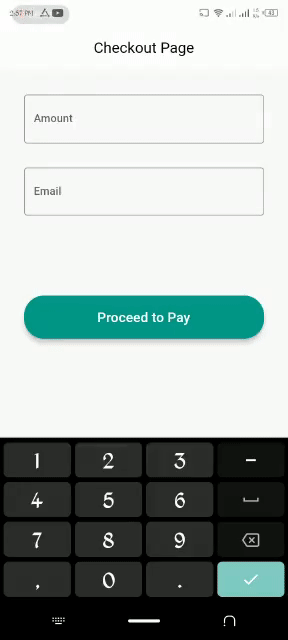
Conclusion
Payment Gateways are of major importance to businesses today. Paystack provides one of the best platforms for users to integrate a payment gateway into their applications because of its simplicity and performance.
Here is the link to the complete source code.
Gain Debugging Superpowers
Unleash the power of session replay to reproduce bugs and track user frustrations. Get complete visibility into your frontend with OpenReplay, the most advanced open-source session replay tool for developers.