TanStack Form: All-in-one Form Handling for React

Forms are very important in software applications. They are the primary means through which we interact with our users. Forms help with key user interactions, ranging from simple logins to complex data entry interfaces. Thus, ensuring efficient form handling is essential for creating seamless user experiences. This article will explore TanStack Form for form handling in React apps.

Discover how at OpenReplay.com.
TanStack Form: All-in-one Form Handling for React Apps
TanStack Form provides a powerful solution for form handling. It is designed to tackle common form-related challenges such as:
- Reactive data binding and state management
- Complex validation and error handling
- Accessibility and responsive design
- Internationalization and localization
- Cross-platform compatibility and custom styling
This guide will be a practical walkthrough to using TanStack Form in React apps, from basic form creation to advanced state management and validation.
Key Features
The core purpose of TanStack Form is to streamline the process of managing forms in web apps. It uses TypeScript and a headless UI component approach. It offers many helpful features. These features enable us to create dynamic and responsive forms with little effort.
Key features include:
- TypeScript Support: Ensures type safety and robustness
- Headless UI Components: Provides full control over form elements’ rendering and behavior
- Framework-Agnostic Design: Integrates seamlessly with React and other frameworks
TanStack Form vs. Other Form Management Libraries
TanStack Form stands out from other form libraries in the React world. It does so for its many features, strength, and ease of use. Other libraries may focus on specific form aspects, like validation or state management. TanStack Form provides a complete solution for the whole form lifecycle.
The idea comes from the need for a clear and fast solution. It offers a complete toolkit for building forms. By using TanStack, we can speed up development and cut boilerplate code. We can also build intuitive, easy-to-use forms. This enhances our applications’ overall user experience.
Setting up TanStack Form in a React Application
Let’s integrate TanStack Form into our app with the following steps:
- Install TanStack dependencies We’re using npm to install the React adapter:
$ npm install @tanstack/react-form- Configure it in the Project Once installed, we’d import the necessary modules at the top of the project files:
import { useForm } from "@tanstack/react-form"
import { FieldApi } from '@tanstack/react-form';- Create a function for the
useForminstance:
const form = useForm({
  defaultValues: {
    fullName: '',
  },
  onSubmit: async ({ value }) => {
    console.log(value)
  },
});

return();
The useForm function creates form instances. When we call the form() function, it will trigger the useForm hook to do so. The onSubmit handler automatically handles the form.
Creating Forms With TanStack
Let’s create a form instance:
<form.Provider>
  <form
    onSubmit={(e) => {
      e.preventDefault();
      e.stopPropagation();
      void form.handleSubmit();
    }}
  >
    //form.Field
    //submit button
  </form>
</form.Provider>
We must wrap the form elements in a form.Provider component. This is necessary for providing context to the form components. The code in the form element prevents the default submission of forms and stops event propagation.
Instead, it calls the handleSubmit() method of the form instance to handle the form. This method is provided by the useForm hook from the @tanstack/react-form library. It contains logic to handle the form data, such as validation, processing, and sending it to a server.
Form Field
Let’s say we want to get the name of a user:
<form.Field
  name="fullName"
  children={(field) => (
    <input
      name={field.name}
      value={field.state.value}
      onBlur={field.handleBlur}
      onChange={(e) => field.handleChange(e.target.value)}
    />
  )}
/>
We use the form.Field element to encapsulate a form input element and its associated logic. It goes inside the form element. Each input field gets its own form.Field. The name attribute specifies the name of the input field when it’s submitted as part of a form.
The name and value attributes inside the input element bind the user’s data to the field object. onBlur doesn’t do much for the form logic here. It blurs the UI when the input field is not in focus. The onChange() function calls the handleChange() method whenever the user enters the input field. This method of the field object updates the form state with the new value.
Lastly, let’s submit the form:
<button type="submit">Submit</button>Output:
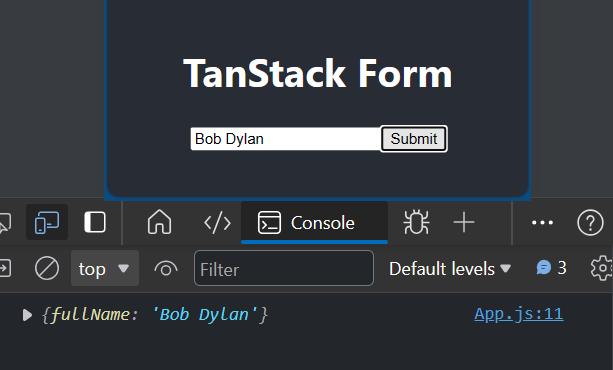
The form field handles the user input and logs the value to the console.
Form Factory
The Form Factory is like a template for setting up forms. Let’s set one up and create an instance.
Firstly, we’ll add the import statement at the top of the file:
import { createFormFactory } from '@tanstack/react-form';Next, we’ll create the formFactory:
const formFactory = createFormFactory({
  defaultValues: {
    firstName: "",
    lastName: "",
    age: "",
    hobbies: [],
  },
});
And then, we can create an instance just like before:
const form = formFactory.useForm({
  onSubmit: async ({ value }) => {
    console.log(value)
  },
})
Form Factory ensures consistency across multiple form instances by sharing a common configuration.
Form and Field Validation
We can choose to carry out validation at the form or field level.
Let’s add an age field with validation:
<form.Field
  name="age"
  validators={{
    onChange: ({ value }) =>
      value < 13
        ? "You must be 13 to make an account"
        : undefined,
  }}
>
  {(field) => (
    <div>
      <label htmlFor={field.name}>Age:</label>
      <input
        id={field.name}
        name={field.name}
        value={field.state.value}
        type="number"
        onChange={(e) =>
          field.handleChange(e.target.valueAsNumber)
        }
      />
      {field.state.meta.errors ? (
        <em role="alert">{field.state.meta.errors.join(", ")}</em>
      ) : null}
    </div>
  )}
</form.Field>
Here, we are performing the validation onChange(), that is, on every keystroke. We can also display errors with the field.state.meta.errors array.
Alternatively, we can set the validation after the user has finished interacting with the field:
validators={{
  onBlur: ({value}) =>
    value < 13 ? 'You must be 13 to make an account' : undefined,
}}
The error message:
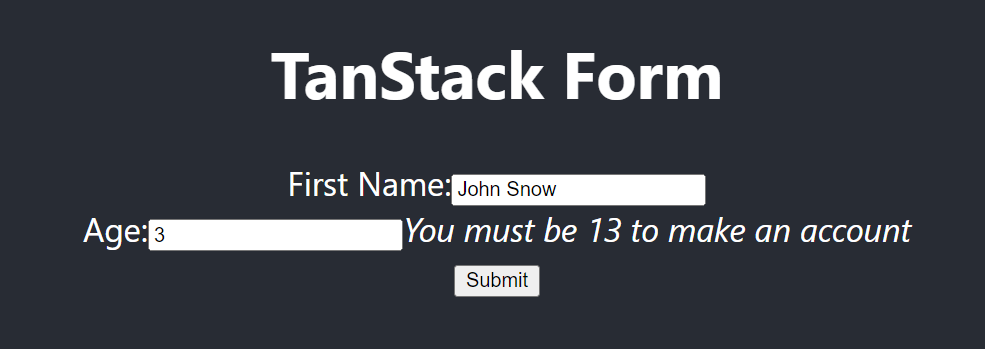 If a user enters an age under 13, they immediately get a prompt that they need to be older.
We can run multiple event validations on the same field at the same time:
validators={{
  onChange: ({value}) =>
    value < 13 ? 'You must be 13 to make an account' : undefined,
  onBlur: ({value}) => (value < 0 ? 'Invalid value' : undefined),
}}
Similarly, we can do all our validation at the field level:
const form = useForm({
  defaultValues: {
    age: 0,
  },
  onSubmit: async ({ value }) => {
    console.log(value)
  },
  validators: {
    onChange({ value }) {
      if (value.age < 13) {
        return 'Must be 13 or older to sign'
      }
    },
  },
})
TanStack offers one of the easiest and most flexible error handling solutions so far.
Managing Form State
TanStack Form maintains the state of each form field internally. The onChange event is triggered for each stroke. The form then updates the state of the corresponding field with the new value. This state includes properties such as value, touched, errors, etc.
When the user submits the form, the onSubmit() function provided to the useForm hook is called. This function receives an object containing the form data. The form data includes the form fields and values provided by the user.
We can perform actions with the form data inside the onSubmit() function. From here, we can easily send it to a server, or update the application state.
Here, we are logging the form data to the console:
const form = formFactory.useForm({
  onSubmit: async ({ value }) => {
    console.log(value);
  },
});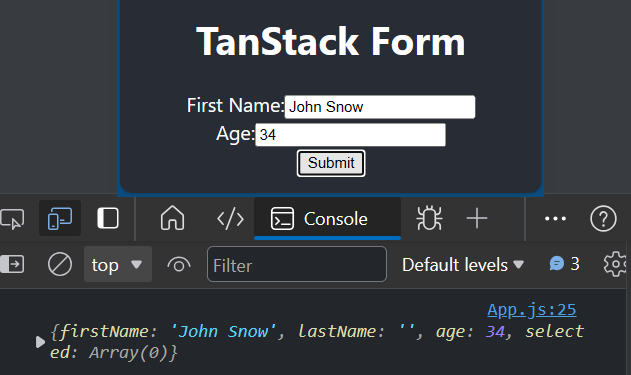
The form data gets logged to the console.
Enhancing Form Functionality
There are some additional features we can use in our React forms. An example is support for asynchronous validation.
Asynchronous Form Handling
This feature allows us to perform validation logic that involves asynchronous operations. Perhaps a network request or database query.
<form.Field
  name="age"
  validators={{
    onChangeAsync: async ({ value }) => {
      await new Promise((resolve) => setTimeout(resolve, 1000));
      return value < 13 ? 'You must be 13 to make an account' : undefined;
    },
  }}
>

//rest of the code
The onChangeAsync() and onBlurAsync() methods define asynchronous validation rules for form fields. Just like with onChange(), onChangeAsync() is triggered on each keystroke. Similarly, onBlurAsync() gets triggered when the field loses focus. Inside these methods, we can create a promise to handle the result of the operation.
Dynamic Form Rendering
Additionally, we can dynamically generate forms by defining form fields programmatically. We can use JavaScript to dynamically create field configurations based on our requirements. For example, we can use arrays or objects to define field configurations. Then, they are passed to the form provider to generate the corresponding form fields.
Suppose we have an array of field configurations with different data types:
const fieldConfigurations = [
  { name: "firstName", label: "First Name", type: "text" },
  { name: "lastName", label: "Last Name", type: "text" },
  { name: "email", label: "Email", type: "email" },
  { name: "age", label: "Age", type: "number" },
  {
    name: "country",
    label: "Country",
    type: "select",
    options: ["Select a Country", "USA", "Canada", "UK", "Other"],
  },
  { name: "birthDate", label: "Birth Date", type: "date" },
  { name: "profilePicture", label: "Profile Picture", type: "file" },
  { name: "agreeTerms", label: "Agree to Terms", type: "checkbox" },
];
We can dynamically render it:
<form.Provider>
  {fieldConfigurations.map((field) => (
    <form.Field key={field.name} name={field.name}>
      {({ fieldApi }) => (
        <div
          key={field.name}
          style={{
            width: "440px",
            display: "flex",
            justifyContent: "space-between",
          }}
        >
          <label htmlFor={field.name}>{field.label}:</label>
          {field.type === "select" ? (
            <select {...fieldApi} id={field.name}>
              {field.options.map((option) => (
                <option key={option} value={option}>
                  {option}
                </option>
              ))}
            </select>
          ) : (
            <input {...fieldApi} type={field.type} id={field.name} />
          )}
        </div>
      )}
    </form.Field>
  ))}
  <button type="submit">Submit</button>
</form.Provider>
This code uses a simple javascript function to map through the fieldConfigurations array and create a form field for each item.
Here’s the output:
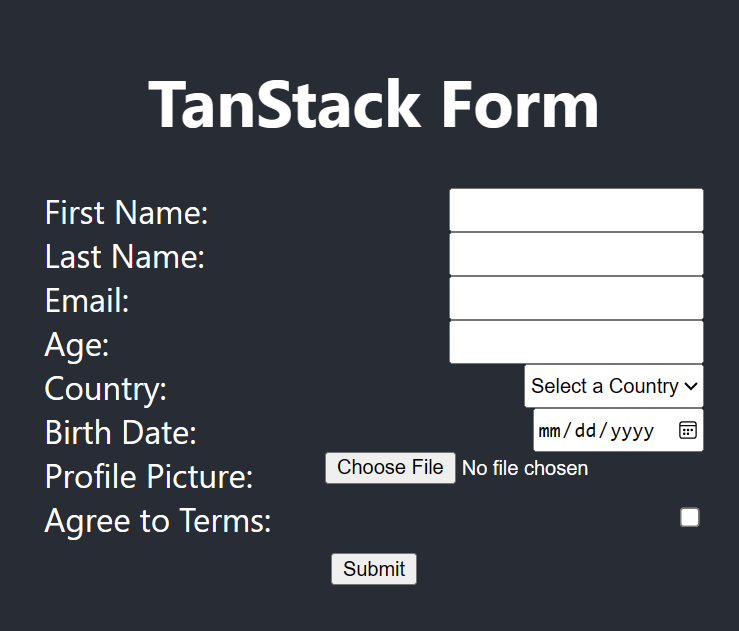
A form field is created for each object in the array.
Conditional Form Rendering
There’s also the flexibility of rendering form fields conditionally based on certain criteria. Similarly, we can use JavaScript features such as conditional if statements or ternary operators. The form fields or components are rendered based on the application state or user interaction.
Here’s an example of how we can do this:
//name form field
//age form field

<form.Field
  name="hobbies"
  initialValue=""
  children={(field) => (
    <>
      <label htmlFor="option">Option:</label>
      <select
        id="option"
        name="option"
        value={field.state.value}
        onChange={(e) => field.handleChange(e.target.value)}
      >
        <option value="A">Option A</option>
        <option value="B">Option B</option>
        <option value="C">Option C</option>
      </select>
      {field.state.value === "A" && (
        <div>Content for Option A</div>
      )}
      {field.state.value === "B" && (
        <div>Content for Option B</div>
      )}
      {field.state.value === "C" && (
        <div>Content for Option C</div>
      )}
    </>
  )}
/>
This form renders additional options depending on the user’s choice.
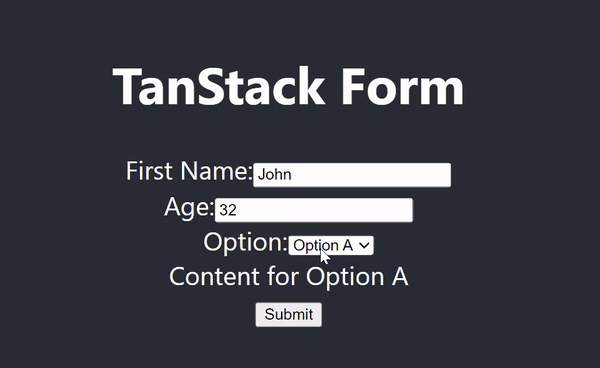
The additional content rendered depends on the user’s selection.
Testing and Debugging
It is not unusual to encounter bugs while working with forms. These could be conflicts with React inbuilt state management, handling of data and so on. The console is always a good place to start when debugging. There would usually be an error message indicating the cause of the problem.
Including validations in the form prompts the user to input information in the correct format. This reduces bugs related to invalid data. It’s also a good idea to implement unit testing and integration testing in our apps. Consequently, we are able to pinpoint the cause of bugs for easy resolution.
Conclusion
This article highlights various features of TanStack Form and how we can use them in our react apps. We experimented with features like state management, dynamic rendering, validations, and others.
Through testing and debugging practices, we can identify and address potential issues. Thus ensuring that our forms maintain their reliability and functionality in production environments. Ultimately, we can streamline the form development process and deliver exceptional user experiences.
Reference
Gain Debugging Superpowers
Unleash the power of session replay to reproduce bugs, track slowdowns and uncover frustrations in your app. Get complete visibility into your frontend with OpenReplay — the most advanced open-source session replay tool for developers. Check our GitHub repo and join the thousands of developers in our community.