Event handling is essential to JavaScript programming. It involves detecting and responding to events such as mouse clicks, keyboard presses, and form submissions. Understanding event bubbling and capturing concepts is crucial to handling events effectively in JavaScript.
Event bubbling and capturing are two methods of event propagation in the DOM (Document Object Model). They dictate the order in which events are processed in the DOM tree. The DOM tree is a hierarchical representation of an HTML document, with the root element being the top-level parent and the child elements being nested.
In event bubbling, events are processed from the innermost element and then bubble up to the parent elements. In event capturing, events are processed from the outermost element and then captured by the inner elements.
Understanding the difference between event bubbling and event capturing is important because they can affect the outcome of your event handling. For example, if you have multiple event listeners attached to a single element, the order in which the events are processed can determine which event handler is executed first.
This article will explore the concepts of event bubbling and capturing in depth. We will look at how they work, their differences, and how to use them in your code. By the end of this article, you will have a strong understanding of these concepts and how they relate to event handling in JavaScript.
Event Bubbling
Event bubbling is a fundamental concept in JavaScript event handling. Understanding event bubbling is crucial for efficiently handling events in web development. When an event occurs in an element, it triggers the event on that specific element and then propagates it up the DOM tree to its parent elements. This is known as event bubbling.
How Event Bubbling Works
Event bubbling is an essential concept in JavaScript event handling. Understanding event bubbling allows us to handle events efficiently in our web applications. By bubbling events from the target element to its parent elements, we can take advantage of handling multiple events with a single event listener. However, care must be taken to prevent unwanted behavior when using event bubbling.
In event bubbling, an event starts at the most deeply nested element and bubbles up to the parent elements. The event first triggers on the target element and then propagates up the DOM tree. For example, if a user clicks on a button inside a div, the click event is triggered on the button element and then on the div element.
Consider the following HTML code:
  <div id="container">
    <p id="paragraph">
      <button id="button">Click Me!</button>
    </p>
  </div>
In this example, we have a button inside a paragraph element inside a div element. We can add event listeners to each of these elements to observe the event bubbling:
const container = document.getElementById("container");
const paragraph = document.getElementById("paragraph");
const button = document.getElementById("button");

container.addEventListener("click", () => {
  console.log("Container Clicked");
});

paragraph.addEventListener("click", () => {
  console.log("Paragraph Clicked");
});
button.addEventListener("click", () => {
  console.log("Button Clicked");
});
When the button is clicked, the following output is displayed in the console:
Button Clicked
Paragraph Clicked
Container Clicked
As we can see, the click event triggers on the button element and then bubbles up to the parent elements.
Pros of Event Bubbling
-
Event bubbling can allow us to handle events on multiple elements at once. For example, if we have multiple buttons inside a div, we can add a single event listener to the div element to handle all the button clicks.
-
Event bubbling allows developers to dynamically add or remove child elements from a parent element without rebinding event handlers to each element.
Cons of Event Bubbling
-
Event bubbling can also cause unwanted behavior. For instance, if an event handler on a parent element interferes with the behavior of the child element, it can cause unexpected results.
-
It can be slow sometimes because the event has to bubble up the DOM tree to the parent element before processing.
Here is an illustration of how event bubbling works in JavaScript:
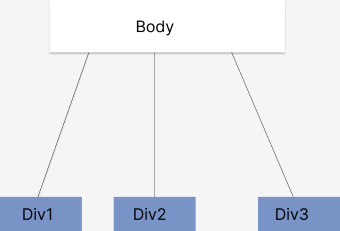
In this illustration, there are three nested div elements within the body.
When an event occurs on the Div element, the event starts at the Div element and then bubbles up the DOM tree, starting with Div2, then Div1, and finally, the Body element.
This is why event bubbling is often called the “bubbling up” phase. Event bubbling is the default propagation method in JavaScript.
Event Capturing
Event capturing is the process by which events are first captured by the innermost element and then propagated to outer elements. It is the opposite of event bubbling, where events are captured by the outermost element and then propagated to inner elements.
In event capturing, events are first captured by the innermost element and then propagated to outer elements. The event flows from the target element (innermost element) to the outermost element and finally to the Document Object Model (DOM) object.
Example of event capturing
<div id="outer">
  <div id="inner">
    <button id="myBtn">Click me</button>
  </div>
</div>
In this example, if we attach a click event listener to both the container and the button but use event capturing on the container, we can observe event capturing in action.
let outer = document.getElementById("outer");
let inner = document.getElementById("inner");
let myBtn = document.getElementById("myBtn");

outer.addEventListener(
  "click",
  function () {
    console.log("Outer div click event");
  },
  true
);

inner.addEventListener(
  "click",
  function () {
    console.log("Inner div click event");
  },
  true
);

myBtn.addEventListener(
  "click",
  function () {
    console.log("Button click event");
  },
  true
);
In this example, if you click the button, the events will be captured by the innermost element (the button) first and then propagated to outer elements (the inner div and outer div). The output in the console will be:
Button click event
Inner div click event
Outer div click event
Pros of Event Capturing
- Event capturing allows you to handle events that bubbling would otherwise miss.
- Event capturing can be useful for catching events within nested elements.
Cons of Event Capturing
- Event capturing can be slower than event bubbling, requiring more processing power.
- Event capturing can also be less intuitive and harder to understand than event bubbling, as the event flow is opposite to what is expected.
Here is an illustration of how event capturing works in JavaScript:
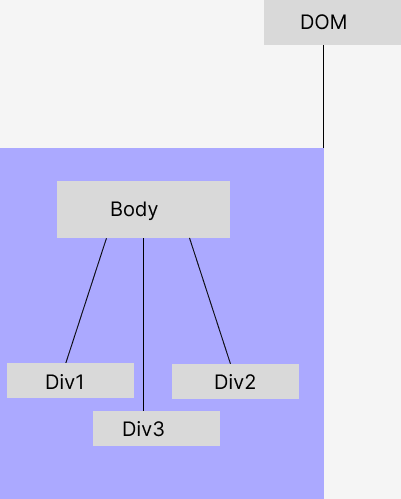
In this illustration, there are three nested div elements within the body. The DOM is the root of the document object model.
When an event is triggered on the Div3 element, the event first travels through the DOM tree starting from the root. The DOM first captures the event, then by the Body element, then by Div1, and finally by Div2.
After capturing all elements, the event bubbles up, starting from the innermost Div2 element, then Div1, and finally, the Body element. The event reaches the DOM and eventually ends.
This way of event propagation is referred to as event capturing, and it’s the opposite of event bubbling, which starts from the innermost element and moves upwards to the outermost element.
Session Replay for Developers
Uncover frustrations, understand bugs and fix slowdowns like never before with OpenReplay — an open-source session replay tool for developers. Self-host it in minutes, and have complete control over your customer data. Check our GitHub repo and join the thousands of developers in our community.
Difference between Event Bubbling and Event Capturing
Event bubbling starts from the most specific (innermost) element and bubbles up to the least specific (outermost) element. This means that when an event is triggered on an element, it will first be handled by the element itself, then by its parent, then by the parent’s parent, and so on, until it reaches the highest-level element in the DOM. This is the default behavior in the HTML DOM. While capturing, the event starts from the least specific (outermost) element and travels down to the most specific (innermost) element. This means that the outermost element will receive the event first, then its parent, then its parent’s parent, and so on, until it reaches the innermost element. Event capturing is less commonly used than event bubbling.
// Example of Event Bubbling
document.querySelector(".container").addEventListener("click", function (e) {
  console.log("Container click");
});

document.querySelector(".inner").addEventListener("click", function (e) {
  console.log("Inner click");
});

// Example of Event Capturing
document.querySelector(".container").addEventListener(
  "click",
  function (e) {
    console.log("Container click");
  },
  true
);

document.querySelector(".inner").addEventListener(
  "click",
  function (e) {
    console.log("Inner click");
  },
  true
);
In the above example, clicking the .inner element will trigger the event handler in both bubbling and capturing. However, the order of the logged messages will be different, reflecting the different propagation methods.
Stopping Event Propagation
In JavaScript, events propagate through the DOM tree, starting from the deepest child element and working their way up to the parent elements. In some cases, it may be necessary to stop this propagation to prevent further event handlers from being called or to allow only the current event handler to process the event.
Two methods can be used to stop event propagation: stopPropagation() and stopImmediatePropagation().
Understanding the method of stopping event propagation
The stopPropagation() method stops the event from propagating to parent elements but allows other event handlers on the same element to be called. The stopImmediatePropagation() method stops the event from propagating to parent elements and prevents other event handlers on the same element from being called.
Using the stopPropagation() method
The stopPropagation() method can be called on the event object within an event handler to prevent the event from propagating further up the DOM tree.
<div id="container">
  <div id="child">Click me</div>
</div>
var container = document.getElementById("container");
var child = document.getElementById("child");
container.addEventListener("click", function (e) {
console.log("container clicked");
});
child.addEventListener("click", function (e) {
console.log("child clicked");
e.stopPropagation();
});In this example, when the user clicks the child element, the event handler for the child element is called, which logs ‘child clicked’ to the console and then calls stopPropagation(). This prevents the event from propagating to the parent container element, so the event handler for the container element is not called.
Using the stopImmediatePropagation() method
The stopImmediatePropagation() method can stop the event from propagating further up the DOM tree and prevent any other event handlers on the same element from being called.
<div id="container">
  <div id="child">Click me</div>
</div>
var container = document.getElementById("container");
var child = document.getElementById("child");
container.addEventListener("click", function (e) {
console.log("container clicked");
});
child.addEventListener("click", function (e) {
console.log("child 1 clicked");
e.stopImmediatePropagation();
});
child.addEventListener("click", function (e) {
console.log("child 2 clicked");
});In this example, when the user clicks the child element, the first event handler for the child element is called, which logs child 1 clicked to the console and then calls stopImmediatePropagation(). This stops the event from propagating to the parent container element and prevents the second event handler for the child element from being called, so child 2 clicked is not logged to the console.
Tips for practical usage in real-world development:
-
When working with events, consider the impact of event bubbling and capturing on your application.
-
Use event delegation to handle events for multiple elements with a single event handler.
-
When stopping event propagation, be mindful of which method you are using and the impact it may have on other event handlers.
Conclusion
Event bubbling and event capturing are two ways in which events can propagate through the DOM tree. Event bubbling is the default propagation method, where events start from the target element and propagate upwards toward the document object. Event capturing is the opposite, where events start from the topmost element and propagate downwards towards the target element.
Gain Debugging Superpowers
Unleash the power of session replay to reproduce bugs and track user frustrations. Get complete visibility into your frontend with OpenReplay, the most advanced open-source session replay tool for developers.