
Building 3D animations using JavaScript and Three.js


Building 3D animations used to be difficult, but using the Three.js library makes it much simpler, as this article shows.

Discover how at OpenReplay.com.
Three.js is a front-end open-source 3D library that enables developing and presenting animated 3D graphics on the web.
Knowledge of this powerful tool allows your projects to stand out among the thousands of others seen daily across the Web. It provides a high-level API for handling cameras, materials, and geometries, making it faster to create interactive 3D experiences.
With its graphical nature, three.js allows you to create enticing and interactive GPU-accelerated 3D animations directly within web pages without relying on proprietary plugins. This article discusses some of the features necessary to get started with three.js.
Prerequisites
The following prerequisites are necessary before delving into three.js:
- JavaScript Knowledge: To work with three.js, it’s essential to have a grasp of Javascript. You will write JavaScript code to create and manipulate 3D scenes. Familiarity with variables, functions, and event handling will be beneficial.
Simple 3D Concepts: While three.js handles a lot for you, knowing some basics of 3D can help you understand how it all works. Knowledge about vertices, faces (polygons), textures, and transformation (translation, rotation, and scaling) will be a plus point.
- HTML and CSS: You should have a good knowledge of HTML and CSS before utilizing this library.
Significance of Creating 3D Graphics on the Web
Why bother with 3D graphics in the browser? Here are some reasons:
-
Engaging User Experiences: 3D visuals enhance interactivity and engagement. Whether it’s a product configurator, interactive map, or game, 3D elements capture attention.
-
Applications: Architectural walkthroughs, product visualizations, and educational tools benefit from 3D graphics. Data visualization can be more intuitive and informative with 3D representations.
-
WebXR (WebVR/WebAR): Three.js integrates well with WebXR, enabling immersive experiences directly in the browser.
Project Setup
In setting up your project, there are various steps you need to follow.
-
Project Structure: The first thing you need to do is create a project directory that contains two files, the HTML and Javascript files.
-
Define Aliases: The next step is to use an
importmapthat will allow you to define aliases for module import paths. Here is an example illustrating this:
{
  "imports": {
    "three": "https://cdn.jsdelivr.net/npm/three@0.161.0/build/three.module.js",
    "jsm/": "https://cdn.jsdelivr.net/npm/three@0.161.0/examples/jsm/"
 }
}
When used in an HTML file, the import map can be specified in a <script> tag with the type="importmap" attribute. This helps the browser resolve module specifiers to URLs when using ES module imports.
- Navigate to the Javascript file earlier created, where you will write the code for the 3D designs. In this file, import all the properties from the three.js library by typing the code below:
import * as THREE from 'three';- Create the scene: After importing the needed features, you have your project almost set up. Now, you need to set up the scene. The scene acts as a container where all your 3D objects reside. It is a canvas that holds everything you can see.
An environment for three-dimensional objects is established when a scene is built. To access the scene, enter:
const scene = new THREE.Scene();The scene holds the cameras, lights, mesh objects, etc., which will be discussed in the next section of this article.
Basics of Three.js
Three.js offers more advanced features, lighting, textures, and complex geometries. All these work together to create a good animation on the screen. This section explores the basics necessary to get started with this library.
Camera
The camera in three.js defines the viewpoint from which we observe the 3D scene. This simulates real-life perspective, making objects appear smaller as they move away from it. To declare a camera, you need to understand the following parameters it takes.
-
Field of view(FOV) determines the vertical amplitude angle in degrees.
-
Aspect Ratio plays a pivotal role when configuring a
PerspectiveCamera. Essentially, it quantifies the proportion between the canvas width and its height. It is represented mathematically asWidth/Height. -
Near and Far clipping planes define the range of visible objects. Anything closer than near or farther than far won’t be rendered.
Here is the code illustrating how the camera is used.
const w = window.innerWidth;
const h = window.innerHeight;
const fov = 75; // which is 75 degree
const aspect = w / h; // which is the width divided by the height
const near = 0.1;
const far = 10;
const camera = new THREE.PerspectiveCamera(fov, aspect, near, far);

camera.position.set(2,2,4);
The gif below shows the output of the camera position when changed.

From the output above, the camera’s position is set to the coordinates (2, 2, 4) and indicates the (x, y, z) axis. Changing any of the axes modifies the camera’s distance. When z is changed to 5, the camera moves further away from its original position along the axis by 5 units. Similarly, if z is set as 6, the camera will move further away from the origin, giving a wider view of the scene.
Renderer
The Renderer is responsible for displaying the 3D scene on the browser. It interacts with the scene, but it is not directly a part of it. To initialize this, you need to type the following:
renderer.render(scene, camera)The scene is presented on the screen when the renderer.render(scene, camera) is used. It is a concept that represents a container for all the objects, lights, and cameras that make up your 3D world. It’s essentially the virtual environment where you place and organize various elements to be rendered.
Geometry
The shape of three-dimensional objects is mostly determined by their geometries, which specify the positions of vertices and the surfaces represented by faces.
For example, consider the following code snippet below:
const geometry = new THREE.TorusKnotGeometry(20, 6, 100, 16); In the code snippet above, THREE.TorusKnotGeometry creates a torus knot, which combines elements of a torus (doughnut-like) and a knot.
The parameters:
- Radius(
20): This determines the overall size of the torus knot. Larger values result in a bigger knot. - Tube Radius (
6): The thickness of the tube. Smaller values create a thinner tube - Radial Segments(
100): These are the slices around the torus. More segments lead to smoother curves. - Tubular Segments(
16): These are the slices along the tube. Increasing this value refines the details of the knot.
These parameters define the geometry of the TorusKnotGeometry. You can create captivating and intricate knots by adjusting the radius, tube radius, and segments.
It is important to note that displaying a geometry is only possible with the help of the material and mesh as they help to make the object visible.
Material
Materials determine how an object appears when rendered. For example, to use a material for the torusKnotGeometry, initialize it by typing:
const material = new THREE.MeshBasicMaterial({
  color: 0x0077ff,
  wireframe: true
});
With the aid of materials, you can manage the texture, color, and other visual properties of the surfaces of the geometries. The wireframe:true toggles the wireframe to true and provides a visual representation, emphasizing edges rather than filled surfaces.
Mesh
A mesh combines geometry with a material. For example, to use the mesh on the Geometry and Material, type the code below:
const torusKnot = new THREE.Mesh(geometry, material);
scene.add(torusKnot); // Add the mesh to the scene
Putting It All Together
Now that we know the basics, let’s use all these concepts to build a TorusKnotGeometry that will be rendered to the browser.
// Importing Three.js components
import * as THREE from 'three';

// Scene setup
const scene = new THREE.Scene();
const camera = new THREE.PerspectiveCamera(75, window.innerWidth / window.innerHeight, 0.1, 1000);
const renderer = new THREE.WebGLRenderer();
renderer.setSize(window.innerWidth, window.innerHeight);
document.body.appendChild(renderer.domElement);

// Geometry, Material, and Mesh
const geometry = new THREE.TorusKnotGeometry(20, 6, 100, 16);
const material = new THREE.MeshBasicMaterial({ color: 0x0077ff, wireframe: true });
const torusKnot = new THREE.Mesh(geometry, material);
scene.add(torusKnot);

// Adjusting camera position
camera.position.z = 50;  // Move the camera 50 units across the z axis from the origin

renderer.render(scene, camera);
This sets up the scene's initialization, adds a mesh, applies a material, makes a geometry, and positions the camera.
The output of the code is given below:

The code initializes a basic 3D scene using the Three.js library. It starts with creating a Three.js scene. This scene acts as a container for all 3D objects we want to render. Next, we set up a PerspectiveCamera. The camera defines our viewpoint and perspective within the scene. The renderer handles rendering the scene onto the HTML canvas. Its size is set to match the window dimensions and append it to the document.
We then create a torus knot geometry with parameters (20, 6, 100, 16) that define the radius, tube radius, radial segments, and tubular segments as explained in the previous section.
Finally, the scene is rendered from the camera’s perspective. This setup provides a static view of a blue torus knot and applies a wireframe material to the geometry.
Animating the Object
Static scenes can feel lifeless. By animating objects, you add movement, making your scene more visually interesting and realistic.
To animate objects in three.js, you need to create a function that will contain all necessary animation. Here, you can update any properties of your 3D objects, like the rotation across an axis and rendering the scene on the screen.
Here is a simple syntax illustrating this:
function animate() {
  // Update your objects here (e.g., rotation, position changes) for example:
  mesh.rotation.y += 0.01; // to rotate by 0.01 radians
  // Render the scene
  renderer.render(scene, camera);
}
// Call the function
animate();
In this basic example, we’re rotating the mesh around its Y-axis. You can modify other properties like position, scale, material color, etc., based on your animation requirements.
Let’s look at animation in action using a rotation of x and y on the TorusKnotGeometry earlier created:
// Importing Three.js components
import * as THREE from 'three';

// Scene setup
const scene = new THREE.Scene();
const camera = new THREE.PerspectiveCamera(75, window.innerWidth / window.innerHeight, 0.1, 1000);
const renderer = new THREE.WebGLRenderer();
renderer.setSize(window.innerWidth, window.innerHeight);
document.body.appendChild(renderer.domElement);

// Geometry, Material, and Mesh
const geometry = new THREE.TorusKnotGeometry(10, 3, 100, 16);
const material = new THREE.MeshBasicMaterial({ color: 0x0077ff, wireframe: true });
const torusKnot = new THREE.Mesh(geometry, material);
scene.add(torusKnot);

// Camera position
camera.position.z = 28;

// Animation loop
function animate() {
  requestAnimationFrame(animate);

  // Rotation
  torusKnot.rotation.x += 0.01;
  torusKnot.rotation.y += 0.01;

  renderer.render(scene, camera);
}
animate();
The gif below shows the output of the code:
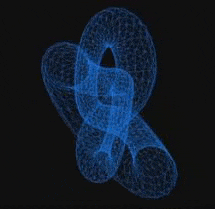
In this example, we have set the torus knot to increment the current rotation around the x and y axis by 0.01 radians, respectively. The renderer.render(scene, camera) call renders the updated scene using the specified camera. This ensures that any changes to the scene are visible on the screen.
Rotation across the screen
To create dynamic and captivating 3D scenarios, three.js requires the movement of objects across the screen. You can adjust an object’s location along the x and y axes to a specific degree in order to move it around by setting its position to a certain value.
For example, let us consider a ConeGeometry. To rotate this geometry across the screen, we simply set cone.position.x and cone.position.y to different values. This changes the object position based on the value, creating a smooth, oscillating motion.
Below is a detailed code explaining the movement of an object across the screen in a circular motion:
// Importing Three.js components
import * as THREE from 'three';

// Scene setup
const scene = new THREE.Scene();
const camera = new THREE.PerspectiveCamera(75, window.innerWidth / window.innerHeight, 0.1, 1000);
const renderer = new THREE.WebGLRenderer();
renderer.setSize(window.innerWidth, window.innerHeight);
document.body.appendChild(renderer.domElement);

// Geometry, Material, and Mesh
const geometry = new THREE.ConeGeometry(5, 20, 32);
const material = new THREE.MeshBasicMaterial({ color: 0xff8c00, wireframe: true });
const cone = new THREE.Mesh(geometry, material);
scene.add(cone);

// Camera position
camera.position.z = 25;

// Animation loop
function animate() {
  requestAnimationFrame(animate);

  // Rotation
  cone.rotation.x += 0.01;
  cone.rotation.y += 0.01;

  // Movement across the screen
  const time = Date.now() * 0.001; // time in seconds
  cone.position.x = Math.sin(time) * 15; // Sine wave for left-right movement
  cone.position.y = Math.cos(time) * 15; // Cosine wave for up-down movement

  renderer.render(scene, camera);
}
animate();
The output is given below:
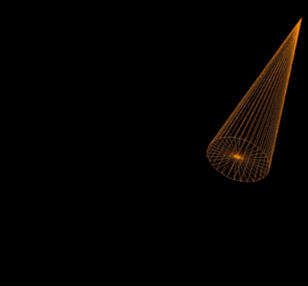
From the output above, the cone mesh is initially created with a wireframe material (lines connecting vertices) and positioned at the origin. Inside the animation loop, the cone.rotation.x and cone.rotation.y values are updated. The cone.rotation.x increases by 0.01 radians (approximately 0.57 degrees) during each frame, causing the cone to rotate around its x-axis. Similarly, the cone.rotation.y increases by the same amount, causing rotation around its y-axis.
The Math.sin(time) function generates a sine wave, which smoothly varies between -1 and 1 over time. By multiplying this sine value by 15, we create a left-right movement for the cone along the x-axis. In the same way, the Math.cos(time) function generates a cosine wave, creating an up-down movement along the y-axis.
Finally, the renderer.render(scene, camera) call updates the canvas with the modified scene, including the rotated and translated cone.
Conclusion
With the help of this incredible 3D graphics package, three.js, web application development takes a whole new level. By increasing interactivity and engagement, using three.js in your portfolios might make you stand out while applying for tech jobs.
Furthermore, its cross-browser compatibility guarantees smooth rendering on various platforms allowing users to create engaging applications in their projects.
There are a lot of concepts to learn about three.js to start building your projects. This article covers the foundation that will help you get started with this 3D library. However, to learn more features, visit their official documentation below:
Understand every bug
Uncover frustrations, understand bugs and fix slowdowns like never before with OpenReplay — the open-source session replay tool for developers. Self-host it in minutes, and have complete control over your customer data. Check our GitHub repo and join the thousands of developers in our community.
