
A deep dive into Rematch -- State Management for React


Rematch is a state management library that I’ve worked with on a blog project recently, and I’ll introduce it to you in this article.
It is an improved version of Redux with a few extra features, a cleaner architecture, and less red tape for React developers. Rematch uses the redux idea and includes a persistor for data storage.
You’ll undoubtedly adore Rematch if you already enjoy using Redux. Rematch, based on Redux, is everything that Redux is without the voluminous boilerplates and perplexing configurations.
Redux users and front-end developers looking to learn more about new state management libraries should find this article useful.
Before building a simple to-do application to demonstrate how to use Rematch, we’ll review its features and operation.
In this tutorial, we will build this TODO app with Rematch for state management.
What will you learn after this tutorial?
- How to use React Rematch for state management
- Installation and using Rematch
- Method to add data form and display lists
- CRUD operations as well
You must have a basic understanding of Redux to follow this tutorial, Don’t worry if you don’t know the basics of Redux; I will cover everything in this tutorial.
If you prefer to code along with the tutorial, here is a link to my GitHub repository
Rematch as a State Management Library
One state management library that works well with React as well as Vue, Angular, and other frameworks is Rematch.
Redux Thunk is not required, nor are additional Redux boilerplates like switch statements and action creators.
Rematch employs the same Redux principle but provides a simpler method of setting up a central store and managing the state of projects.
This library is easy to understand if you’ve used Redux before because of how similar the two are.
Many popular React State Management options are available, but the following are some justifications for choosing Rematch.
- Rematch exposes an API interface for creating custom plugins that extend its functionalities
- Written in TypeScript, Rematch easily supports TypeScript and has to autocomplete for all your methods, state, and reducers.
- A more streamlined architecture, Redux best practices, and less boilerplate
- Rematch can be used with native redux integrations such as “react-redux”.
- Designed to help programmers write code that utilizes Redux best practices without action types, action creators, and switch statements
Getting started with Rematch
To understand how Rematch works, let’s build a to-do app that uses Rematch to manage states. First, let’s install a new React app template:
npx create-react-app my-todoWhen the app template is done installing, copy it into my-to-do. Let’s go ahead and install Rematch:
npm install @rematch/coreWe’ll also use some functionalities from React Redux, so let’s install that:
npm install react-reduxThe development server should be launched with npm side effects, which support native JavaScript async/await for calling external APIs.
This will make an API interface available for creating unique plugins to increase its functionality.
Rematch Models
Models are the basis of the store. State variables, reducers, and effects are all included in the model.
A task is delivered to the reducer, which is in charge of updating state variables, by the front end after an action that executes in effect has been computed.
Therefore, our component is likewise informed anytime the state variable is modified.
We must first define models before we can use Rematch. Models show a snapshot of your Redux store and how it changes by bringing states, reducers, and async actions together in one location. Models are items that are crucial to managing the state.
All that is required to create a model is the definition of an object with particular properties. You can accomplish that manually or by using the type interference helper createModel().
A model uses properties such as;
- state - For defining the initial state;
- reducers - To contain pure functions for conducting state changes;
- effects - For async side-effects.
These questions help you understand what needs to be in the model:
- What condition do I start in? state
- How may the state be altered? reducers
- How should async operations be handled? impact of async/await
Create Todo App Component
Let’s create the model for our to-do app:
// models.js
// function to create a one second delay

const delay = (time) => new Promise(resolve => setTimeout(() => resolve(), time));
export const todos = {
  state: {
    1516344826871: { text: 'do stuff', done: true },
    1516344852231: { text: 'do other stuff', done: false }, },
  reducers: {
    toggleDone(state, id) {
      const todo = { ...state[id], done: !state[id].done }
      return {
        ...state,
        [id]: todo
      } },
    add(state, text) {
      return {
        ...state,
        [Date.now()]: { text, done: false }
      }},
    remove(state, id) {
      delete state[id]
      return {
        ...state
      }}},
  effects: {
    async asyncRemove(id, state) {
      await delay(1000)
      this.remove(id)
        }
    }
}
The initial state, a to-do task, is contained in a state object we constructed. We added state-updating methods to the reducer as well.
To simulate API calls, we finally put up a promise inside of effects that resolve after a second. API calls and other side effects are run using effects. The store needs to be initialized next.
Session Replay for Developers
Uncover frustrations, understand bugs and fix slowdowns like never before with OpenReplay — an open-source session replay tool for developers. Self-host it in minutes, and have complete control over your customer data. Check our GitHub repo and join the thousands of developers in our community.
Redux store creation using init()
You may establish a fully configured Redux store by executing the init() method; it receives a config object containing properties like models and plugins and returns a fully configured Redux store with additional Rematch capability.
The init() function accepts a config object with model-like characteristics and returns a fully-configured Redux store with Rematch capability.
The constructed store includes all of the features of a Redux store, such as dispatch(). In most cases, rematch contains some of its own features, such as the addModel() method for lazy-loading new models or the dispatch action dispatchers.
We’ve used the Provider component from React Redux, the official React Redux UI binding library.
The provider component makes the store accessible to hierarchical components that require it. We also imported the models and used them to populate the store.
Let’s connect this store and models to our React application.
In the index.js file, connect to the store as so. Open the index.js file. Import Provider from the react-redux and models from model.js.
//index.js

import React from "react";
import ReactDOM from "react-dom";
import { init } from "@rematch/core";
import { Provider } from "react-redux";
import * as models from "./models";
import App from "./App";
Wrap your component in this provider and edit it like this;
// index.js
// generate Redux store
const store = init({
 models
});
const Root = () => (
 <Provider store={store}>
   <App />
 </Provider>
);
ReactDOM.render(<Root />, document.querySelector("#root"));
Connect component with Rematch
Let’s use these store and rematch features in the app.js component.
We’ll use react-redux’s connect() method to connect this component to Redux.
Open the app.js file.
Import the connect method from react-redux.
We’ll use the state in the app.js file to get and display to-do items:
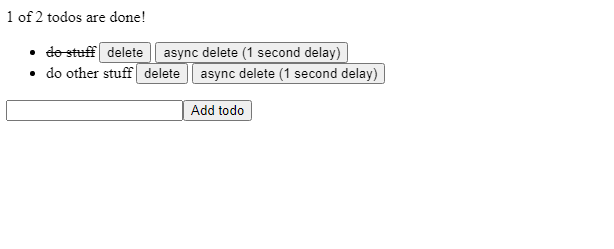
//app.js
import React from 'react'
import { connect } from 'react-redux'
import AddTodoForm from './AddTodoForm'

const App = props => (
  <div>
    {props.completedTodos} of {props.totalTodos} todos are done!
    <ul>{props.todosArray.map((todo) => (
        <li key={todo.id}>
          <span
          style={{cursor: 'pointer',
             textDecoration: todo.done ? 'line-through': 'none'}}
            onClick={() => props.toggleDone(todo.id)} > {todo.text}
          </span> {' '}
          <button onClick={() => props.remove(todo.id)}>delete</button>
          {''}
          <button onClick={() => props.asyncRemove(todo.id)}>async delete  (1 second delay)</button> </li> ))}
    </ul><AddTodoForm />
  </div>);
export default connect(mapState, mapDispatch)(App);
Now instead of simply export default App, change it to this line:
export default connect(mapState, mapDispatch)(App);This is how we use the connect method. It’s similar to a higher-order function that takes your component (in our case, App) and adds redex-rematch functionality before returning it.
We got the state, an object, and transformed it into an array to loop through it and display it.
Edit app.js with the function as so;
//app.js

const mapState = state => {
  const todosIds = Object.keys(state.todos)
  return {
    totalTodos: todosIds.length,
    completedTodos: todosIds.filter(id => state.todos[id].done).length,
    todosArray: todosIds.map(id => ({
      ...state.todos[id],
      id,
    }))
  }
}
Dispatch Data Models
You can use dispatch to trigger reducers and effects in your models, just like in plain Redux.
You can use dispatch either directly or with the dispatch [model] [action] (payload) shorthand to standardize your actions without having to write action types or action creators.
const mapDispatch = dispatch => ({
  toggleDone: id => dispatch.todos.toggleDone(id),
  remove: id => dispatch.todos.remove(id),
  asyncRemove: id => dispatch.todos.asyncRemove(id)
    }
)
How to Add an “Add Todo Form”
To create a to-do item, we’ll need a form that triggers a function that adds an item to our list.
Let’s separate all of the logic and UI for adding a to-do in AddTodoForm.js.
Let’s go ahead and create a form for adding to-do items in the AddTodoForm.js component:
// AddTodoForm.js

import React from "react";
import { connect } from "react-redux";

class AddTodoForm extends React.Component {
  state = { text: "" };

  handleTextChange = event => {
    const text = event.target.value;
    this.setState({ text });};
  handleSubmit = event => {event.preventDefault();
    this.props.addTodo(this.state.text);
    this.setState({ text: "" });};
  render = () => {
    return (
      <form onSubmit={this.handleSubmit}>
        <input value={this.state.text} onChange={this.handleTextChange} />
        <button type="submit">Add todo</button>
      </form>); };
}
export default connect(null, mapDispatch)(AddTodoForm);
Your store’s dispatch will be received by mapDispatch, giving your component access to reducers and effects.
const mapDispatch = dispatch => ({
  addTodo: dispatch.todos.add
}
);
The load effect is asynchronous, so loading is automatically set to true when fired.
This method can send an action to a reducer and accepts dispatch as a parameter.
Here, I want to add to-do items so that the addTo-do method returns an object(obj) used to dispatch an addTodos action using the addTodo method.
Conclusion
So that’s basically all you need to know about Rematch to get started. However, the fundamentals are simple, and you may gradually learn the various capabilities as and when you require them.
Whether new to state management or a seasoned Redux user, getting started with Rematch is easy and offers a great development experience.
Because of its intricacy and complexity, many front-end engineers have resisted learning Redux, but now you can get started and take on more projects.
Rematch, on the other hand, does an excellent job of abstracting away the majority of the labor, making it simple and quick to set up a Redux store.
Gain Debugging Superpowers
Unleash the power of session replay to reproduce bugs and track user frustrations. Get complete visibility into your frontend with OpenReplay, the most advanced open-source session replay tool for developers.
