
When you develop for the web, you may not be aware of several built-in APIs that can powerfully extend and enhance your app. Out of the many available APIs, this article will explain how to use four of the most interesting ones, so you can immediately benefit from them.
The web comprises a large number of interconnected public web pages that sits on the internet. Many application programming interfaces (APIs) are available for anyone building on the web. These Web APIs are usually used with JavaScript and can help build vital features and services into your web application. The built-in Web APIs simplify how functionalities are built by abstracting away complexities and providing you with a more straightforward syntax to get things done. As earlier mentioned, these APIs are large, so this article intends to focus only on four (4) APIs: Geolocation API, WebOTP API, Payment handler API, and Clipboard API. These APIs can be used for verification and payment purposes.
Why APIs are important in web development
Application programming interfaces (APIs) are a core of building web applications. Usually, your application may need to interact with servers, third-party infrastructures, or browser properties. APIs make it easy to send and receive data from another source.
Imagine if you had to build every feature you need in your application from the ground up. That would be daunting! Your productivity will be negatively affected, and the time from idea to production will also be unnecessarily elongated if you have to write complex code every time you need to do basic things. APIs help you avoid starting from scratch whenever you build a feature.
Developers who are building for the web have available a large number of built-in Web APIs to help abstract away the complexities of feature integrations. Some of the benefits of using Web APIs are:
- Development efficiency: APIs help you build faster and better.
- Customization and personalization: Serve your users better by giving them a personalized experience with your product. For example, the Device Orientation API lets you know the device orientation and detect the device motion of users to decide how best to display a page to them.
- Automating tasks: Reduce manual efforts by using APIs to automate tasks. Automating tasks can help improve productivity.
- Improved services: With Web APIs, you can improve your services and create a custom user experience for your customers.
Now, let’s dive in and explore some of these Web APIs.
Geolocation API
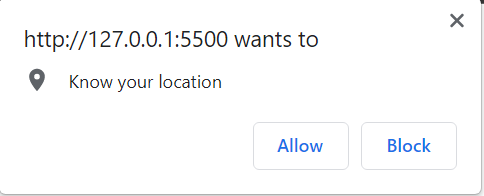
The Geolocation API gives the latitude and longitude coordinates of a device location. The user can choose to provide or not provide this information. When the API is executed for the first time, it displays a prompt asking the user for permission to report their location - the user can choose to accept or decline. This feature is available only on pages with a secure connection (HTTPS) but also works in localhost.
The Geolocation API can help:
- Keep accounts safe by verifying the location where login is initiated. If the login request is coming from an unusual location, you might want to do another round of verification (usually, a 2 Factor Authentication). VPNs can’t hinder the performance of this API because the API uses GPS location amongst other combinations, and VPNs will not change a person’s GPS location.
- Plot coordinates on a map. Plot a device location on a map.
- Personalize product experience by enabling or disabling features based on location.
- Restrict access to sensitive pages for users in some locations.
navigator.geolocation is the entry point for this API. The API takes the following methods:
Geolocation.getCurrentPosition(): Returns the current location of the device.Geolocation.watchPostion(): This method returns an updated location each time the device location changes.Geolocation.clearWatch(): Clears position watch installed usingGeolocation.watchPosition().
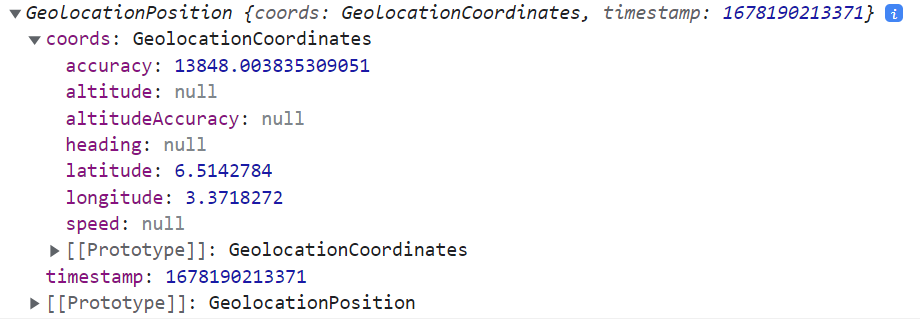
Each method takes up to 3 arguments. The first argument is a mandatory callback function that executes and returns the GeolocationPosition object containing the location data upon a successful location retrieval. The second argument is an optional error callback executed upon an unsuccessful location retrieval, and the third is an optional options object passed to the method.
If the API call is successful, the GeolocationPosition and GeolocationCoordinates interfaces are returned. An unsuccessful call returns the GeolocationError interface.
Let’s get the current position of your device.
function getUserLocation() {
  if (navigator.geolocation) {
    navigator.geolocation.getCurrentPosition((position) =>
      console.log(position)
    );
  } else {
    console.log("geolocation unavailable");
  }
}

getUserLocation();
The conditional statement checks for the availability of the geolocation API in the browser. However, the MDN Web Docs browser compatibility status for this API is “full support” on many browsers.
The user is asked for permission.
Upon successful call, it returns the following information:
NB: It is advised not to call this API immediately after your page loads, as it is a big turn-off for users.
WebOTP API
The WebOTP API is used to verify a user’s phone number by generating a one-time password. Identification and verification are important steps in a KYC process. You may want to verify that the phone number provided by the user belongs to them and not someone else. A great way to do that is to send a one-time password to the user that they would copy and paste to verify. WebOTP removes the extra step of copying and pasting - the one-time password sent is verified automatically.
<form>
  <input type="text" autocomplete="one-time-code" inputmode="numeric" />
</form>;
if (window.OTPCredential) {
// add an event that listens for when the DOM content is loaded.
window.addEventListener("DOMContentLoaded", (e) => {
//get the input element
const input = document.querySelector('input[autocomplete="one-time-code"]');
if (!input) return;
//abort controller if input does not exist.
const abortCont = new AbortController();
const form = input.closest("form");
if (form) {
form.addEventListener("submit", (e) => {
abortCont.abort();
});
}
navigator.credentials
.get({
otp: { transport: ["sms"] },
signal: abortCont.signal,
})
.then((otp) => {
input.value = otp.code;
if (form) form.submit();
})
.catch((err) => {
console.error(err);
});
});
}When the website’s server sends the OTP via the request transport mechanism (SMS) and the user grants permission, the OTP is prefilled automatically on the client.
Session Replay for Developers
Uncover frustrations, understand bugs and fix slowdowns like never before with OpenReplay — an open-source session replay tool for developers. Self-host it in minutes, and have complete control over your customer data. Check our GitHub repo and join the thousands of developers in our community.
Clipboard API
In the past, clipboard data was accessed via the document.execCommand() method. This method was problematic mainly because clipboard access was synchronous, and permission to read or write to the clipboard varies across browsers. The synchronous access to the clipboard makes this method a security pitfall. Developers are advised to avoid using the document.execCommand() method as it is deprecated.
A better way to manipulate the clipboard is via the Clipboard API. The Clipboard API provides a way to read and write to the clipboard asynchronously. Clipboard operations like cut, copy, and paste can be performed with this API. The API works only over a secure connection (HTTP) and only when the browser tab is active - it will not work on background tabs. The Clipboard API is triggered by event handlers like the click event. For privacy reasons, the API requests permission from the user to read or write to the clipboard on initial execution.
The read() and write() methods support all data types. However, browser support is more limited, and the code is not as straightforward.
Let’s copy some text to the clipboard.
<!DOCTYPE html>
<html lang="en">
  <head>
    <meta charset="UTF-8" />
    <meta http-equiv="X-UA-Compatible" content="IE=edge" />
    <meta name="viewport" content="width=device-width, initial-scale=1.0" />
    <title>Web APIs</title>
  </head>
  <body>
    <script src="index.js"></script>

    <input type="text" value="I love OpenReplay" class="textVal" />

    <button onclick="clipboardAPI()">Copy</button>
  </body>
</html>
An input element was created with the value “I love OpenReplay.” We want to copy this text whenever the button element is clicked.
function clipboardAPI() {
  const textVal = document.querySelector(".textVal");
  if (navigator.clipboard.writeText) {
    navigator.clipboard.writeText(textVal.value);
  }
}
We checked if the writeText() method of the Clipboard API is available on the user’s browser. If it is available, the value of the input element is copied to the clipboard. It is important to check for the availability of the clipboard or the methods before manipulating the clipboard.
You can also read the clipboard data.
function clipboardAPI() {
  if (navigator.clipboard.readText) {
    navigator.clipboard.readText().then((text) => console.log(text));
  }
}
The readText() method takes a callback function that returns the text on the clipboard.
Payment handler API
The Payment Handler API provides a way for web applications to handle payment inside a page rather than redirecting to a different website. When a merchant initiates via the payment request API, the payment handler API opens a window where the user is presented with payment apps to choose from to initiate payment to the merchant. The payment request API allows users to select their preferred payment method and then informs the merchant about their preference.
The PaymentRequest object is used to create a payment request.
const requestPayment = new PaymentRequest();The payment request object takes three parameters:
methodData: a mandatory object holding supported payment methods.details: a mandatory object containing specific payment information such as tax, amount, total, shipping address, etc.options: an optional object containing additional payment options.
Let’s create these parameters and add them to the PaymentRequest object.
const methodData = [
  {
    supportedMethods: "https://bobbucks.dev/pay",
  },
  {
    supportedMethods: "https://examplepay.dev/pay",
  },
];

const details = {
  orderId: "order-111",
  items: [
    {
      label: "Shirt",
      amount: { currency: "GBP", value: "13.00"},
    },
  ],
  total: {
    label: "Total",
    amount: { currency: "GBP", value: "13.00"},
  },
};

const requestPayment = new PaymentRequest(methodData, details);
supportedMethods represent the payment methods the merchant support. There is no limit to the payment methods a merchant can support.
The payment request process starts by requesting a manifest JSON file from each supportedMethods. The browser loads the URL and checks its HTTP header to download the payment method manifest. If no manifest is found inside the HTTP header, it then goes ahead to parse the response body from the URL as the manifest. The downloaded content, either from the HTTP or the response body, is parsed as JSON with default_applications and supported_origins members.
The default_application contains the URL where the default payment app can be found, and supported_origins contains the alternative payment apps allowed to handle the payment. Essentially, these are options that will be presented to the user.
To initiate the payment request, use the PaymentRequest.show() method.
requestPayment.show().then((response) => {
  // process the payment here.
  response.complete("success").then(() => {
    alert("payment was successful");
  });
});
request.complete() means that the payment was completed. Upon payment completion, the merchant is provided with the necessary details, such as the shipping address and phone number, to complete the process.
Before starting a payment process, check if the PaymentRequest object can make a payment. Use the PaymentRequest.canMakePayment() method to check for this.
The payment request API is not available in all browsers; therefore, it’s best to check its availability before initializing payment.
if (window.PaymentRequest) {
  //initialize payment here
}
Cons and browser compatibility
There are a few downsides to using these Web APIs. When a user initially denies Geolocation API permission to fetch their current location, you cannot programmatically display the permission prompt again - this brings about some problems. Unlike other APIs (such as the notification API) that allow you to check permission status and request permission again, the Geolocation API doesn’t. The only way to re-enable permission is to nudge the user to manually grant permission for your website in the browser’s settings tab. Recent versions of most major browsers support the Geolocation API.
The Firefox browsers do not support some of the Clipboard API methods. For example, Firefox does not support the read() method, while Firefox for Android does not support both the read() and the write() methods. The Clipboard API is behind in some browser versions, while others partially support it.
The WebOTP API and Payment handler API are still very much experimental. Developers are advised to check for browser compatibility carefully before using them.
Conclusion
There are many built-in Web APIs to help developers build faster and better on the web. The four APIs discussed in this article, Geolocation, Clipboard, WebOTP, and Payment Handler APIs, can be useful for verification and payments. Although some of these APIs are still experimental, the future is nonetheless bright for them. The World Wide Web Consortium and many other developers are committed to solving the difficulty faced by developers building on the web.
Gain Debugging Superpowers
Unleash the power of session replay to reproduce bugs and track user frustrations. Get complete visibility into your frontend with OpenReplay, the most advanced open-source session replay tool for developers.