
Add Locomotive Scrolling to Your Site


In today’s digital landscape, websites are constantly evolving to provide more engaging and seamless browsing experiences, and scrolling animations have emerged as an effective method to captivate users. This article will delve into Locomotive Scroll, a specialized JavaScript library that empowers developers to elevate their scroll effects, allowing for even more immersive and delightful user experiences.

Discover how at OpenReplay.com.
Locomotive Scroll is a powerful JavaScript library that enhances user scrolling experiences by enabling smooth and seamless navigation through individual sections reminiscent of a train gliding along a track. Also referred to as “scroll hijacking” or “scroll snapping,” it allows for touch, keyboard, and mouse interactions. With its extensive customization options, including smooth scrolling, page overlay scroll, and parallax effects, it empowers developers to create captivating and dynamic scrolling animations within their websites.
Why use Locomotive Scroll?
There are many reasons to add scrolling features to a site, but the primary purpose is to create an engaging and interactive user experience. Here are a few reasons why this technique is employed:
- Visual Impact: One reason is that it provides dynamism and intrigue to a webpage, giving the user a visually pleasing and memorable experience by segmenting the content into discrete sections and animating the scrolling between them.
- Highlighting Key Content: It also allows isolating each segment, highlighting specific text or components, and drawing user attention.
- User Engagement: This package’s interactive features enable users to browse the page more thoroughly. Fluid scrolling between sections may intrigue and drive users to continue scrolling to find additional content.
Setting up Work Environment
Let’s get started by setting up our project. To do that, we’ll use the local development server (Vite) to create our Javascript project. Run the command below in your terminal.
yarn create viteNext, add the project name, framework, and language variant, as shown in the image below.
After successfully creating the project, change the directory to the project directory and run the following command below to download the required dependencies.
yarnNext, add the Locomotive Scroll package using the command below.
yarn add locomotive-scrollFinally, run the development server by running the command below.
yarn devWith all the packages installed and our development server running, let’s create a demo project to experiment on. To achieve this, update the styles in the style.css file with the styles below.
* {
  margin: 0;
  padding: 0;
  box-sizing: border-box;
}

body {
  background-color: maroon;
}

section {
  height: 100vh;
  display: flex;
  justify-content: center;
  align-items: center;
}

.page-overlay {
  background-color: maroon;
  color: white;
}

.sticky-scrolling {
  background-color: rgba(128, 128, 0, 0.527);
  color: white;
}

.parallax-scrolling {
  background-color: chocolate;
  color: white;
}

.scrolling-into-view {
  background-color: rgb(2, 21, 67);
  color: white;
}
We will use the provided code to style the different sections of our application.
Next, update the code in the index.html file with the code block below.
<!doctype html>
<html lang="en">
  <head>
    <meta charset="UTF-8" />
    <meta http-equiv="X-UA-Compatible" content="IE=edge" />
    <meta name="viewport" content="width=device-width, initial-scale=1.0" />
    <link rel="stylesheet" href="style.css" />
    <title>Document</title>
  </head>

  <body>
    <body>
      <section class="page-overlay">
        <h1>Trying to overlay this page?? 🤔</h1>
      </section>
      <section class="sticky-scrolling">
        <h1>Hey!! This is Sticky🤩</h1>
      </section>
      <section class="parallax-scrolling">
        <h1>Hey I'm going Horizontally 👉🏻</h1>
        <h1>Hey I'm going vertically 👆🏻</h1>
      </section>
      <section class="scrolling-into-view">
        <h1>I just scrolled this into View🤯</h1>
      </section>
      <script type="module" src="/index.js"></script>
    </body>
  </body>
</html>
We’ve created a few sections in the code above to try the various Locomotive Scroll features.
Save the changes and go to http://localhost:5173/ to see a preview of our app.
Locomotive Scroll features
With the project demo set up, let’s initiate the scrolling package and try out its features. Create a locomotive-scroll.css file in the project directory and copy the code below.
/*! locomotive-scroll v4.1.3 | MIT License | https://github.com/locomotivemtl/locomotive-scroll */
html.has-scroll-smooth {
  overflow: hidden;
}
html.has-scroll-dragging {
  -webkit-user-select: none;
  -moz-user-select: none;
  -ms-user-select: none;
  user-select: none;
}
.has-scroll-smooth body {
  overflow: hidden;
}
.has-scroll-smooth [data-scroll-container] {
  min-height: 100vh;
}
[data-scroll-direction="horizontal"] [data-scroll-container] {
  height: 100vh;
  display: inline-block;
  white-space: nowrap;
}
[data-scroll-direction="horizontal"] [data-scroll-section] {
  display: inline-block;
  vertical-align: top;
  white-space: nowrap;
  height: 100%;
}
.c-scrollbar {
  position: absolute;
  right: 0;
  top: 0;
  width: 11px;
  height: 100%;
  transform-origin: center right;
  transition: transform 0.3s, opacity 0.3s;
  opacity: 0;
}
.c-scrollbar:hover {
  transform: scaleX(1.45);
}
.c-scrollbar:hover,
.has-scroll-scrolling .c-scrollbar,
.has-scroll-dragging .c-scrollbar {
  opacity: 1;
}
[data-scroll-direction="horizontal"] .c-scrollbar {
  width: 100%;
  height: 10px;
  top: auto;
  bottom: 0;
  transform: scaleY(1);
}
[data-scroll-direction="horizontal"] .c-scrollbar:hover {
  transform: scaleY(1.3);
}
.c-scrollbar_thumb {
  position: absolute;
  top: 0;
  right: 0;
  background-color: black;
  opacity: 0.5;
  width: 7px;
  border-radius: 10px;
  margin: 2px;
  cursor: -webkit-grab;
  cursor: grab;
}
.has-scroll-dragging .c-scrollbar_thumb {
  cursor: -webkit-grabbing;
  cursor: grabbing;
}
[data-scroll-direction="horizontal"] .c-scrollbar_thumb {
  right: auto;
  bottom: 0;
}
The style above is the recommended style when using this package.
Next, create an index.js file in the project directory and paste the code below.
import LocomotiveScroll from "locomotive-scroll";

const element = document.querySelector("[data-scroll-container]");

const scroll = new LocomotiveScroll({
  el: element,
});
In the code above, we import the Locomotive Scroll package into our Javascript file. Next, we create a new instance of the scroll class, which lets us assign an element and override some features discussed in this article.
The selected data-scroll-container element is an identifier and will be used in our HTML code to wrap our contents.
Finally, head over to the index.html file and update the code to the one below.
<!doctype html>
<html lang="en">
  <head>
    <meta charset="UTF-8" />
    <link rel="icon" type="image/svg+xml" href="/vite.svg" />
    <meta name="viewport" content="width=device-width, initial-scale=1.0" />

 <--! Linked the locomotive style -->
    <link rel="stylesheet" href="locomotive-scroll.css" />

    <link rel="stylesheet" href="style.css" />
    <title>Vite App</title>
  </head>
  <body>
 <--! Added this -->
    <div data-scroll-container><--! Rest of the Code --></div>
    <script type="module" src="/index.js"></script>
  </body>
</html>
In the code above, we linked our locomotive-scroll.css file and wrapped our contents in the <body> tag with the data-scroll-container.
Smooth scroll
With our scroll library configured for our project, let’s start testing its features. One such feature, smooth scrolling, provides a seamless and sleek scrolling experience between sections. Let’s see how this affects our application. Go to the index.js file and update the code.
const scroll = new LocomotiveScroll({
  el: element,
  smooth: true, // add this
});
In the code snippet above, we’ve enabled the smooth feature on our project. The result can be observed in the GIF below.
Here is a GIF showing the smooth scrolling feature of Locomotive Scroll.
Speed scroll
The next feature is the speed scrolling feature. This feature comes out of the box and can be implemented by updating the index.js file with the code below.
const scroll = new LocomotiveScroll({
  el: element,
  smooth: true,
  multiplier: 9, // added this
});
In the code snippet above, we’ve added and set the multiplier property in our class to 9. The greater the value, the higher the speed. The default multiplier value is 1.
The GIF below shows the increased scroll speed of our application.

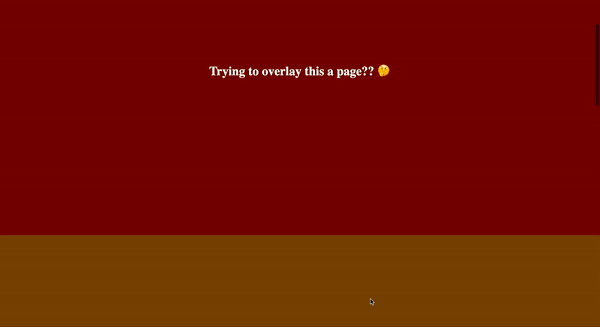
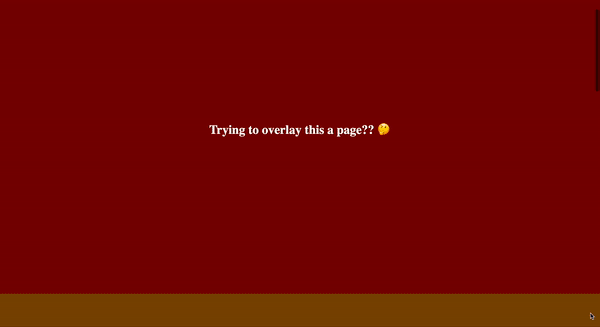
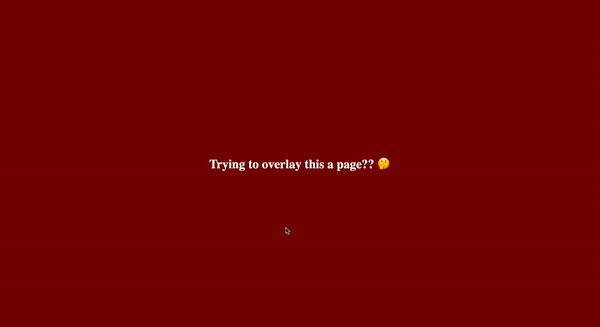
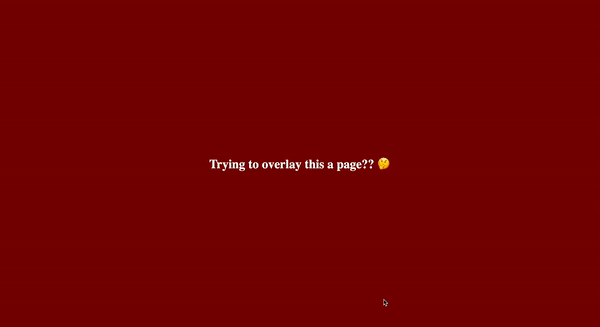
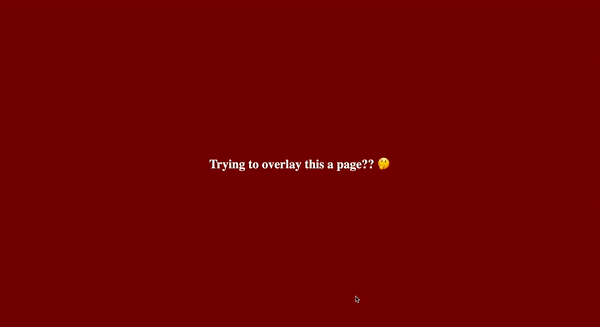
Page overlay scroll
Page overlay scroll is a feature that allows seamless scrolling of pages and sections, creating a visually stunning effect as they gracefully transition onto one another. You can effortlessly incorporate this scrolling behavior into your application by leveraging specific scroll attributes. Let’s delve into this feature and discover the immersive possibilities it brings to your user experience.
<body>
  <div data-scroll-container>
    <section
      data-scroll-section
      data-scroll
      data-scroll-speed="2"
      class="page-overlay"
    >
      <h1>Trying to overlay this page?? 🤔</h1>
    </section>

    <section data-scroll-section>
      <h1>Hey!! This is Sticky🤩</h1>
    </section>

    <section data-scroll-section class="parallax-scrolling">
      <h1>Hey I'm going Horizontally 👉🏻</h1>
      <h1>Hey I'm going vertically 👆🏻</h1>
    </section>

    <section data-scroll-section class="scrolling-into-view">
      <h1>I just scrolled this into View🤯</h1>
    </section>
  </div>
  <script type="module" src="/index.js"></script>
</body>
In the code block above, we’ve successfully added the data-scroll-section attributes to our sections. We’re also increasing the speed at which the section is scrolled out of view with the data-scroll-speed attribute, thus leaving behind an overlaying effect when scrolling.
Let’s have a breakdown the attributes we just used:
- The
data-scroll-section,data-scroll, and thedata-scroll-speedare attributes provided by the scroll library. - The
data-scroll-sectionattribute allows the scroll package to recognize and handle individual sections as scrollable entities. - The
data-scrollattribute detects if a target element or tag is in view. - The
data-scroll-speedattribute determines the speed at which a section or page is scrolled in and out of view.
The GIF below shows the overlaying effect implemented from the scroll library.
Sticky scroll
The next feature is the sticky scroll feature, which allows you to stick elements in position when scrolling. You can observe this in the following example. Head over to the index.html page and update the code.
<body>
  <div data-scroll-container>
    <!-- Other code blocks -->

    <!--added data-scroll-target and data-scroll-sticky -->
    <section data-scroll-section class="sticky-scrolling" id="stick">
      <h1 data-scroll data-scroll-target="#stick" data-scroll-sticky>
 Hey!! This is Sticky🤩
      </h1>
    </section>
  </div>

  <!-- Other code blocks -->

  <script type="module" src="/index.js"></script>
</body>
In the code block above, We’re using an id for the Sticky section, which enables the scroll package to recognize and apply a sticky behavior to our element. Additionally, we enhance the scrolling experience of the H1 text by incorporating data-scroll and data-scroll-target attributes; the data-scroll-target identifies if a particle id is in view position.
Sticky scrolling can be seen in the GIF below.
Parallax scroll
The Parallax scroll feature allows elements, tags, and other content to be moved horizontally, vertically, and diagonally on a page. To use this feature in our application, update the parallax-scrolling section with the code below.
<body>
  <div data-scroll-container>
    <!-- Other code blocks -->

    <section data-scroll-section class="parallax-scrolling">
      <h1
        data-scroll
        data-scroll-direction="horizontal"
        data-scroll-speed="-20"
      >
 Hey I'm going Horizontally 👉🏻
      </h1>

      <h1 data-scroll data-scroll-direction="vertical" data-scroll-speed="8">
 Hey I'm going vertically 👆🏻
      </h1>
    </section>

    <!-- Other code blocks -->
  </div>

  <script type="module" src="/index.js"></script>
</body>
In the code above, we set the direction of our content using our custom parallax (horizontal and vertical) values and increase the movement speed of the content when scrolling.
The GIF below shows the effect of parallax scrolling.
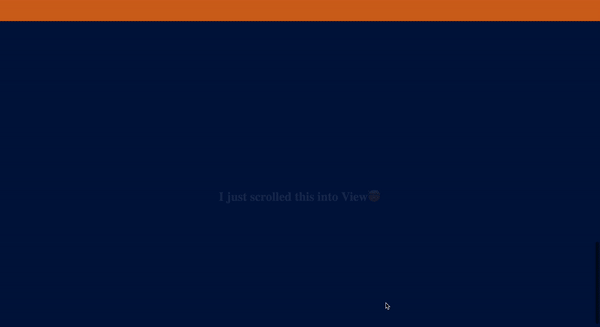
Scroll-into-view classes
Besides utilizing scroll attributes to perform swift animations and excellent page transitions, this library can also apply classes when specific content or sections are in view. Navigate to the style.css file and append the following code at the bottom.
/* Other Styles */
.text {
  opacity: 0;
}

.animated-heading {
  opacity: 1;
  transition: opacity 5s ease-out;
}
Next, go to the index.html file and update the scrolling-into-view section with the code below.
<body>
  <div data-scroll-container>
    <!-- Other code blocks -->

    <section data-scroll-section data-scroll class="scrolling-into-view">
      <h1
        class="text"
        data-scroll
        data-scroll-repeat="true"
        data-scroll-class="animated-heading"
        data-scroll-speed="5"
      >
 I just scrolled this into View🤯
      </h1>
    </section>
  </div>
  <script type="module" src="/index.js"></script>
</body>
In the code block above, we’ve added the text class to our h1 text, thus making it invincible by setting the opacity to 0. Next, we added the data-scroll-class and gave it the animation in our style. Next, we enable the animation to repeat itself every time the page is scrolled into view by setting the data-scroll-repeat to true.
The GIF below displays the scroll into view effect of the scroll library.
Mini project with Locomotive Scroll features
Let’s put all the features we’ve learned in the preview section into a mini-project. In this section, we’ll build a simple Gallery Application to showcase the aforementioned scroll features.
To get started, clone the starter file from GitHub and run the code by running the command below in the terminal.
yarn && yarn devRunning the command will give us a preview like this.

Next, install the Locomotive Scroll package and add its recommended style, as discussed in the section above. Then, update your index.js file with the code below.
import LocomotiveScroll from "locomotive-scroll";

const element = document.querySelector("[data-scroll-container]");

const scroll = new LocomotiveScroll({
  el: element,
  smooth: true,
  multiplier: 4,
});
In the code block above, we’re importing and instantiating a new class from our imported the scroll library, setting the smooth scrolling to true, and increasing our scroll speed to 4.
Next, head over to the index.html and update it with the code below.
<!doctype html>
<html>
  <head>
    <title>Image Gallery with Locomotive Scroll</title>
    <link rel="stylesheet" href="style.css" />

    <!-- added the locomotive scroll style -->
    <link rel="stylesheet" href="locomotive-scroll.css" />
  </head>
  <body>
    <!-- added this -->
    <div data-scroll-container>
      <!-- Other Code blocks here -->
    </div>
    <script type="module" src="/index.js"></script>
  </body>
</html>
In the code block above, we’ve added our the recommended scroll style and wrapped our code with the data-scroll-container attribute.
Configuring Welcome Section
Let’s add some scroll features to our Welcome section. To achieve this, update the welcome section with the code below.
<div data-scroll-container>
  <section
    data-scroll-section
    data-scroll
    data-scroll-speed="-5"
    class="welcome"
  >
    <h1 data-scroll data-scroll-speed="-15">
 Welcome to my<br />
      <p>Gallery Application</p>
    </h1>
  </section>

  <!-- Other Code blocks here -->
</div>
In the code block above, we’ve identified our section with the data-scroll-section attribute and added a negative scroll speed to the section and the Text, giving it a reversed overlay effect.
Configuring Gallery Section
Next up, let’s customize our Gallery section. Update the Gallery section with the code below.
<!-- Other Code blocks here -->

<section data-scroll-section id="sticky" class="section">
  <div class="text-container">
    <h1 data-scroll data-scroll-target="#sticky" data-scroll-sticky>
 Image Gallery
    </h1>
    <p data-scroll data-scroll-target="#sticky" data-scroll-sticky>
 Keep Scrolling to Enjoy Locomotive Effects
    </p>
  </div>
  <div class="image-container">
    <img
      data-scroll
      data-scroll-speed="3"
      src="https://picsum.photos/id/237/400/300"
      alt="Image 1"
    />
    <img
      data-scroll
      data-scroll-speed="7"
      src="https://picsum.photos/id/238/400/300"
      alt="Image 2"
    />
    <img
      data-scroll
      data-scroll-speed="3"
      src=" https://picsum.photos/id/239/400/300"
      alt="Image 3"
    />
    <img
      data-scroll
      data-scroll-speed="7"
      src="https://picsum.photos/id/241/400/300"
      alt="Image 4"
    />
  </div>
</section>

<section data-scroll-section class="section">
  <div class="text-container"></div>
  <div data-scroll data-scroll-speed="9" class="image-container">
    <img
      data-scroll
      data-scroll-speed="7"
      src="https://picsum.photos/id/240/400/300"
      alt="Image 5"
    />
    <img
      data-scroll
      data-scroll-speed="3"
      src="https://picsum.photos/id/242/400/300"
      alt="Image 6"
    />
    <img
      data-scroll
      data-scroll-speed="7"
      src=" https://picsum.photos/id/243/400/300"
      alt="Image 7"
    />
    <img
      data-scroll
      data-scroll-speed="3"
      src="https://picsum.photos/id/244/400/300"
      alt="Image 8"
    />
  </div>
</section>

<!-- Other Code blocks here -->
In the code block above, we’ve added the sticky feature to our text when scrolling and set some custom scroll speed for our images on both sections.
Configuring Contact Section
Finally, let’s customize the Contact section with more scroll features. First, add the code below to the style.css file.
/* Other Styles here */
.form-field,
.form-btn {
  opacity: 0;
}
.animated-form {
  opacity: 1;
  transition: opacity 3s ease-out;
}
.animated-btn {
  opacity: 1;
  transition: opacity 7s ease-out;
}
The style above will use with the Scroll-into-view feature to customize our Contact section.
Next, update the Contact section with the code below.
<!-- Other Code blocks here -->

<section data-scroll-section class="contact-section">
  <h2 data-scroll data-scroll-direction="horizontal" data-scroll-speed="-2">
 Contact Us
  </h2>
  <p data-scroll data-scroll-direction="vertical" data-scroll-speed="3">
 We would love to hear from you. Fill out the form below and we'll get back
 to you as soon as possible.
  </p>
  <form
    class="form-field contact-form"
    data-scroll
    data-scroll-repeat="true"
    data-scroll-class="animated-form"
    data-scroll-speed="3"
    action="#"
    method="POST"
  >
    <input type="text" name="name" placeholder="Your Name" required />
    <input type="text" name="email" placeholder="Your Email" required />
    <textarea name="message" placeholder="Your Message" required></textarea>
  </form>
  <button
    class="form-btn"
    data-scroll
    data-scroll-repeat="true"
    data-scroll-class="animated-btn"
    data-scroll-speed="2"
    type="submit"
  >
 Send Message
  </button>
</section>
In the code above, we’ve added the Parallax scrolling feature to the text and the Scroll-into-view feature to the forms and the button. The Scroll-into-view feature adds the animate classes to the elements, giving it a swift fade-in effect.
With all the Configurations correctly done and completed, we should see a Beautiful Gallery application with awesome scroll features, as shown below.

Conclusion
Integrating amazing scrolling features can take our application’s User Experience to the next level by enriching it with significant page transitions, effects, and fast scrolling. Using the Locomotive Scroll package can enable us to implement these scrolling features and also provide us with options to customize the app’s scrolling speed. The package also offers more features on its official documentation for further implementation.
Here is the Link to the Complete source code on GitHub.
Explore this package and paste the Links to your finished projects in the comment section.
Gain control over your UX
See how users are using your site as if you were sitting next to them, learn and iterate faster with OpenReplay. — the open-source session replay tool for developers. Self-host it in minutes, and have complete control over your customer data. Check our GitHub repo and join the thousands of developers in our community.
