
Add an Image Editor to your app with Pintura


A neat feature to add to your web project is an Image editor if you’re trying to give your users the ability to post content on your site. A roundabout way to implement this would be to create your own Image editor, but that would cost you valuable development time and money to set up, especially if you’re working on a large project and need a ton of features for your image editor. A good alternative would be to use a third-party library or plugin. This article aims to enlighten you on an easier way to include an image editor using a third-party plugin Pintura. To get the most out of this article, you should understand JavaScript and HTML.
What is Pintura?
Pintura is a powerful, fully customizable image editor SDK created by the team at PQUINA. It performs well on mobile and desktop, and packs everything the average user needs to perform image editing; it also can easily be integrated into any project. With this editor, a user can resize, crop, filter, adjust colors, and rotate images; it also supports stickers, annotation, and many more. It is a great tool, perfect for developers.
It operates on all modern browsers and devices:
-
Opera
-
Chrome
-
Edge 18+
-
Firefox
-
Safari 10+
-
Chrome for android
-
Firefox Android
-
iOS Safari 10+
-
Firefox iOS
-
Chrome for iOS.
The editor is written in vanilla JavaScript and possesses zero dependencies; it ships with multiple adapter components allowing faster integration with popular frameworks like jQuery, Cordova, Vue, React, Angular, Svelte, and Sveltekit.
The Pintura image editor allows you to accomplish many things with the features packed within. They include;
-
The ability to easily integrate with any of your preferred stacks.
-
The editor layout can update its size to fit the available space, making it feel native to the platform it’s shipped.
-
It gives you the ability to set up overlaying crop guides.
-
When integrating the editor, you can set a default crop aspect ratio to always get a perfect crop from uploaded images.
-
The image editor SDK can be used programmatically.
-
Easily flip, rotate and scale an image.
-
It allows you to select from a growing set of preset filters and add your own filters.
-
Drawing shapes, lines, and text becomes easier with powerful annotation tools.
-
The editor will automatically adjust an image to fit inside the bounds of the input image by adjusting the zoom and position.
-
The ability to adjust clarity, contrast, gamma, exposure, brightness, and saturation.
-
The editor allows users to easily censor information in their images.
-
No server dependency; as a result, you get faster image uploads by compressing, resizing, and converting images in the browser.
-
The Markup Shape API lets you control how shapes can be manipulated through code.
For more information on the features offered by the image editor, check out the features page on the Pintura site here.
Project setup for Pintura
Pintura is a paid tool; to use it, you must purchase one of its available plans here. However, many companies trust the editor, and PQUINA offers a 60-day money-back guarantee if you feel dissatisfied with the product.
As previously mentioned in this article, Pintura can be implemented in several frameworks, but the primary focus will be on JavaScript for this article.
Unpacking
Once you have chosen a plan and downloaded the latest version of Pintura, proceed to unpack the Pintura archive, and you’ll be presented with a folder structure similar to what we have below:

The locale folder contains files for translating into different languages if you need to use Pintura for non-English projects.
The packages folder holds the components and helper files for development in various supported stacks.
The presets folder contains an assembly of example integrations with the different supported frameworks and libraries.
Installation
Installing the Pintura packages in your project is a relatively simple and quick process; by following the steps listed below, you’ll be able to install the full SDK and begin implementing it in your project.
- Start by creating a new empty file in the root folder of your project and name it .npmrc*.* If this file already exists in your project, skip this step.
- Copy the contents below to the .npmrc file.
@pqina:registry=https://npm.pqina.nl/
//npm.pqina.nl/:_authToken=$PQINA_NPM_TOKEN-
Replace $PQINA_NPM_TOKEN with your private pqina npm token shown in the customer portal under your license details.
With this, the pqina packages are now installed from the PQINA repository.
Session Replay for Developers
Uncover frustrations, understand bugs and fix slowdowns like never before with OpenReplay — an open-source session replay tool for developers. Self-host it in minutes, and have complete control over your customer data. Check our GitHub repo and join the thousands of developers in our community.
Adding implementation code for JavaScript
The downloaded package includes several examples to help introduce you to using the plugin with different frameworks. The image editor can be added to your project using two different methods:
The appendDefaultEditor adds the default editor with all its default settings, plugins, and English locale. Below we’ll add the image editor to an HTML element using the appendDefaultEditor method to illustrate using the image editor with vanilla JavaScript.
<!DOCTYPE html>

<link rel = ”stylesheet” href = “./pintura.css” />

<style>
  .my-editor {
    height: 600px;
  }
</style>

<div class="my-editor"></div>

<script type="module">
  import{ appendDefaultEditor } from './pintura.js';

  const Pintura = appendDefaultEditor('.my-editor',
  // The source image to load
  { src: './my-image.jpeg',
  // This will set a square crop aspect ratio
  imageCropAspectRatio: 1,
  });
</script>
The appendEditor method allows you to create a custom editor with a custom set of plugin s, locale, and options. We’ll create a custom image editor using the appendEditor method. To do this, we’ll need to set the available plugins, load the correct locales and set which plugin options will be used. The following plugins in the code block below will be enabled for the custom editor, crop, finetune, filter and annotate.
<!DOCTYPE html>
<link rel="stylesheet" href="./pintura.css" />
<style>
.my-editor {
height: 600px;
}
</style>
<div class="my-editor"></div>
<script type="module">
import {
// The editor factory method
appendEditor,
// Import the default image reader and writer
createDefaultImageReader,
createDefaultImageWriter,
// The method used to register the plugins
setPlugins,
// The plugins we want to use
plugin_crop,
plugin_finetune,
plugin_filter,
plugin_annotate,
// The user interface and plugin locale objects
locale_en_gb,
plugin_crop_locale_en_gb,
plugin_finetune_locale_en_gb,
plugin_filter_locale_en_gb,
plugin_annotate_locale_en_gb,
// Because we use the annotate plugin we also need
// to import the markup editor locale and the shape preprocessor
markup_editor_locale_en_gb,
createDefaultShapePreprocessor,
// Import the default configuration for the markup editor and finetune plugins
markup_editor_defaults,
plugin_finetune_defaults,
plugin_filter_defaults,
} from "./pintura.js";
// This registers the plugins with Pintura Image Editor
setPlugins(plugin_crop, plugin_finetune, plugin_filter);
// Append the editor
appendEditor(".my-editor", {
// The source image to load
src: "./my-image.jpeg",
// This will read the image data (required)
imageReader: createDefaultImageReader(),
// This will write the output image
imageWriter: createDefaultImageWriter(),
// The markup editor default options, tools, shape style controls
...markup_editor_defaults,
// The finetune util controls
...plugin_finetune_defaults,
// The filter util controls
...plugin_filter_defaults,
// This handles complex shapes like arrows / frames
shapePreprocessor: createDefaultShapePreprocessor(),
// This will set a square crop aspect ratio
imageCropAspectRatio: 1,
// The icons and labels to use in the user interface (required)
locale: {
...locale_en_gb,
...plugin_crop_locale_en_gb,
...plugin_finetune_locale_en_gb,
...plugin_filter_locale_en_gb,
...plugin_annotate_locale_en_gb,
...markup_editor_locale_en_gb,
},
});
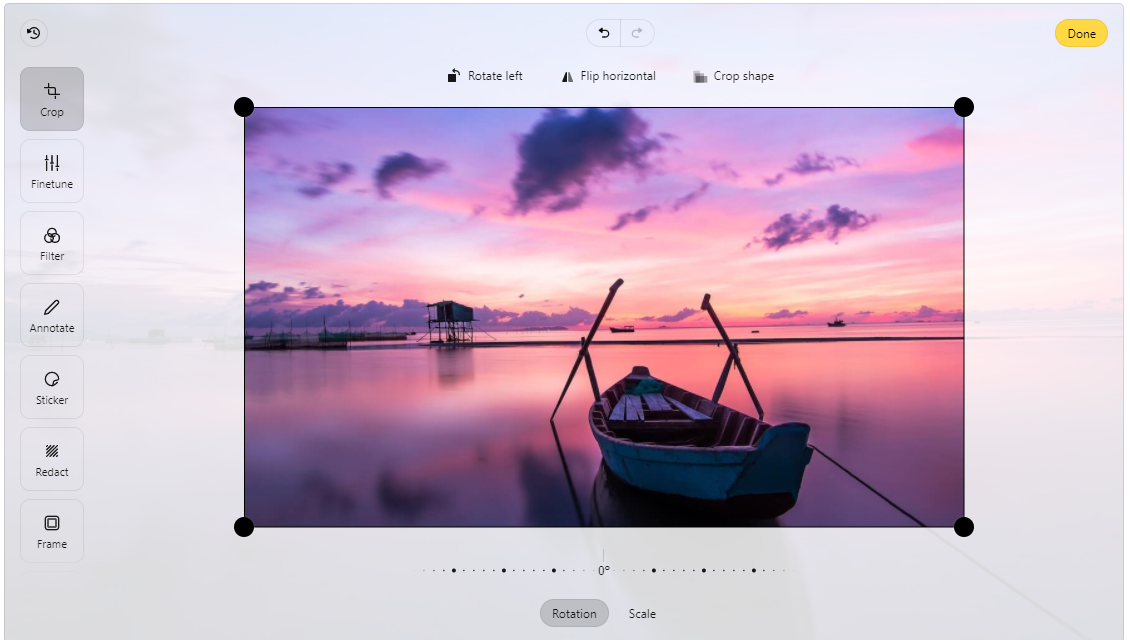
</script>Here’s an image of the editor created using the appendDefaultEditor method.
For more code examples to help you learn to use a wider variety of Pintura’s features, check out the examples page on the product site here.
Conclusion
In this article, you’ve been introduced to an alternative way to include an image editor feature in your project and added the plugin with native JavaScript. By learning how to use this SDK, you’ll have enough knowledge to customize the editor to suit your needs and deliver an awesome project.
A TIP FROM THE EDITOR: For another type of image manipulation, don’t miss our Image Manipulation With React-Easy-Crop article.
Gain Debugging Superpowers
Unleash the power of session replay to reproduce bugs and track user frustrations. Get complete visibility into your frontend with OpenReplay, the most advanced open-source session replay tool for developers.
