Effective error handling is crucial in every Svelte web application, ensuring a smooth user experience and a streamlined web development process. This article aims to provide a comprehensive guide on improving error handling for your Svelte app. By leveraging Svelte’s error boundaries, global event listeners, and error reporting services, developers can enhance error-handling capabilities and create more efficient applications, and this article will teach you all about it.

Discover how at OpenReplay.com.
Let’s explore some benefits of having robust error-handling processes in your front-end project. Robust error handling not only helps in gracefully recovering from errors but also provides meaningful error messages and guidance to users, enabling them to navigate through issues and find resolutions. Below are five important reasons robust error handling is necessary.
-
Preventing Application Crashes and Unexpected Behavior: When errors occur within Svelte components, they can propagate and potentially break the entire application. Youu can catch and handle error by implementing error handling mechanismss, preventing them from propagating further and crashing the application. This ensures the stability and reliability of the application, offering a smoother user experience.
-
Enhancing User Experience: Robust error handling significantly enhances the user experience by providing meaningful error messages and guidance. When errors occur, users are provided with clear and understandable feedback rather than encountering cryptic error messages or experiencing silent failures, but robust error handling can minimize user frustration, improve user trust, and maintain a positive user experience.
-
Efficient Debugging and Issue Resolution: If errors are properly caught, logged, and reported, developers can gain valuable insights into the root causes of problems. Robust error-handling mechanisms allow developers to isolate and identify the specific components or areas where errors occur, accelerating the debugging process and resulting in shorter development cycles.
-
Maintaining Data Integrity and Security: In scenarios where errors occur during data processing, proper error handling ensures that data integrity is preserved. For example, error handling can prevent the application from persisting invalid or inconsistent data in a database, protect sensitive information, and prevent potential security vulnerabilities.
Implementing Error Boundaries, Global Event Listeners, and Error Reporting Services in a Svelte Application
Error Boundaries, Global Event Listeners, and Error Reporting Services are three robust solutions for error management, and they will all be discussed in this tutorial. I have worked on a single-page site that I will be using to illustrate these solutions. The site is basically for ticket creation. When a ticket is created, we save the data in the Firestore database. After that, we fetch it to the screen so that all created tickets are displayed on the screen. You can find the project for this tutorial here.
How Error Boundaries Work
Error boundaries in Svelte encapsulate other components and provide a controlled mechanism for handling and recovering from errors within their subtree. They act as a protective barrier, preventing the propagation of errors to the entire application and allowing for graceful error handling. In a Svelte project, error boundaries involve wrapping components or sections of the application with an error boundary component that captures the error and takes control of the error handling process whenever an error occurs within the subtree of the error boundary. To set up this error boundary, I will declare a writable store named error and initialize it with a null value.
// authStore.js
import { writable } from 'svelte/store';
import { auth } from './Firebase';
export const user = writable(null);
export const error = writable(null); //add this line
...
Next, we create a file called ErrorBoundary.svelte, and there we will paste in the following code.
<script>
 import { error } from "./authStore";
 export let tryAgain;
 $error = null;
 const setError = (err) => {
  $error = err;
  console.error("Error caught by ErrorBoundary:", $error);
 };
</script>
{#if $error}
 <div>
  <h2 style="color: red;">Something went wrong!</h2>
  <p>{$error.message}</p>
  <!-- <button on:click={tryAgain}>Try Again</button> -->
 </div>
{:else}
 <slot />
{/if}
The above code snippet begins by importing the error writable store from the authStore.js file. Then, it initializes a variable $error with null. Please note that in Svelte, prefixing a writable store with $ allows the component to access the store’s value directly, so $error represents the current value of the imported error store. A function setError is defined that takes an error object err, sets the value of the $error variable to err, and consequently changes the value of the error store. It will also log the error to the console. Now with conditional rendering, based on the value of $error, the HTML is displayed. If $error is not null, the error’s details are displayed, providing feedback to the user, but If $error is null, the
<script>
 ...
 //Add the following imports
 import ErrorBoundary from "./ErrorBoundary.svelte";
 import { error } from "./authStore";
 ...

 const tryAgain = () => {
  // logic to retry the action
 };
 const handleError = (err) => {
  $error = err; // Set the error using the error store
 };
 const setError = (err) => {
  $error = err; // Set the error in the store
  console.error("Error caught:", err);
 };
 // Simulate an error for demonstration purposes
 setTimeout(() => handleError(new Error("Test Error")), 10000);
 // Function to create a new ticket
 const createTicket = async () => {
  try {
    ...
  } catch (err) {
   setError(err); // Use the setError function from ErrorBoundary
  }
 };
 // Function to fetch all the tickets
 const fetchTickets = async () => {
  try {
   ...
  } catch (err) {
   setError(err); // Use the setError function from ErrorBoundary
  }
 };
 onMount(fetchTickets);
</script>
Now, update the HTML component with the code below.
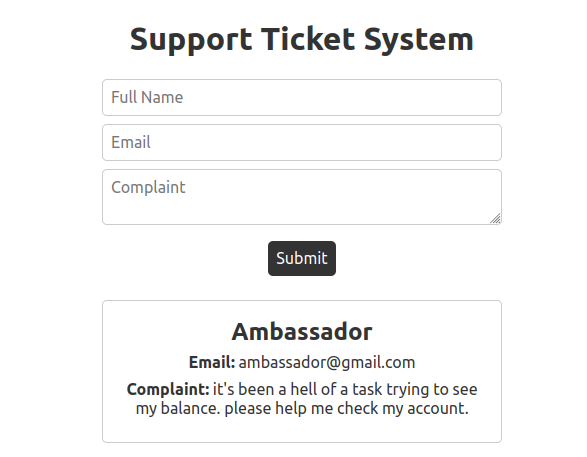
<main>
 <ErrorBoundary {tryAgain}>
  <form on:submit|preventDefault={createTicket}>
   <input
    type="text"
    placeholder="Full Name"
    bind:value={fullName}
    required
   />
   <input type="email" placeholder="Email" bind:value={email} required />
   <textarea placeholder="Complaint" bind:value={complaint} required />
   <button type="submit">Submit</button>
  </form>
 </ErrorBoundary>
 ...
</main>
Now, we should throw in an error to test the error boundary. To do that, we have already added a function to throw an error after 10 seconds,, so we should have this.
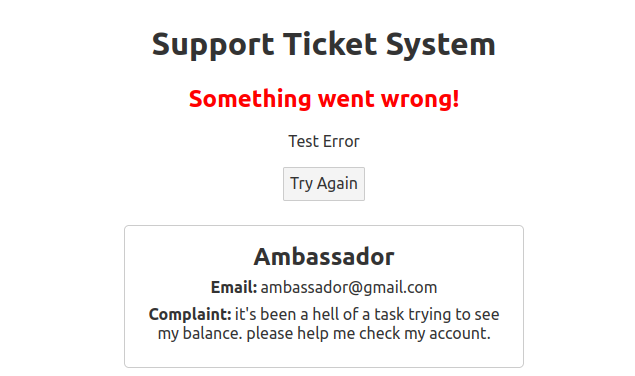 As you can see, the error component replaced the form component. In this case, you should consider adding a “Try Again” button.
Utilizing Global Event Listeners for Error Handling
Global event listeners are event handler mechanisms in Svelte that allow you to capture and handle global events, outside the scope of specific components. They enable you to listen for events at the global level, such as window or document events, and perform actions based on those events.
To apply the established concept to catch errors, we will need to do three things. One, we will need to set up the listeners to listen for the errors, then we need to set what should be done in a case where there is an error, and finally, add it to the main.js file, which is the entry file of our svelte component.
The first step, hence, is to create a javascript file called globalErrorListeners.js, and in the file, add the following code to define the errors to be listened for and the action to be taken in case of an error. The action we will trigger in this tutorial is logging the error to the console.
// Global Error Listener for Uncaught Exceptions
window.onerror = function (message, source, lineno, colno, error) {
 console.log("Global error:", { message, source, lineno, colno, error });
 // You can add additional error handling or reporting logic here
};
// Global Listener for Unhandled Promise Rejections
window.onunhandledrejection = function (event) {
 console.log("Unhandled rejection:", event.reason);
 // You can add additional error handling or reporting logic here
};
Now, in your main.js file, add the following code.
import "./globalErrorListeners.js"; //add this line
import App from "./App.svelte";
const app = new App({
target: document.body,
props: {
name: "world",
},
});
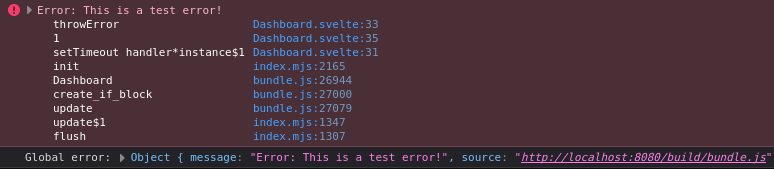
export default app;With that being done, I would add the code below to the script component of the dashboard.svelte file to throw in an error for illustration.
...
 setTimeout(() => {
  function throwError() {
   throw new Error("This is a test error!");
  }
  throwError();
 }, 10000);
...
Now, in the event of an error, we will have our console displaying it like this:
Error Reporting Services
Error reporting services are tools or services that help track, collect, and analyze errors that occur in a software application. They provide insights into the occurrence and nature of errors, allowing developers to identify and address issues more effectively.
In a Svelte project, integrating an error-reporting service involves leveraging a third-party service or library specializing in capturing and reporting errors. These services typically provide APIs or SDKs to integrate into your application code.
The process of using an error reporting service in a Svelte project typically involves the following steps:
Integration: First, choose an error reporting service that suits your requirements. Once selected, you typically follow the service’s documentation to integrate it into your Svelte project. This may involve installing the necessary package or script, configuring it with appropriate settings, and initializing the service.
Error Capture: After integration, the error reporting service automatically captures errors within your application. When an error is encountered, it is reported to the service along with relevant details such as an error message, stack trace, and contextual information.
Error Tracking: The error reporting service collects and aggregates error data from multiple occurrences. It provides a dashboard or interface to view and analyze the reported errors. This includes information such as the frequency of errors, affected areas of the application, and specific error details.
Notifications and Alerts: Error reporting services often provide notification mechanisms to alert developers about critical or high-impact errors. These notifications can be delivered via email, Slack, or other channels, enabling prompt action.
Analysis and Insights: Error reporting services offer features for analyzing error data, such as filtering errors by specific criteria, grouping errors by common patterns, and generating reports. These insights help identify recurring errors, prioritize bug fixes, and improve the overall stability and performance of the application.
There are a handful of error reporting services, but in this tutorial, I will use OpenReplay for the error reporting service. Although OpenReplay is a session replay service, it can also be used to report errors reliably.
To get started with this service, head to their website and create an account. Next, you will need to install their tracker package. They have a straightforward onboarding process that lets you complete the setup. You just need to follow the steps.
Three major steps are the package installation, updating your main.js file with the instantiation code, and adding a method to register the user’s name in the session report.
Now, in the main.js file, add the code below.
import "./globalErrorListeners.js";
import Tracker from '@openreplay/tracker'; //add this import statement
import App from "./App.svelte";
const tracker = new Tracker({
 projectKey: YOUR_PROJECT_KEY,
 __DISABLE_SECURE_MODE: true // because we are running it on localhost
});
tracker.start();
...
export { tracker }; // export the tracker
export default app;
To get the current user’s name, we will update the Auth.svelte component.
<!-- Auth.svelte -->
<script>
 import { tracker } from "./main";
 ...
 const signInWithGoogle = () => {
  signInWithPopup(auth, googleProvider)
   .then((result) => {
    tracker.setUserID(result.user.displayName); //Add this line
    console.log(result);
   })
   .catch((error) => {
    console.error(error);
   });
 };
</script>
After some time, you will notice your dashboard has been updated with the users that have interacted with the website. Also, you can replay and see the errors the user got at different times.
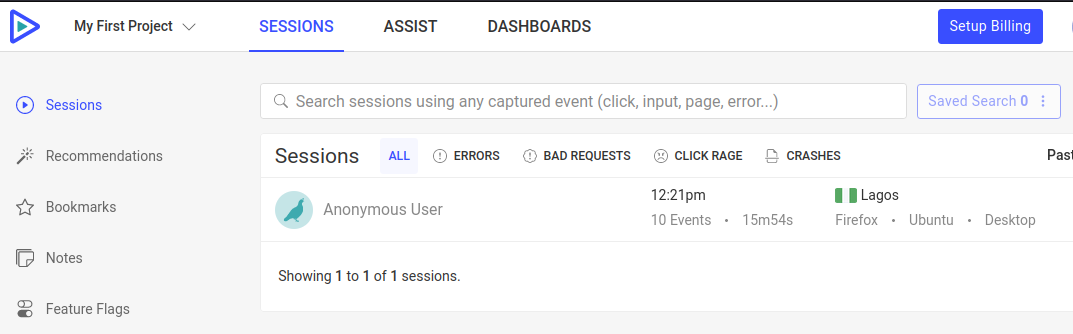 Then, if you replay the report, you will notice the errors the users had faced with some other important details.
 You should be able to set up and utilize these robust error management systems in your Svelte application. As for the complete project of this tutorial, you can get it here on GitHub.
Conclusion
The essence of this tutorial is to introduce and demonstrate how to apply advanced error management techniques in your Svelte project, and I trust it’s been established. Honestly, prioritizing proper error handling has many benefits. With this comprehensive approach, not only would it prevent application crashes and unexpected behavior, but it will also enhance your user experience.
Gain Debugging Superpowers
Unleash the power of session replay to reproduce bugs, track slowdowns and uncover frustrations in your app. Get complete visibility into your frontend with OpenReplay — the most advanced open-source session replay tool for developers.
Star on GitHub12k