
In the fast-paced web development landscape, technologies constantly evolve to provide more efficient, dynamic, and user-friendly experiences. One such innovation that has garnered significant attention is Blazor. This article will discuss this unique technology by outlining its purpose, benefits, and key features that set it apart from traditional web development approaches.

Discover how at OpenReplay.com.
Blazor is a cutting-edge web framework created by Microsoft, enabling web developers to construct engaging and dynamic applications using C# and .NET, departing from the conventional trio of HTML, CSS, and JavaScript. The term “Blazor” is a fusion of “Browser” and “Razor,” the latter being a syntax within ASP.NET that facilitates the generation of dynamic web elements. Notably, Blazor’s standout feature lies in its capacity to facilitate comprehensive web development using C#, either by harnessing Web Assembly or by direct execution within the browser via the WebAssembly-oriented .NET runtime.
Advantages of Blazor
-
Performance: Blazor’s client-side rendering capabilities, powered by WebAssembly, enable highly responsive and performant user interfaces. It strikes a balance between a server-rendered web application and a single-page application (SPA), offering the best of both worlds.
-
Security: By leveraging the security features of
C#and.NET, Blazor helps mitigate common web vulnerabilities, such as cross-site scripting (XSS) attacks. This is particularly crucial for applications dealing with sensitive data. -
Ecosystem and Tooling: Being a Microsoft-backed technology, Blazor seamlessly integrates with Visual Studio and other popular development tools. This integration enhances productivity and provides a familiar environment for developers.
-
Unified Language: With Blazor, developers can use a single language,
C#, throughout the entire stack, from server to client. This leads to a more streamlined development process and reduces the learning curve for those familiar with.NETtechnologies. -
Code Sharing: Blazor allows code sharing between client-side and server-side components, enhancing code reusability and maintainability. This speeds up development and ensures consistency across different parts of the application.
Key Features
-
Razor Syntax: Blazor employs Razor syntax for writing UI components. Razor is intuitive and familiar to ASP.NET developers, making the transition to Blazor smoother.
-
WebAssembly Support: Blazor’s ability to run
C#code directly in the browser via WebAssembly enables the creation of highly interactive web applications with near-native performance. -
Dependency Injection: Blazor offers built-in support for dependency injection, promoting clean and maintainable code by facilitating component communication and sharing of services.
-
Component-Based Architecture: Blazor follows a component-based architecture, allowing developers to create encapsulated and reusable UI components. This enhances modularity and simplifies the development process.
-
Data Binding: Blazor supports two-way data binding, automatically synchronising UI and data without complex event handling.
Understanding Blazor Architecture
Let’s delve into the underpinnings of Blazor’s architecture, its operational modes and constituent elements.
-
Client-Side Blazor: Client-Side Blazor referred to as Blazor WebAssembly, involves running the entire application within the user’s browser. This is facilitated by leveraging WebAssembly, a lower-level virtual machine enabling the efficient execution of code, such as
C#, directly in web browsers. In this setup, the application’s code, encompassing user interface components and business logic, is transferred to the browser for execution. This method offers a dynamic, responsive user experience, enabling developers to utilizeC#and.NETfor client-side and server-side programming tasks. -
Server-Side Blazor: Server-Side Blazor takes an alternate approach by executing the application’s code on the server side. The user interface components are rendered on the server and then transmitted as
HTMLto the browser. User interactions are relayed to the server, where the correspondingC#code is executed. This approach diminishes the amount of code required to be downloaded to the client’s browser, leading to quicker initial loading times. Server-Side Blazor is particularly effective in scenarios requiring low-latency communication with the server or when client devices have limited processing capabilities. -
WebAssembly: WebAssembly, often abbreviated as wasm, is a binary instruction format tailored for execution within web browsers. It facilitates near-native speed code execution within the browser, making it a potent tool for running intricate applications on the web. Blazor’s integration of WebAssembly allows developers to write applications in languages like C#, ensuring efficient execution in web browsers. This effectively bridges the performance gap between web-based and native applications.
-
Razor Components:Razor Components are a cornerstone of Blazor’s architecture, constituting reusable UI elements that encapsulate both visual elements and associated logic. Constructed using the Razor syntax – a fusion of
HTMLandC#– these components serve as modular, maintainable, and interactive segments of a Blazor application. Whether implemented in Client-Side or Server-Side Blazor, Razor Components form the essential building blocks for constructing user interfaces and managing user interactions.
In essence, comprehending Blazor’s architecture entails discerning the distinctions between Client-Side and Server-Side Blazor, appreciating the potency of WebAssembly for web execution, and recognizing the pivotal role that Razor Components play in shaping Blazor’s user interface development methodology. This foundational architecture fundamentally shapes how developers design and deploy contemporary web applications through the innovative technological framework offered by Blazor.
Setting up the Development Environment
Before diving into Blazor development, it’s crucial to configure your development environment properly. This involves installing the necessary tools and frameworks. Typically, you’ll need:
-
.NET Core/.NET 5+: Blazor projects are built on the .NET ecosystem, so ensure you have the appropriate version of .NET Core or .NET installed.
-
IDE (Integrated Development Environment): A popular choice is Visual Studio, which offers robust features for Blazor development. Alternatively, Visual Studio Code with the C# extension can also be used.
-
Blazor Templates: Install Blazor templates using the command-line interface or the IDE’s extensions marketplace. These templates streamline project creation.
Creating a Blazor Project
Creating a Blazor project within Visual Studio Code via the command line is simple. Adhere to these instructions to generate a Client-Side Blazor project:
-
First download
.NET Core SDK(You can download it from https://dotnet.microsoft.com/download/dotnet) -
Next, launch Visual Studio Code on your computer.
-
Open a terminal within Visual Studio and navigate to the directory you want to create the Blazor project in using the following command
cd directory

- Create a Blazor Project: In the terminal, navigate to the directory where you want to create your Blazor project. Then, run the following command to create a Client-Side Blazor project:
dotnet new blazorwasm -n MyBlazorApp
You can replace MyBlazorApp with the desired name for your project. This command will generate a new Blazor project in a folder named MyBlazorApp in the Desktop directory.
-
Navigate to the project folder and Change into the newly created project directory by running
cd MyBlazorApp -
Run the Blazor Project using the following command:
dotnet watch run
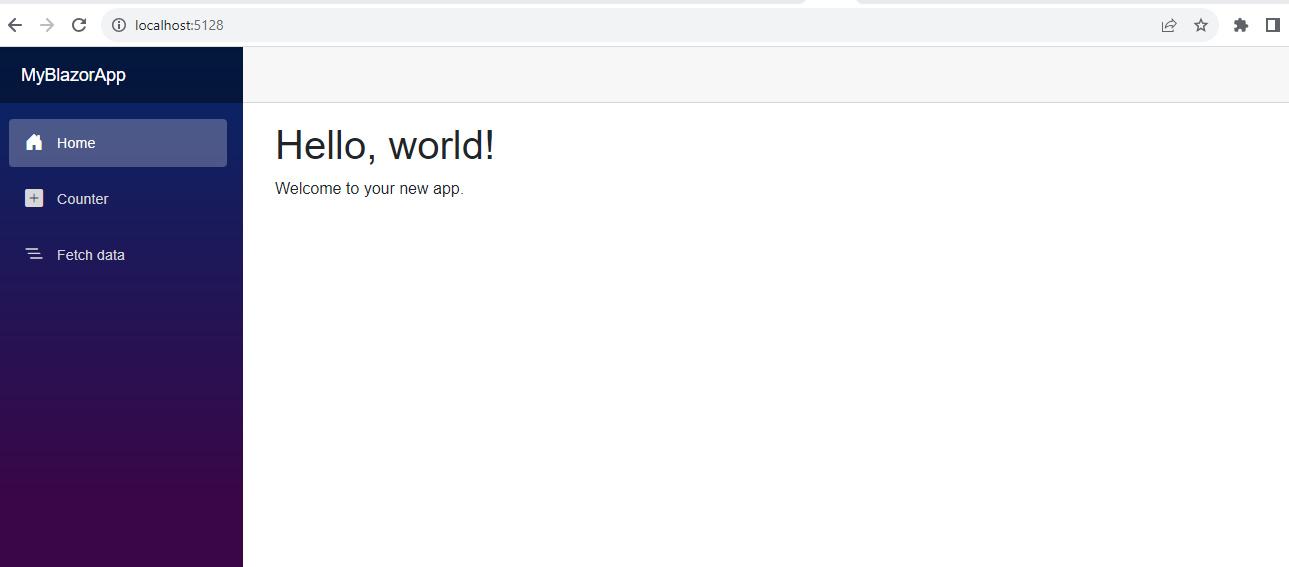
This command compiles and runs the Blazor application. After compilation, you’ll see a URL (usually http://localhost:5000 or similar), although in our case, we have (http://localhost:5128/) in the terminal. Open this URL in your web browser to access your newly created Blazor application.
Designing a simple To-do list with Blazor
Using the following steps, we will design a to-do that allows users to add tasks, mark them as completed, and clear the completed tasks list with Blazor.
Remember to download .NET Core SDK (You can download it from https://dotnet.microsoft.com/download/dotnet).
- Open your terminal and navigate to the directory where you want to create your project; in our case, ‘Desktop’. Run the following command to create a new Blazor WebAssembly project named “ToDoListApp”:
dotnet new blazorwasm -n ToDoListApp
- Navigate to the newly created Project folder with the following command
cd ToDoListApp
- Open the Project in Visual Studio Code (Optional) with the following command
code .
- Navigate to the “Pages folder” and open the
Index.razorfile. Replace the existing content with the code below.
@page "/"

<style>
   .completed-message {
       color: green;
       font-weight: bold;
       margin-left: 10px;
   }
</style>

<h1>To-Do List</h1>

<div class="input-group mb-3">
   <input type="text" class="form-control" @bind="newTask" />
   <div class="input-group-append">
       <button class="btn btn-success" @onclick="AddTask">Add Task</button>
   </div>
</div>

<ul class="list-group">
   @foreach (var task in tasks)
   {
       <li class="list-group-item d-flex justify-content-between">
           <div>@task.Name</div>
           @if (task.IsCompleted)
           {
               <div class="completed-message">Task completed!</div>
           }
           <button class="btn btn-outline-danger" @onclick="() => CompleteTask(task)">Complete</button>
       </li>
   }
</ul>

<button class="btn btn-danger" @onclick="ClearCompletedTasks">Clear Completed</button>
<p>@RemainingTasksCount tasks remaining</p>

@code {
   private string newTask;
   private List<TaskItem> tasks = new List<TaskItem>();

   private class TaskItem
   {
       public string Name { get; set; }
       public bool IsCompleted { get; set; }
       public bool ShowCompletedMessage { get; set; } = false;
   }

   private void AddTask()
   {
       if (!string.IsNullOrWhiteSpace(newTask))
       {
           tasks.Add(new TaskItem { Name = newTask });
           newTask = string.Empty;
       }
   }

   private void CompleteTask(TaskItem task)
   {
       task.IsCompleted = true;
       task.ShowCompletedMessage = true;

       // Hide the completed message after 2 seconds
       Task.Run(async () =>
       {
           await Task.Delay(2000);
           task.ShowCompletedMessage = false;
           StateHasChanged();
       });
   }

   private void ClearCompletedTasks()
   {
       tasks.RemoveAll(task => task.IsCompleted);
   }

   private int RemainingTasksCount
   {
       get { return tasks.Count(task => !task.IsCompleted); }
   }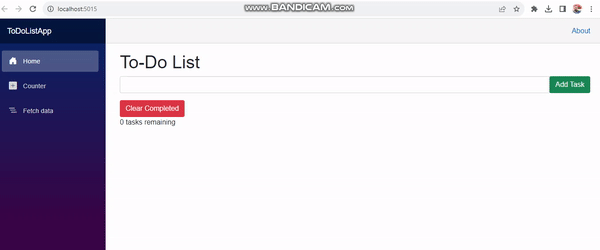
}- To run the application, open your terminal and run the command below
dotnet watch run
We should have an output that looks like this.
- Finally, let us explain the code
MarkupDisplays the title, input field, and buttons.CSS StylingDefines a completed message style.@code SectionContains C# logic.newTaskHolds the new task text.tasksStores the list of tasks.TaskItemDefines a task’s properties.AddTask()Adds a new task.CompleteTask(task)Marks a task as completed, shows a message, and hides it after a delay.ClearCompletedTasks()Removes completed tasks.RemainingTasksCountCalculates and displays the remaining tasks count.
Structure of a Blazor Application
Comprehending the arrangement of a Blazor application holds significant importance for proficient development. A customary Blazor application encompasses the subsequent elements.
-
Pages: Blazor applications are built around pages, which are essential components representing different views or screens. These pages can be Razor Components.
-
Razor Components: These are the building blocks of Blazor applications. They encompass the UI and logic, utilizing Razor syntax to blend HTML and C#.
-
Layouts: Layouts define the overall structure of a page, including shared components like headers, footers, and navigation bars. They provide a consistent look and feel across multiple pages.
-
Routing: Blazor includes a routing system that allows you to navigate between different pages based on URLs. This enables creating single-page applications with different views.
-
Services and Dependency Injection: Blazor applications can utilize services for handling various functionalities. Dependency injection is used to manage these services, promoting modularity and maintainability.
-
Data Binding: Blazor employs data binding to synchronize data between the UI and the underlying data source. This enables dynamic and interactive user interfaces.
Code Reusability and Components
Efficient web development involves maximizing code reusability and creating modular components that can be shared across different parts of an application.
-
Crafting Reusable Components: At the heart of Blazor’s development philosophy is the creation of readily reusable components. These components encapsulate visual elements and underlying logic, forming a self-contained unit to fulfill specific functions or interface requirements. This approach simplifies development, fosters maintainability, and cultivates uniformity throughout the application. Leveraging reusable components facilitates efficient development by enabling deployment in multiple instances, thereby minimizing redundancy.
-
Harnessing Component Parameters: The versatility and customization of reusable components are empowered by component parameters. These parameters enable developers to convey data and configurations to components during their utilization. By fine-tuning parameters, components can be tailored to adapt to distinct scenarios without necessitating alterations to their internal code. Parameter configuration enables customization of appearance, behavior, and content, streamlining development efforts and promoting modular design.
-
Employing Cascading Values and Parameters: Cascading values and parameters offer an avenue for disseminating data and settings across component hierarchies. A higher-level component sets a cascading value, subsequently relayed to child components. This proves particularly valuable when multiple components necessitate access to shared data, obviating the requirement for explicit data transfer through intermediary components. The deployment of cascading parameters mirrors this functionality, enabling the seamless exchange of information among components nested within a specific hierarchy.
Blazor Components
-
Razor Syntax and Components: Razor syntax, a fusion of C# and HTML, is used to construct Blazor Components. This subsection elucidates the seamless integration of code and markup within components, allowing developers to craft UI elements and accompanying logic in a unified manner.
-
Data Binding: Data Binding is a pivotal feature of Blazor Components, enabling automatic synchronization between data and the UI. This section expounds upon the mechanisms through which data is bound to UI elements, ensuring that any changes in data are instantly reflected in the user interface.
-
Event Handling: Effective interaction in Blazor Components is achieved through Event Handling. This subsection delves into how developers can attach event handlers to user actions, allowing the application to respond dynamically to user input.
-
Lifecycle Methods: Lifecycle Methods govern the various stages of a Blazor Component’s existence. From initialization to rendering and destruction, understanding these methods is essential for managing component behavior. This section outlines the lifecycle methods and their significance in Blazor Component development.
Blazor Components form the bedrock of building interactive and dynamic user interfaces within Blazor applications.
State Management
Managing application state is a crucial aspect of web development. Let’s explore the strategies for handling state within Blazor applications.
-
Local State vs. Shared State: Understanding the distinction between Local State (component-specific) and Shared State (accessible across components) is paramount. This subsection sheds light on when to effectively employ each approach to manage the application’s state.
-
Using StateContainer and Services: This part delves into the utilization of StateContainer and services to manage and share state across components. Exploring these mechanisms enables efficient communication and synchronization of state changes.
-
Flux Pattern and Fluxor Library: The Flux pattern, a popular architecture for managing state, finds its application in Blazor through the Fluxor library. This subsection introduces the concept and illustrates how to leverage Fluxor to streamline state management.
Deployment Options
After development, deploying a Blazor application is the next step. This section outlines deployment options for both Client-Side and Server-Side Blazor applications.
-
Deploying Client-Side Blazor: This subsection details the steps and considerations when deploying a Client-Side Blazor application, ensuring it’s accessible to users over the internet.
-
Deploying Server-Side Blazor: For Server-Side Blazor applications, the deployment process differs. This part guides developers through the deployment of Server-Side Blazor, making the application available for users while maintaining optimal performance.
Blazor in Real-World Applications
Blazor’s practical applicability extends beyond theory into real-world scenarios. Let us examine how Blazor is harnessed in diverse applications.
-
Use Cases and Application Scenarios: Blazor finds its footing in various use cases and application scenarios. This subsection delves into these scenarios, such as creating single-page applications, building interactive dashboards, crafting data visualization tools, and more. Understanding these use cases sheds light on Blazor’s versatility and adaptability across different domains.
-
Performance Considerations: Performance is a pivotal concern in web development. This part explores the performance considerations when employing Blazor. It delves into factors like loading times, execution speed, and memory consumption, helping developers make informed decisions about utilizing Blazor in scenarios that demand optimal performance.
-
Pros and Cons of Adopting Blazor: Like any technology, Blazor presents both advantages and challenges. This subsection provides an objective assessment of the pros and cons of adopting Blazor. It highlights benefits such as code reusability, unified development stack, and enhanced security while also addressing potential downsides like initial learning curve and performance trade-offs.
-
Examples of sites using Blazor
Conclusion
In the swiftly evolving realm of web development, Blazor emerges as an enticing contender. This section concludes our exploration by condensing the key insights drawn from this document.
As we’ve traversed Blazor’s architecture, components, state management, deployment, and real-world applications, we’ve brought to light the framework’s capacity to revolutionize the approach to constructing web applications. Blazor’s capability to seamlessly integrate C# across the entire stack, its foundation on component-based principles, and its options for both Client-Side and Server-Side deployment empower developers to craft contemporary, dynamic applications with efficacy and adaptability.
As you embark on your personal Blazor endeavors, it’s vital to acknowledge that Blazor transcends being merely a technology; it represents a toolkit of boundless prospects. Its prowess resides in its potential to streamline development processes, elevate reusability, and cater to a range of application scenarios. Armed with this understanding, you stand poised to harness Blazor’s capabilities to fabricate captivating and impactful web applications that align with the demands of the ever-evolving digital landscape.
Gain Debugging Superpowers
Unleash the power of session replay to reproduce bugs, track slowdowns and uncover frustrations in your app. Get complete visibility into your frontend with OpenReplay — the most advanced open-source session replay tool for developers.
Star on GitHub12k