Bun is the new JavaScript runtime that competes with Node and Deno, offering greater speed plus several other features. This article will show how to use Bun to create a full API.

Discover how at OpenReplay.com.
Bun.js is a new JavaScript runtime environment similar to Node.js and Deno but faster and more self-contained. It is written in Zig, a fast low-level language, and utilizes the JavaScriptCore Engine, which powers Webkit browsers like Safari. Combining Zig and the JavaScriptCore engine has made Bun one of the fastest JavaScript runtimes.
Additionally, Bun is not limited to being just a runtime. It serves as a package manager, a test runner, and a bundler. In this tutorial, you will learn how to create a simple recipe-sharing API with Bun using Elysia, PostgreSQL, and Prisma.
Setting up your Development Environment
To use Bun, you have to install it on your system. Run the command below to install Bun on macOS, Linux, or Windows Subsystem for Linux (WSL).
curl -fsSL https://bun.sh/install | bashCurrently, Bun only has an experimental build for Windows that only supports the runtime.
After installing Bun, run the command below to create and cd into your project directory:
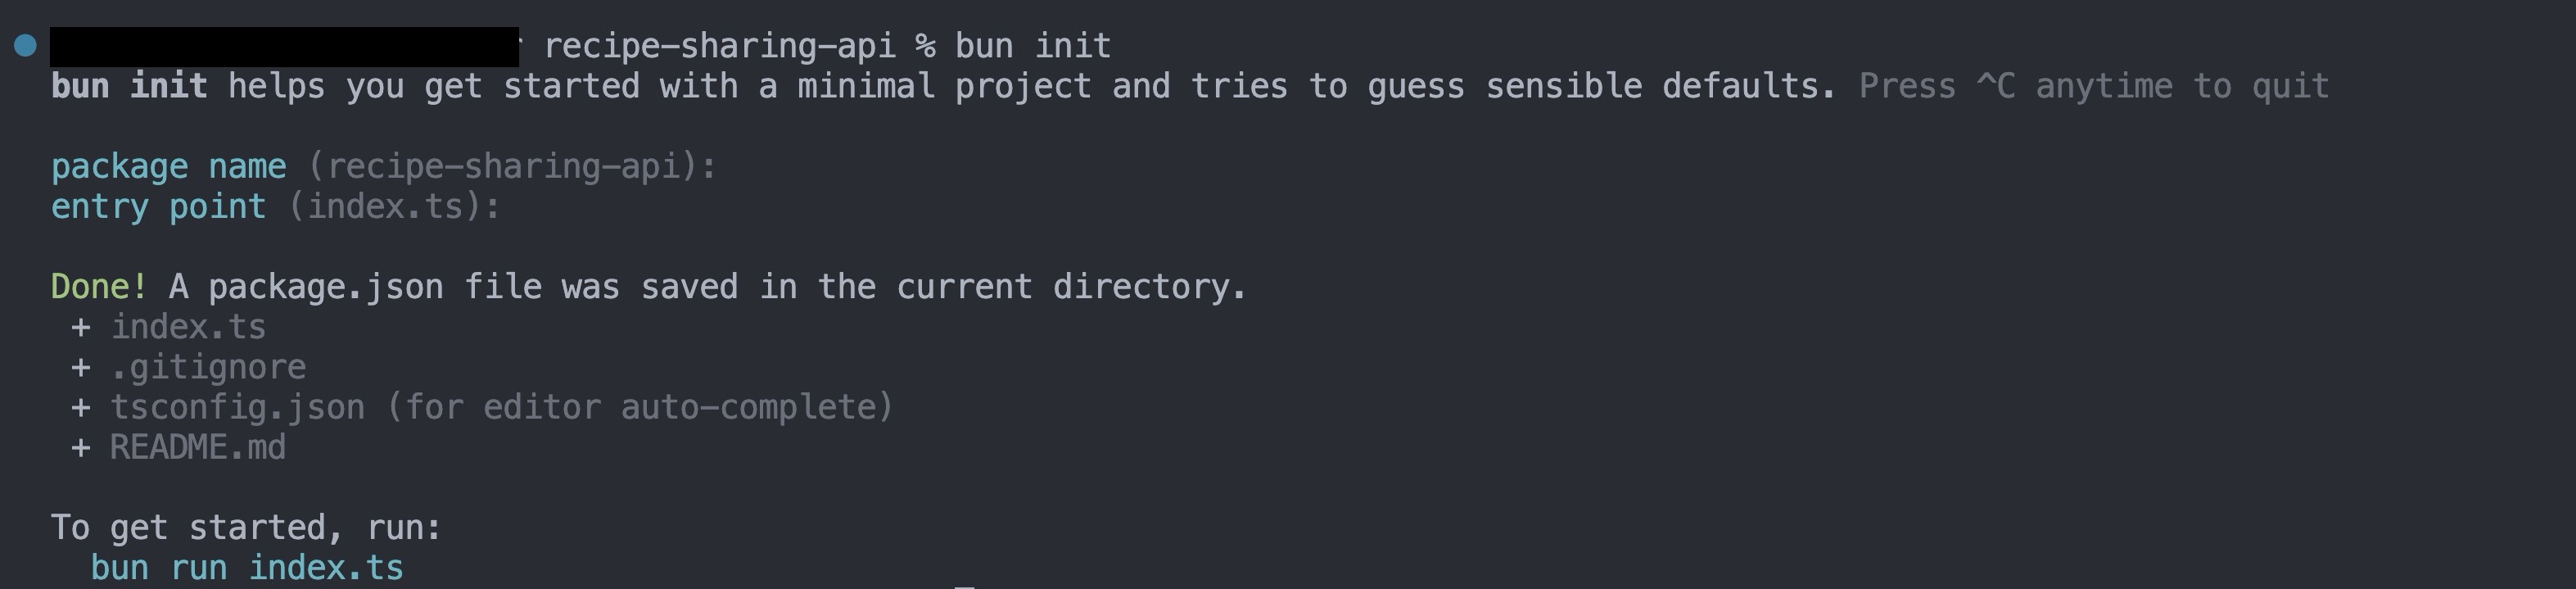
mkdir recipe-sharing-api && cd recipe-sharing-apiNext, run the command below to initialize a new Bun app:
bun initThe command above will prompt you to enter your application’s package name and entry point. You can press the ENTER key to choose the defaults, as shown in the image below.
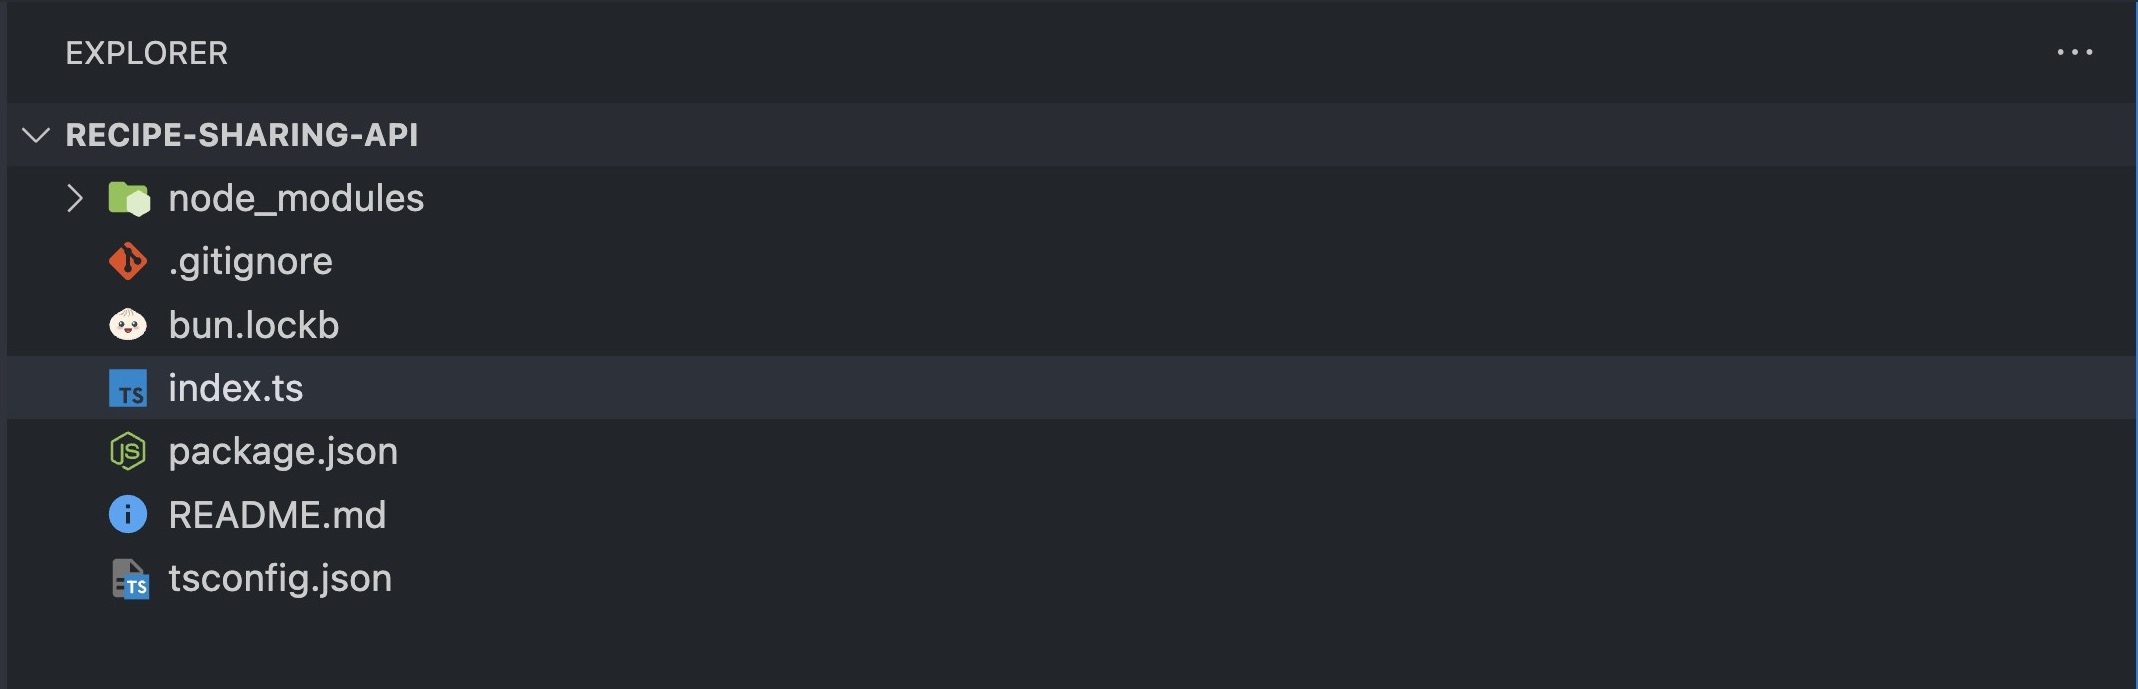
Your current directory should look like the image below.
Next, install the required dependencies by running the command below:
bun add elysia @elysiajs/cookie prisma @prisma/client dotenv pg jsonwebtoken@8.5.1Install their corresponding types by running:
bun add -d @types/jsonwebtokenThe dependencies you installed are:
- Elysia: Elysia is a web framework for Bun that simplifies working with Bun, similar to what Express does for Node.js.
- Prisma: Prisma is an object-relational mapper (ORM) for JavaScript and TypeScript.
- Dotenv: Dotenv is an NPM package that loads environmental variables from a
.envfile intoprocess.env. - PG: PG is the native driver for PostgreSQL.
- jsonwebtoken@8.5.1: A package that implements the JWT standard (version 8.5.1).
Setting up your Database
The Recipe Sharing API will involve three tables: Recipes, Users, and Comments. Users can create and share recipes, view recipes from others, and comment on recipes.
Run the command below to initialize Prisma with PostgreSQL in your application:
bunx prisma init --datasource-provider postgresqlThe command above creates a .env file and a Prisma folder. You will find a schema.prisma file in the Prisma folder. This file contains the configuration for your database connection.
Next, open your .env file and replace the dummy database connection URI with your database’s connection URI.
Creating Prisma Models
Prisma models represent tables in your database. Each model in the Prisma schema corresponds to a table in the database, defining its structure.
Open your schema.prisma file and add the code block below to create the User model.
model User {
  id        Int      @id @default(autoincrement())
  email     String   @unique
  name      String?
  password  String
  createdAt DateTime @default(now())
  updatedAt DateTime @updatedAt

  recipies  Recipe[]

  comments  Comment[]
}
The code block above represents your User model. It contains all the user information necessary for your application, such as the email, name, password, recipes, and comments.
When a new user signs up, you will create a new instance of the User model, and when they try to log in, you will fetch the instance and compare the stored information with the information sent in the login request.
Next, add the code block below to your schema.prisma file to create the Recipe model:
model Recipe {
  id        Int      @id @default(autoincrement())
  title     String
  body      String
  createdAt DateTime @default(now())
  updatedAt DateTime @updatedAt

  user      User     @relation(fields: [userId], references: [id])
  userId    Int

  comments  Comment[]
}
The code block above represents your Recipe model. It contains all the recipe information necessary for your application, such as the title, body, and information about the user who created the recipe.
When a user creates a recipe, you create a new instance of the Recipe model.
Then, add the code block below to your schema.prisma file to create the Comment model:
model Comment {
  id        Int      @id @default(autoincrement())
  body      String
  createdAt DateTime @default(now())
  updatedAt DateTime @updatedAt

  user      User     @relation(fields: [userId], references: [id])
  userId    Int

  recipe   Recipe  @relation(fields: [recipeId], references: [id])
  recipeId Int
}
The code block above represents your Comment model. It contains all the comment information necessary for your application, including the body, date, the user that created the comment, and the recipe the comment is for.
When a user comments on a recipe, you create a new instance of the Comment model.
Finally, run the command below to generate and run a migration:
bunx prisma migrate dev --name initYou can replace init with any name of your choice.
Running the command above will ensure that your Prisma schema is in sync with your database schema.
Creating Services and Controllers
Creating services and controllers in your project helps organize the code and make it more maintainable.
Create a controllers and a services folder in your project’s root directory by running the command below:
mkdir controllers && mkdir servicesNext, create the following files in your services folder:
user.service.ts: This file contains all the logic related to signing up and signing in as a user.recipe.service.ts: This file contains all the logic for creating and viewing recipes.comment.service.ts: This file contains all the logic for commenting on recipes.auth.service.ts: This file contains the logic for authenticating a user.
Then, create the following files in your controllers folder:
comments.controller.ts: This file contains all the controller logic for comments.recipe.controller.ts: This file contains all the recipe controller logic.user.controller.ts: This file contains all the controller logic for user authentication.
Implementing Service Logic
Services are distinct units of functionality or logic designed to perform specific tasks.
To implement this, open your auth.service.ts file and add the code block below.
//auth.service.ts
import jwt from "jsonwebtoken";

export const verifyToken = (token: string) => {
  let payload: any;

  //Verify the JWT token
  jwt.verify(token, process.env.JWT_SECRET as string, (error, decoded) => {
    if (error) {
      throw new Error("Invalid token");
    }

    payload = decoded;
  });

  return payload;
};

export const signUserToken = (data: { id: number; email: string }) => {
  //Sign the JWT token
  const token = jwt.sign(
    {
      id: data.id,
      email: data.email,
    },
    process.env.JWT_SECRET as string,
    { expiresIn: "1d" }
  );

  return token;
};
The code block above exports two functions: verifyToken and signUserToken. The verifyToken function takes a user’s access token and checks its validity. If it is valid, it decodes the token and returns the information contained in the token else, it throws an error.
The signUserToken function takes a user’s data as a payload, creates, and returns a JWT, valid for one day.
Next, open your user.service.ts file and add the code block below to it:
//user.service.ts
import { prisma } from "../index";
import { signUserToken } from "./auth.service";

export const createNewUser = async (data: {
  name: string;
  email: string;
  password: string;
}) => {
  try {
    const { name, email, password } = data;

    //Hash the password using the Bun package and bcrypt algorithm
    const hashedPassword = await Bun.password.hash(password, {
      algorithm: "bcrypt",
    });

    //Create the user
    const user = await prisma.user.create({
      data: {
        name,
        email,
        password: hashedPassword,
      },
    });

    return user;
  } catch (error) {
    throw error;
  }
};

export const login = async (data: { email: string; password: string }) => {
  try {
    const { email, password } = data;

    //Find the user
    const user = await prisma.user.findUnique({
      where: {
        email,
      },
    });

    if (!user) {
      throw new Error("User not found");
    }

    //Verify the password
    const valid = await Bun.password.verify(password, user.password);

    if (!valid) {
      throw new Error("Invalid credentials");
    }

    //Sign the JWT token
    const token = signUserToken({
      id: user.id,
      email: user.email,
    });

    return {
      message: "User logged in successfully",
      token,
    };
  } catch (error) {
    throw error;
  }
};
The code block above exports two functions, createNewUser and login. The createNewUser function accepts a user’s name, email, and password. It hashes the password using Bun’s built-in password module and creates a new user with the provided information.
The login function takes a user’s credentials and validates them against the records stored in the database. If they match, it creates an access token for the user; otherwise, it throws an error.
Next, open your recipe.service.ts file and add the code block below.
//recipe.service.ts
import { prisma } from "../index";

export const createRecipe = async (data: {
  title: string;
  body: string;
  userId: number;
}) => {
  const { title, body, userId } = data;

  //Create the recipe
  const recipe = await prisma.recipe.create({
    data: {
      title,
      body,
      userId,
    },
  });

  return recipe;
};

export const getAllRecipes = async () => {
  //Get all recipes
  const recipes = await prisma.recipe.findMany({
    include: {
      user: true,
      comments: true,
    },
  });

  return recipes;
};

export const getRecipeById = async (id: number) => {
  //Get recipe by id and include the user
  const recipe = await prisma.recipe.findUnique({
    where: {
      id,
    },
    include: {
      user: true,
    },
  });

  return recipe;
};
The code block above exports three functions: createRecipe, getAllRecipies, and getRecipeById.
The createRecipe function creates a new recipe from the data passed as an argument and returns it. The getAllRecipies function retrieves and returns all the recipes in the database. The getRecipeById function gets a recipe based on the id passed as an argument and returns it.
Next, open your comments.service.ts file and add the code block below.
//comments.service.ts
import { prisma } from "../index";

export const createComment = async (data: {
  body: string;
  recipeId: number;
  userId: number;
}) => {
  try {
    const { body, recipeId, userId } = data;

    //Create the comment for the recipe with the given id
    const comment = await prisma.comment.create({
      data: {
        body,
        userId,
        recipeId: recipeId,
      },
    });

    return comment;
  } catch (error: any) {
    throw error;
  }
};

export const getAllCommentsForRecipe = async (recipeId: number) => {
  //Get all comments for the recipe with the given id
  const comments = await prisma.comment.findMany({
    where: {
      recipeId,
    },
    include: {
      user: true,
    },
  });

  return comments;
};
The code block above exports two functions, createComment and getAllCommentsForRecipe. createComment creates a new comment for a particular recipe, while getAllCommentsForRecipe returns all the comments for a particular recipe.
Implementing Controller Logic
Unlike Express.js, which uses a request and response object to handle requests, Elysia uses a context object.
The context object provides methods similar to Express’s request and response objects. Additionally, Elysia automatically maps the return value of your controller function into a response and returns it to your client.
To implement your controller logic, open your user.controller.ts file and add the code block below.
//user.controller.ts
import Elysia from "elysia";
import { createNewUser, login } from "../services/user.service";

export const userController = (app: Elysia) => {
  app.post("/signup", async (context) => {
    try {
      const userData: any = context.body;

      const newUser = await createNewUser({
        name: userData.name,
        email: userData.email,
        password: userData.password,
      });

      return {
        user: newUser,
      };
    } catch (error: any) {
      return {
        error: error.message,
      };
    }
  });

  app.post("/login", async (context) => {
    try {
      const userData: any = context.body;

      const loggedInUser = await login({
        email: userData.email,
        password: userData.password,
      });

      return loggedInUser;
    } catch (error: any) {
      console.log(error);
      return {
        error: error.message,
      };
    }
  });
};
The code block above implements the controller logic for /signup and /login.
When a user makes a POST request to /signup, your controller will extract the request body from the context object (context.body) and pass it to the createNewUser function you created in your users.service.ts file.
When a user makes a POST request to /login, your controller will extract the request body from the context body and pass the email and password to the login function. If the user details are correct, the controller returns a success message and the access token.
Next, open your recipe.controller.ts file and add the code block below.
//recipe.controller.ts
import Elysia from "elysia";
import { createRecipe, getAllRecipes } from "../services/recipe.service";
import { verifyToken } from "../services/auth.service";

export const recipeController = (app: Elysia) => {
  app.post("/create-recipe", async (context) => {
    try {
      const authHeader = context.headers["authorization"];
      const token = authHeader && authHeader.split(" ")[1];

      if (!token) {
        throw new Error("Invalid token");
      }

      const verifiedToken = verifyToken(token as string);

      const recipeData: any = context.body;

      const newRecipe = await createRecipe({
        title: recipeData.title,
        body: recipeData.body,
        userId: verifiedToken?.id,
      });

      return {
        recipe: newRecipe,
      };
    } catch (error: any) {
      return {
        error: error.message,
      };
    }
  });

  app.get("/recipes", async () => {
    try {
      const recipes = await getAllRecipes();

      return recipes;
    } catch (error: any) {
      return {
        error: error.message,
      };
    }
  });
};
The code block above implements the controller logic for /create-recipe and /recipes.
When a user makes a POST request to /create-recipe, your controller will check if the user has a valid access token (check if the user is logged in). If the user doesn’t have an access token or if the token is invalid, your controller will throw an error.
If the token is valid, your controller will extract the recipe details from the context object and pass it to your createRecipe function.
When a user makes a GET request to /recipes, your controller calls your getAllRecipes function and returns all the recipes.
Next, open your comments.controller.ts and add the code block below.
//comments.controller.ts
import Elysia from "elysia";
import {
  createComment,
  getAllCommentsForRecipe,
} from "../services/comments.service";
import { verifyToken } from "../services/auth.service";

export const commentController = (app: Elysia) => {
  app.post("/:recipeId/create-comment", async (context) => {
    try {
      const authHeader = context.headers["authorization"];
      const token = authHeader && authHeader.split(" ")[1];
      const recipeId = context.params.recipeId;

      if (!token) {
        throw new Error("Invalid token");
      }

      const verifiedToken = verifyToken(token as string);

      const commentData: any = context.body;

      const newComment = await createComment({
        body: commentData.body,
        recipeId: +recipeId,
        userId: verifiedToken?.id,
      });

      return newComment;
    } catch (error: any) {
      return {
        error: error.message,
      };
    }
  });

  app.get("/:recipeId/comments", async (context) => {
    try {
      const recipeId = context.params.recipeId;

      const comments = await getAllCommentsForRecipe(+recipeId);

      return {
        comments,
      };
    } catch (error: any) {
      return {
        error: error.message,
      };
    }
  });
};
The code block above implements the controller logic for /:recipeId/create-comment and /:recipeId/comments.
When a user makes a POST request to /:recipeId/create-comment, your controller checks if the user is logged in, if they are, it extracts the comment details from the context object and passes it to your createComment function.
When a user makes a GET request to /:recipeId/comments, your controller extracts the recipeId from the context object (context.params.recipeId) and passes it as an argument to your getAllCommentsForRecipe after converting it to a number using explicit type coercion.
Setting up your Bun-Elysia Server
After creating your services and controllers, you must set up a server to handle the incoming requests.
To create a Bun-Elysia server, open your index.ts file and add the code block below.
//index.ts
import Elysia from "elysia";
import { recipeController } from "./controllers/recipe.controller";
import { PrismaClient } from "@prisma/client";
import { userController } from "./controllers/user.controller";
import { commentController } from "./controllers/comments.controller";

//Create instances of prisma and Elysia
const prisma = new PrismaClient();
const app = new Elysia();

//Use controllers as middleware
app.use(userController as any);
app.use(recipeController as any);
app.use(commentController as any);

//Listen for traffic
app.listen(4040, () => {
  console.log("Server is running on port 4040");
});

export { app, prisma };
The code block above imports all your controllers, the elysia framework, and PrismaClient. It also creates instances of Prisma and Elysia and registers your controllers as middleware to route all incoming requests to the right handlers.
Then, it listens for incoming traffic on port 4040 and exports the Elysia and Prisma instances to the rest of your application.
Finally, run the command below to start up your application:
bun --watch index.tsThe command above starts up your Bun application in watch mode.
Conclusion
In this article, you explored how to build a simple API with Bun, Elysia, Prisma, and Postgres. You’ve learned to install and configure Bun, structure a database, and implement modular services and controllers for efficient code management. You can test the API you built using any API testing tool like Postman or Insomnia.
Gain Debugging Superpowers
Unleash the power of session replay to reproduce bugs, track slowdowns and uncover frustrations in your app. Get complete visibility into your frontend with OpenReplay — the most advanced open-source session replay tool for developers.
Star on GitHub12k