Authentication and DB access with Next, Prisma, and MongoDB

Building modern full-stack applications has gotten easier for frontend developers with new technologies and tools. With these, we can build frontend applications with server-side capabilities with frameworks like Next.js. We can also abstract the complex details of interfacing with a database using an ORM like Prisma. In this tutorial, we’ll learn how to build a full-stack application with authentication and CRUD functionality using Next.js, Prisma & MongoDB. We’ll explain these technologies and related concepts and see how we can put these technologies together to build an application.
Prisma
Prisma is a next-generation object-relational mapper (ORM) that can be used to access a database in Node.js and TypeScript applications. We’ll use Prisma to interact with our MongoDB database to CREATE, READ, UPDATE and DELETE notes, create users in our database, and define the schema for users and notes.
Cool, but what’s an ORM, and why do we need Prisma to access our database? Object Relational Mapping is a technique used to access and manage relational databases using an object-oriented programming language (like JavaScript). Prisma ORM works for MongoDB too, which is the document-based database that we’ll be using in the article. ORMs let you model your application data by mapping classes to tables in the database, and instances of classes are mapped to rows in the tables. In Prisma, though, which takes a somewhat different approach from other traditional ORMs, the application models are defined in your Prisma schema.
Next, let’s take a look at MongoDB.
MongoDB
According to Guru99:
MongoDB is a document-oriented NoSQL database used for high-volume data storage. Instead of using tables and rows as in the traditional relational databases, MongoDB uses collections and documents. Documents consist of key-value pairs, the basic unit of data in MongoDB. Collections contain sets of documents which is the equivalent of relational database tables. —>
MongoDB is a No-SQL database that stores data in documents in a JSON-like format. Collections are a set of documents equivalent to a table in a relational database. This is where we’ll store our data. You can read a little more on MongoDB at this post from Guru99.
Next.js
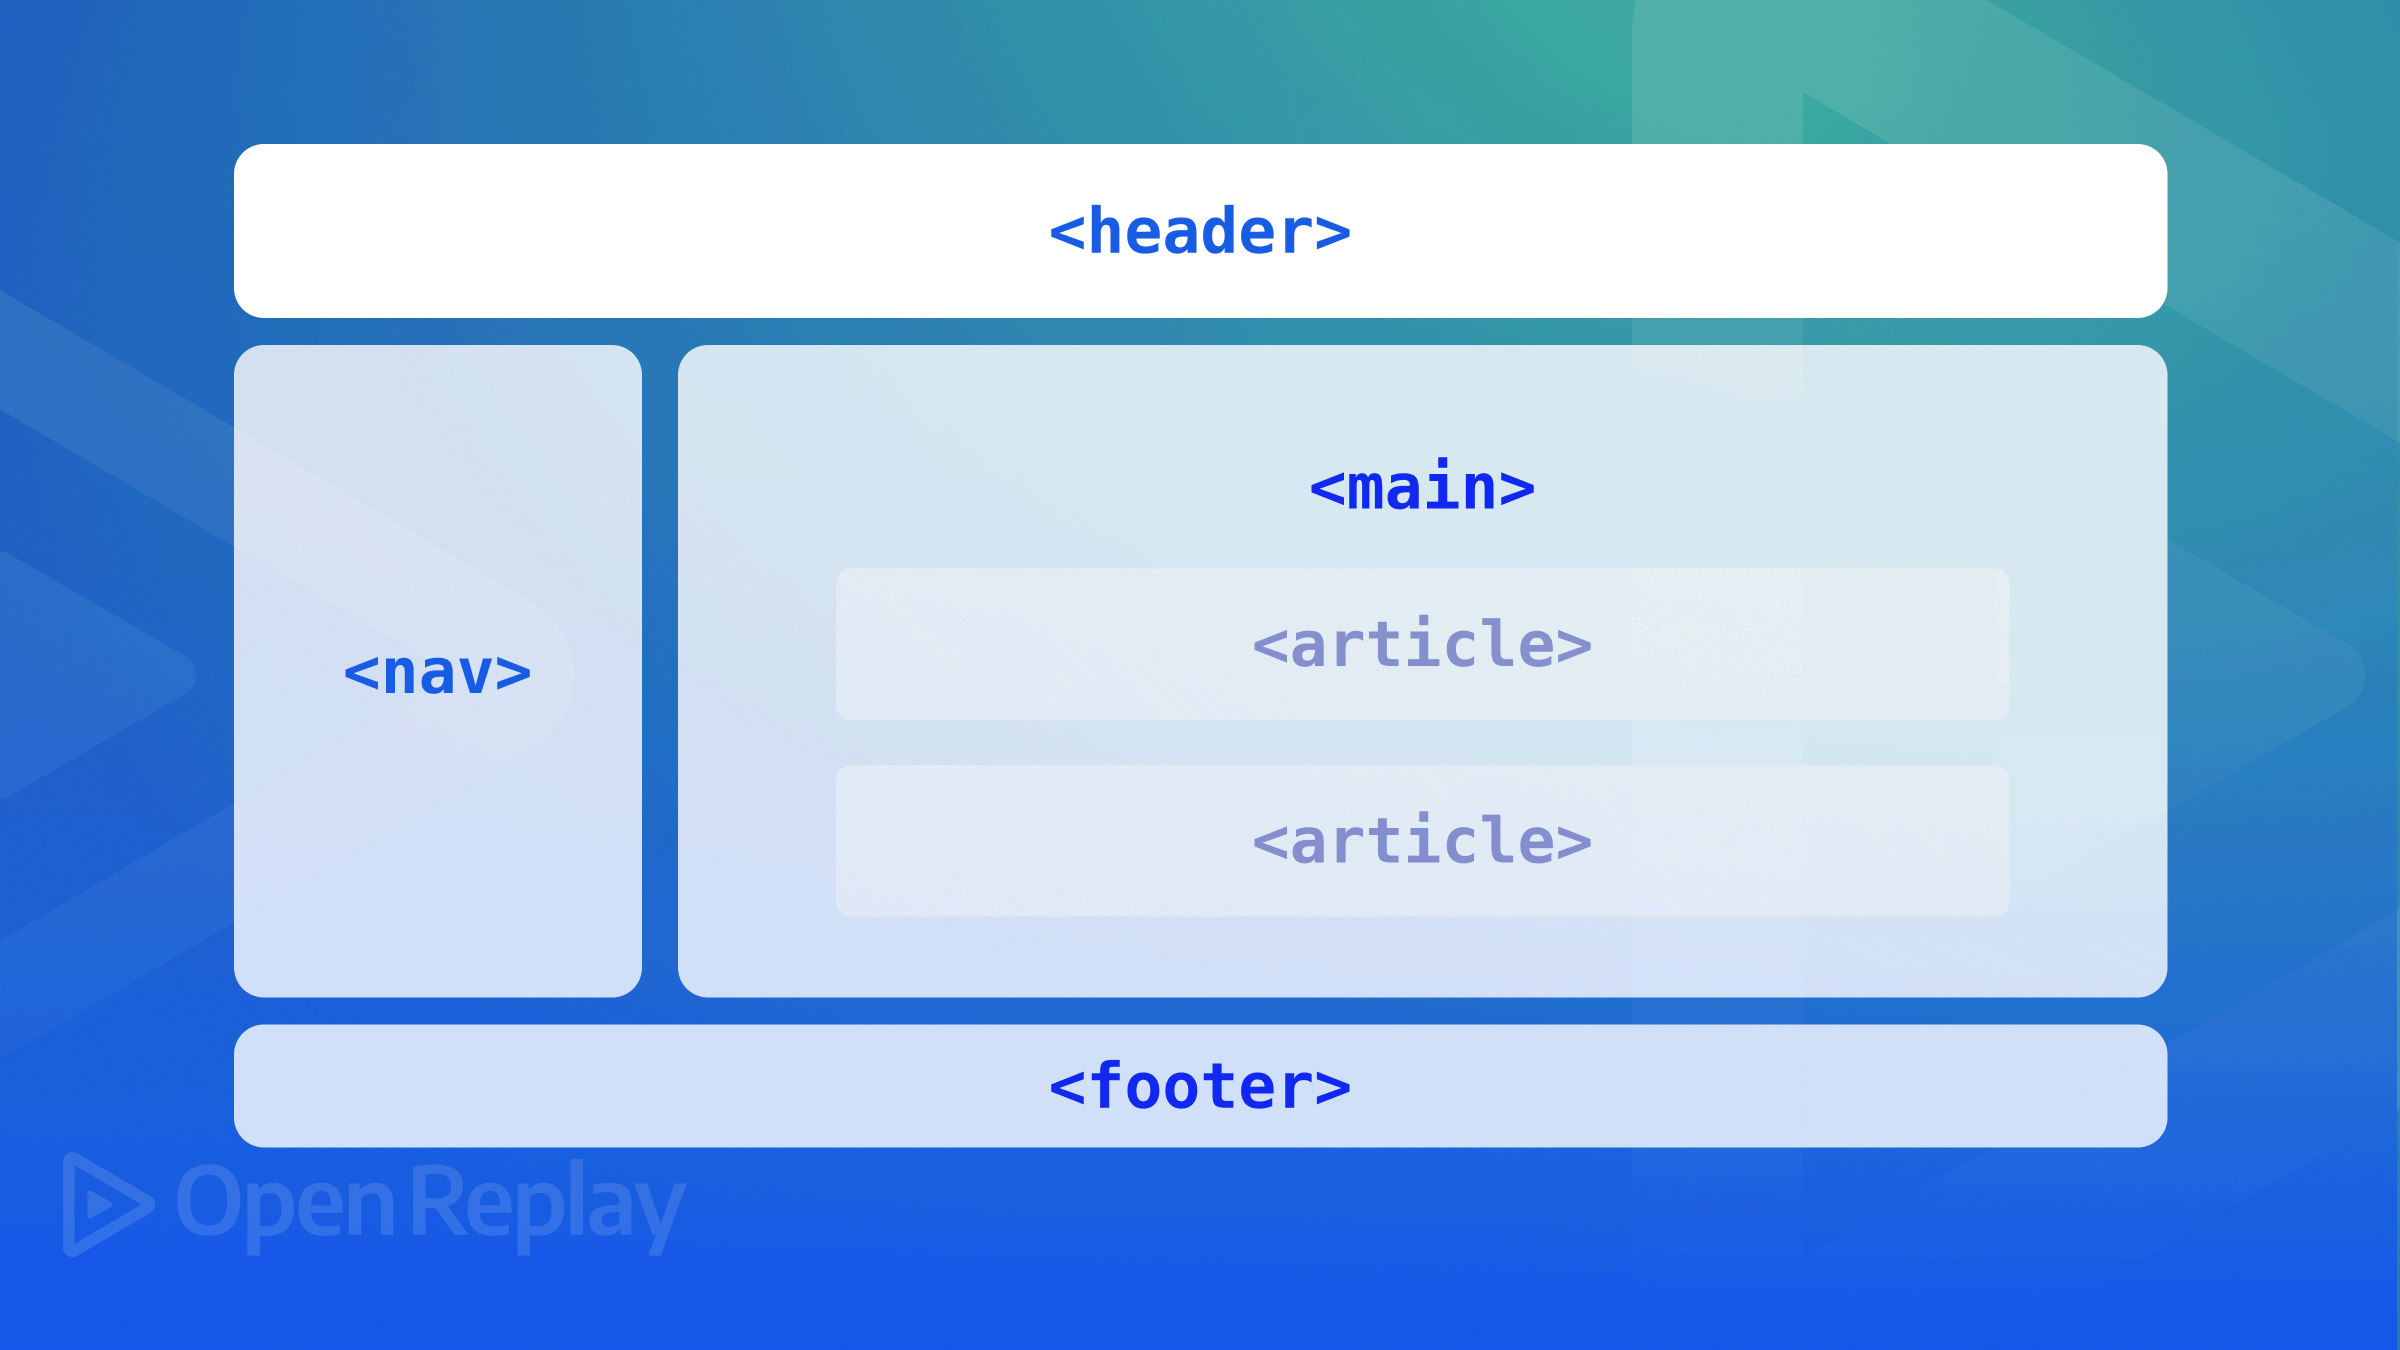
Next.js is an open-source React framework that makes it easier to build production-ready react applications by providing multiple features like server-side rendering and static-site generation, which renders the application on the server and hydrates (add the JavaScript functionality) on the client (browser). Next.js also includes features like API Routes, File-system Routing, Fast Refresh, Built-in CSS Support, Meta tags, and many more.
Let’s dive into building our application.
Prerequisites
To follow along and complete this tutorial, you’ll need the following:
- Basic knowledge of JavaScript, React and Next.js
- Node.js installed; I’ll be using v16.13.0
- A MongoDB Database. Make sure that your MongoDB deployment is configured with replica sets to be able to integrate with Prisma. You can launch a free instance of MongoDB on MongoDB Atlas, which has replica set support out-of-the-box. You can also convert standalone to replica set if you want to work with MongoDB locally.
- A Google account and access to the Google Cloud Console
- If you are using VSCode, I recommend downloading the Prisma VSCode Extension
Setting up the Frontend
To save time and get into the core purpose of this tutorial, we’ll use a simple starter with basic functionality and components built-in. This starter comes with TailwindCSS and the heroicons library. We’ll explore the starter project structure, functionalities, and components before integrating with NextAuth, Prisma, and MongoDB. On your machine, clone the starter repo, and install dependencies:
git clone https://github.com/miracleonyenma/next-notes-app-starter.git

# cd into the directory
cd next-notes-app

# install dependencies
yarn
Once installed, our directory structure should look something like this:
📦next-notes-app
  ┣ 📂node_modules
  ┣ 📂components
  ┃ ┣ 📜Editor.js
  ┃ ┣ 📜NotesList.js
  ┃ ┗ 📜SiteHeader.js
  ┣ 📂layouts
  ┃ ┗ 📜default.js
  ┣ 📂modules
  ┃ ┣ 📜AppContext.js
  ┃ ┗ 📜RandomID.js
  ┣ 📂pages
  ┃ ┣ 📂api
  ┃ ┃ ┗ 📜hello.js
  ┃ ┣ 📂[user]
  ┃ ┃ ┗ 📜index.js
  ┃ ┣ 📜index.js
  ┃ ┗ 📜_app.js
  ┣ 📂public
  ┃ ┣ 📜favicon.ico
  ┃ ┗ 📜vercel.svg
  ┣ 📂styles
  ┃ ┣ 📜Editor.css
  ┃ ┣ 📜globals.css
  ┃ ┣ 📜Home.module.css
  ┃ ┣ 📜NoteList.css
  ┃ ┗ 📜SiteHeader.css
  ┣ 📜.eslintrc.json
  ┣ 📜.gitignore
  ┣ 📜next.config.js
  ┣ 📜package.json
  ┣ 📜postcss.config.js
  ┣ 📜README.md
  ┣ 📜tailwind.config.js
  ┗ 📜yarn.lock
To start the application, run yarn dev and the app should start running at http://localhost:3000/.
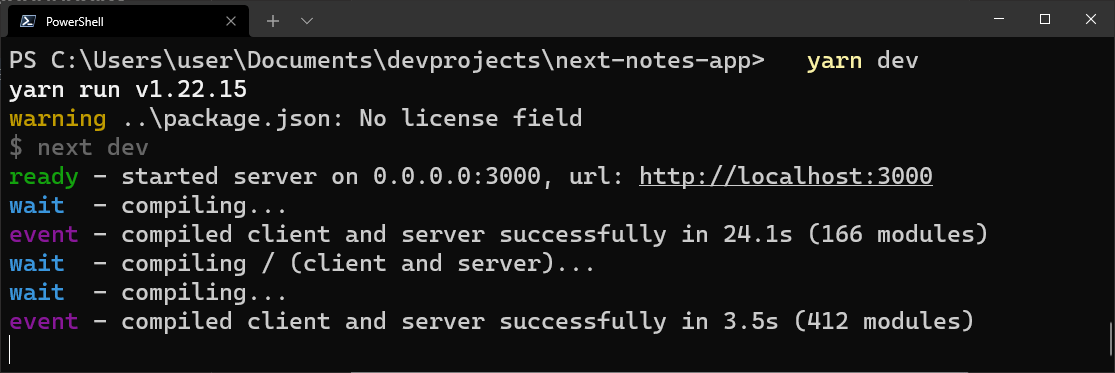
Open in the browser to see the notes app running.
You can view the starter example hosted on Netlify. Right now, we can create, update and delete notes. However, it’s all on the client side. When we refresh the page, we lose all the data because the state is managed in our app using the Context API
State management with Context API
Context API is a state management tool bundled with the React.js library itself. We typically need to pass data between components in any application. For example, to pass state from a parent component down to a child component, we would use props. However, passing state between sibling components and from a child component to its parent can become complex. That’s where state management comes in, allowing any component anywhere in the application to have access to the application state. We could use Redux or Recoil, but we’ll use the Context API. To see how our Context API works, open the ./modules/AppContext.js file. We won’t go in-depth about how Context API works in a Next.js application, but you can refer to this GitHub example to see how to use the Context API in a Next.js application.
    // ./modules/AppContext.js

    const { createContext, useState, useContext, useReducer } = require("react");

    // context data getter
    const NoteStateContext = createContext();
    const NotesStateContext = createContext();

    // context data setter
    const NoteDispatchContext = createContext();
    const NotesDispatchContext = createContext();

    // reducer function to modify state based on action types
    const notesReducer = (state, action) => {
      const { note, type } = action;
      if (type === "add") {...}
      if (type === "remove") {...}
      if (type === "edit") {...}
      return state;
    };

    // NoteProvider, which will wrap the application
    // providing all the nested state and dispatch context
    export const NoteProvider = ({ children }) => {
      // useState for note, to get and set a single note
      const [note, setNote] = useState({});

      // use Reducer for notes, to get all notes
      // and add, edit or remove a note from the array
      const [notes, setNotes] = useReducer(notesReducer, []);
      return (
        <NoteDispatchContext.Provider value={setNote}>
          <NoteStateContext.Provider value={note}>
            <NotesDispatchContext.Provider value={setNotes}>
              <NotesStateContext.Provider value={notes}>
                {children}
              </NotesStateContext.Provider>
            </NotesDispatchContext.Provider>
          </NoteStateContext.Provider>
        </NoteDispatchContext.Provider>
      );
    };

    // export state contexts
    export const useDispatchNote = () => useContext(NoteDispatchContext);
    export const useNote = () => useContext(NoteStateContext);
    export const useDispatchNotes = () => useContext(NotesDispatchContext);
export const useNotes = () => useContext(NotesStateContext);Here, we have two basic types of context: the state context and the dispatch context created using the createContext hook.
The state context will act as a data getter, while the dispatch context will act as a setter.
To achieve this, within the NoteProvider function which wraps the children prop around the DispatchContext & StateContext providers, we use useState and useReducer hooks to create notes and setNotes for example.
const [notes, setNotes] = useReducer(notesReducer, []);setNotes uses the useReducer hook and the notesReducer function to add, edit or delete a note from the notes array based on the action.type passed to the setNotes function and are passed into their context providers:
    <NotesDispatchContext.Provider value={setNotes}>
      <NotesStateContext.Provider value={notes}>
At the end of the file, the context is exported using the useContext hook:
    export const useDispatchNotes = () => useContext(NotesDispatchContext);
    export const useNotes = () => useContext(NotesStateContext);
For the entire application to have access to the context, we need to include it in our ./pages/app.js file.
    // ./pages/app.js

    import { NoteProvider } from "../modules/AppContext";
    import DefaultLayout from "../layouts/default";

    function MyApp({ Component, pageProps }) {
      return (
        <NoteProvider>
          <DefaultLayout>
            <Component {...pageProps} />
          </DefaultLayout>
        </NoteProvider>
      );
    }
export default MyApp;Here, we wrap our application - <Component {…pageProps} /> around the NoteProvider which we imported into the file import { NoteProvider } from "../modules/AppContext";
This makes any state within NoteProvider available in all components in the application.
The NoteList component
To access and modify this global state, we import the context we need from ./modules/AppContext.js first.
// ./components/NotesList.js
import {  PencilAltIcon, TrashIcon, ExternalLinkIcon } from "@heroicons/react/solid";
import { useNote, useDispatchNote, useNotes, useDispatchNotes } from "../modules/AppContext";

const NotesList = ({ showEditor }) => {
  // this is where we assign the context to constants
  // which we will use to read and modify our global state
  const notes = useNotes();
  const setNotes = useDispatchNotes();
  const currentNote = useNote();
  const setCurrentNote = useDispatchNote();

  // function to edit note by setting it to the currentNote state
  // and adding the "edit" action
  // which will then be read by the <Editor /> component
  const editNote = (note) => {
    note.action = "edit";
    setCurrentNote(note);
  };

  // function to delete note by using the setNotes Dispatch notes function
  const deleteNote = (note) => {
    let confirmDelete = confirm("Do you really want to delete this note?");
    confirmDelete ? setNotes({ note, type: "remove" }) : null;
  };

  return (
    <div className="notes">
      {notes.length > 0 ? (
        <ul className="note-list">
          {notes.map((note) => (
            <li key={note.id} className="note-item">
              <article className="note">
                <header className="note-header">
                  <h2 className="text-2xl">{note.title}</h2>
                </header>
                <main className=" px-4">
                  <p className="">{note.body}</p>
                </main>
                <footer className="note-footer">
                  <ul className="options">
                    <li onClick={() => editNote(note)} className="option">
                      <button className="cta cta-w-icon">
                        <PencilAltIcon className="icon" />
                        <span className="">Edit</span>
                      </button>
                    </li>
                    <li className="option">
                      <button className="cta cta-w-icon">
                        <ExternalLinkIcon className="icon" />
                        <span className="">Open</span>
                      </button>
                    </li>
                    <li className="option">
                      <button onClick={() => deleteNote(note)} className="cta cta-w-icon">
                        <TrashIcon className="icon" />
                        <span className="">Delete</span>
                      </button>
                    </li>
                  </ul>
                </footer>
              </article>
            </li>
          ))}
        </ul>
      ) : (
        <div className="fallback-message">
          <p>Oops.. no notes yet</p>
        </div>
      )}
    </div>
  );
};
export default NotesList;The Editor component
The function of the <Editor /> component is simple, it gets current note data from the application state by importing useNote() from ./modules/AppContext.js and assigning it to currentNote. It adds a new note to the global notes array or updates an existing note depending on the action type.
import { useEffect, useState } from "react";
import { CheckCircleIcon } from "@heroicons/react/solid";
import { useNote, useDispatchNote, useNotes, useDispatchNotes } from "../modules/AppContext";
import RandomID from "../modules/RandomID";
const Editor = () => {
  // the current note
  const currentNote = useNote();
  const setCurrentNote = useDispatchNote();
  // the array of saved notes
  const notes = useNotes();
  const setNotes = useDispatchNotes();
  // editor note states
  const [title, setTitle] = useState("Hola");
  const [body, setBody] = useState(
    `There once was a ship that put to sea
and the name of the ship was the billy old tea`
  );
  const [noteID, setNoteID] = useState(null);
  const [noteAction, setNoteAction] = useState("add");
  const [isSaved, setIsSaved] = useState(false);
  // function to update textarea content and height
  const updateField = (e) => {
    // get textarea
    let field = e.target;
    //set body state to textarea value
    setBody(field.value);
    // reset textarea height
    field.style.height = "inherit";
    // Get the computed styles for the textarea
    let computed = window?.getComputedStyle(field);
    // calculate the height
    let height =
      parseInt(computed.getPropertyValue("border-top-width"), 10) +
      parseInt(computed.getPropertyValue("padding-top"), 10) +
      field.scrollHeight +
      parseInt(computed.getPropertyValue("padding-bottom"), 10) +
      parseInt(computed.getPropertyValue("border-bottom-width"), 10);
    // set the new height
    field.style.height = `${height}px`;
  };
  // function to save note to saved notes array
  const saveNote = () => {
    // check if the title input & body textarea actually contain text
    if (title && body) {
      // check if note already has an ID, if it does asign the current id to the note object,
      // if not, assign a new random ID to the note object
      let id = noteID || RandomID(title.slice(0, 5), 5);
      // the note object
      let note = {
        id,
        title,
        body,
      };
      try {
        if (noteAction == "edit") {
          // edit in notes list
          setNotes({ note, type: "edit" });
          console.log({ note, noteAction, noteID, notes });
        } else {
          // add to notes list
          setNotes({ note, type: "add" });
        }
        // change isSaved state to true, thereby disabling the save button
        setIsSaved(true);
        // clear note content
        note = { title: "", body: "" };
        // clear editor
        setTitle(note.title);
        setBody(note.body);
        // clear current note state
        setCurrentNote(note);
      } catch (error) {
        console.log({ error });
      }
    }
  };
  // enable the button whenever the content of title & body changes
  useEffect(() => {
    if (title && body) setIsSaved(false);
    else setIsSaved(true);
  }, [title, body]);
  // update the editor content whenever the note context changes
  // this acts like a listener whenever the user clicks on edit note
  // since the edit note funtion, sets
  useEffect(() => {
    if (currentNote.title && currentNote.body) {
      setTitle(currentNote.title);
      setBody(currentNote.body);
      setNoteID(currentNote.id);
      setNoteAction(currentNote.action);
    }
  }, [currentNote]);
  return (
    <div className={"editor"}>
      <div className={"wrapper"}>
        <div className="editing-area">
          <div className="title">
            <input value={title} onChange={(e) => setTitle(e.target.value)} type="text" className={"form-input"} placeholder="Title" />
          </div>
          <div className="body">
            <textarea
              value={body}
              onChange={(e) => updateField(e)}
              name="note-body"
              id="note-body"
              className="form-textarea"
              cols="10"
              rows="2"
              placeholder="Write something spec ✨"
            ></textarea>
          </div>
        </div>
        <ul className={"options"}>
          <li className={"option"}>
            <button onClick={saveNote} disabled={isSaved} className="cta flex gap-2 items-end">
              <CheckCircleIcon className="h-5 w-5 text-blue-500" />
              <span className="">{isSaved ? "Saved" : "Save"}</span>
            </button>
          </li>
        </ul>
      </div>
    </div>
  );
};
export default Editor;Hopefully, we now know the basics of how the app works. Let’s proceed to NextAuth, Prisma & MongoDB.
Open Source Session Replay
OpenReplay is an open-source, session replay suite that lets you see what users do on your web app, helping you troubleshoot issues faster. OpenReplay is self-hosted for full control over your data.

Start enjoying your debugging experience - start using OpenReplay for free.
Setting up NextAuth, Prisma & MongoDB
An Adapter in NextAuth.js connects your application to whatever database or backend system you want to use to store data for users, their accounts, sessions, etc. We’ll be using the Prisma adapter. To use this Adapter, you need to install Prisma Client, Prisma CLI, and the separate @next-auth/prisma-adapter package:
yarn add next-auth @prisma/client @next-auth/prisma-adapter
yarn add prisma --dev
Let’s set up our MongoDB cluster so we can configure our NextAuth.js to use the Prisma Adapter. Log in to MongoDB and set up a MongoDB cluster on Atlas Go to Projects and create a new project:
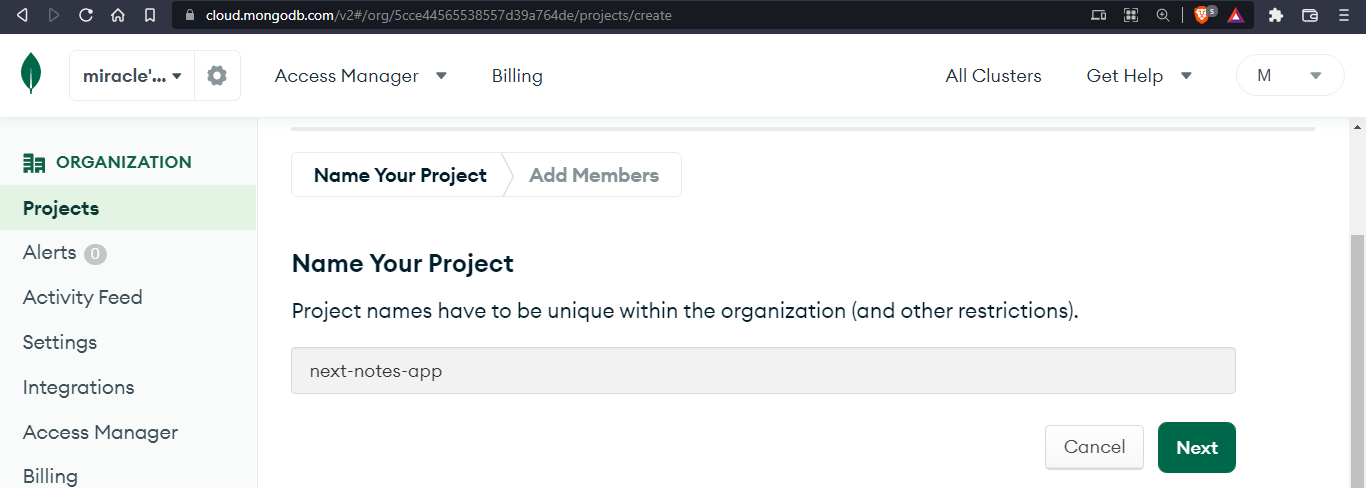
Next, we’ll add permissions to our project and be assigned Project Owner. Next, create a database for our project.
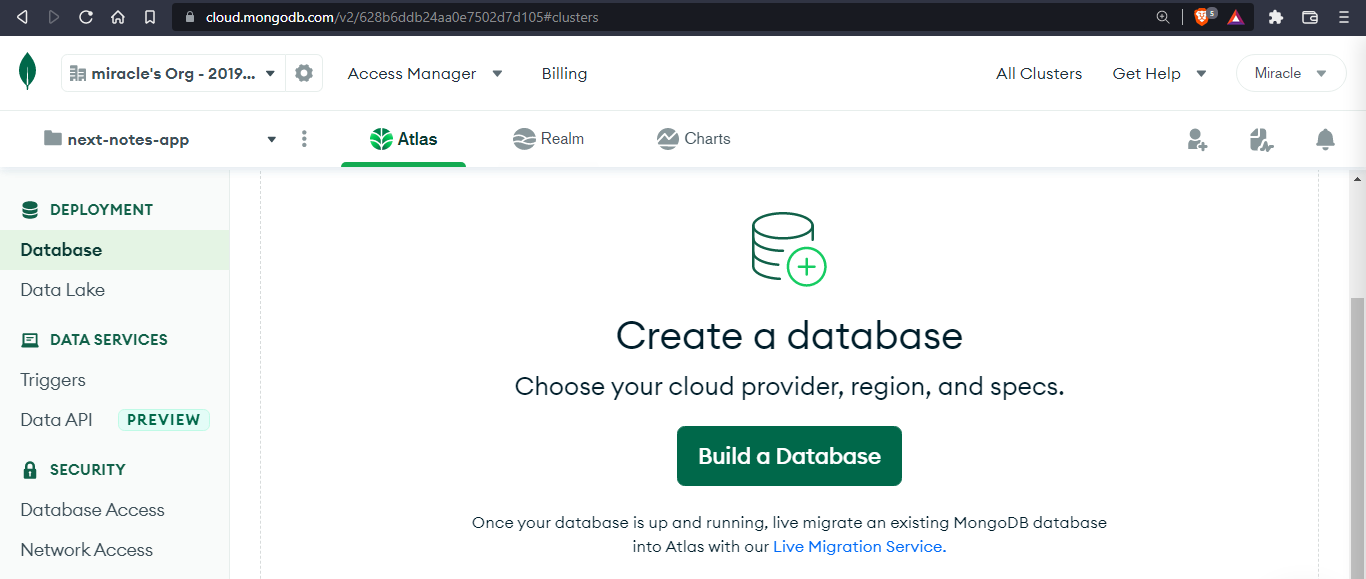
Once we click on Build a database, we’ll be asked to choose our database plan; you can use the free shared plan. Next, we select the providers and region for our database cluster; you can leave it as is and use the M0 cluster, which is free.
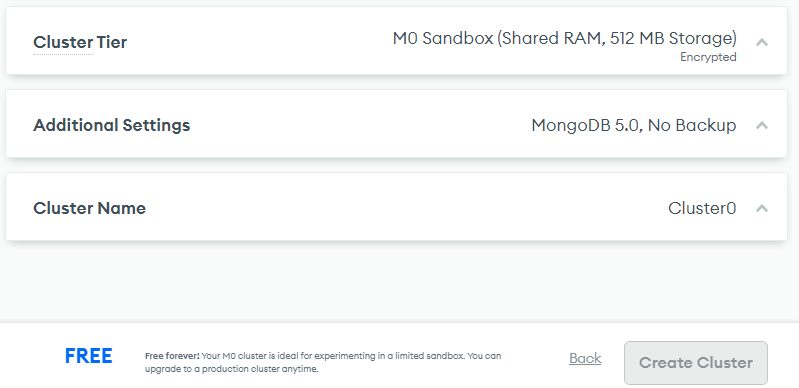
Click on Create Cluster. Next, we’ll have to set up our database security. Choose username and password, create a new user, in the “Where would you like to connect from?” section, choose “My Local Environment” and Add My Current IP Address. Click on Finish.
Next, we need to get our connection URL to connect to our cluster. Click on Connect your application
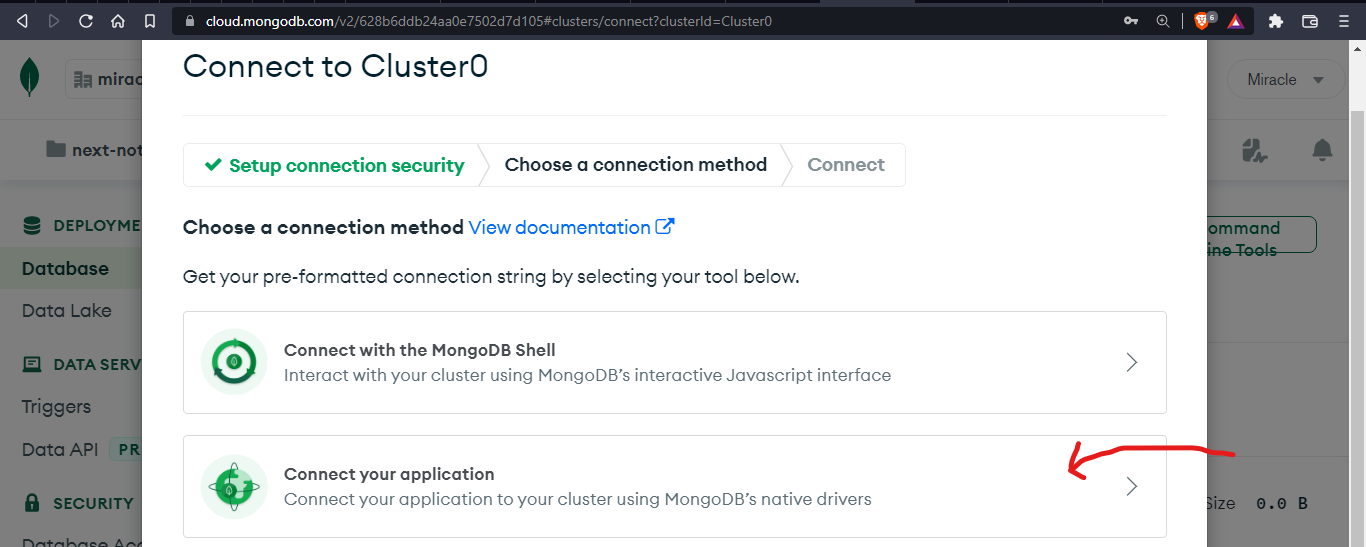
Copy the connection string provided
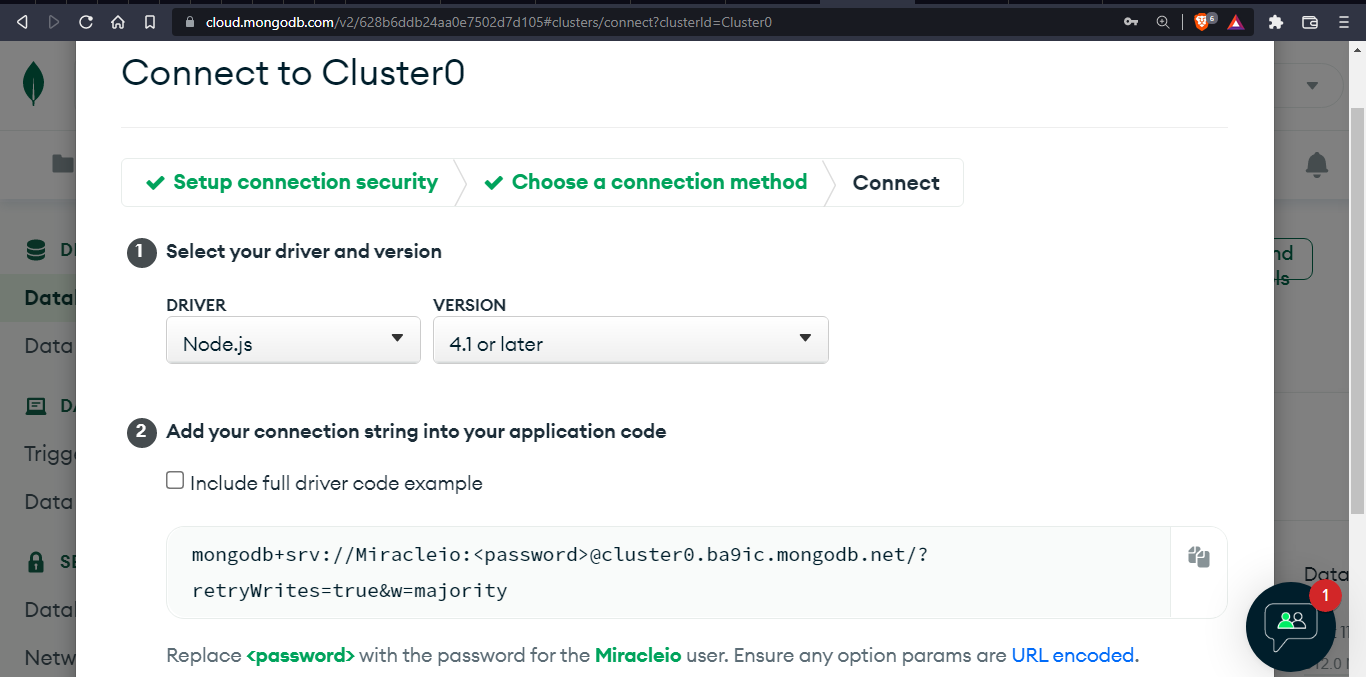
Now that we’ve gotten or database connection string, add it to a .env file. With a few other environment variables required by NextAuth.
// .env

DATABASE_URL=mongodb+srv://username:password@cluster0.ba9ic.mongodb.net/myFirstDatabase?retryWrites=true&w=majority
NEXTAUTH_SECRET=somesecret
NEXTAUTH_URL=http://localhost:3000
🚨 Make sure you include the database name in your MongoDB URL. For example, the database used here is
myFirstDatabase.
Working with Prisma
We can use the Prisma CLI tool to create a couple of Prisma-related files. Run:
npx prisma initThis creates a basic /prisma/schema.prisma file. This schema is adapted for use in Prisma and based on NextAuth main schema. We’ll modify the schema to work with NextAuth; enter the following code into the schema:
// ./prisma/schema.prisma
datasource db {
provider = "mongodb"
url = env("DATABASE_URL")
}
generator client {
provider = "prisma-client-js"
}
model Account {
id String @id @default(auto()) @map("_id") @db.ObjectId
userId String
type String
provider String
providerAccountId String
refresh_token String? @db.String
access_token String? @db.String
expires_at Int?
token_type String?
scope String?
id_token String? @db.String
session_state String?
user User @relation(fields: [userId], references: [id], onDelete: Cascade)
@@unique([provider, providerAccountId])
}
model Session {
id String @id @default(auto()) @map("_id") @db.ObjectId
sessionToken String @unique
userId String
expires DateTime
user User @relation(fields: [userId], references: [id], onDelete: Cascade)
}
model User {
id String @id @default(auto()) @map("_id") @db.ObjectId
name String?
email String? @unique
emailVerified DateTime?
image String?
accounts Account[]
sessions Session[]
}
model VerificationToken {
identifier String @id @default(auto()) @map("_id") @db.ObjectId
token String @unique
expires DateTime
@@unique([identifier, token])
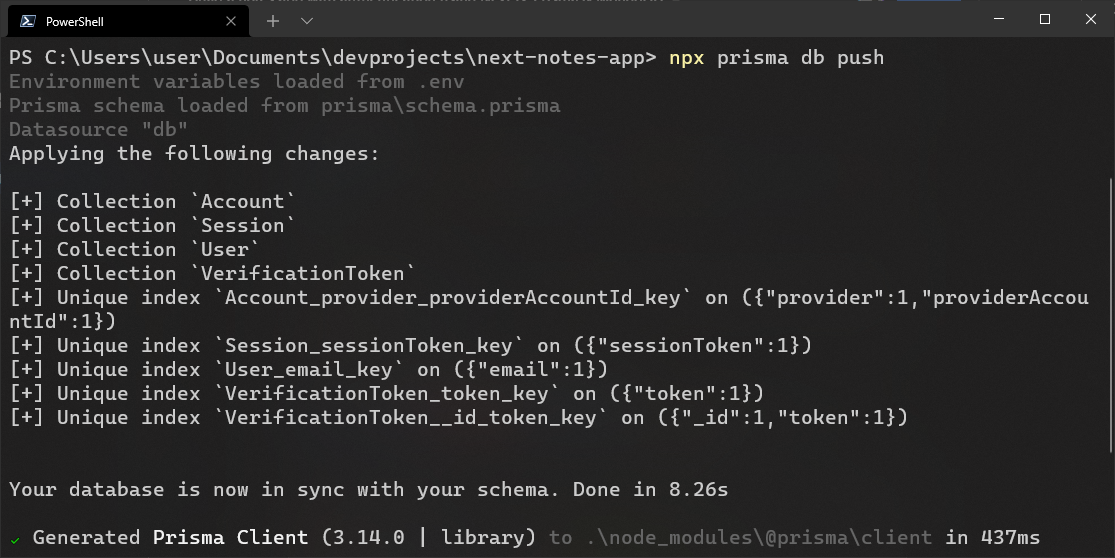
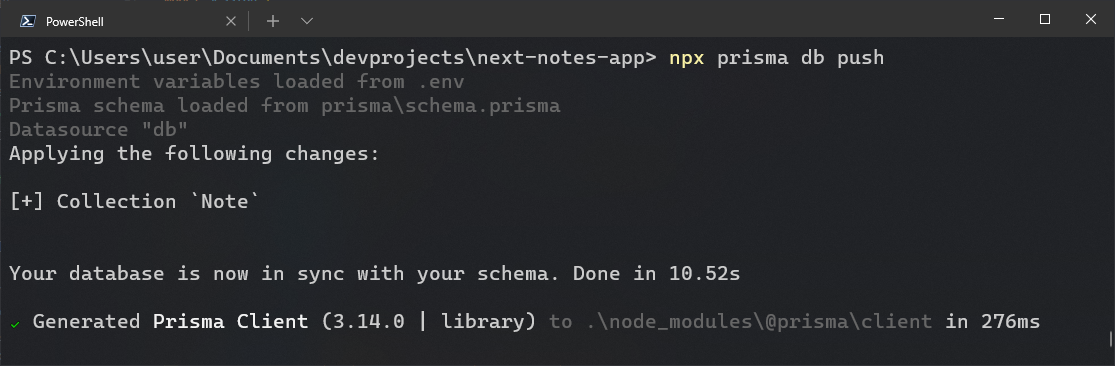
}Now that we have written our schema, we can create the collections in our database. Using the Prisma using the CLI tool, run npx prisma db push, and you should see:
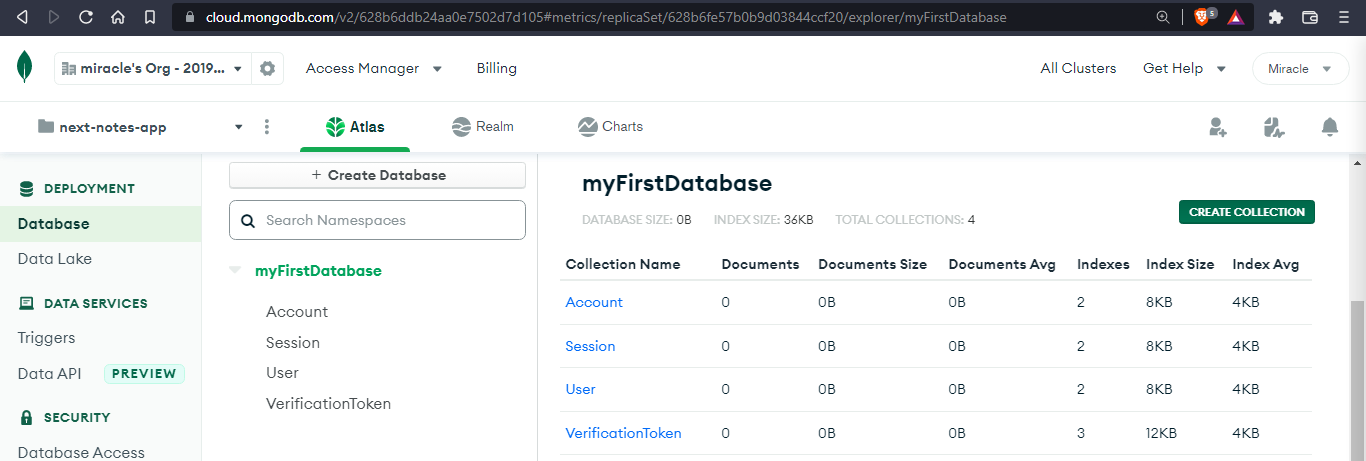
We should see our new collections if we check our database collection in Atlas.
Awesome! Now, to interact with our database, we must first generate the Prisma Client. Use the Prisma CLI to generate the Prisma Client:
npx prisma generateThis command reads our Prisma schema and generates a version of Prisma Client that is tailored to our models.
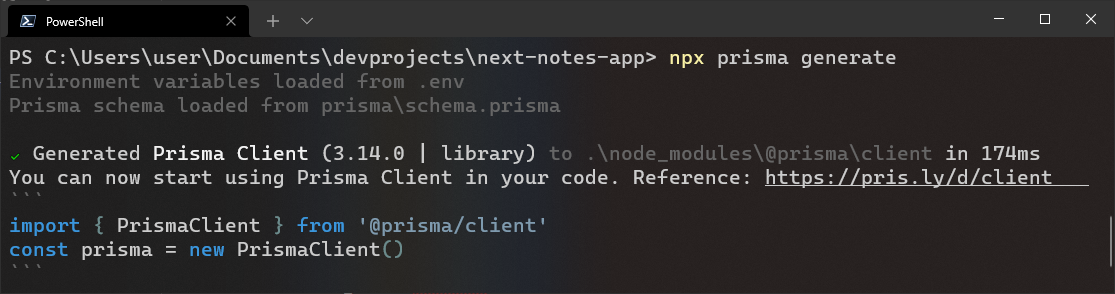
We can start using PrismaClient to interact with our database. We’ll use a single PrismaClient instance that we can import into any file where needed. Create a new ./prisma/prisma.js file:
// prisma/prisma.js

import { PrismaClient } from '@prisma/client'
let prisma
if (process.env.NODE_ENV === 'production') {
  prisma = new PrismaClient()
} else {
  if (!global.prisma) {
    global.prisma = new PrismaClient()
  }
  prisma = global.prisma
}
export default prisma
Now, let’s proceed to complete our NextAuth integration.
Set up our Google application
We’ll be using Google provider for this project, and so we need to get our environment variables to configure our Google provider. First, we log into Google Cloud console,
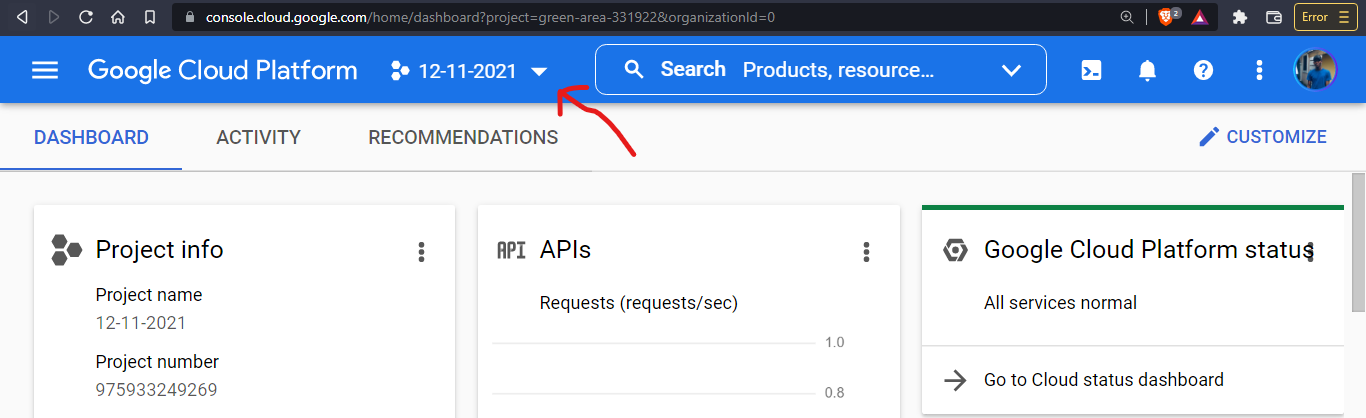
Click on the dropdown which opens a modal; in the top right corner of the modal, click on New Project, to create a new project.
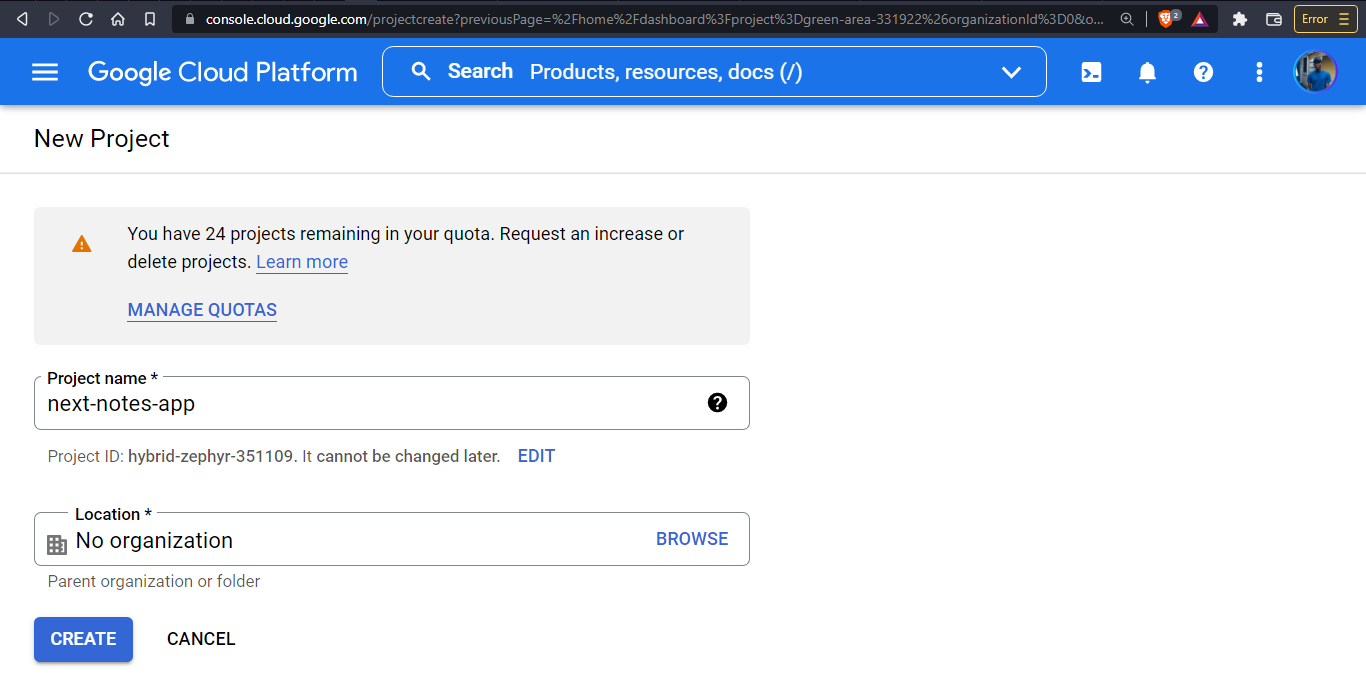
Enter the project name and click create. Once the project is created, click on SELECT PROJECTin the notifications modal.
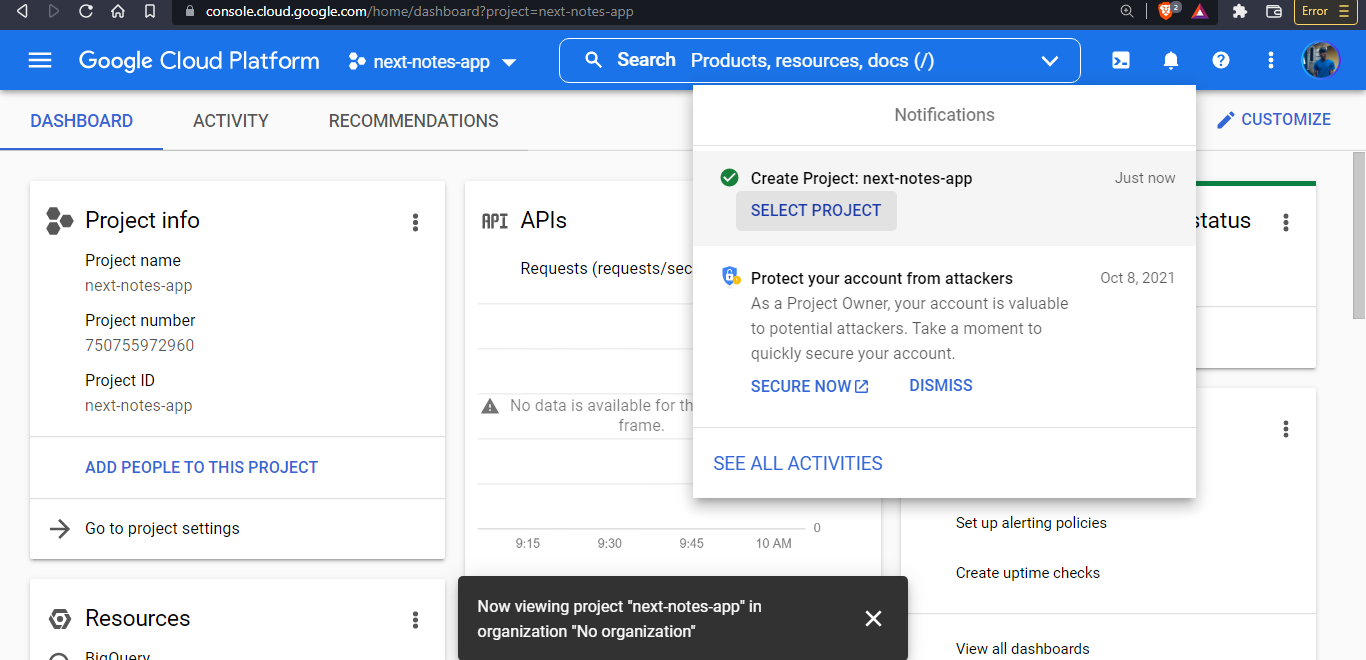
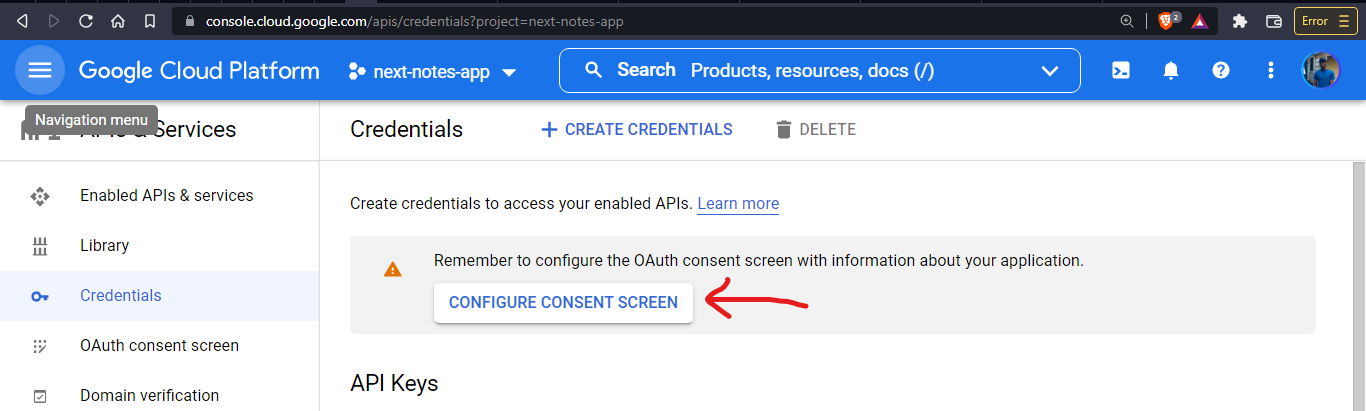
Now, in our new app we can open the side bar, go to APIs & Services > Credentials. The first thing we need to do is to configure the consent screen:
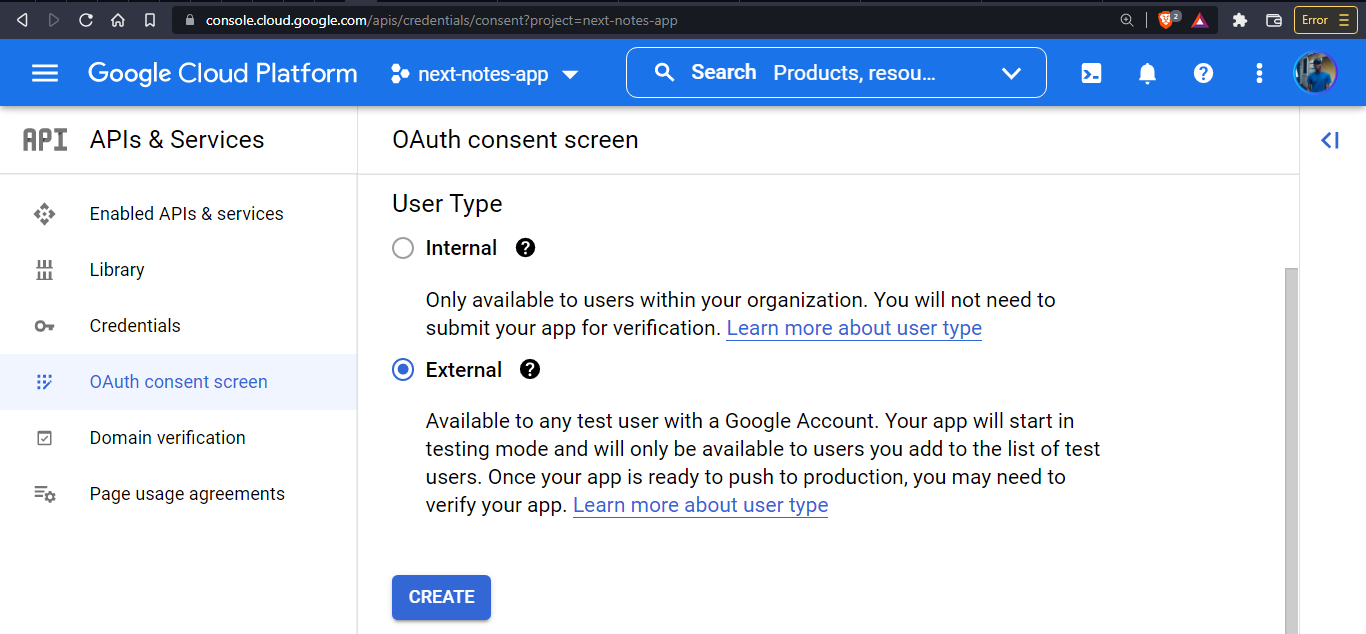
Then choose External User type.
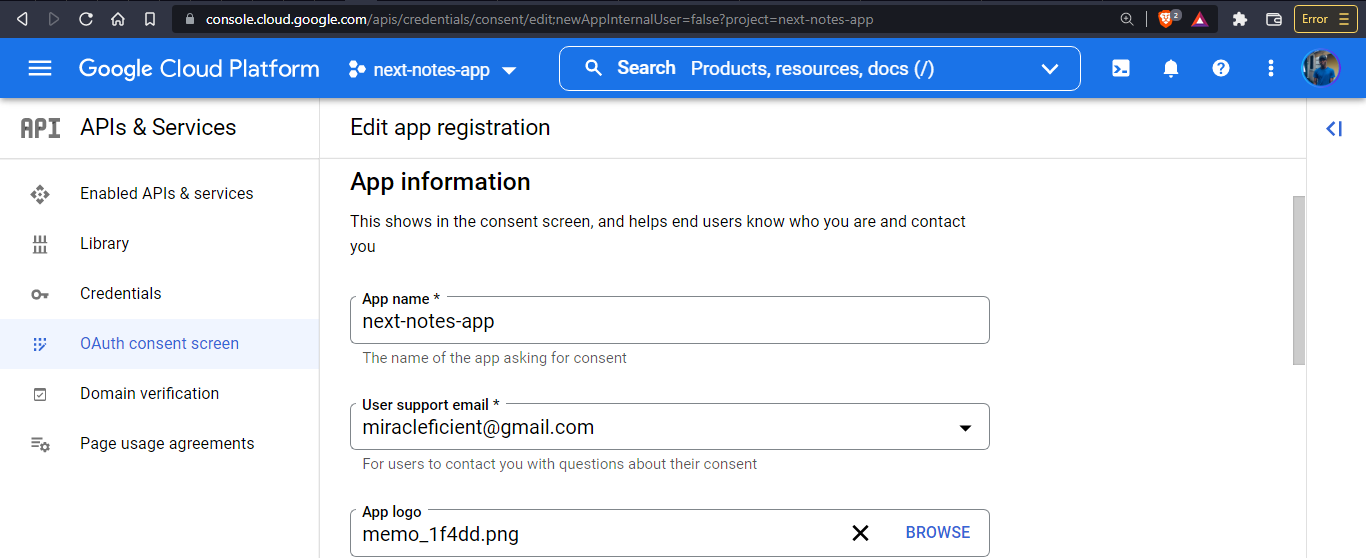
On the next screen, we add our app information.
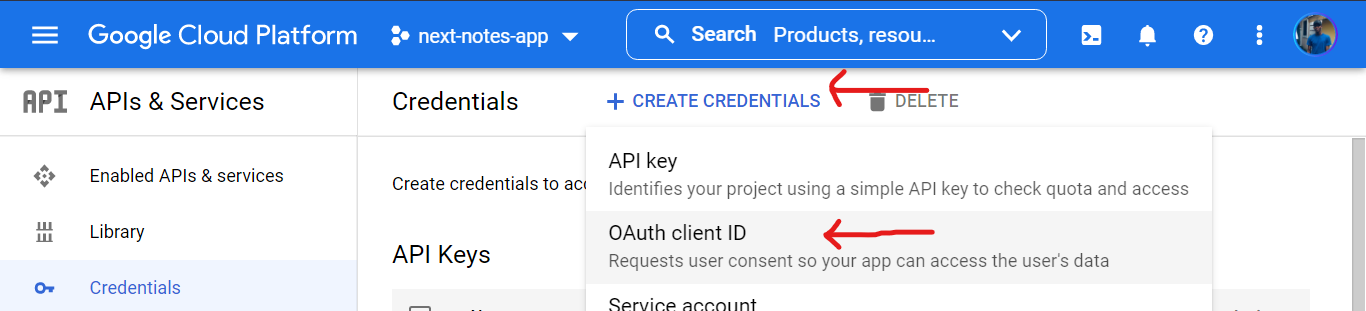
Then, we add the developer information and click on Save & Continue on this screen and the following screens until it’s complete, and we go back to the dashboard. In the side menu, under API & CREDENTIALS, click on Credentials to create a new **OAuth Client ID.
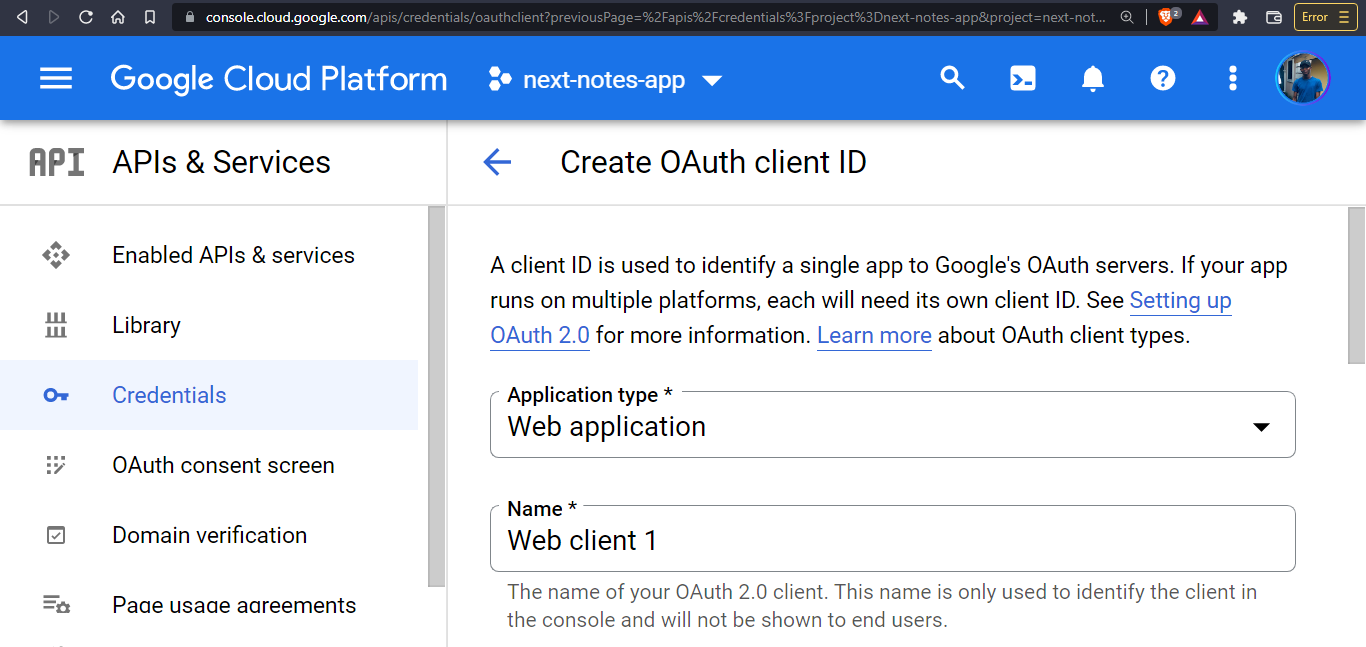
In the next screen, we’ll select the application type and name,
and add an authorized Google URI for development - http://localhost:3000/api/auth/callback/google
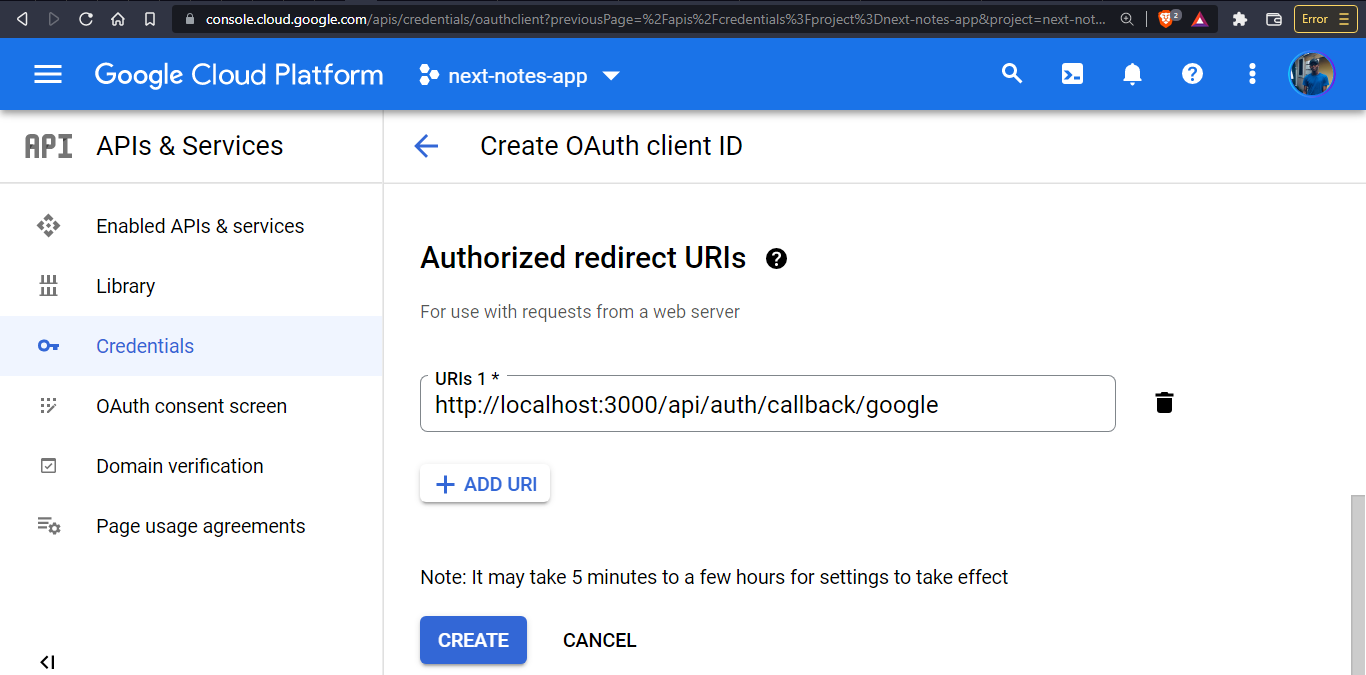
Click on Create, and after the client ID has been created, we’ll have our Client ID and Client Secret. Create a .env file to save these variables
// .env

GOOGLE_CLIENT_ID=<client_ID_here>
GOOGLE_CLIENT_SECRET=<client_secret_here>
DATABASE_URL=mongodb+srv://username:password@cluster0.ba9ic.mongodb.net/myFirstDatabase?retryWrites=true&w=majority
NEXTAUTH_SECRET=somesecret
NEXTAUTH_URL=http://localhost:3000
Set up NextAuth with the Prisma adapter
To add NextAuth.js to a project, create a file called [...nextauth].js in pages/api/auth. This contains the dynamic route handler for NextAuth.js, which will also contain all your global NextAuth.js configurations. All requests to /api/auth/* (signIn, callback, signOut, etc.) will automatically be handled by NextAuth.js. We also configure your NextAuth.js to use the Prisma Adapter and Prisma client.
// ./pages/api/auth/[...nextauth].js

import NextAuth from "next-auth"
import GoogleProvider from "next-auth/providers/google"
import { PrismaAdapter } from "@next-auth/prisma-adapter"
import prisma from "../../../prisma/prisma";

export default NextAuth({
  adapter: PrismaAdapter(prisma),
  providers: [
    GoogleProvider({
      clientId: process.env.GOOGLE_CLIENT_ID,
      clientSecret: process.env.GOOGLE_CLIENT_SECRET,
    }),
  ],
  callbacks: {
    async session({ session, token, user }) {
      session.user.id = user.id;
      return session;
    },
  },
});
})
Take note of the callbacks object; this is where we populate the user session with their id as NextAuth does not provide this value by default.
Configure the NextAuth Shared session state
The useSession() React Hook in the NextAuth.js client is the easiest way to check if someone is signed in.
To be able to use useSession first you’ll need to expose the session context, [**<SessionProvider />**](https://next-auth.js.org/getting-started/client#sessionprovider), at the top level of your application:
// ./pages/_app.js

import { SessionProvider } from "next-auth/react";
import { NoteProvider } from "../modules/AppContext";
import DefaultLayout from "../layouts/default";

function MyApp({ Component, pageProps: { session, ...pageProps } }) {
  return (
    <SessionProvider session={session}>
      <NoteProvider>
        <DefaultLayout>
          <Component {...pageProps} />
        </DefaultLayout>
      </NoteProvider>
    </SessionProvider>
  );
}
export default MyApp;
Instances of useSession will then have access to the session data and status. The <SessionProvider /> also keeps the session updated and synced between browser tabs and windows.
Add Login functionality
To add the login and logout actions, we’ll create a component ./components/AuthBtn.js, which will be placed in our ./components/SiteHeader.js component.
// ./components/AuthBtn.js

import { ChevronDownIcon, RefreshIcon } from "@heroicons/react/solid";
import { useSession, signIn, signOut } from "next-auth/react";
import Image from "next/image";
const AuthBtn = () => {
  const { data: session, status } = useSession();
  if (status === "loading") {
    return (
      <div className="auth-btn">
        <div className="auth-info">
          <RefreshIcon className="icon animate-spin" />
        </div>
      </div>
    );
  }
  if (status === "unauthenticated") {
    return (
      <div className="auth-btn">
        <button onClick={() => signIn()}>Login</button>
      </div>
    );
  }
  return (
    <div className="auth-btn">
      <div className="auth-info pr-2">
        <Image src={session.user.image} alt={session.user.name} width={30} height={30} className="rounded-full" />
        <p>Hi, {session.user.name}</p>
      </div>
      <div className="dropdown">
        <button className="dropdown-btn !py-1">
          <ChevronDownIcon className="icon" />
        </button>
        <ul className="dropdown-list opacity-0 invisible">
          <li className="dropdown-item">
            <button onClick={() => signOut()} className="cta">
              Logout
            </button>
          </li>
        </ul>
      </div>
    </div>
  );
};
export default AuthBtn;
Here, we render our UI based on the state returned by status, which maps to three possible session states:
"loading"- A rotating spinning Icon"authenticated"- Username, picture and logout dropdown"unauthenticated"- A login button
Quick note: To display images from another domain using Next.js <Image />, we need to add it to a list of domains in our ./next.config.js file
// next.config.js

const nextConfig = {
  reactStrictMode: true,
  images: {
    domains: ['lh3.googleusercontent.com'],
  },
}
module.exports = nextConfig
Let’s see it in action. Run yarn dev to get:
You can view the deployed app hosted on Netlify and the current code on the [basic-auth](https://github.com/miracleonyenma/next-notes-app-starter/tree/basic-crud) branch of the repository on GitHub
Next, we update our Prisma schema with the Note model so that we can manage notes in our MongoDB database.
Add Note Model to Prisma Schema
In our ./prisma/schema.prisma file, we’re going to add Note model:
// ./prisma/schema.prisma

model Note {
  id    String @id @default(auto()) @map("_id") @db.ObjectId
  title String
  body  String
  userId String?
  user   User?   @relation(fields: [userId], references: [id], onDelete: Cascade)
  @@unique([id, userId])
}
We’ll also have to add the Note reference to our User model:
// ./prisma/schema.prisma

model User {
  id            String    @id @default(auto()) @map("_id") @db.ObjectId
  name          String?
  email         String?   @unique
  emailVerified DateTime?
  image         String?
  accounts      Account[]
  sessions      Session[]
  notes          Note[] //add note reference
}
Once again, to sync with our database, run npx prisma db push
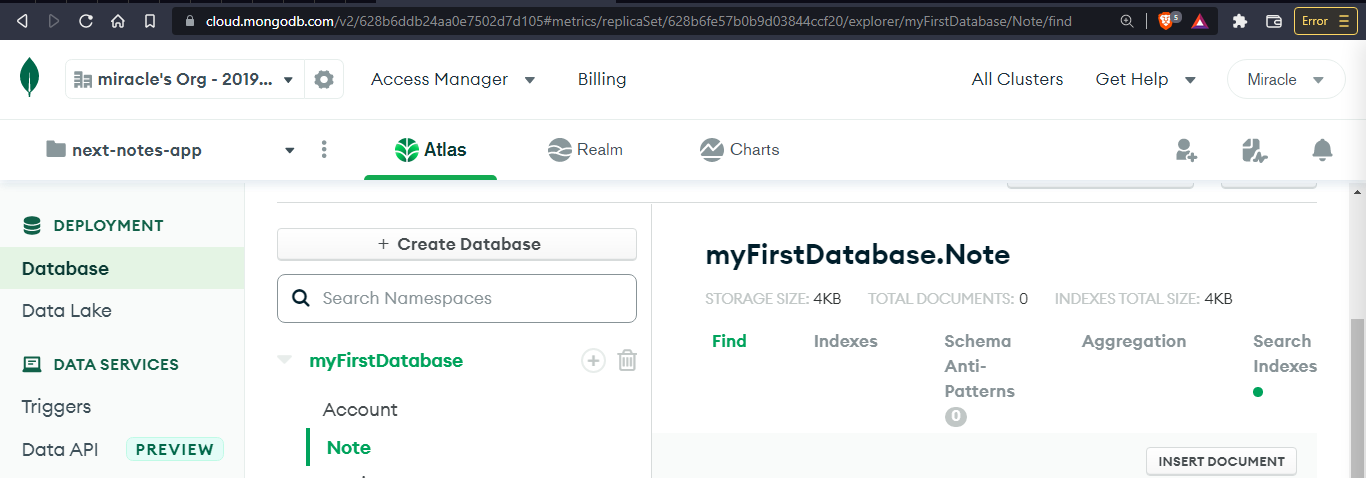
We should see the new Note collection if we check our MongoDB database.
Add create new note functionality
Let’s create our CRUD functions. First, a createNote function will add a note to our database with Prisma. As we progress, we’ll create reading, updating, and deleting functions. Create a new file ./prisma/note.js which will contain all our CRUD functions:
// ./prisma/Note.js
import prisma from "./prisma";

// READ
//get unique note by id
export const getNoteByID = async (id) => {
  const note = await prisma.note.findUnique({
    where: {
      id,
    },
    include: {
      user: true,
    },
  });
  return note;
};

// CREATE
export const createNote = async (title, body, session) => {
  const newNote = await prisma.note.create({
    data: {
      title,
      body,
      user: { connect: { email: session?.user?.email } },
    },
  });
  const note = await getNoteByID(newNote.id);

  return note;
};
Here, our create function accepts a few parameters - title, body and session. session will contain the current session data, including information about the user, specifically user.email. We’re using prisma.note.create() to create a new note by passing an object with the data key, which is an object containing title, body, and user. Since the user field is relational, we’re using connect to connect the new note to an existing user with the email provided. Next, we must create an API endpoint to run this function.
Add Create Note API endpoint
Create a new file ./pages/api/note.js.
// pages/api/note.js

import { createNote } from "../../prisma/Note";
import { getSession } from "next-auth/react";
export default async function handle(req, res) {
  // Get the current session data with {user, email, id}
  const session = await getSession({ req });
  // Run if the request was a post request
  if (req.method == "POST") {
    // Get note title & body from the request body
    const { title, body } = req.body;
    // Create a new note
    // also pass the session which would be use to get the user information
    const note = await createNote(title, body, session);
    // return created note
    return res.json(note);
  }
}
Here, we’re creating an API endpoint. Whenever a request goes to /api/note, we handle it here. First, we check we get the authenticated user session with the getSession helper function from NextAuth.js. For a POST request, we get the title and body from the request. We then run the createNote function that we created earlier. Next, let’s send a create request from our frontend in the <Editor /> component.
Send create request from Frontend
🚨 To ensure that only authenticated users can create notes, in the editor component, we must render only when the session status is “authenticated.”
// ./components/Editor.js

const Editor = () => {
  // ..
  return (
    status === "authenticated" && (
        <div className={"editor"}> {/* ... */} </div>
    )
  );

};
In our ./components/Editor.js file, using the fetch API, we’ll send a POST request to our create endpoint /api/note and save the data to our Notes context state. Let’s edit our saveNote function.
// ./components/Editor.js

// ...
  const saveNote = async () => {
    if (title && body) {
      // ...
      try {
        if (noteAction == "edit") {
          // ...
        } else {
          // send create request with note data
          let res = await fetch("/api/note", {
            method: "POST",
            headers: { "Content-Type": "application/json" },
            body: JSON.stringify(note),
          });

          const newNote = await res.json();
          console.log("Create successful", { newNote });
          // add to notes list (global context state)
          setNotes({ note: newNote, type: "add" });
        }
        // ...
      }
    }
  }
// ...
Let’s see that in action:
Next, let’s see how we can update our notes.
Add update note functionality
Similarly, we’ll create an update function. In our ./prisma/note.js file, create a new updateNote() function.
// ./prisma/Note.js
// ...

// UPDATE
export const updateNote = async (id, updatedData, session) => {
  let userId = session?.user.id;
  const updatedNote = await prisma.note.update({
    where: {
      id_userId: {
        id,
        userId,
      },
    },
    data: {
      ...updatedData,
    },
  });
  const note = await getNoteByID(updatedNote.id);
  return note;
};
Here, we get the note id, updatedData, and user session. From the user session, we get the userId.
In prisma.note.update, we filter the note to update by the userId and note id by combining the unique fields and concatenating them with an underscore.
where: {
    id_userId: {
      id,
      userId,
    },
  },
},
And then pass the updatedData to data. Next, we’ll create the API endpoint to call our update function.
Add update note API endpoint
Back in our ./pages/api/note.js file, for PUT requests, we’ll get and pass the note id, title , body and session and pass it into our updateNote() function.
// ./pages/api/note.js
// ...
export default async function handle(req, res) {
  // Run if the request is a POST request
  // ...

  // Run if the request is a PUT request
  else if (req.method == "PUT") {
    const { id, title, body } = req.body;

    // const updatedData = {title, body}
    // Update current note
    // also pass the session which would be use to get the user information
    const note = await updateNote(id, { title, body }, session);
    // return updated note
    return res.json(note);
  }
}
Now, back in our ./components/Editor.js component, let’s add the request for a note update.
// ./components/Editor.js

// ...
  const saveNote = async () => {
    if (title && body) {
      // ...
      try {
        if (noteAction == "edit") {
          // add note id to note data
          note.id = noteID;
          // send request to edit note
          let res = await fetch("/api/note", {
            method: "PUT",
            headers: { "Content-Type": "application/json" },
            body: JSON.stringify(note),
          });
          // update note
          const updatedNote = await res.json();
          console.log("Update successful", { updatedNote });
          // edit in notes list
          setNotes({ note: updatedNote, type: "edit" });
        } else {
          // send create request with note data
          // ...
        }
        // ...
      }
    }
  }
// ...
Here, we get the note id from the noteID state variable. In our fetch function, we send a PUT request with the note data and save the response to our Notes context state. Let’s see it in action:
So far, we’ve implemented Create and Update functionality to our application, but if we still refresh, we see that our notes disappear since we can’t yet get notes from the database. Next, we’ll have to make some changes to be able to load notes from our database.
Update view to display notes from the database
First, we’ll create more helper functions to get all notes from the authenticated user.
  // ./prisma/Note.js
  // ...

  // get notes by user
  export const getAllNotesByUserID = async (id) => {
    const notes = await prisma.note.findMany({
      where: {
        userId: id,
      },
      include: {
        user: true,
      },
    });
    return notes;
  };
Next, on our home page ./pages/index.js, we’ll get the notes on the server-side using getServerSideProps
// ./pages/index.js

import { getSession } from "next-auth/react";
const getAllNotesByUserID = require("../prisma/Note").getAllNotesByUserID;

// ...

export const getServerSideProps = async ({ req, res }) => {
  const session = await getSession({ req });
  if (!session) {
    res.statusCode = 403;
    return { props: { notes: [] } };
  }
  const notes = await getAllNotesByUserID(session?.user?.id);
  return {
    props: { notes },
  };
};

const Home = ({ notes }) => {
  const [showEditor, setShowEditor] = useState(true);
  return (
    <>
      {/* ... */}
      <div className={HomeStyles.container}>
        <main className={HomeStyles.main}>
          <div className="wrapper m-auto max-w-8xl">
            {/* ... */}

            {/* Note list component */}
            <NotesList retrieved_notes={notes} />
          </div>
        </main>
      </div>
    </>
  );
};
🚨 Here, we’re using require to import our getAllNotesByUserID helper function to avoid Next.js trying to run it on the client-side. Then, in the ./components/NoteList.js component, we get retrieved_notes as props, and in a useEffect hook, replace the application notes state with the fetched notes:
// ./components/NoteList.js

import { useEffect } from "react";
import Image from "next/image";
// ...

const NotesList = ({ retrieved_notes, showEditor }) => {
  // ...
  useEffect(() => {
    // replace notes in notes context state
    setNotes({ note: retrieved_notes, type: "replace" });
  }, [retrieved_notes]);

  return (
    <div className="notes">
      {notes.length > 0 ? (
        <ul className="note-list">
          {notes.map((note) => (
            <li key={note.id} className="note-item">
                {/* ... */}
                <footer className="note-footer">
                  <ul className="options">
                    <li className="option">
                      {/* add user image to note footer */}
                      <Image src={note.user.image} alt={note.user.name} width={32} height={32} className="rounded-full" />
                    </li>
                    {/* ... */}
                  </ul>
                </footer>
              </article>
            </li>
          ))}
        </ul>
      ) : (
        {/* ... */}
      )}
    </div>
  );
};
Also, in our .modules/AppContext.js file, we add support for the replace action type in our reducer function.
const notesReducer = (state, action) => {
  // get the note object and the type of action by destructuring
  const { note, type } = action;

  // if "replace"
  // replace the entire array with new value
  if (type === "replace") return note;

  // ...
}
See in action:
Awesome.We can now get our notes from the database and update the application state when the page loads.
Add delete note functionality
To delete a note, we need to create a delete helper function. In our ./prisma/Note.js file, add this function:
// ./prisma/Note.js
// ...

// DELETE
export const deleteNote = async (id, session) => {
  let userId = session?.user.id;
  const deletedNote = await prisma.note.delete({
    where: {
      id_userId: {
        id,
        userId,
      },
    },
  });
  return deletedNote;
};
Next, create a delete handler in our ./pages/api/note.js file.
// pages/api/note.js

export default async function handle(req, res) {
  if (req.method == "POST") {
    // ... Create a new note
  }
  else if (req.method == "PUT") {
    // ... Update current note
  }
  // Run if the request is a DELETE request
  else if (req.method == "DELETE") {
    const { id } = req.body;
    const note = await deleteNote(id, session);
    // return deleted note
    return res.json(note);
  }
}
And finally, in our ./components/NoteList.js component, we’ll send a DELETE request in our deleteNote function.
// ./components/NoteList.js

const NotesList = ({ retrieved_notes, showEditor }) => {
  // ...
  // function to delete note by using the setNotes Dispatch notes function
  const deleteNote = async (note) => {
    let confirmDelete = confirm("Do you really want to delete this note?");
    try {
      let res = await fetch(`/api/note`, {
        method: "DELETE",
        headers: { "Content-Type": "application/json" },
        body: JSON.stringify(note),
      });
      const deletedNote = await res.json();
      confirmDelete ? setNotes({ note: deletedNote, type: "remove" }) : null;
    } catch (error) {
      console.log(error);
    }
  };

// ...

}
Let’s see it in action:

Awesome! Finally, we can create dynamic routes to display individual notes. Create a new dynamic page ./pages/note/[id].js
// ./pages/note/[id].js

import Head from "next/head";
import Image from "next/image";
import { getSession } from "next-auth/react";
const getNoteByID = require("../../prisma/Note").getNoteByID;
import HomeStyles from "../../styles/Home.module.css";
export const getServerSideProps = async ({ req, res, params }) => {
  const session = await getSession({ req });
  console.log({ params });
  const { id } = params;
  if (!session) {
    res.statusCode = 403;
    return { props: { note: null } };
  }
  const note = await getNoteByID(id);

  return {
    props: { note },
  };
};
const Note = ({ note }) => {
  if (note == null) {
    return (
      <>
        <Head>
          <title>Login to view note</title>
          <meta name="description" content="Login to view this note" />
          <link rel="icon" href="/favicon.ico" />
        </Head>
        <div className={HomeStyles.container}>
          <main className={HomeStyles.main}>
            <header className="max-w-4xl mt-24 mx-auto">
              <h1 className="text-4xl">Oops... You have to login to view this note</h1>
            </header>
          </main>
        </div>
      </>
    );
  }
  return (
    <>
      <Head>
        <title>{note.title}</title>
        <meta name="description" content={`By ${note.user.name}`} />
        <link rel="icon" href="/favicon.ico" />
      </Head>
      <div className={HomeStyles.container}>
        <main className={HomeStyles.main}>
          <article className="note max-w-4xl m-auto mt-20">
            <header className="note-header">
              <h2 className="text-4xl">{note.title}</h2>
            </header>
            <main className=" px-4">
              <p className="text-xl">{note.body}</p>
            </main>
            <footer className="note-footer">
              <ul className="options px-4">
                <li className="option">
                  {/* add user image to note footer */}
                  <Image src={note.user.image} alt={note.user.name} width={48} height={48} className="rounded-full" />
                </li>
              </ul>
            </footer>
          </article>
        </main>
      </div>
    </>
  );
};
export default Note;
Next, in the ./components/NoteList.js component, we’ll use Next.js <Link> component to wrap our “open” button to route each note page by its id.
// ./components/NoteList.js

//...
<li className="option">
  <Link href={`/note/${note.id}`} target={`_blank`} rel={`noopener`}>
    <button className="cta cta-w-icon">
      <ExternalLinkIcon className="icon" />
      <span className="">Open</span>
    </button>
  </Link>
</li>

another word
//...
Now, if we click the open button, we’ll be taken to the note page.
We’re done! Awesome! You can also see the outcome hosted on Netlify and the code on the [basic-crud](https://github.com/miracleonyenma/next-notes-app-starter/tree/basic-crud) branch of the project repository on GitHub
Conclusion
It’s a popular fact that Next.js and Prisma are great for building fast full-stack applications. In this tutorial, we built a notes application where users can log in to the application thanks to NextAuth, create, view, edit and delete notes. All user information and notes are saved to a MongoDB database. To interact with the database from the Next.js application, we used the Prisma ORM, which helps us define our schema and create and connect to our database for us to manage it.
Further reading & resources
Here are some excellent links and resources to help you as you explore Next.js & Prisma
Code & hosted examples for this project
- Starter template on GitHub
- Starter example hosted on Netlify
- Basic auth implementation code on the
basic-authbranch of the project GitHub repo - Basic auth example hosted on Netlify
- Final project with basic CRUD functionality on the
basic-crudbranch of the project repo - Final example hosted on Netlify