Authentication in Next with LoginRadius


Authentication is the process of determining whether information about someone or something is, in fact, correct about who or what it says they are. Authentication deals with identifying a user and the user data. Users can implement authentication with username and password, fingerprint, OTP, and many more. Its technology provides access control for systems by scrutinizing to see if user/owner credentials match the credentials in a database of authorized users or a data authentication server. There are a few methods of performing authentications, such as fingerprints, face recognition, One Time Pin (OTPs), magic links, email and password, etc.
LoginRadius is a leading cloud-based consumer identity and access management (CIAM) solution that empowers businesses to deliver a delightful consumer experience and win consumer trust. It provides a no-code service for authorization, authentication, account security, and many more features to work with that will enable a safe and secured platform for users/clients’ data. It provides compelling features such as;
- Social Login
- Phone Login
- User Management
- Passwordless Login
- Single Sign-On
- Multi-Factor Authentication
- Standard Login (Email and Password)
In this article, we’ll show how to use LoginRadius for Next.js based web apps.
Authentication Patterns in Next.js
Next.js offers multiple authentication patterns, each application for different use cases. Although there are two main patterns which are;
- Client-Side Authentication
- Server-Side Authentication
Client-Side Authentication
Also known as a static generation pattern, using such a pattern you’ll initially serve a loading state from the server followed by loading user information on the client-side. Next.js will automatically determine if a page should be generated statistically if there are no blocking data requirements, so if you’re not using a getServerSideProps and getInitialProps that page will automatically render as static HTML. Serving a loading state from the server which has a really fast time to the first byte and then fetches the user information on the client-side, one advantage of the static generation patterns is that it allows your pages to be served from a global CDN because of they’re just static files and they can be pre-loaded using next.js link component. Let’s take a look at a good example of how client-side authentication works.
// pages/profile.js

import useUser from '../lib/useUser'
import Layout from '../components/Layout'

const Profile = () => {
  // Fetch the user client-side
  const { user } = useUser({ redirectTo: '/login' })

  // Server-render loading state
  if (!user || user.isLoggedIn === false) {
    return <Layout>Loading...</Layout>
  }

  // Once the user request finishes, show the user
  return (
    <Layout>
      <h1>Your Profile</h1>
      <pre>{JSON.stringify(user, null, 2)}</pre>
    </Layout>
  )
}

export default Profile
Server-Side Authentication
With a server-side authentication pattern, the request is sent from the browser to a server-side page on the Next.js app. When non-authenticated users try to access a protected page, they’re redirected to a login page. To fully understand how server-side authentication works with the following example:
// pages/profile.js

import withSession from '../lib/session'
import Layout from '../components/Layout'

export const getServerSideProps = withSession(async function ({ req, res }) {
  const { user } = req.session

  if (!user) {
    return {
      redirect: {
        destination: '/login',
        permanent: false,
      },
    }
  }

  return {
    props: { user },
  }
})

const Profile = ({ user }) => {
  // Show the user. No loading state is required
  return (
    <Layout>
      <h1>Your Profile</h1>
      <pre>{JSON.stringify(user, null, 2)}</pre>
    </Layout>
  )
}

export default Profile
Next.js Authentication With LoginRadius
Run the following command in your terminal to create a new Next.js application:
npx create-next-app@latestOnce that is done, you should create an account to get started with LoginRadius. You can as well sign up for free. When you have your account, copy down your credentials for your appName and apiKey from the dashboard. You’ll need them later during integration.
Next, we’ll install the LoginRadius React SDK into our project. Go to the project directory, and do:
npm install loginradius-reactAfter that, you’ll need to integrate the SDK by wrapping the root component with the SDK’s authentication provider. Also, you’ll pass the credentials (you copied down) to the provider. Navigate to pages/_app.js and update it with the following:
import Head from "next/head"
import { LRAuthProvider } from "loginradius-react"
import { ChakraProvider } from "@chakra-ui/react"
import Layout from "../layout/layout"

function MyApp({ Component, pageProps }) {
  return (
    <>
      <Head>
        <title>Loginradius Next</title>
      </Head>

      <LRAuthProvider
        appName="your-app-name"
        apiKey="your-api-key"
        redirectUri={"http://localhost:3000/"}
      >
        <ChakraProvider>
          <Layout>
            <Component {...pageProps} />
          </Layout>
        </ChakraProvider>
      </LRAuthProvider>
    </>
  )
}

export default MyApp
The above code snippet imports LRAuthProvider component from loginradius-react. Which passes the appName and apiKey taken from the LoginRadius account dashboard earlier to LRAuthProvider. The redirectUri is the callback URL where you want to redirect users after being authenticated. Whitelist the redirect_uri in your LoginRadius dashboard. localhost URLs are whitelisted by default.
After the integration of the React SDK, let’s move on by adding authentication functionality.
Open Source Session Replay
OpenReplay is an open-source, session replay suite that lets you see what users do on your web app, helping you troubleshoot issues faster. OpenReplay is self-hosted for full control over your data.

Start enjoying your debugging experience - start using OpenReplay for free.
Login and Logout
We’ll have to set up login and logout functions, because users should be able to log in and out of our Next application. Create a folder for our layout in the root directory, create a Nav.js file in it, and implement the following;
import { Button, Box } from "@chakra-ui/react"
import { useLRAuth } from "loginradius-react"

export default function Nav() {
  const { loginWithRedirect, logout } = useLRAuth()

  return (
    <Box>
        <Button onClick={() => loginWithRedirect()}>Login to continue</Button>
        <Button onClick={() => logout()}>Log out</Button>
    </Box>
  )
}
Note: we’ll be using Chakra UI for the UI component; check the link for installation.
We import the useLRAuth hook from the SDK. After that, it accesses the loginWithRedirect and logo methods from the useLRAuth hook.
Also, we’ll have to create a separate component layout.js in the layout folder below:
import { Box } from "@chakra-ui/react"
import Nav from "./Nav"

export default function Layout({ children }) {
  return (
    <Box h="100vh" bg="blue.100">
      <Box>{children}</Box>
      <Nav />
    </Box>
  )
}
And that’s it, we’ve added authentication to our Next application!
Authentication State Tracking
You need a way for tracking the authentication state. As the app owner, you need to know if there was/is a logged-in user and if such user has accurate information. You can have access to information about an authenticated user, such as name, and email address. The React SDK also comes along with isLoading and isAuthenticated. whenever isAuthenticated turns true means there’s an authenticated user otherwise there’s none.
Currently, we’re rendering both the login and logout buttons in the Nav component, but we really want to display the login button when there is no authenticated user, and show the log out option when there’s an authenticated user. Let’s update the Nav.js file with the following code:
import { Box, Button, Center, Flex, Stack } from "@chakra-ui/react"
import { useLRAuth } from "loginradius-react"
export default function Nav() {
  const { isAuthenticated, user, loginWithRedirect, logout } = useLRAuth()
  return (

    <Box>
        <Center mt={10}>
        {!user && (
          <Button onClick={() => loginWithRedirect()}>Login to continue</Button>
        )}
        {isAuthenticated && user && (
          <Button onClick={() => logout()}>Log out</Button>
        )}
      </Center>
    </Box>
  )
}
We’ll also update our pages/index.js file so that if there is a logged-in user, we want to redirect them to the profile page.
import { useEffect } from "react"
import { useRouter } from "next/router"
import { useLRAuth } from "loginradius-react"
import { Text, Heading, VStack, Center } from "@chakra-ui/react"
export default function Home() {
  const { isLoading, isAuthenticated, error, user } = useLRAuth()
  const router = useRouter()
  useEffect(() => {
    if (user && isAuthenticated) {
      router.push("/profile")
    }
  }, [router, user, isAuthenticated])
  if (isLoading) {
    return <div>Loading...</div>
  }
  if (error) {
    return <div>Oops... {error.message}</div>
  }
  return (
    <Center pt={10}>
      <VStack spacing={[6, 8]}>
        <Heading as="h2">Welcome to Openreplay Authentication Platform</Heading>
        <Text fontSize="3xl"> Click Login to Continue</Text>
      </VStack>
    </Center>
  )
}
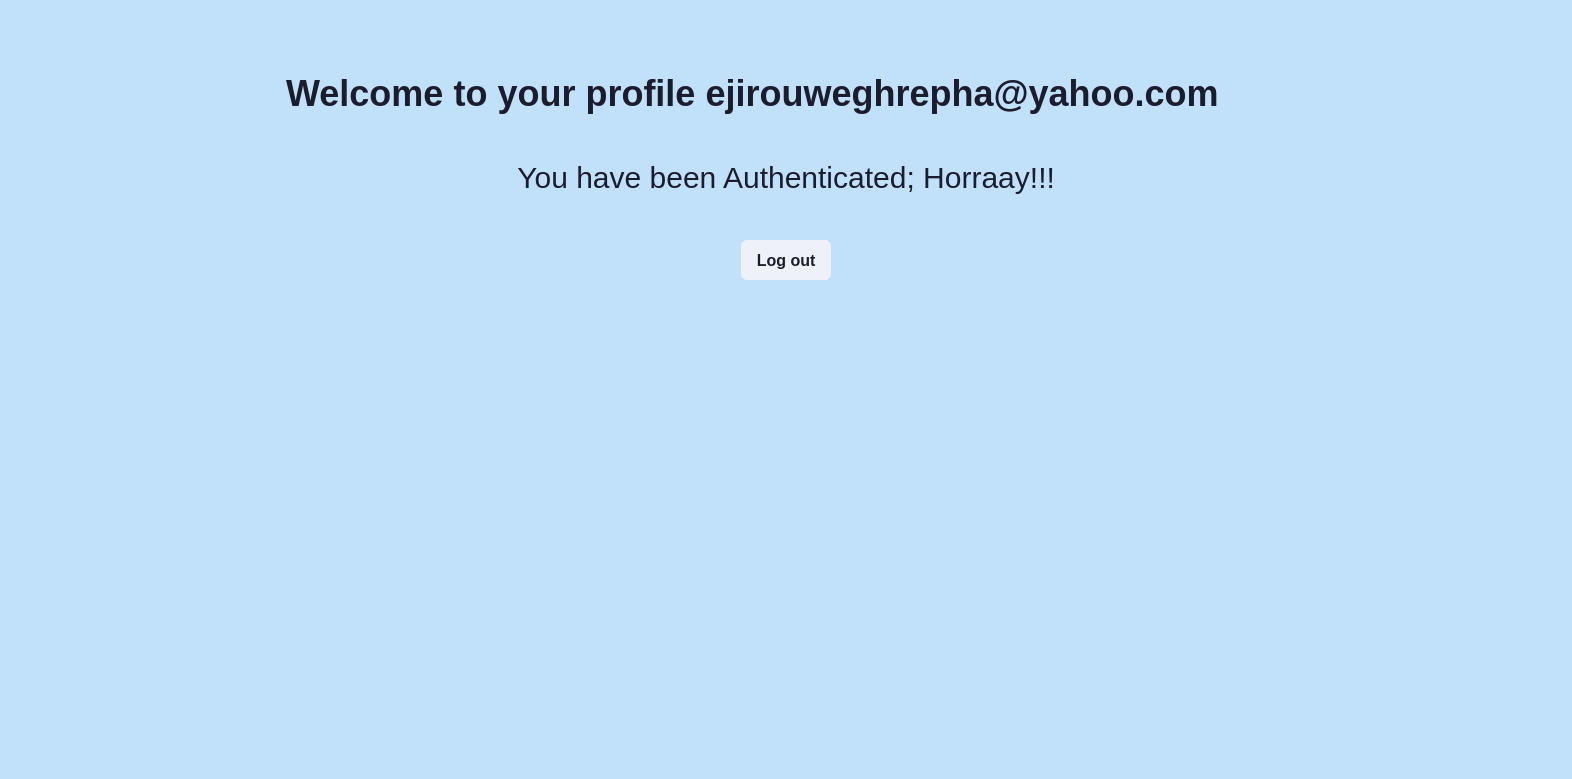
Display User Data
Since we want to display that information about the authenticated user, We’ll create a Profile.js in the page directory and implement that:
import {Text, Box, Center, Heading } from "@chakra-ui/react"
import { useLRAuth } from "loginradius-react"
export default function Profile() {
  const { user, isLoading, isAuthenticated } = useLRAuth()
  if (isLoading) {
    return <div>Loading...</div>
  }
  if (isAuthenticated) {
    return (
      <Box>
          <Heading ml='300' pt='20' a="h2">
            Welcome to your profile {user.Email[0].Value}
          </Heading>
        <Center mt={10}>
            <Text fontSize='3xl'>You have been Authenticated; Horraay!!!</Text>
        </Center>
      </Box>
    )
  }
}
Conclusion
We’ve covered Next.js Authentication patterns then we discussed a platform called LoginRadius, and how to integrate LoginRadius with our Next.js application for authentication. For the functional version of the code used in this tutorial on Github.