Build a Blockchain explorer with Solana and Next.js


A blockchain explorer is a tool that allows users to search, view, and verify the contents of a blockchain. Many blockchain explorers, such as Bitcoin, Ethereum, and Solana, are available.
The Solana Blockchain is a high-performance blockchain platform that supports large-scale decentralized applications. Some use cases for the Solana blockchain include decentralized finance (DeFi), non-fungible tokens (NFTs), gaming, and social media.
This article will look at building a blockchain explorer for the Solana blockchain using Next.js.
Setting up a Next.js Project
We will be building a Next.js application to interface with the Solana Blockchain. Next.js is a framework for building React applications. It is a popular choice for building React applications as it comes with so many features out of the box. This includes:
- File-based routing
- Server-side rendering
- Static site generation
- Automatic code splitting
To create a Next.js app, ensure you have Node.js v14.16.0 or newer installed on your machine. Once that is confirmed, open a terminal and run the code below.
npx create-next-app@latestThe above command bootstraps a Next.js application. You will be asked to
- Provide a name for the application
- Choose between Typescript and Javascript for bootstrapping the application
- Installing Eslint
After installation, navigate to the directory of the newly created application and run the code below to start the application.
npm run devOpen a browser and navigate to http://localhost:3000 to view the application.

To style this project, we will use Tailwind CSS, a utility CSS framework. Run the code below to add Tailwind CSS to the project.
npm install -D tailwindcss postcss autoprefixer
npx tailwindcss init -p
The above command will install the Tailwind CSS library and create a tailwind.config.js file. Open the file in a code editor and replace the content property. Your config should be similar to the code below.
module.exports = {
  content: [
    "./pages/**/*.{js,ts,jsx,tsx}",
    "./components/**/*.{js,ts,jsx,tsx}",
  ],
  theme: {
    extend: {},
  },
  plugins: [],
};
The content block helps tell tailwind the file directories to look for tailwind styles. Next, navigate to the styles directory and open the global.css file. Add the following imports at the top of the file.
@tailwind base;
@tailwind components;
@tailwind utilities;
We can now use tailwind in our project. Navigate to the index.js file in our pages directory and replace the code with the code below.
import Head from "next/head";

export default function Home() {
  return (
    <>
      <Head>
        <title>Create Next App</title>
        <meta name="description" content="Generated by create next app" />
        <meta name="viewport" content="width=device-width, initial-scale=1" />
        <link rel="icon" href="/favicon.ico" />
      </Head>
      <main className="w-full h-full max-w-2xl p-6 flex flex-col items-center justify-between gap-6 mx-auto relative">
        <h1 className="text-2xl">Solana Blockchain Explorer</h1>
      </main>
    </>
  );
}
Building out Components
Before getting the transaction history, let’s take a minute to build out the components we will use to display the transaction information.
Run the code below to install the libraries we will need
npm i axios date-fnsThis will install Axios, a promise-based data fetching library for JavaScript, and date-fns, a library for manipulating JavaScript dates.
After installation, navigate to the root directory and create a components directory. In the components directory, create a TransactionList.js file and paste the code below.
import React from "react";
import { fromUnixTime, format, formatDistanceToNow } from "date-fns";
import Link from "next/link";

const TransactionList = ({ transactionList, balance }) => {
  return (
    <div className="first-line:overflow-hidden transition-all duration-300 max-h-fit w-full h-full">
      {balance && (
        <h2 className="flex justify-between text-lg mb-4">
          Balance: <span>◎{balance}</span>
        </h2>
      )}
      {transactionList?.length > 0 && (
        <div className="overflow-x-auto">
          <table className="w-full border-spacing-x-4 -ml-4 border-separate">
            <thead className="text-left">
              <tr>
                <th className="font-medium">Signature</th>
                <th className="font-medium">Block</th>
                <th className="font-medium">Age</th>
                <th className="font-medium">Status</th>
              </tr>
            </thead>
            <tbody>
              {transactionList.map((transaction) => (
                <tr key={transaction?.signature}>
                  <td className="truncate max-w-[230px] text-blue-600 hover:underline">
                    <Link href={`/transaction/${transaction?.signature}`}>
                      {transaction?.signature}
                    </Link>
                  </td>
                  <td>{transaction?.slot}</td>
                  <td
                    className="whitespace-nowrap"
                    title={format(
                      fromUnixTime(transaction?.blockTime),
                      "MMMM d, yyyy 'at' HH:mm:ss OOOO"
                    )}
                  >
                    {formatDistanceToNow(fromUnixTime(transaction?.blockTime), {
                      includeSeconds: true,
                    })}
                  </td>
                  <td>
                    <span
                      className={`inline-block px-2 py-1 rounded-full text-xs font-bold leading-none text-white ${
                        transaction?.confirmationStatus === "finalized"
                          ? "bg-green-500"
                          : "bg-yellow-400"
                      }`}
                    >
                      {transaction?.confirmationStatus}
                    </span>
                  </td>
                </tr>
              ))}
            </tbody>
          </table>
        </div>
      )}
      {transactionList?.length <= 0 && (
        <div className="text-center">No transaction to display</div>
      )}
    </div>
  );
};

export default TransactionList;
This component will be used to display a list of transactions that will be gotten from the Solana blockchain. It takes a transactionList and balance as props and displays them on the UI.
In the components directory, create another file called SearchTransactionForm.js and paste the code below.
import React from "react";

const SearchTransactionForm = ({
  handleFormSubmit,
  address,
  loading,
  setAddress,
  errorMessage,
}) => {
  return (
    <form onSubmit={handleFormSubmit} className="flex flex-wrap w-full">
      <label htmlFor="address" className="w-full shrink-0 text-lg mb-2">
        Transaction address
      </label>
      <input
        type="text"
        name="address"
        value={address}
        onChange={(event) => setAddress(event.target.value)}
        className="w-3/4 border-2 border-r-0 border-gray-500 h-12 rounded-l-lg px-4 focus:outline-none focus:border-blue-600 disabled:bg-gray-500 transition-colors duration-150"
        placeholder="CHrNmjoRzaGCL..."
        disabled={loading}
        required
      />
      <button
        type="submit"
        disabled={loading}
        className="flex-grow bg-blue-600 flex items-center justify-center rounded-r-lg text-white text-sm hover:bg-blue-900 disabled:bg-gray-500 transition-colors duration-150"
      >
        Search
      </button>
      {errorMessage && (
        <p className="text-red-600 text-base my-1">{errorMessage}</p>
      )}
    </form>
  );
};

export default SearchTransactionForm;
This component displays the Search input form. It allows the user to enter an address and submit, which is expected to return the list of transactions.
Lastly, paste the code below to create another file called TransactionListDetail.js.
import React from "react";
import { fromUnixTime, format } from "date-fns";

const TransactionListDetail = ({ loading, transactionData }) => {
  return (
    <div className="w-full">
      {!loading && transactionData && (
        <div className="rounded-lg border max-w-xl overflow-x-auto mx-auto">
          <table className="table-auto w-full border-collapse p-4">
            <tbody className="overflow-x-scroll">
              <tr className="border-b">
                <td className="font-medium text-sm p-4">Signature</td>
                <td className="p-4">
                  {transactionData.transaction.signatures[0]}
                </td>
              </tr>
              <tr className="border-b">
                <td className="font-medium text-sm p-4">Timestamp</td>
                <td className="p-4">
                  {format(
                    fromUnixTime(transactionData?.blockTime),
                    "MMMM d, yyyy 'at' HH:mm:ss OOOO"
                  )}
                </td>
              </tr>
              <tr className="border-b">
                <td className="font-medium text-sm p-4">Recent Blockhash</td>
                <td className="p-4">
                  {transactionData.transaction.message.recentBlockhash}
                </td>
              </tr>
              <tr className="border-b">
                <td className="font-medium text-sm p-4">Slot</td>
                <td className="p-4">
                  {Intl.NumberFormat().format(transactionData.slot)}
                </td>
              </tr>
              <tr className="border-b">
                <td className="font-medium text-sm p-4">Fee</td>
                <td className="p-4">
                  ◎{transactionData.meta.fee / 1_000_000_000}
                </td>
              </tr>
              <tr className="border-b">
                <td className="font-medium text-sm p-4">Amount</td>
                <td className="p-4">
                  ◎
                  {transactionData.transaction.message.instructions[0].parsed
                    .info.lamports / 1_000_000_000}
                </td>
              </tr>
            </tbody>
          </table>
        </div>
      )}
      {!loading && !transactionData && (
        <p className="text-center">No transaction to display</p>
      )}
    </div>
  );
};

export default TransactionListDetail;
We will use this component to display the details of a particular transaction. It will accept the transactionData as props and use its details to display on the UI.
Session Replay for Developers
Uncover frustrations, understand bugs and fix slowdowns like never before with OpenReplay — an open-source session replay tool for developers. Self-host it in minutes, and have complete control over your customer data. Check our GitHub repo and join the thousands of developers in our community.
Get Transaction History from Solana
Now that we have our Next.js app up and running, the next step is adding Solana to our application. Luckily, Solana provides a well-maintained javascript library for interfacing with the Solana blockchain called @solana/web3.js. Run the code below to install the library.
npm install @solana/web3.jsAfter installation, go to pages/api and create a transactions.js file. We will be using Next.js API routes to fetch the user transactions. This allows us to separate the Solana config and business logic from the client. Open the transactions.js file and paste the code below.
import * as solanaWeb3 from "@solana/web3.js";

const DEV_NET = solanaWeb3.clusterApiUrl("devnet");
const solanaConnection = new solanaWeb3.Connection(DEV_NET);

const getAddressInfo = async (address, numTx = 3) => {
  const pubKey = new solanaWeb3.PublicKey(address);
  const transactionList = await solanaConnection.getSignaturesForAddress(
    pubKey,
    { limit: numTx }
  );
  const accountBalance = await solanaConnection.getBalance(pubKey);

  return { transactionList, accountBalance };
};

const handler = async (req, res) => {
  const queryAddress = req.query?.address;
  if (!queryAddress) {
    return res.status(401).json({
      message: "Invalid address",
    });
  }
  try {
    const { accountBalance, transactionList } = await getAddressInfo(
      queryAddress
    );
    return res.status(200).json({ transactionList, accountBalance });
  } catch (error) {
    console.log(error);
    return res.status(500).json({
      message: "Something went wrong. Please try again later",
    });
  }
};

export default handler;
We must import the library to use Solana in our transactions.js file. After that, we create a connection to a Solana RPC Node.
const DEV_NET = solanaWeb3.clusterApiUrl('devnet');
const solanaConnection = new solanaWeb3.Connection(DEV_NET);
A Solana RPC (Remote Procedural Call) node is a node that responds to requests about the network and allows users to submit transactions. Solana maintains some publicly available Nodes, which includes the DEV_NET. We will create a connection to the DEV_NET RPC Node, allowing us to get the transaction history and balance of an address transacted on the Node.
The next step is to create a function getAddressInfo to get the info we need from the Solana RPC Node. The function accepts an address and a number of transactions to get, which has been set to a default number of 3. To get transactions and perform most operations with @solana/web3.js, we will need a public key, a general identifier on Solana. A public key can be generated from a base58 encoded string, buffer, Uint8Array, number, and an array of numbers. We generate our public key from the user address, a base58 encoded string.
const pubKey = new solanaWeb3.PublicKey(address);To get the list of transactions, we use the getSignaturesForAddress method, which returns the list of transactions. The method requires a publicKey and an optional object for pagination.
const transactionList = await solanaConnection.getSignaturesForAddress(pubKey, { limit: numTx });The getBalance method returns the user balance and requires a public key.
const accountBalance = await solanaConnection.getBalance(pubKey);The handler function ties everything together and returns the details in a presentable way that can be displayed to the client.
Run the code below in a terminal to install libraries that will help us fetch and format the transactions properly.
Now return to the index.js file and paste the code below.
import Head from "next/head";
import { useState } from "react";
import axios from "axios";
import TransactionList from "../components/TransactionList";
import SearchTransactionForm from "../components/SearchTransactionForm";

export default function Home() {
  const [loading, setLoading] = useState(false);
  const [transactionList, setTransactionList] = useState([]);
  const [balance, setBalance] = useState(null);
  const [address, setAddress] = useState("");
  const [errorMessage, setErrorMessage] = useState("");

  const handleFormSubmit = async (event) => {
    try {
      event.preventDefault();
      setLoading(true);
      setErrorMessage("");

      const response = await axios.get(`/api/transactions/?address=${address}`);
      if (response.status === 200) {
        setTransactionList(response.data.transactionList);
        const accountBalanceText = response.data.accountBalance;
        const accountBalance = parseInt(accountBalanceText) / 1_000_000_000;

        accountBalance && setBalance(accountBalance);
      }
    } catch (error) {
      console.log("client", error);
      setErrorMessage(
        error?.response.data?.message ||
          "Unable to fetch transactions. Please try again later."
      );
    } finally {
    }

    setLoading(false);
  };
  return (
    <>
      <Head>
        <title>Solana Blockchain Explorer</title>
      </Head>
      <main className="w-full h-full max-w-2xl p-6 flex flex-col items-center justify-between gap-6 mx-auto relative">
        <h1 className="text-2xl">Solana Blockchain Explorer</h1>
        <SearchTransactionForm
          handleFormSubmit={handleFormSubmit}
          address={address}
          setAddress={setAddress}
          loading={loading}
          errorMessage={errorMessage}
        />

        <TransactionList transactionList={transactionList} balance={balance} />

        {loading && (
          <div className="absolute inset-0 bg-white/70 flex items-center justify-center">
            Loading
          </div>
        )}
      </main>
    </>
  );
}
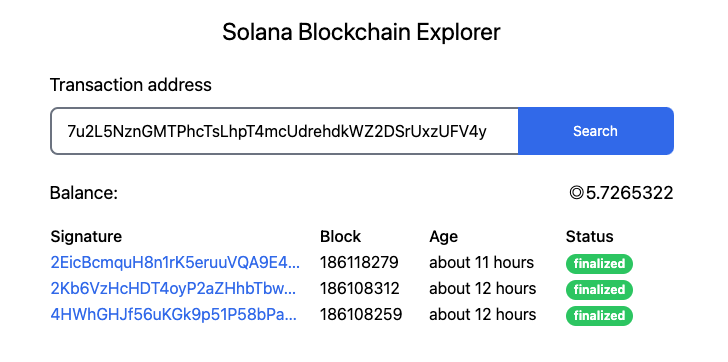
What we’ve done on this page is tie everything together. We display the SearchTransactionForm component created earlier to collect the address from the user. When the user submits the form, the handleFormSubmit function is called, which calls the transactions API we created earlier, passing the address as a parameter. If the search is successful, the API request returns the transactionData and balance which are passed as props to the TransactionList component to be displayed.
Save and reload your browser. You can now enter a Solana address and click the search button to fetch the transaction history. You should get a result similar to the screenshot below.
Get a Single transaction
We’ve looked at how to get a transaction list from the Solana web3 library and display it. In this section, we will look at how to get the details of a single transaction. Navigate to the api directory and create a transaction.js file. Open the file and paste the code below.
import * as solanaWeb3 from "@solana/web3.js";

const DEV_NET = solanaWeb3.clusterApiUrl("devnet");
const solanaConnection = new solanaWeb3.Connection(DEV_NET);

const handler = async (req, res) => {
  const transactionHash = req.body.transactionHash;
  if (!transactionHash) {
    return res.status(401).json({
      error: "Invalid transaction hash",
    });
  }
  try {
    const transaction = await solanaConnection.getParsedTransaction(
      transactionHash
    );
    return res.status(200).json(transaction);
  } catch (error) {
    console.log("Error:", error);
    return res.status(500).json({
      error: "Server error",
    });
  }
};

export default handler;
To get the details of a single transaction, we use the getParsedTransaction method, which requires a transaction hash. The transaction hash is obtained from the request body, which is provided to the handler function by Next.js. Depending on the result, we return a response to the client.
The next step is building a page to display the transaction details obtained from the API. Create a transaction directory in the pages directory. Navigate to the transaction directory and create a file called [id].js. This page is a dynamic route; whenever a user visits /transaction/gm12 or transaction/12gm, this page will be rendered in the browser. Open the file in your code editor and paste the code below.
import Head from "next/head";
import { useState, useEffect } from "react";
import axios from "axios";
import { useRouter } from "next/router";
import TransactionListDetail from "../../components/TransactionListDetail";

export default function TransactionDetail() {
  const [loading, setLoading] = useState(false);
  const [transactionData, setTransactionData] = useState();
  const [errorMessage, setErrorMessage] = useState("");
  const router = useRouter();

  useEffect(() => {
    const getTransaction = async () => {
      try {
        setLoading(true);
        setErrorMessage("");

        const response = await axios.post("/api/transaction", {
          transactionHash: router.query?.id,
        });

        if (response.status === 200) {
          setTransactionData(response.data.transaction);
        }
      } catch (error) {
        setErrorMessage(
          error?.response.data?.message ||
            "Unable to fetch transaction. Please try again later."
        );
      } finally {
        setLoading(false);
      }
    };

    getTransaction();
  }, [router.query?.id]);

  return (
    <>
      <Head>
        <title>Solana Blockchain Explorer: Transaction</title>
      </Head>
      <main className="w-full h-full p-6 flex flex-col items-center justify-between gap-6 mx-auto relative">
        <h1 className="text-2xl">Transaction</h1>
        {errorMessage && (
          <p className="text-red-600 text-base text-center my-1">
            {errorMessage}
          </p>
        )}

        <TransactionListDetail
          loading={loading}
          transactionData={transactionData}
        />

        {loading && (
          <div className="absolute inset-0 bg-white/70 flex items-center justify-center">
            Loading
          </div>
        )}
      </main>
    </>
  );
}
We are doing something similar to what we did on the homepage, but instead of taking input from the user and passing it to a function that calls the API, we are grabbing the input we need from the URL. When a user visits the /transaction/[id] route, the getTransaction function is called. The function requests the /api/transaction endpoint with the transaction hash, which is gotten from the route. If the request is successful, it returns the data, which is displayed on the page. An appropriate error message is also shown on the page if there is an error fetching the transaction details.
Now visit the app in your browser, and search for an address. When the results show up, click on a transaction to open the details on the transaction page.
Conclusion
In this article, we’ve looked at creating a blockchain explorer on the Solana blockchain. A blockchain explorer has many uses, and it can be part of a web3 app that allows users to view their transaction history, and it can also be a standalone app like the one we built above.
The code for this project is available here. You can also view a working example here.
Gain Debugging Superpowers
Unleash the power of session replay to reproduce bugs and track user frustrations. Get complete visibility into your frontend with OpenReplay, the most advanced open-source session replay tool for developers.