Build A Blog with Google Sheets as a Headless CMS
Use Google Sheets in an unexpected CMS role


Google Sheets is a cloud-based spreadsheet application that you can use to store and organize your blog data, and it can be easily accessed and updated from anywhere. React is a powerful JavaScript library that you can use to build dynamic and interactive user interfaces for your blog.
In this step-by-step guide, I’ll show you how to build a simple yet customizable blog using React and Google Sheets. I’ll cover all the necessary components, including setting up a development environment, integrating Google Sheets with your React app, and deploying your blog to the web.
This guide is perfect for you if you want to build a simple blog without the cost and complexity of a full-fledged CMS like WordPress.
Here is a quick demo of what we will be building today, and here is the Google Sheets spreadsheet that powers it.
Here is the project Github page.
Setting up Google Sheets
When setting up your Google Spreadsheet, the first thing you’ll need is a Google Account (obviously). If you have a Google account, head over to docs.google.com/sheets and create a new spreadsheet.
Note If you don’t have a Google Account, you can create an account with Google through accounts.google.com.
Populate the cells of the first row in your Google Sheets with the following information: In cell A1, enter “Title”. In cell B1, enter “Content”. In cell C1, enter “Author”. In cell D1, enter “Date,” and finally in cell E1, enter “Tags” These labels will serve as the headers for your blog post information in the subsequent rows of your sheet. At this point, your Spreadsheet should look something like this:
| A | B | C | D | E | |
|---|---|---|---|---|---|
| 1 | Title | Content | Author | Date | Tags |
The Title column is where the title of our blog post will live, the Content column will contain the contents of our blog posts, the Author column contains the name of the blog post author, and the Date column will contain the publication date of our blog post. Here is a link to the already populated Google Sheets spreadsheet that was used in this tutorial.
This is what my spreadsheet looks like after it has been populated:
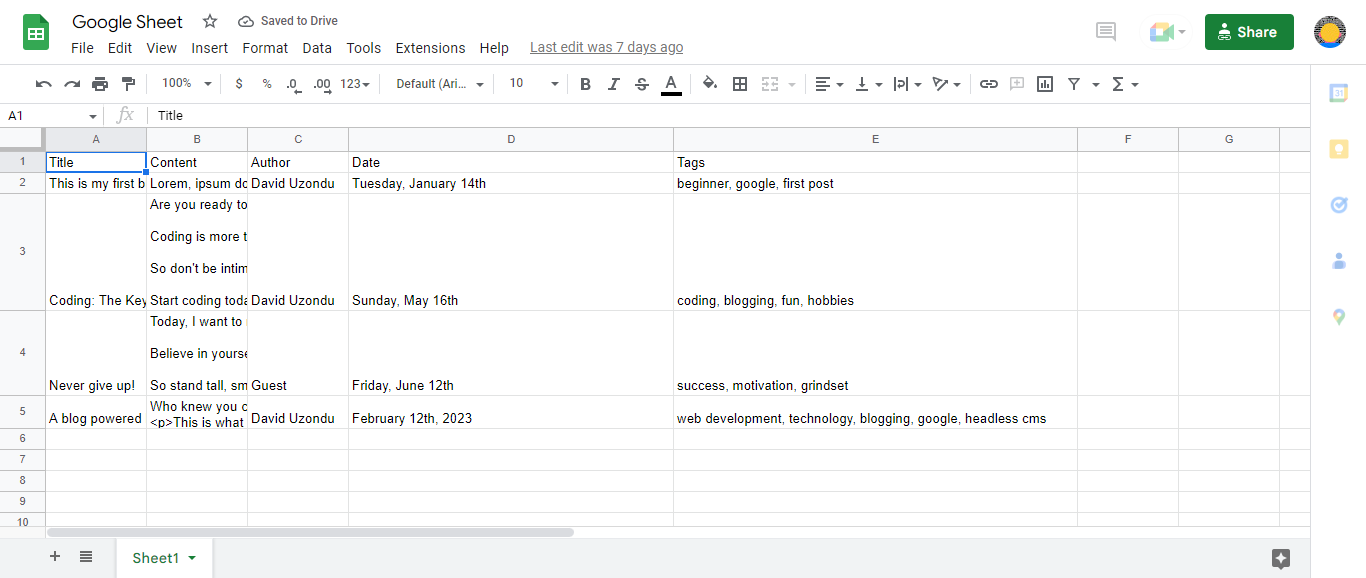
Note The Tags column will contain the tags for each post, separated by a comma. This is very important. For example: “web development, coding, beginner”.
Setting Up the Google Sheets API
Before you move on to the next part of this guide, you need to grab your spreadsheet ID, and this is a fairly simple process. If the URL to your Google Sheets spreadsheet is https://docs.google.com/spreadsheets/d/1YvOk7KB8gdkxWAKSGemzwTHHWLD7ZhS1Jzp75VRAKxI/edit#gid=0 then your spreadsheet ID is 1YvOk7KB8gdkxWAKSGemzwTHHWLD7ZhS1Jzp75VRAKxI. Keep this ID in mind because, without it, you cannot access your spreadsheet.
The Google Sheets API offers a REST-based method for interacting with spreadsheets. You can perform actions like establishing spreadsheets, reading and altering cell contents, adjusting the format of the sheet, and handling linked spreadsheets with this API.
Before using the Google Sheets API, you need to enable the API from your Google Cloud Console
- On the Google Cloud Console, click the ‘Create Project’ button to create a new project. You can name your project anything you want but do keep in mind that your project name cannot be changed later. In my case, I will name the project “sheets-project”.
- Click the Create project button, and you will be taken to a screen that looks something like this:
- Click “Next” to proceed and then click “Enable”. If all goes well, the ‘Enable’ button should be greyed out.
- You should now be redirected to the Project dashboard. Click on the APIs & Services navigation item in the sidebar.
- Now, you can enable access to the Google Sheets API. Click the
+ ENABLE APIS AND SERVICESbutton. - On the search bar at the top, search for “Google Sheets API” and select it, then enable access to the API by clicking the “Enable” button.
- On the sidebar, click on “Credentials” and then click on the “Create Credentials” button at the top. A drop-down menu should appear, then click on ‘API keys’.
- Wait for the API key to be created. You can copy this key because it will come in handy later.
- Now that the API key is created, click on the three dots icon on the right and select “Edit API Key” from the drop-down menu.
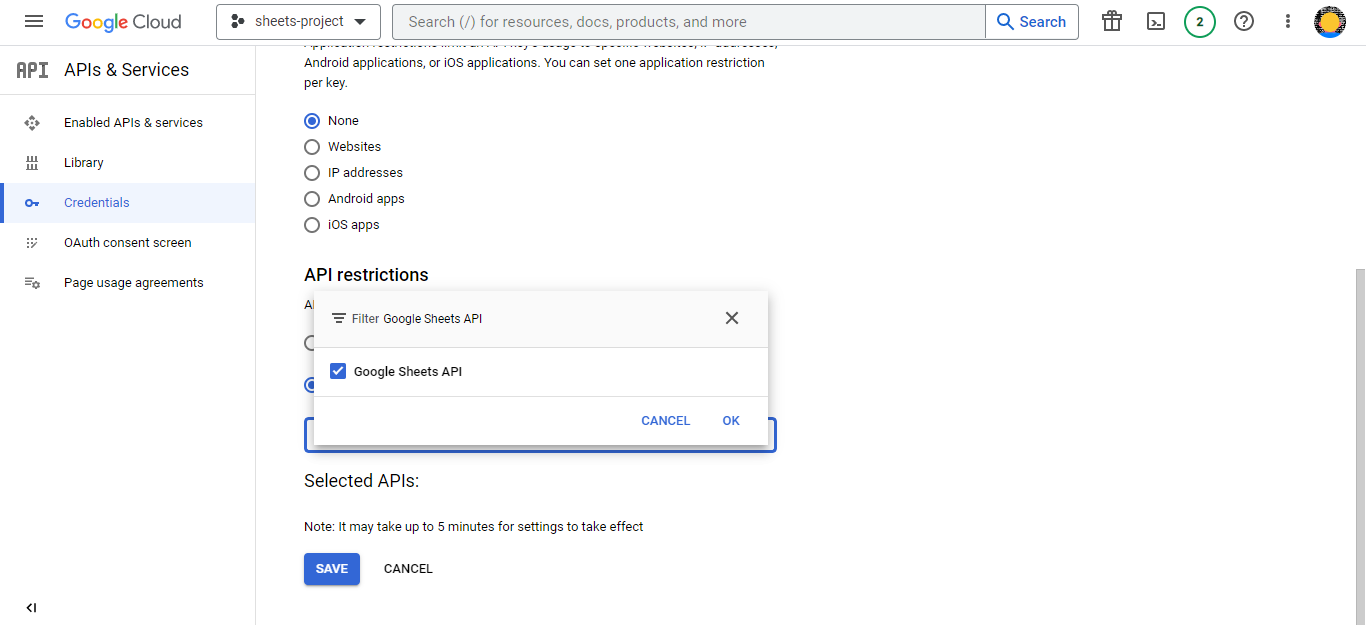
- Rename the API Key to “Google Sheets API”. Scroll down to the “API Restrictions” section and click the “Restrict key” radio button. A drop-down box should appear now.
- Click the drop-down box and search for “Google Sheets API”.
- Make sure the “Google Sheets API” checkbox is checked, like so:
Now that you have set up your Google Sheets API, you should be ready to move on to the next part of this guide.
Setting up the front end
For this part of the guide, you will use create-react-app to build the front end. We will use React Router for routing and HTMLParser to parse any HTML tags that may be in the content returned by the API
- Open your terminal and run
npx create-react-app google-sheet-blog- After running the process, you run
cd google-sheet-blogand thennpm start. This should start up a local development server, allowing you to view and test the application on your local machine. You can access the application by navigating tohttp://localhost:3000in your web browser. - In the src directory, create a new folder called
Pages. In this folder, go ahead and create four new.jsfiles, namely:BlogPage.js,HomePage.js,PostPage.js, andPostNotFound.js. - Now, delete everything in
App.csssuch thatApp.cssis just an empty file.
Setting up the routes
- In your terminal, run:
npm i react-router-domThis will install React Router, which will allow us to set up routing on our front end.
- Navigate to
index.js. Here you will import theBrowserRoutercomponent from thereact-router-domlibrary by adding the following lines to the top level of the document.
import { BrowserRouter } from 'react-router-dom';- Now, in the
rendermethod, you will wrap the<App />component with the imported<BrowserRouter>component, such that therendermethod looks something like this:
<React.StrictMode>
    <BrowserRouter>
        <App />
    </BrowserRouter>
</React.StrictMode>- Now navigate to
App.jsand import the following components:Route,Routes,useLocation, andLinkfromreact-router-dom.
import { Route, Routes, useLocation, Link } from 'react-router-dom';- Now import the following pages:
BlogPage.js,HomePage.js,PostPage.jsandPostNotFound.js
import Homepage from './Pages/Homepage';
import Blogpage from './Pages/Blogpage';
import PostNotFound from './Pages/PostNotFound'
import FindPage from './Pages/FindPage';- Delete all the child elements of the
<div className="App">and replace them with the following:
{
  location.pathname !== "/" && (
    <nav>
      <Link to={"/"}>
        <div className="home">
          <span>🏠 Take me Home</span>
        </div>
      </Link>
    </nav>
  );
}
<Routes>
  <Route path="/" element={<Homepage />} />
  <Route path="/posts/:id" element={<Blogpage />} />
  <Route path="/tags/:tag" element={<FindPage />} />
  <Route path="*" element={<PostNotFound />} />
</Routes>;
The code above uses the Routes and Route components from the @react-route-dom/core library to render different pages in a React application.
The code starts with a conditional statement that checks whether the current location pathname is not equal to ”/”. If this condition is true, a navigation component is rendered.
This component contains a Link component that points to the root route ”/”, and a div with a class name ‘home’ that displays a message to take the user back home.
The Routes component is then used to define multiple Route components. Each Route component has a path property that defines a URL pattern and an element property that defines the component to be rendered when the corresponding URL is matched. :id and :tag are placeholders for a dynamic parameter in the URL.
Setting up the useFetch hook
To retrieve data from the API, you will need a custom hook named useFetch. In your src folder, create another folder called Hooks and in that folder create a new file called useFetch.js. You will also need the spreadsheet ID and your API key. Import the useState and useEffect hooks from react.
import { useEffect, useState } from 'react'- Define your function
useFetchand pass in the parameter ofid
function useFetch(id){

}

export default useFetch- In the function, define the following:
const SPREADSHEET_ID=YOUR_SPREADSHEET_ID;
const API_KEY=YOUR_API_KEY;
const [data, setData] = useState([])
const [loading, setLoading] = useState(true);
const [error, setError] = useState(null);
const [exists, setExists] = useState(null);
let url;
Make sure you replace YOUR_SPREADSHEET_ID with your actual spreadsheet ID and YOUR_API_KEY with your actual API key.
- Next, add the following lines to your code:
if (id === "all") {
  url = `https://sheets.googleapis.com/v4/spreadsheets/${SPREADSHEET_ID}/values/Sheet1?key=${API_KEY}`;
} else {
  url = `https://sheets.googleapis.com/v4/spreadsheets/${SPREADSHEET_ID}/values/Sheet1!${id}:${
    id + 1
  }?key=${API_KEY}`;
}
The code uses an if statement to determine the value of a URL. It checks the value of the id variable. If id is equal to the string “all”, the URL is set to a URL string that fetches all the data from the Google Sheets API. The URL string is constructed using string interpolation and the SPREADSHEET_ID and API_KEY variables.
Otherwise, if id is not equal to “all”, the URL is set to a URL string that fetches specific data from the Google Sheets API. In this case, the URL string is constructed by specifying a range of cells in the Google Sheet to retrieve. The range of cells is defined using the id variable, which is used to specify the start of the range, and id + 1, which is used to specify the end of the range.
Note The Google Sheets A1 notation is a syntax used to specify cell references or ranges of cells in a sheet using a string that combines the sheet name with the starting and ending cell coordinates, which are specified using column letters and row numbers. This notation is the most commonly used and is useful for referencing an absolute range of cells. For example:
Sheet1!1:2refers to all the cells in the first two rows of Sheet1.
- Now add the following lines to your code:
useEffect(() => {
  fetch(url)
    .then((res) => {
      if (res.status !== 200) {
        setError(true);
        throw new Error("Something went wrong!");
      }
      return res.json();
    })
    .then((data) => {
      // Check if the data object has a 'values' key.
      if (!data.hasOwnProperty("values")) {
        setLoading(false);
        setExists(false);
      } else {
        let sheetArray = data.values;
        const jsonData = sheetArray.slice(1).map((value, index) => ({
          id: index + 1,
          title: value[0],
          content: value[1],
          author: value[2],
          date: value[3],
          tags: value[4],
        }));
        console.log(sheetArray.length);
        if (sheetArray.length === 1) {
          setError(true);
          setExists(false);
        } else {
          setData(jsonData);
          setExists(true);
        }
        setLoading(false);
      }
    })
    .catch(() => {
      setError(true);
    });
}, []);

return { data, loading, error, exists };
Here a useEffect hook is used to fetch data from an API. The hook is used to manage the component’s state and side effects. The API URL is passed as a variable url.
The fetch method is used to retrieve the data from the API. The returned promise is handled by the .then method, which takes a callback function that processes the response. If the response’s status code is not equal to 200, this indicates an error, so the error state is set to true, and a new error is thrown with the message “Something went wrong!”. If the status code is 200, which indicates a successful response, the res.json() method is used to extract the JSON data from the response object. The extracted JSON data is then processed to extract the required values and store them in the data state variable. We assign the values property of the data to the variable sheetArray. The sheetArray variable is simply an array of arrays where each array represents a row and the contents of each cell in that row. The first array is not needed.
The processing involves using the .map method to loop through the sheetArray array, starting from the second item in the array sheetArray.slice(1), and returning an object with id, title, content, author, date, and tags properties. The returned object is stored in jsonData.
Before storing the jsonData in the data state, a check is performed to see if the sheetArray is of length 1. If this is the case, it indicates that the data does not exist, so the error state is set to true, and the exists state is set to false. If the sheetArray has more than one item, the jsonData is stored in the data state, and the exists state is set to true.
After processing the data, the loading state is set to false to indicate that the data has been loaded. In the event of any errors during the fetch and processing, the catch block is executed, which sets the error state to true.
Finally, the useEffect hook is specified to run only once on the component mount, as specified by the empty array as the second argument. This means that the hook will only run when the component is initially rendered and will not run on subsequent updates.
The function returns an object with data, loading, error, and exists properties that can be used within the component. The component can use these properties to render the data, display a loading state, handle errors, and check if the data exists.
Setting up our homepage
The homepage is what will be displayed to the user when he/she visits the website. The homepage will display all the blog posts, and when the user clicks on a particular post, he will be taken to another page to read the post.
- Navigate to the
HomePage.jscomponent and add the following lines:
import React from 'react'
import useFetch from '../Hooks/useFetch';
import HTMLReactParser from 'html-react-parser';
The code is importing three things in the React application:
React: The main React library that provides the basic functionality for building React components and working with the React DOM.useFetch: A custom hook, which is a reusable piece of logic for managing state and side effects in a functional component. It is used for fetching data from the Google Sheets API.HTMLReactParser: A library used for parsing HTML strings and converting them into React components. This library allows developers to safely render user-generated content as React components and avoid potential security issues like XSS attacks.
- Now define a functional component in React called
HomePage. This component returns the JSX code that will be rendered on the screen. The component is then exported as the default export of the module.
function HomePage(){

}
export default HomePage- Now in the functional component, add the following code:
const { data, error } = useFetch("all");
return (
  <>
    <header>
      <h1>Google Sheets Blog</h1>
      <h4>A simple blog powered by Google Sheets</h4>
      <div>Showing {data.length} posts</div>
    </header>
    {!error ? (
      <div>
        {
          // Sort through the array in ascending order
          data
            .sort((a, b) => b.id - a.id)
            .map((element) => {
              return (
                <div
                  className="post-card"
                  key={element.id}
                  onClick={() => window.open(`/posts/${element.id}`, "_self")}
                >
                  <h2>{element["title"]}</h2>
                  <div>
                    <em>
                      Posted on {element["date"]} by {element["author"]}
                    </em>
                  </div>
                  <h5>
                    {HTMLReactParser(
                      element["content"].length > 500
                        ? element["content"].substring(
                            0,
                            element["content"].length -
                              (90 / 100) * element["content"].length
                          )
                        : element["content"]
                    )}
                    ...
                  </h5>
                  <div className="read-more">Read more</div>
                </div>
              );
            })
        }
      </div>
    ) : (
      <h3 style={{ textAlign: "center" }}>
        Something went wrong. Check your internet connection...
      </h3>
    )}
  </>
);
Here we make use of the custom hook useFetch to fetch data from a Google Sheet and display a blog powered by the data.
The const declaration destructures the object returned by the useFetch hook and assigns the value of data to data and the value of error to error. The component then uses this data to render a header for the blog that displays the number of posts by using data.length and also checks for errors using a ternary operator.
The ternary operator checks if there’s an error, and if there isn’t, it renders a section that maps through the data array and displays each post as a card. It sorts the array of data by post ID in descending order and maps through the array to create a div for each post.
For each post, it sets the key prop to the post id, so React can keep track of each element. It also sets a click event listener on the div that opens the post on a new page. Each post card displays the title, date, author, content, and a “Read more” link.
The code trims the post content to 10% of its original length if the content length is greater than 500, and it uses the HTMLReactParser library to parse the HTML content of the content property and display it in the post card. The purpose of HTMLReactParser is to parse HTML strings as React elements. This is useful in this case because the content of the posts is stored as a string in the Google Sheets Spreadsheet and could contain HTML tags. The library helps to display the content as HTML rather than a string.
Session Replay for Developers
Uncover frustrations, understand bugs and fix slowdowns like never before with OpenReplay — an open-source session replay tool for developers. Self-host it in minutes, and have complete control over your customer data. Check our GitHub repo and join the thousands of developers in our community.
Setting up our blog page
The blog page is the page where the user will be taken to when he/she clicks on a particular post from the home page.
- Navigate to the
BlogPage.jscomponent and add the following lines:
import React from 'react'
import useFetch from '../Hooks/useFetch';
import { useParams } from 'react-router-dom';
import { Link } from 'react-router-dom';
import HTMLReactParser from 'html-react-parser';
useParams is a hook from the ‘react-router-dom’ library that allows you to access the dynamic parts of the URL in a functional component. In other words, it allows you to retrieve the value of a specific URL parameter and use it in your component.
Link is a component from the ‘react-router-dom’ library that provides navigation between different pages in a single-page application. This component is used instead of the standard a tag for navigation because with Link you can update the content of your application without requesting a new page from the server, making navigation faster and smoother for users.
- Now define a functional component called
BlogPageand export the component as the default export of the module.
function BlogPage(){

}
export default BlogPage- In the functional component, add the following lines of code:
const { id } = useParams();
const { data, loading, error, exists } = useFetch(parseInt(id));
if (!loading && exists) {
  return (
    <div>
      {data.map((element) => {
        return (
          <div key={element.id}>
            <div>
              <h1 className="title">{element.title}</h1>
              <div className="post-info">
                <div className="author">{element.author}</div>
                <div className="date">{element.date}</div>
              </div>
            </div>
            <div className="content">{HTMLReactParser(element.content)}</div>
            <div className="tags">
              {element.tags.split(",").map((tag) => {
                return (
                  <Link
                    className="tag"
                    style={{ textDecoration: "none" }}
                    to={`/tags/${tag.trim()}`}
                  >
                    <span>#{tag}</span>
                  </Link>
                );
              })}
            </div>
          </div>
        );
      })}
    </div>
  );
}
// Check for internet error
if (error) {
  return (
    <h1 style={{ textAlign: "center" }}>
      Something went wrong. Check your internet connection...
    </h1>
  );
}
// Check if post has stopped loading and post does not exist.
if (!loading && !exists) {
  window.open("/*", "_self");
}
if (loading) {
  return (
    <>
      <h1>Loading...</h1>
    </>
  );
}
Here we perform conditional rendering based on the data returned by the useFetch hook, which is a custom hook that fetches data from a remote source, in this case, Google Sheets. The code uses the useParams hook from react-router-dom to extract the id from the URL parameters.
The useFetch hook returns three values: data, loading, and error. The data value contains the actual data that has been fetched from the remote source, the loading value represents whether the data is currently being fetched or not, and the error value represents whether an error has occurred during the data fetch.
The code checks the loading and exists values to determine what should be rendered on the screen. If loading is false and exists is true, then the fetched data is rendered on the screen using the data value. If there was an error while fetching the data, the code will render a message “Something went wrong. Check your internet connection…”.
If loading is false and exists is false, it means that the post with the specified id does not exist, and the code will redirect the user to a different page. If loading is true, it means that the data is still being fetched, so a “Loading…” message is displayed on the screen.
element.tags is a string containing comma-separated tags for the post. The .tags div maps over the split tags array and returns a Link component for each tag. The Link component takes the user to a page that shows all posts with the same tag. The tag.trim() method is used to remove whitespaces from the tag.
Setting up our tag page
In the previous section, you added functionality that displays the post tags. Now, when each of these tags is clicked, the user should be directed to a page that displays posts that have a similar tag. Let’s implement that:
- Navigate the
FindPage.jscomponent and add the following lines
import React from 'react'
import { useState, useEffect } from 'react';
import HTMLReactParser from 'html-react-parser';
import useFetch from '../Hooks/useFetch';
import { useParams } from 'react-router-dom';- Now define a functional component called
FindPageand export the component as the default export of the module.
function FindPage(){

}
export default FindPage- In the
FindPagecomponent, add the following lines
const [similarPosts, setSimilarPosts] = useState([]);
const [notFound, setNotFound] = useState(false);
const { tag } = useParams();
const { data, loading, error } = useFetch("all");
useEffect(() => {
  let posts = [];
  posts = data.find((obj) => {
    if (obj.tags.includes(tag)) {
      posts.push(obj);
      setSimilarPosts(posts);
      setNotFound(false);
    } else {
      setNotFound(true);
    }
  });
}, [data]);
if (similarPosts.length !== 0) {
  return (
    <div className="search-results">
      <h1>Showing posts with tag: "{tag}"</h1>
      {similarPosts
        .sort((a, b) => b.id - a.id)
        .map((element) => {
          return (
            <div
              className="post-card"
              key={element.id}
              onClick={() => window.open(`/posts/${element.id}`, "_self")}
            >
              <h2>{element["title"]}</h2>
              <div>
                <em>
                  Posted on {element["Date"]} by {element["author"]}
                </em>
              </div>
              <h5>
                {HTMLReactParser(
                  element["content"].length > 500
                    ? element["content"].substring(
                        0,
                        element["content"].length -
                          (70 / 100) * element["content"].length
                      )
                    : element["content"]
                )}
                ...
              </h5>
              <div className="read-more">Read more</div>
            </div>
          );
        })}{" "}
    </div>
  );
}
if (notFound) {
  return <h1>Error! No posts with tag: "{tag}" was found...</h1>;
}
if (error) {
  return (
    <h1 style={{ textAlign: "center" }}>
      Something went wrong. Check your internet connection...
    </h1>
  );
}
if (loading) {
  return <h1>Searching for posts with tag: "{tag}"...</h1>;
}
The component starts by defining three state variables: similarPosts, notFound, and data, loading, and error using useState hook. similarPosts is an array that will hold the posts that match the specified tag, notFound is a boolean variable that indicates whether or not posts matching the tag were found, and data, loading, and error are used to manage the state of a fetch request that is made to the API.
The component then uses the useEffect hook to make a fetch request to the API. In the useEffect hook, it finds the posts that match the tag using the .find method on the data array. If there is a match, it pushes the matching post to the similarPosts array and sets the notFound to false. If there is no match, it sets the notFound to true.
Finally, the component returns a different output depending on the state of similarPosts, notFound, error, and loading:
- If there are matching posts in the
similarPostsarray, the component returns a list of those posts along with a header indicating the matching tag. - If
notFoundis true, the component returns an error message indicating that no posts were found with the matching tag. - If
erroris true, the component returns an error message indicating that there was a problem with the fetch request. - If
loadingis true, the component returns a message indicating that the component is searching for posts with the specified tag.
Setting up our PostNotFound Page
If the user inputs the URL for a post that doesn’t exist, he will be redirected to a page that tells him that the post does not exist.
- Navigate to the
PostNotFoundpage and add the following lines:
import React from "react";
function PostNotFound() {
  return (
    <h1 style={{ textAlign: "center" }}>Sorry this post does not exist</h1>
  );
}
export default PostNotFound;
Styling our homepage
Clear the contents of the index.css file and replace it with the following:
@import url("https://fonts.googleapis.com/css2?family=Quicksand:wght@300;400;500;600;700&family=Source+Code+Pro:ital,wght@0,400;0,500;0,600;1,400;1,500&display=swap");

body {
  margin: 0 auto;
  width: 80vw;
  font-family: "Quicksand", sans-serif;
}

@media (max-width: 768px) {
  body {
    width: 90vw;
  }
}
.post-card:hover {
  outline: solid 2px;
  transform: scaleX(1.03);
  box-shadow: 0px 2px 5px 0px;
  transition: 250ms ease-in-out;
}
.post-card {
  padding: 30px;
  transition: 250ms ease-in-out;
  margin: 20px;
  cursor: pointer;
  background-color: #f5f5f5;
  border-radius: 12px;
}

header {
  text-align: center;
}

.content {
  font-weight: 500;
  text-align: justify;
}

.content a {
  text-decoration: none;
  max-width: min-content;
  background-color: rgb(19, 106, 206);
  padding: 3px;
  color: white;
  line-height: 30px;
  border-radius: 4px;
  transition: 250ms;
}
.content a:hover {
  background-color: rgb(15, 74, 142);
  transition: 250ms;
}
.content a::before {
  content: "▶ ";
}

code {
  font-family: "Source Code Pro", monospace;
}

.code-block {
  background-color: whitesmoke;
}

.post-info {
  display: flex;
  margin-bottom: 10px;
  font-style: italic;
}

.post-info .author {
  flex: 1;
}

.title {
  margin: 10px 0px 10px 0px;
  font-size: 40px;
}

.tags {
  max-width: fit-content;
  display: flex;
  flex-wrap: wrap;
  margin-top: 15px;
  margin-bottom: 15px;
}

.tag {
  background-color: rgb(234, 115, 36);
  color: rgb(8, 8, 8);
  padding-left: 10px;
  padding-right: 10px;
  padding-top: 5px;
  padding-bottom: 5px;
  border-radius: 10px;
  cursor: pointer;
  font-weight: 600;
  object-fit: contain;
  margin-top: 15px;
  margin-right: 15px;
}
.tag a {
  color: initial;
}
.home {
  margin: 0 auto;
  padding: 10px;
  border-radius: 10px;
  margin-top: 20px;
  margin-bottom: 20px;
  background-color: rgb(236, 160, 109);
  width: fit-content;
  transition: 250ms;
  cursor: pointer;
}

.home:hover {
  background-color: rgb(249, 143, 73);
  transition: 250ms;
}

nav a {
  text-decoration: none;
  color: black;
  font-weight: 600;
}

.read-more {
  color: rgb(88, 88, 249);
  font-weight: 700;
}

.read-more:hover {
  text-decoration: underline;
}

.read-more::after {
  content: " 🡪";
}
Conclusion
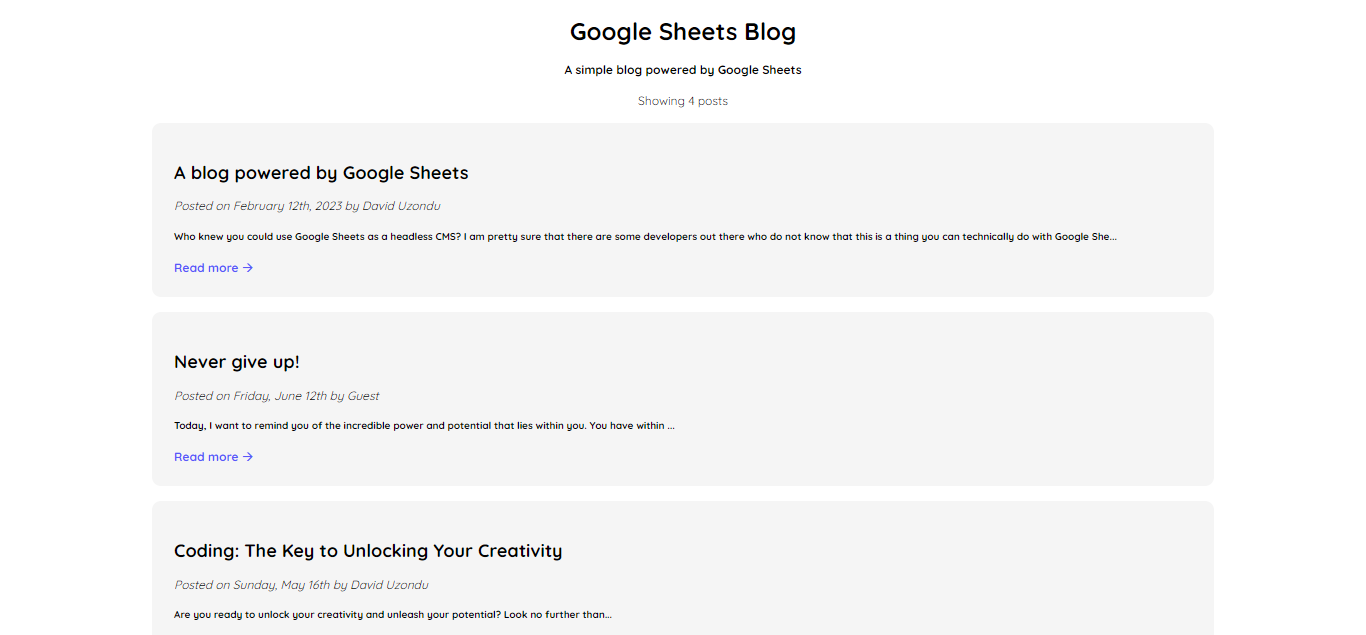
And that’s it! We have successfully created a blog with Google Sheets as the headless CMS. You can now build the project with npm run build and upload the build folder to any hosting platform of your choice (in my case, I chose Netlify). Here is what the blog looks like:
It is exciting that we can create a blog using Google Sheets as our database. However, it is important to note that there are some limitations to keep in mind:
- Google Sheets is not ACID-compliant. ACID means Atomicity, Consistency, Isolation, and Durability, and it represents a set of properties that ensure reliable and consistent processing of transactions in a database.
- Spreadsheets created in Google Sheets have a maximum number of about 10 million cells, which means it is not suitable for gigantic projects.
Finally, if using Google Sheets as your headless CMS is not your thing, you can check out services like Hygraph, Contentful, ButterCMS, and Strapi. You can also check out Google Firebase RealTime Database.
Gain Debugging Superpowers
Unleash the power of session replay to reproduce bugs and track user frustrations. Get complete visibility into your frontend with OpenReplay, the most advanced open-source session replay tool for developers.