A mind map is a visual representation of thoughts, concepts, information, or tasks grouped around a common theme or issue. A mind map application is a software application that allows you to create, visualize, and organize your thoughts, ideas, and information as a mind map. This article will show you how to implement a mind-mapping app of your own.

Discover how at OpenReplay.com.
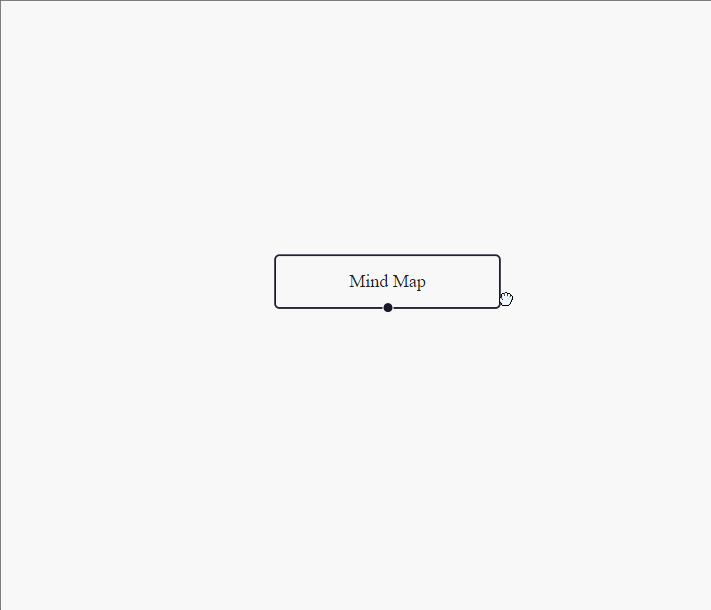
Before we get started, I’d like to show you the mind-mapping application that we’ll have by the end of this tutorial:

What is React Flow?
React Flow is an open-source toolkit that generates interactive diagrams, flowcharts, and visualizations within React applications. It provides a powerful way to create and manage complex visualizations such as mind maps, network diagrams, organizational charts, etc. React Flow is built on top of React and uses modern web technologies to deliver a unified user experience.
Thousands of users use React Flow, ranging from individual open-source developers to large corporations such as Stripe and Typeform. The library has been used in data processing tools, chatbot builders, machine learning, musical synthesizers, and other applications.
Choosing a library that meets your needs can be difficult due to the abundance of possibilities in the developing industry. However, employing React Flow, mind mapping, and planning and architecting your project may be simplified, saving you time and frustration.
Despite having numerous competitors in the market, React Flow stands out as one of the greatest frameworks for mind mapping and flow, and it continues to benefit users throughout the development process of huge projects.
In this tutorial, you will learn how to create a basic mind map app with React Flow that can be used for brainstorming, structuring an idea, or visually mapping your thoughts.
Project setup
Let’s start by scaffolding our React app. Scaffold React in your selected directory by running the following command:
npm create vite@latest mind-mapping-app --template react

cd mind-mapping-app
Vite is a tool for major frameworks that lets you quickly launch a project from a basic template. Templates that are community-maintained and target various frameworks or incorporate additional tools. One of the templates can be used to scaffold your project using a tool like Degit.
npx degit user/project my-project
cd mind-mapping-app

npm install
npm run dev
Creating Components
To create a component, navigate to the src folder in your mind-mapping app and create a component folder. Next, create a new file in the component folder, node.jsx.
Integrating React Flow
To integrate React Flow into your Vite React project, follow the process below:
First, ensure that you have already installed React Flow. If you haven’t already, run the command below:
npm install react-flow-rendererNext, navigate to the node.jsx directory and paste the following code:
import React from "react";
import ReactFlow from "reactflow";

import "reactflow/dist/style.css";

const initialNodes = [
  {
    id: "1",
    type: "input",
    data: { label: "Mind Map" },
    position: { x: 0, y: 0 },
  },
];

export default function MindNode() {
  return (
    <div id="container">
      <ReactFlow nodes={initialNodes }></ReactFlow>
    </div>
  );
}
We import the important dependencies needed for our project. Then, we define an array called initialNodes. This array comprises a starting node configuration, with each node having several properties. The MindNode functional React component returns JSX, which renders the mind map node.
From there, navigate to App.jsx in the src directory/folder and replace the following code to render the function MindNode.
import React from "react";
import MindNode from "./components/node";

function App() {
  return (
    <div className="App">
      <MindNode />
    </div>
  );
}

export default App;
Lastly, for this phase, navigate to src/main.jsx and paste the code below:
import React from "react";
import ReactDOM from "react-dom/client";
import App from "./App.jsx";
import "./index.css";

ReactDOM.createRoot(document.getElementById("root")).render(
  <React.StrictMode>
    <App />
  </React.StrictMode>
);
The code above sets up and renders your main React component App into the HTML DOM. From the code so far, you should get the output shown below:
Customizing Node Appearance
You can build nodes with varied styles and visual attributes based on their kinds or properties by modifying the appearance of nodes in your React Flow application. Now navigate to src/node.jsx and add the following code to it:
import React, { useState } from "react";
import ReactFlow, { MiniMap, useNodesState } from "reactflow";

import "reactflow/dist/style.css";

const initialNodes = [
  {
    id: "1",
    type: "input",
    data: { label: "Mind Map" },
    position: { x: 0, y: 0 },
  },
];


export default function MindNode() {
  const [nodes, setNodes, onNodesChange] = useNodesState(initialNodes);
  const [name, setName] = useState("");

  const addNode = () => {
    setNodes((e) =>
      e.concat({
        id: (e.length + 1).toString(),
        data: { label: `${name}` },
        position: {
          x: Math.random() * window.innerWidth,
          y: Math.random() * window.innerHeight,
        },
      })
    );
  };

  return (
    <div id="container">
      <ReactFlow nodes={nodes} onNodesChange={onNodesChange}>
        <MiniMap
          nodeColor={(n) => {
            if (n.type === "input") return "blue";

            return "#FFCC00";
          }}
        />
      </ReactFlow>
      <div>
        <input
          type="text"
          onChange={(e) => setName(e.target.value)}
          name="title"
        />
        <button type="button" onClick={addNode}>
          Add Node
        </button>
      </div>
    </div>
  );
}
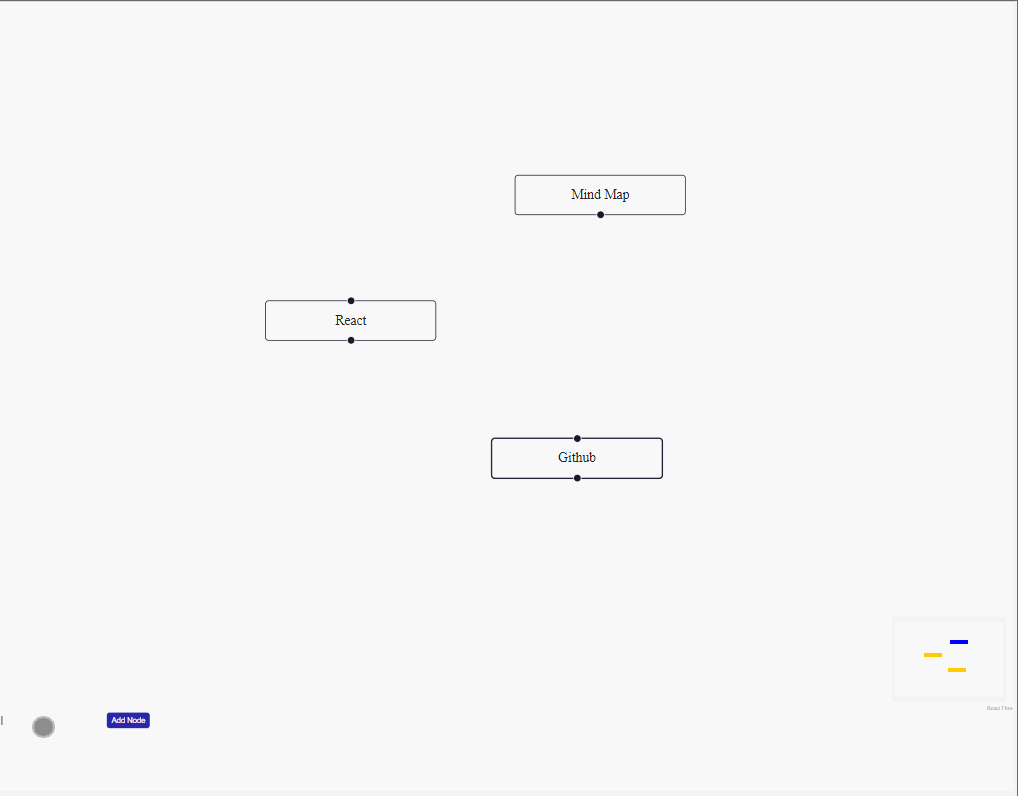
The code above creates a basic mind map application. Users can add custom labels to the map and alter the appearance of nodes based on their kind. The Reactflow library includes the components and hooks needed to handle the mind map’s state and interactivity. The miniMap lets you see the entire screen from a small perspective.
Add Interactivity
We can see from the above clip that we could not connect the nodes. Allowing users to engage with the nodes and edges, such as making connections and engaging with the nodes, is one way to add interactivity to the mind map application. Copy and paste the code below in your src/node.jsx.
import React, { useState, useCallback } from "react";
import ReactFlow, {
  MiniMap,
  Controls,
  useNodesState,
  useEdgesState,
  addEdge,
} from "reactflow";

import "reactflow/dist/style.css";

const initialNodes = [
  {
    id: "1",
    type: "input",
    data: { label: "Mind Map" },
    position: { x: 0, y: 0 },
  },
];
const initialEdges = [];
const onLoad = (reactFlowInstance) => {
  reactFlowInstance.fitView();
};

export default function MindNode() {
  const [nodes, setNodes, onNodesChange] = useNodesState(initialNodes);
  const [edges, setEdges, onEdgesChange] = useEdgesState(initialEdges);
  const [name, setName] = useState("");

  const addNode = () => {
    setNodes((e) =>
      e.concat({
        id: (e.length + 1).toString(),
        data: { label: `${name}` },
        position: {
          x: Math.random() * window.innerWidth,
          y: Math.random() * window.innerHeight,
        },
      })
    );
  };

  const onConnect = useCallback(
    (params) => setEdges((eds) => addEdge(params, eds)),
    [setEdges]
  );

  return (
    <div id="container">
      <ReactFlow
        nodes={nodes}
        edges={edges}
        onNodesChange={onNodesChange}
        onEdgesChange={onEdgesChange}
        onConnect={onConnect}
        onLoad={onLoad}
      >
        <Controls />

        <MiniMap
          nodeColor={(n) => {
            if (n.type === "input") return "blue";

            return "#FFCC00";
          }}
        />
      </ReactFlow>
      <div>
        <input
          type="text"
          onChange={(e) => setName(e.target.value)}
          name="title"
        />
        <button type="button" onClick={addNode}>
          Add Node
        </button>
      </div>
    </div>
  );
}
The code above manages edge states with useEdgesState and defines onConnect with useCallback to handle node edge (connection) generation. After that, we render a ReactFlow component with the required edges, event handlers, and controls for zooming and panning the display.
Saving and Loading mind maps
Saving and loading mind maps in the React Flow-based app is an important feature allowing users to save and recover their work later. This feature improves your application’s usability and value.
Saving Mind Maps:
When saving mind maps, you must collect the data representing the nodes and edges in your mind map. This information should be translated into a storable format, such as JSON. You can utilize the element’s state to capture the mind map’s current state. Navigate to the src folder and create a new file, storage.jsx, by adding the following code:
export const saveMindMap = (nodes, edges) => {
  const data = { nodes, edges };
  localStorage.setItem("mindMapData", JSON.stringify(data));
};
The above code defines the saveMindMap function, which saves the data of a mind map, including information about its nodes and edges, to the browser’s local storage. Local storage is a straightforward method for storing tiny quantities of data on a user’s device.
Loading Mind Maps:
Loading mind maps is the opposite of saving. You fetch the saved data, deserialize it, and then update the React Flow canvas with the loaded data. To load the saved mind map, Paste the following code in your src/storage.jsx
export const loadMindMap = () => {
  const data = localStorage.getItem("mindMapData");
  return data ? JSON.parse(data) : null;
};
The code above retrieves serialized data from local storage, parses it back into an object and returns that object. Next, import the following functions into your node.jsx component and use them to save and load the mind map:
import React, { useState, useCallback, useEffect } from "react";
import ReactFlow, {
  MiniMap,
  Controls,
  useNodesState,
  useEdgesState,
  addEdge,
  Background,
} from "reactflow";
import { saveMindMap, loadMindMap } from "./Storage";
import "reactflow/dist/style.css";

const initialNodes = [
  {
    id: "1",
    type: "input",
    data: { label: "Mind Map" },
    position: { x: 0, y: 0 },
    style: { border: "20px solid #9999" },
  },
];
const initialEdges = [];
const onLoad = (reactFlowInstance) => {
  reactFlowInstance.fitView();
};

export default function MindNode() {
  const [nodes, setNodes, onNodesChange] = useNodesState(initialNodes);
  const [edges, setEdges, onEdgesChange] = useEdgesState(initialEdges);
  const [name, setName] = useState("");

  const addNode = () => {
    setNodes((e) =>
      e.concat({
        id: (e.length + 1).toString(),
        data: { label: `${name}` },
        position: {
          x: Math.random() * window.innerWidth,
          y: Math.random() * window.innerHeight,
        },
        style: { border: "10px solid #9999" },
      })
    );
  };

  const onConnect = useCallback(
    (params) => setEdges((eds) => addEdge(params, eds)),
    [setEdges]
  );
  const handleSaveClick = () => {
    saveMindMap(nodes, edges);
    console.log(nodes);
  };
  const handleLoadClick = () => {
    const loadedData = loadMindMap();
    if (loadedData) {
      setNodes(loadedData.nodes);
      setEdges(loadedData.edges);
      console.log(loadedData);
    }
  };

  const refreshPage = () => {
    window.location.reload();
  };
  // const nodeOrigin = [0.5, 0.5];
  const connectionLineStyle = {
    stroke: "#9999",
    strokeWidth: 3,

  };
  const defaultEdgeOptions = { style: connectionLineStyle, type: "mindmap" };

  return (
    <div id="container">
      <ReactFlow
        nodes={nodes}
        edges={edges}
        onNodesChange={onNodesChange}
        onEdgesChange={onEdgesChange}
        connectionLineStyle={connectionLineStyle}
        defaultEdgeOptions={defaultEdgeOptions}
        onConnect={onConnect}
        onLoad={onLoad}
      >
        <Controls />
        <Background variant="dots" gap={12} size={1} />
        <MiniMap
          nodeColor={(n) => {
            if (n.type === "input") return "blue";

            return "#FFCC00";
          }}
        />
      </ReactFlow>
      <div>
        <input
          type="text"
          onChange={(e) => setName(e.target.value)}
          name="title"
        />
        <button id="one" type="button" onClick={addNode}>
          Add Node
        </button>
      </div>
      <div>
        <button id="two" onClick={handleSaveClick}>
          Save Mind Map
        </button>
        <button id="three" onClick={handleLoadClick}>
          Load Mind Map
        </button>
        <button id="four" onClick={refreshPage}>
          Refresh
        </button>
      </div>
    </div>
  );
}
With these changes, you now have a handleSaveClick function for saving current mind map data, a handleLoadClick function for loading previously saved mind data, and a refreshPage function to reload the page to its original form.
Styling the User Interface Design
We are almost done with the development process. Let us tailor our design to our specific needs. Navigate to src/index.css and substitute the following code:
body {
  margin: 0;
  background-color: #f8f8f8;
}
#container {
  height: 90vh;
  width: 100%;
}
input {
  border: 1px solid rgb(203, 186, 186);
  padding: 4px 8px;
  border-radius: 5px;
  font-weight: 700;
  background: transparent;
  height: 100%;
  color: #222;
}

input:focus {
  border: none;
  outline: none;
  background: rgba(255, 255, 255, 0.25);
  pointer-events: all;
}
button {
  padding: 6px 8px;
  border-radius: 5px;
  border: none;
  background-color: #008cba;
  color: white;
}
button:hover {
  background-color: rgb(69, 69, 229);
}
input[type="text"] {
  padding: 8px;
  margin-right: 10px;
  border: 1px solid #ccc;
  border-radius: 4px;
}

.react-flow {
  border: 3px solid #9999;
  border-radius: 10px;
}
/* .react-flow_nodes {
  color: #a02828;
} */
#two {
  background-color: #4caf50;
  margin: 5px;
}
#two:hover {
  background-color: #63c266;
}
#three {
  background-color: #f44336;
  margin: 2px;
}
#three:hover {
  background-color: rgb(190, 68, 68);
}
#four {
  background-color: rgb(86, 86, 6);
}
#four:hover {
  background-color: rgb(113, 113, 18);
}
Testing
We’ll be running a test to see how our reactflow mind application works.
NB: You can link different nodes regardless of position, and you can also give each node a desired name to illustrate your idea or project.
Wrapping Up
Creating a mind map application with React Flow is a fun and versatile project that can be adjusted to a variety of use cases, ranging from brainstorming sessions to project management and beyond. We’ve covered the important steps for building a working mind map application throughout this guide, such as setting up the development environment, integrating React Flow, modifying node look, adding interaction, and implementing save, load, and refresh functionality. You can add more features and functionalities as you see fit.