Building a Video Chat App with Next.js, 100ms, and TailwindCSS
Integrate 100ms features to create your own video call software

Video chat applications have a lot of popularity and usage in the tech world today. Apart from simply being a means of social interaction, it has been extended to be a means by which companies manage their applications with their team and discuss and access customer feedback on their services. In this tutorial, readers will learn how to integrate the 100ms features to create a chat application using Next.js and TailwindCSS.
What is 100ms?
100ms is an infrastructure provider that allows users to effortlessly set up optimized audio and video chat interfaces for different use cases such as game streaming, classrooms, and virtual events. These use cases can be simple audio and video chats and involve screen sharing, waiting rooms, and recording.
To set up a 100ms account, navigate to 100ms and set up a user account in your browser. When logged in on the dashboard, select “Virtual Events” from the list of options.
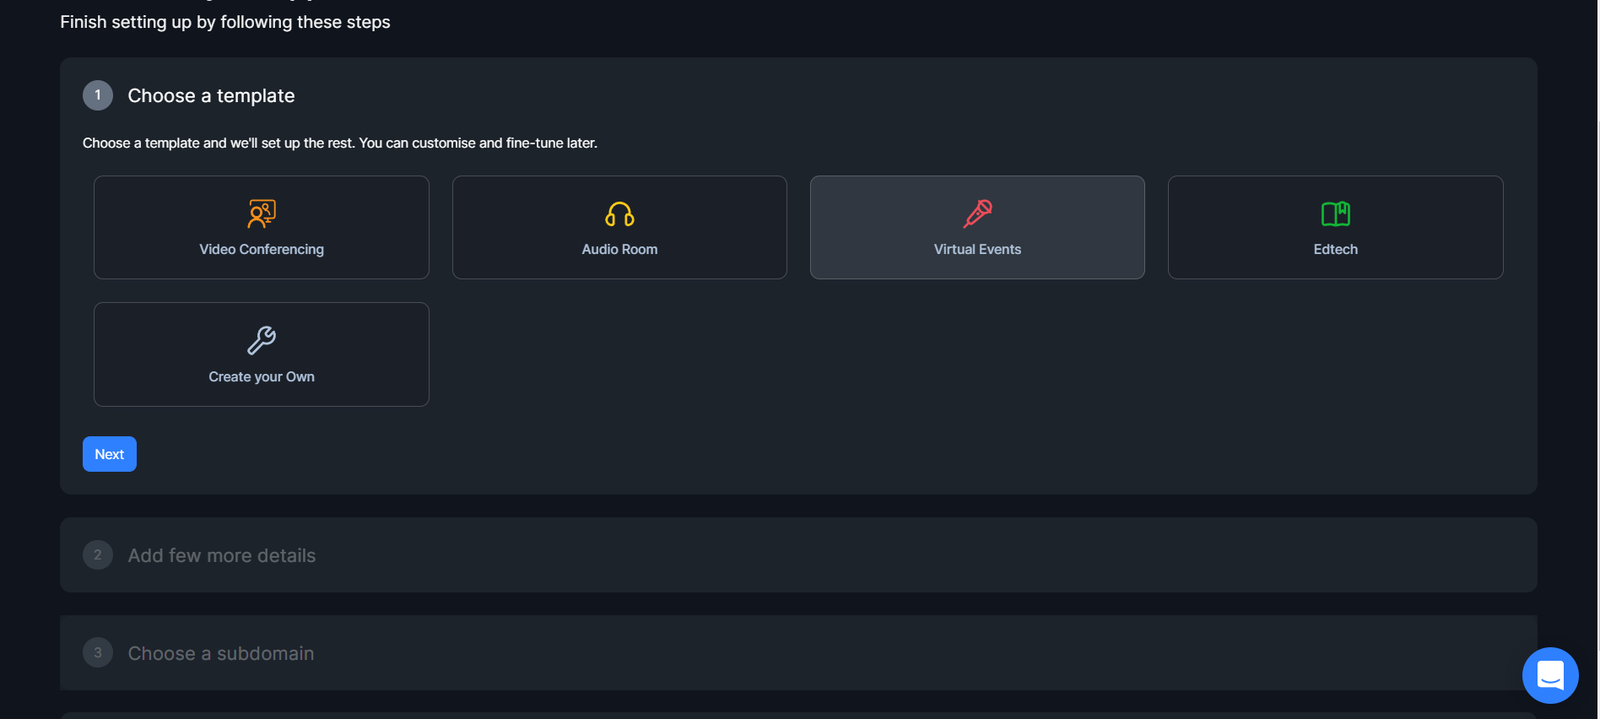
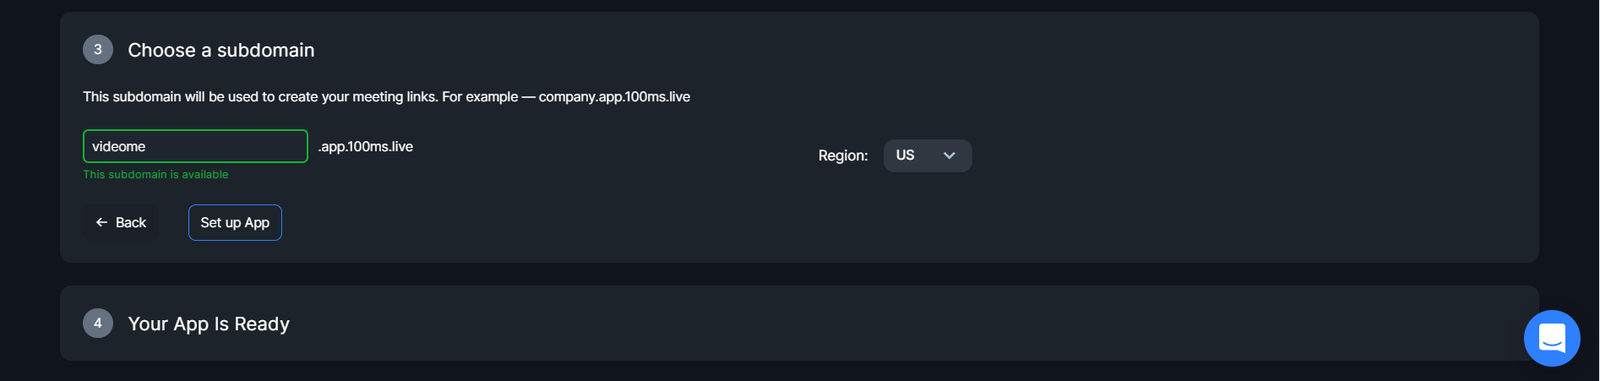
After that, choose an account type: Business or Personal. Next, enter a unique subdomain for the application and click on the “Set up App” button. Below, I’m using “videome.”
Select “Join as Stage” to test the video chat functionalities in the specified subdomain.
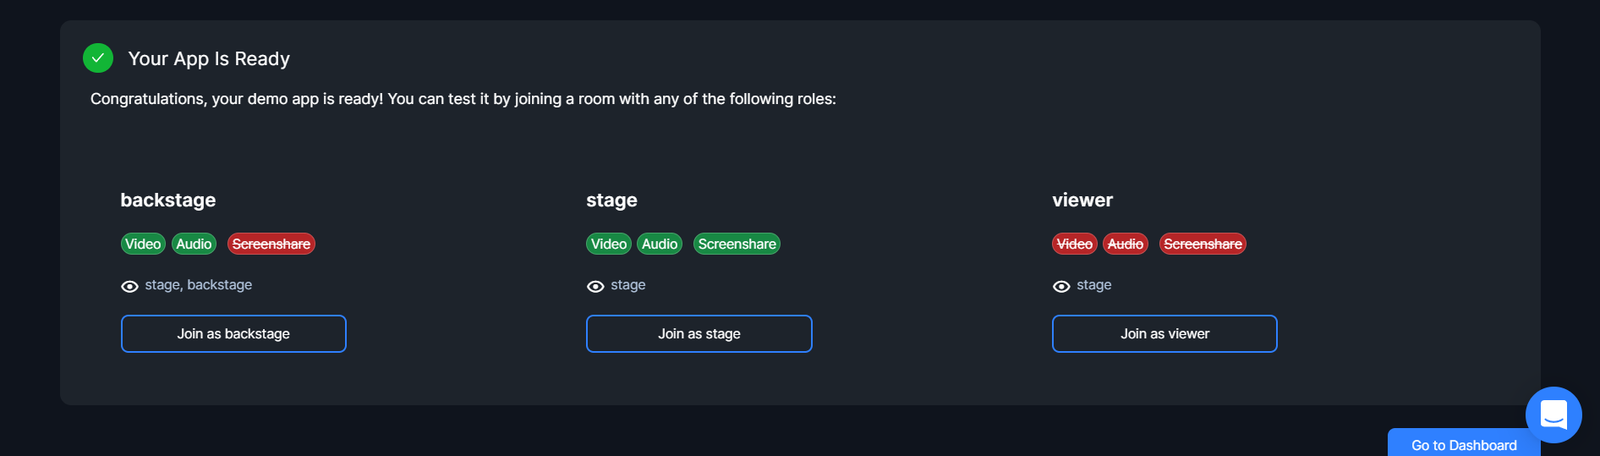
Click on the “Go to Dashboard” option at the bottom of the screen to finish setting up the account.
Creating our Next.js application
We will use the Next.js framework and the 100ms SDK for our application. To install this, navigate to a working directory, clone the Github repo and run npm install to install the necessary dependencies. That will create a working directory called videome, with all the required dependencies installed.
The application will contain a login form to join meetings, followed by a Room where meeting attendees can share screens, chat, and interact based on their roles. Below is the tree structure for the application
┣ 📂pages ┃ ┣ 📂api ┃ ┃ ┗ 📜hello.js ┃ ┣ 📂components ┃ ┃ ┣ 📂RoomControls.js ┃ ┃ ┃ ┗ 📜Controls.js ┃ ┃ ┣ 📜Login.js ┃ ┃ ┗ 📜Room.js ┃ ┣ 📜index.js ┃ ┗ 📜_app.js ┣ 📂public ┃ ┣ 📜favicon.ico ┃ ┗ 📜vercel.svg ┣ 📂styles ┃ ┣ 📜globals.css ┃ ┗ 📜Home.module.css ┣ 📜.eslintrc.json ┣ 📜.gitignore ┣ 📜next.config.js ┣ 📜package-lock.json ┣ 📜package.json ┣ 📜postcss.config.js ┣ 📜README.md ┣ 📜tailwind.config.js ┗ 📜yarn.lock
There are two main components for the application: Room.js and Login.js for the Room and Login pages. The Controls.js component will contain some control elements for the room. The index.js file houses the Login component. The Login component returns a form if the user is not connected; else, it displays the Room component. The Room component will follow this layout:

There is a screen sharing pane, a chat interface, and a chat control block containing options to toggle audio and video, allowing screen sharing, exit meetings, and switching between views.
Setting up Video Chat with 100ms
With the app layout ready, the next step is integrating the 100ms SDK into the application. But before this, roles have to be specified for different categories of users attending a meeting. We will set up the following roles: stage, viewer, and backstage. These roles can be configured so that the stage role is for the meeting speakers, the viewers role is for the attendees, and the backstage role is for the organizers. We can do this via the 100ms dashboard, template options:
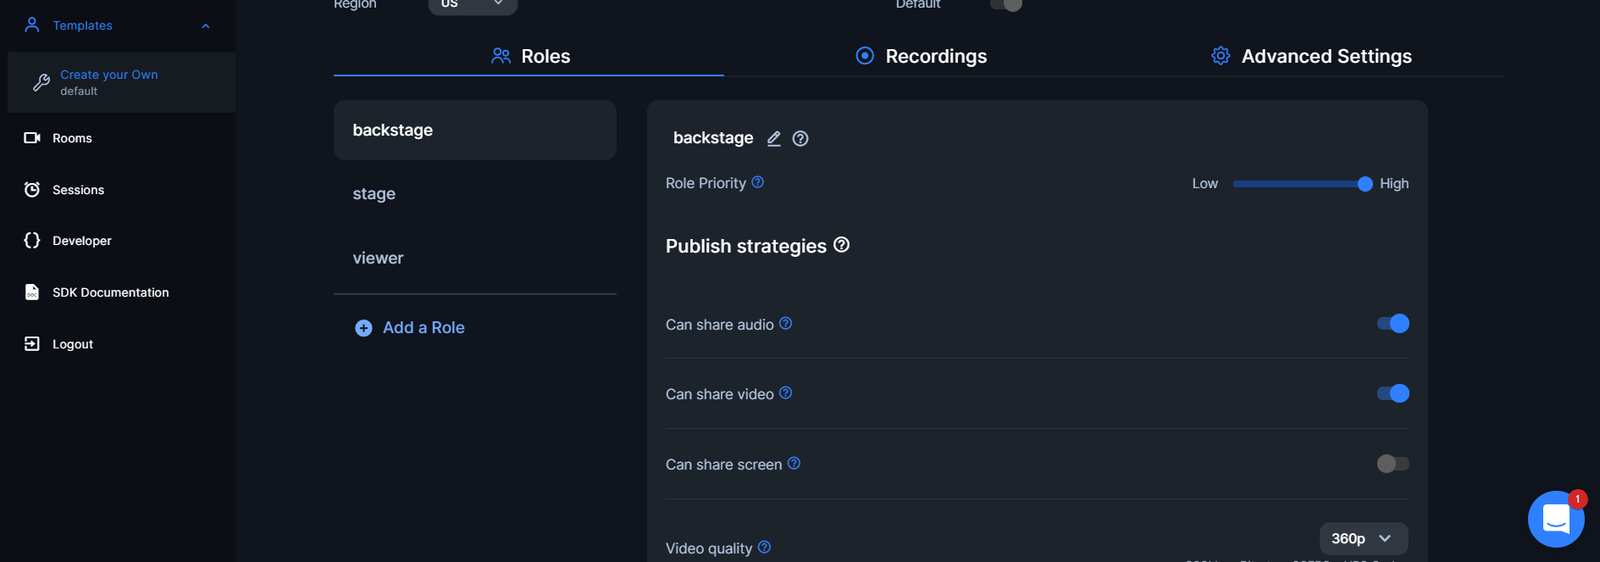
In the viewers role, enable the “can share audio” and “can share video” options. Set the subscribe strategies option to “stage and backstage” for all the roles. Navigate in the sidebar to the developer options. Here, we will need the end point and room id to use 100ms in the application. In the working directory, open the index.js file and make the following modifications:
import { HMSRoomProvider } from "@100mslive/react-sdk";

export default function Home() {
  return (
    <HMSRoomProvider>
      <div>
        <Head>
          <title>Videome</title>
          <meta name="description" content="Generated by create next app" />
          <link rel="icon" href="/favicon.ico" />
        </Head>
        <Login />
      </div>
    </HMSRoomProvider>
  );
}
We added an import for the HMSRoomProvider component and wrapped it around our Login Component.
Creating the Login Page
Next, make the following changes in Login.js:
import { React, useState, useEffect } from "react";
import { useHMSActions } from "@100mslive/react-sdk";
import Room from "./Room";
function Login() {
const endpoint = "your endpoint";
const hmsActions = useHMSActions();
const [inputValues, setInputValues] = useState("");
const [selectValues, setSelectValues] = useState("viewer");
const handleInputChange = (e) => {
setInputValues(e.target.value);
};
const handleSelect = (e) => {
setSelectValues(e.target.value);
};
const handleSubmit = async (e) => {
e.preventDefault();
const fetchtoken = async () => {
const response = await fetch(`${endpoint}api/token`, {
method: "POST",
body: JSON.stringify({
user_id: "1234",
role: selectValues, //stage, moderator, viewer
type: "app",
room_id: "your room id",
}),
});
const { token } = await response.json();
return token;
};
const token = await fetchtoken(inputValues);
hmsActions.join({
userName: inputValues,
authToken: token,
settings: {
isAudioMuted: true,
},
});
};
return (
<>
<div className=" h-screen flex justify-center items-center bg-slate-800">
<div className=" flex flex-col gap-6 mt-8">
<input
type="text"
placeholder="John Doe"
value={inputValues}
onChange={handleInputChange}
className=" focus:outline-none flex-1 px-2 py-3 rounded-md text-black border-2 border-blue-600"
/>
<select
type="text"
placeholder="Select Role"
value={selectValues}
onChange={handleSelect}
className=" focus:outline-none flex-1 px-2 py-3 rounded-md text-black border-2 border-blue-600"
>
<option>stage</option>
<option>viewer</option>
</select>
<button
className="flex-1 text-white bg-blue-600 py-3 px-10 rounded-md"
onClick={handleSubmit}
>
Join
</button>
</div>
</div>
<Room />
</>
);
}
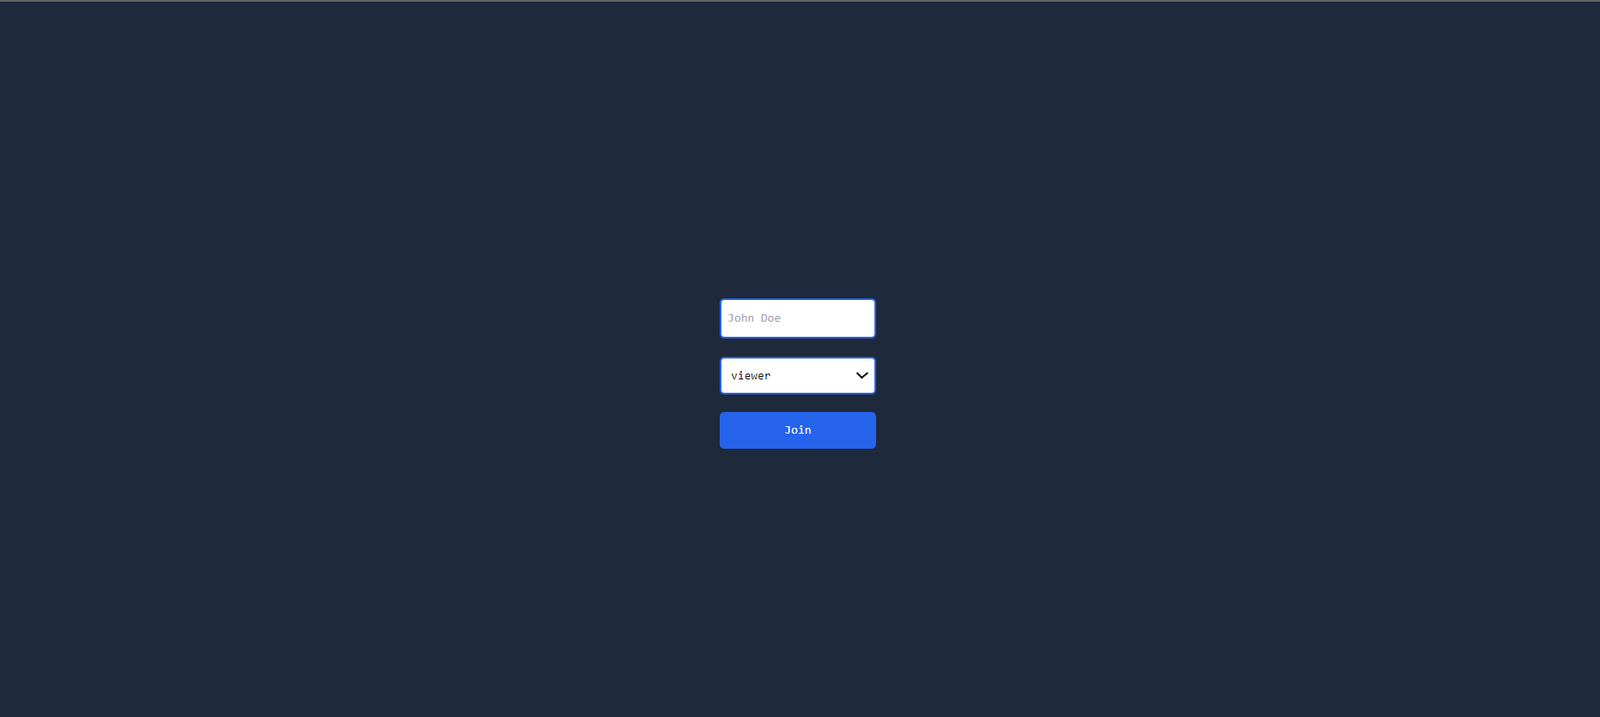
export default Login;We created two state variables to handle changes to our inputs. There are functions to manage updates in the input fields and a function that runs when the submit button is clicked. Upon submission, an asynchronous function to create an authentication token runs, taking the value of the role from the user input. This token is then passed along with the username using the hmsActions hook. The audiomuted property set to false ensures that new attendees to a meeting will have their mic muted by default. If we run the application with the npm run dev command, we’ll get a result similar to the image below.
We use the useHmsStore hook and a boolean variable selectIsConnectedToRoom to only render the login form when the user is not connected.
import {
  selectIsConnectedToRoom,
  useHMSActions,
  useHMSStore,
} from "@100mslive/react-sdk";
//...
function Login() {
  //...
  const isConnected = useHMSStore(selectIsConnectedToRoom);
}
Then wrap return the login form is !isConnected is true, else the Room component if false.
  <>
    {!isConnected? (
    //Form
    ):(
    <Room/>
    )}
  </>
The Room component will be displayed as soon as the user connects. The useHMSActions hook can be used to exit rooms upon reloading the tab or when the user closes the tab. We will create a useEffect() block that will take a window.onunload event to do this and use the useHMSActions hook as a callback to the event.
useEffect(() => {
 window.onunload = () => {
  hmsActions.leave();
 };
}, [hmsActions]);
Video-Sharing Component
We will create three new components called VideoTiles.js, VideoSpaces.js, and ScreenShare.js in the components folder for video and screen sharing. VideoTiles.js will handle the host sharing presentations, while VideoSpaces.js will show all attendees to the meeting. In VideoTiles.js, we have the following code.
import { React, useEffect, useRef } from "react";
import {
  useHMSActions,
  useHMSStore,
  selectLocalPeer,
  selectCameraStreamByPeerID,
} from "@100mslive/react-sdk";

function VideoTile({ peer, isLocal }) {
  const hmsActions = useHMSActions();
  const videoRef = useRef(null);
  const videoTrack = useHMSStore(selectCameraStreamByPeerID(peer.id));
  const localPeer = useHMSStore(selectLocalPeer);
  const stage = localPeer.roleName === "stage";
  const viewer = localPeer.roleName === "viewer";

  useEffect(() => {
    (async () => {
      if (videoRef.current && videoTrack) {
        if (videoTrack.enabled) {
          await hmsActions.attachVideo(videoTrack.id, videoRef.current);
        } else {
          await hmsActions.detachVideo(videoTrack.id, videoRef.current);
        }
      }
    })();
  }, [hmsActions, videoTrack]);

  return (
    <div>
      <video
        ref={videoRef}
        autoPlay={true}
        playsInline
        muted={false}
        style={{ width: "calc(85vw - 100px)" }}
        className={`object-cover h-40 w-40 rounded-lg mt-12 shadow-lg" ${
          isLocal ? "mirror" : ""
        }`}
      ></video>
    </div>
  );
}

export default VideoTile;
And in VideoSpaces.js :
import { React, useEffect, useRef } from "react";
import {
  useHMSActions,
  useHMSStore,
  selectLocalPeer,
  selectCameraStreamByPeerID,
} from "@100mslive/react-sdk";
function VideoSpaces({ peer, islocal }) {
  const hmsActions = useHMSActions();
  const videoRef = useRef(null);
  const videoTrack = useHMSStore(selectCameraStreamByPeerID(peer.id));

  useEffect(() => {
    (async () => {
      if (videoRef.current && videoTrack) {
        if (videoTrack.enabled) {
          await hmsActions.attachVideo(videoTrack.id, videoRef.current);
        } else {
          await hmsActions.detachVideo(videoTrack.id, videoRef.current);
        }
      }
    })();
  }, [videoTrack]);

  return (
    <div className=" flex m-1">
      <div className="relative">
        <video
          ref={videoRef}
          autoPlay={true}
          playsInline
          muted={true}
          className={`object-cover h-40 w-40 rounded-lg mt-12 shadow-lg" ${
            islocal ? "mirror" : ""
          }`}
        ></video>
        <span className=" text-white font-medium text-lg uppercase">
          <h3>{peer.name}</h3>
        </span>
      </div>
    </div>
  );
}

export default VideoSpaces;
Open Source Session Replay
OpenReplay is an open-source, session replay suite that lets you see what users do on your web app, helping you troubleshoot issues faster. OpenReplay is self-hosted for full control over your data.

Start enjoying your debugging experience - start using OpenReplay for free.
Adding Chat Functionality with 100ms
We are returning the video interface and the user’s name. With this, we can integrate video chat into our application in Room.js:
import React from "react";
import Controls from "./RoomControls.js/Controls";
import {
  useHMSStore,
  selectLocalPeer,
  selectPeers,
} from "@100mslive/react-sdk";
import VideoTile from "./VideoTile";
import VideoSpaces from "./VideoSpaces";

function Room() {
  const localPeer = useHMSStore(selectLocalPeer);
  const stage = localPeer.roleName === "stage";
  const viewer = localPeer.roleName === "viewer";
  const peers = useHMSStore(selectPeers);

  return (
    <div className=" relative h-screen flex justify-center items-center px-12 bg-slate-800 flex-row gap-8 overflow-hidden">
      <div className=" h-5/6 bg-slate-600 shadow-md w-3/5 rounded-2xl">
        <span className="flex flex-col w-full h-full">
          <div className=" h-3/5 w-full rounded-2xl">{/* Share screen */}</div>
          <span className=" h-2/5 w-full flex flex-col gap-8 py-3 px-5">
            <div className=" flex flex-row w-full gap-28">
              <div className=" text-white w-3/5">
                <h3 className=" text-4xl font-black">Live</h3>
                <h2 className=" text-2xl font-semibold">
                  Live Conference meeting
                </h2>
                <span className="text-2xl mt-4">
                  Welcome {localPeer && localPeer.name}
                </span>
                {/* display users name */}
              </div>
              <div className=" h-40 rounded-xl w-32 flec justify-center items-center">
                {stage
                  ? localPeer && <VideoTile peer={localPeer} isLocal={true} />
                  : peers &&
                    peers
                      .filter((peer) => !peer.isLocal)
                      .map((peer) => {
                        return (
                          <>
                            <VideoTile isLocal={false} peer={peer} />
                          </>
                        );
                      })}
                {/* Room owner video chat */}
              </div>
            </div>
            <div className="w-max px-4 bg-slate-500 h-12 rounded-md">
              {/* Controls */}
              <Controls />
            </div>
          </span>
        </span>
      </div>
      <span className=" z-10 rounded-md w-1/4 h-5/6">
        <div className=" relative h-full w-full">
          {/* Chat interface */}
          <div className=" relative w-full h-full bg-slate-700"></div>
          <div className=" absolute w-full rounded-2xl bottom-0 bg-slate-900 py-3 px-5 flex flex-row gap-4">
            <input
              type="text"
              placeholder="Write a Message"
              className=" focus:outline-none flex-1 px-2 py-3 rounded-md text-white bg-slate-900"
            />
            <button className=" btn flex-1 text-white bg-blue-600 py-3 px-10 rounded-md">
              Send
            </button>
          </div>
        </div>
      </span>
      {/* section for attendees videos chat interface */}
      <div className=" absolute h-full w-1/2 top-0 right-0 bg-slate-900 z-10 py-3 px-6 grid grid-cols-3 gap-3 overflow-y-auto">
        {localPeer && <VideoSpaces peer={localPeer} isLocal={true} />}
        {peers &&
          peers
            .filter((peer) => !peer.isLocal)
            .map((peer) => {
              return (
                <>
                  <VideoSpaces isLocal={false} peer={peer} />
                </>
              );
            })}
      </div>
    </div>
  );
}

export default Room;
We added imports for the components and rendered them. For VideoTile.js, we check if the user has a stage role; if true, it is rendered. VideoSpaces.js renders all the users. The first condition checks if localPeer exists and uses peer=localPeer and islocal to render the current user’s video, while the second renders other users’ videos using !peer.isLocal. We will use a button to toggle this section’s visibility later in this tutorial. To add functionality to the chat container, add the following lines of code to Room.js:
import {
  //...
  useHMSActions,
  selectHMSMessages,
} from "@100mslive/react-sdk";
//...
const hmsActions = useHMSActions();
const allMessages = useHMSStore(selectHMSMessages); // get all messages
const [inputValues, setInputValues] = React.useState("");
const handleInputChange = (e) => {
  setInputValues(e.target.value);
};
const sendMessage = () => {
  hmsActions.sendBroadcastMessage(inputValues);
  setInputValues("");
};
We added an import for 100ms message provider selectHMSMessages. We created a state value for the input field and also created a function that we will use to send the messages.
<div className=" relative h-full w-full pb-20">
  {/* Chat interface */}
  <div className=" relative w-full h-full bg-slate-700 overflow-y-scroll">
    {allMessages.map((msg) => (
      <div
        className="flex flex-col gap-2 bg-slate-900 m-3 py-2 px-2 rounded-md"
        key={msg.id}
      >
        <span className="text-white text-2xl font-thin opacity-75">
          {msg.senderName}
          {console.log(msg.time)}
        </span>
        <span className="text-white text-xl">{msg.message}</span>
      </div>
    ))}
  </div>
  <div className=" absolute w-full rounded-2xl bottom-0 bg-slate-900 py-3 px-5 flex flex-row gap-4">
    <input
      type="text"
      placeholder="Write a Message"
      value={inputValues}
      onChange={handleInputChange}
      required
      className=" focus:outline-none flex-1 px-2 py-3 rounded-md text-white bg-slate-900"
    />
    <button
      className=" btn flex-1 text-white bg-blue-600 py-3 px-10 rounded-md"
      onClick={sendMessage}
    >
      Send
    </button>
  </div>
</div>;
Here, we mapped all messages returned by the selectHMSMessages array and returned them in the chat container. The input field and button have been set up with the earlier defined functions to send messages.
Screen Sharing with 100ms
Next, we will add screen-sharing functionality to our application. To do this, add the following lines of code to the ScreenShare.js component:
import { React, useEffect, useRef } from "react";
import {
  useHMSActions,
  useHMSStore,
  selectScreenShareByPeerID,
} from "@100mslive/react-sdk";

const ScreenShare = ({ peer, isLocal }) => {
  const hmsActions = useHMSActions();
  const screenRef = useRef(null);
  const screenTrack = useHMSStore(selectScreenShareByPeerID(peer.id));

  useEffect(() => {
    (async () => {
      if (screenRef.current && screenTrack) {
        if (screenTrack.enabled) {
          await hmsActions.attachVideo(screenTrack.id, screenRef.current);
        } else {
          await hmsActions.detachVideo(screenTrack.id, screenRef.current);
        }
      }
    })();
  }, [screenTrack]);

  return (
    <div className="flex h-full">
      <div className="relative h-full">
        <video
          ref={screenRef}
          autoPlay={true}
          playsInline
          muted={false}
          className={`h-full ${isLocal ? "" : ""}`}
        ></video>
      </div>
    </div>
  );
};

export default ScreenShare;
We can import this into Room.js to render with the following code:
//...
import ScreenShare from "./ScreenShare";
//...
<div className=" h-3/5 w-full rounded-2xl">
  {/* Share screen */}
  {stage
    ? null
    : peers &&
      peers
        .filter((peer) => !peer.isLocal)
        .map((peer) => {
          return (
            <>
              <ScreenShare isLocal={false} peer={peer} />
            </>
          );
        })}
</div>;
The stage role shares the screen, and other connected peers will receive the video rendered.
Adding User Control Functionalities
To enable the screen-sharing operation, we will create our controls in Controls.js:
import {
  useHMSActions,
  useHMSStore,
  selectPeers,
  selectLocalPeer,
  selectIsLocalAudioEnabled,
  selectIsLocalVideoEnabled,
  selectPermissions,
  selectIsLocalScreenShared,
} from "@100mslive/react-sdk";

function Controls() {
  const hmsActions = useHMSActions();
  const localPeer = useHMSStore(selectLocalPeer);
  const stage = localPeer.roleName === "stage";
  const peers = useHMSStore(selectPeers);
  const isLocalAudioEnabled = useHMSStore(selectIsLocalAudioEnabled);
  const isLocalVideoEnabled = useHMSStore(selectIsLocalVideoEnabled);
  const isLocalScreenShared = useHMSStore(selectIsLocalScreenShared);

  const SwitchAudio = async () => {
    //toggle audio enabled
    await hmsActions.setLocalAudioEnabled(!isLocalAudioEnabled);
  };

  const ScreenShare = async () => {
    //toggle screenshare enabled
    await hmsActions.setScreenShareEnabled(!isLocalScreenShared);
  };

  const SwitchVideo = async () => {
    //toggle video enabled
    await hmsActions.setLocalVideoEnabled(!isLocalVideoEnabled);
  };

  const ExitRoom = () => {
    hmsActions.leave();
    //exit a room
  };

  const permissions = useHMSStore(selectPermissions);

  const endRoom = async () => {
    //end the meeting
    try {
      const lock = true; // A value of true disallow rejoins
      const reason = "Meeting is over";
      await hmsActions.endRoom(lock, reason);
    } catch (error) {
      // Permission denied or not connected to room
      console.error(error);
    }
  };

  // continues...
Before creating the controls, note that the stage role will have the control option to share the screen and end the meeting instead of exiting the meeting. To correctly display the controls based on the user role, we will add a condition to check if the connected user is a viewer or stage for these two buttons.
  // continued...

  return (
    <div className=" w-full h-full flex flex-row gap-2 justify-center items-center text-white font-semibold">
      <button
        className=" uppercase px-5 py-2 hover:bg-blue-600"
        onClick={SwitchVideo}
      >
        {isLocalVideoEnabled ? "Off Video" : "On Video"}
      </button>
      <button
        className=" uppercase px-5 py-2 hover:bg-blue-600"
        onClick={SwitchAudio}
      >
        {isLocalAudioEnabled ? "Off Audio" : "On Audio"}
      </button>
      {stage ? (
        <>
          <button
            className=" uppercase px-5 py-2 hover:bg-blue-600"
            onClick={ScreenShare}
          >
            Screen Share
          </button>
          {permissions.endRoom ? (
            <button
              className=" uppercase px-5 py-2 hover:bg-blue-600"
              onClick={endRoom}
            >
              Exit Meeting
            </button>
          ) : null}
        </>
      ) : (
        <>
          <button
            className=" uppercase px-5 py-2 hover:bg-blue-600"
            onClick={ExitRoom}
          >
            Exit Meeting
          </button>
        </>
      )}
      <button className=" uppercase px-5 py-2 hover:bg-blue-600" onClick={/* ... */}>
        Switch view
      </button>
    </div>
  );
}

export default Controls;
We will pass down a prop from the Room component for the’ switch view’ control.
const [visible, isVisible] = React.useState(false);
const setVisibility = (dat) => {
  isVisible(dat);
};

//...
{
  /*then show the video section if visible is true*/
}
{
  /* section for attendees videos chat interface */
}
{
  visible ? (
    <div className=" absolute h-full w-1/2 top-0 right-0 bg-slate-900 z-10 py-3 px-6 grid grid-cols-3 gap-3 overflow-y-auto">
      //.....
    </div>
  ) : null;
}
Then pass setVisibility to Controls.js:
<Controls switches={setVisibility} />Finally, we can use the passed down props in Control.js:
function Controls({ switches }) {
//...
let toggler = false;
//...
<button
className=" uppercase px-5 py-2 hover:bg-blue-600"
onClick={() => {
switches(!toggler);
toggler = true;
}}
>
Switch view
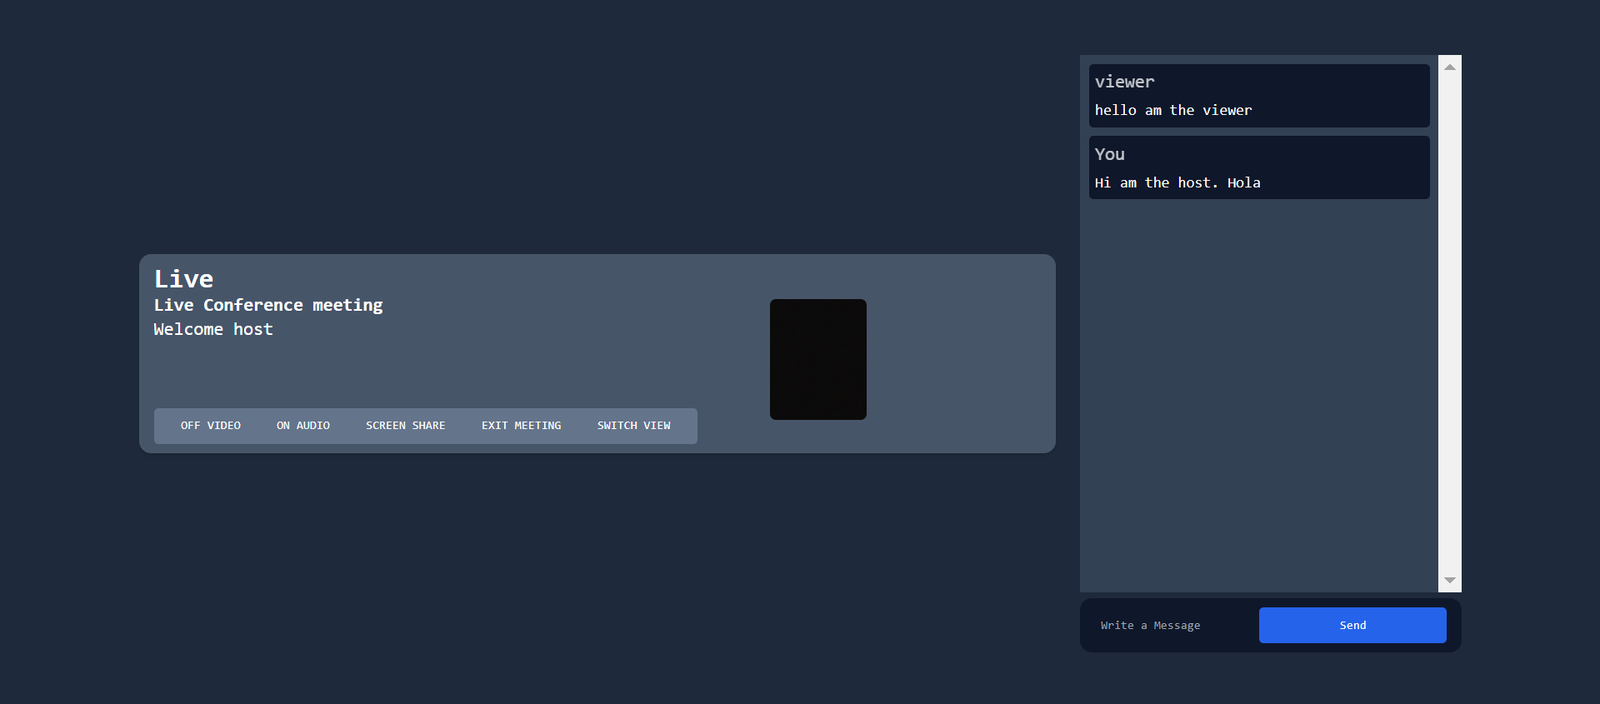
</button>;If we run our application in two tabs, one as a stage role and the other as a viewer role, we get results similar to the images below. The stage looks as follows:
And the viewer:

Conclusion
We have come to the end of this tutorial. In this tutorial, readers learned about the 100ms SDK and how they can build a video chat application with it.
The entire source code used in the tutorial can be found here.