
Building a Custom Renderer for React


React has gained widespread popularity for its declarative and component-based approach to front-end development. At the core of its functionality is the concept of renderers, which translate components into UI elements. While React primarily uses a default renderer for the web (
ReactDOM), its architecture’s flexibility allows you to create custom renderers tailored to specific platforms or use cases, as this article will show.

Discover how at OpenReplay.com.
The demand for specialized rendering solutions grows as applications become more diverse and extend beyond traditional web platforms. The need for custom React renderers arises when developers encounter scenarios where the default rendering approach may not be optimal or when developers are targeting unconventional environments such as mobile applications, virtual reality experiences, or even server-side rendering.
Recognizing this scenario is crucial when developers notice significant performance bottlenecks or limitations in achieving the desired user experience using React’s default rendering. For instance, imagine a financial analytics dashboard within a React application that dynamically visualizes stock market data with numerous live updates and sophisticated charting requirements. In this example, the default rendering approach might not efficiently manage the continuous flow of data and intricate chart computations, signaling the necessity for a tailored rendering solution.
Custom renderers offer several advantages. First, they provide enhanced performance by addressing specific bottlenecks, significantly improving rendering speed, memory usage, and frame rates compared to the default approach. For instance, a custom renderer could optimize data handling and chart rendering in the financial analytics dashboard example, resulting in a smoother and more responsive dashboard experience.
In the following sections, we will explore the process of building a custom React renderer, unraveling the steps involved in extending React’s rendering capabilities to meet specific project needs.
Overview of the react-reconciler package
Within the expansive landscape of React customization, the react-reconciler package stands out as a powerful tool that empowers developers to create custom renderers with precision and efficiency. This package is the backbone for building custom React renderers, providing a structured and extensible framework for the reconciliation process.
The reconciliation process in React is responsible for efficiently updating the UI by determining the minimal set of changes needed to reflect the current state of the application. The react-reconciler package facilitates this crucial aspect by offering a set of interfaces and utilities that streamline the implementation of a custom renderer, allowing developers to tailor the reconciliation logic to specific use cases.
Purpose and Use Cases
The primary purpose of the react-reconciler package is to enable developers to construct custom renderers that align seamlessly with their project requirements. This versatility is particularly valuable when traditional rendering approaches may not suffice or when a tailored solution is necessary to address unique challenges.
Use cases for custom React renderers built with react-reconciler are diverse. They range from optimizing performance for specific platforms, such as native mobile applications, to integrating React into unconventional environments like game engines or augmented reality frameworks. By leveraging this package, developers gain the flexibility to transcend the boundaries of standard web rendering and extend React’s capabilities into a myriad of innovative applications.
Relationship with the Fiber Architecture
The react-reconciler package is intricately tied to React’s Fiber Architecture, a sophisticated mechanism introduced to enhance the efficiency and responsiveness of the reconciliation process. By aligning with Fiber, react-reconciler taps into a robust infrastructure that manages the prioritization and scheduling of updates, resulting in a more resilient and performant rendering system.
Understanding the relationship between react-reconciler and Fiber is crucial for developers aiming to build custom renderers. This synergy ensures that the custom renderer can seamlessly integrate with React’s core architecture, harnessing the benefits of Fiber’s incremental rendering to deliver a smooth and responsive user experience.
Exploring the Fiber Data Structure
A Fiber in React is a lightweight unit of work that represents a component in the virtual DOM. It plays a pivotal role in the reconciliation process, helping React update and render components efficiently.
Fiber Node Anatomy:
A Fiber node is a JavaScript object that holds information about a component. It contains various fields, such as:
- Type: This represents the type of the component (e.g., function, class, host).
- Key: An optional unique identifier to optimize updates.
- State: The current state of the component.
- Props: The properties passed to the component.
- Child, Sibling, and Return: Pointers to other Fiber nodes, forming a tree structure. This tree structure represents the component hierarchy in the application. The “Child” pointer points to the first child of the current node, the “Sibling” pointer points to the next sibling, and the “Return” pointer points to the parent.
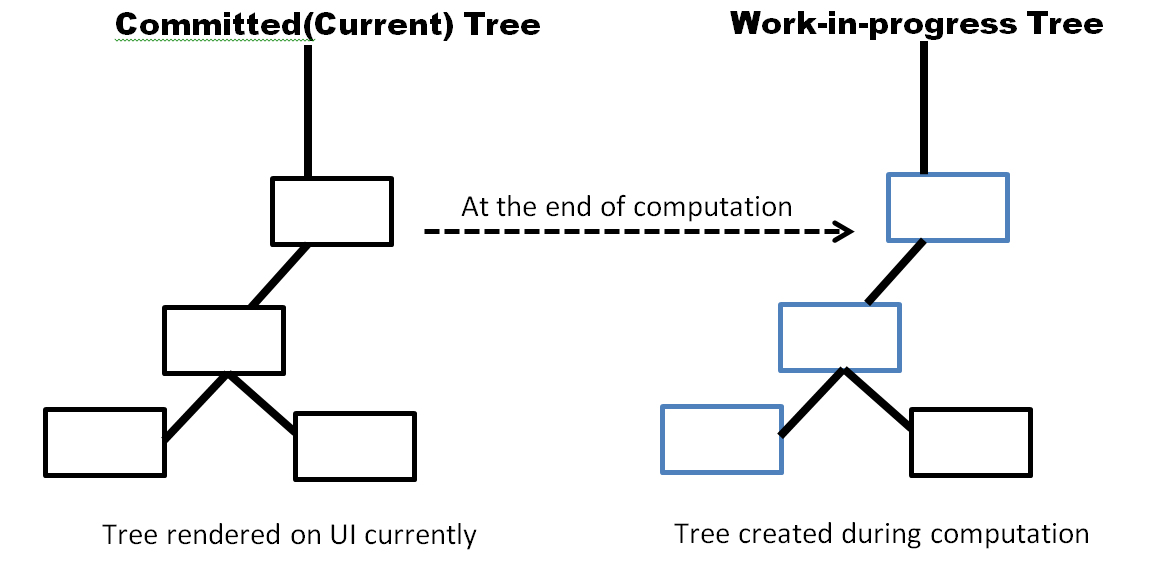
Work-in-Progress and Committed Fiber Trees
React maintains two Fiber trees during the reconciliation process: The work-in-progress tree (current changes being applied) and the committed tree (last successfully rendered state). The “Work-in-Progress Fiber Tree” is a dynamic, in-memory representation that reflects the current state of React components being processed. When changes occur in the application, such as state updates or prop changes, React generates a new version of the component tree. This newly created tree is called the work-in-progress tree, as it captures the ongoing changes.
Conversely, the “Committed Fiber Tree” represents the last successfully rendered state of the user interface. Once the reconciliation process is complete, React takes the updated work-in-progress tree and designates it as the new committed tree. This committed tree signifies the most recent successfully rendered state and is ready to be displayed.
The image displays both the committed tree and the work-in-progress tree. The blue-outlined rectangle indicates nodes that have been updated.
Reconciliation Algorithm
The reconciliation algorithm is at the core of React’s ability to update the UI efficiently. It leverages the Fiber tree to determine which components need to be updated and in what order. The algorithm balances responsiveness and throughput, ensuring a smooth user experience.
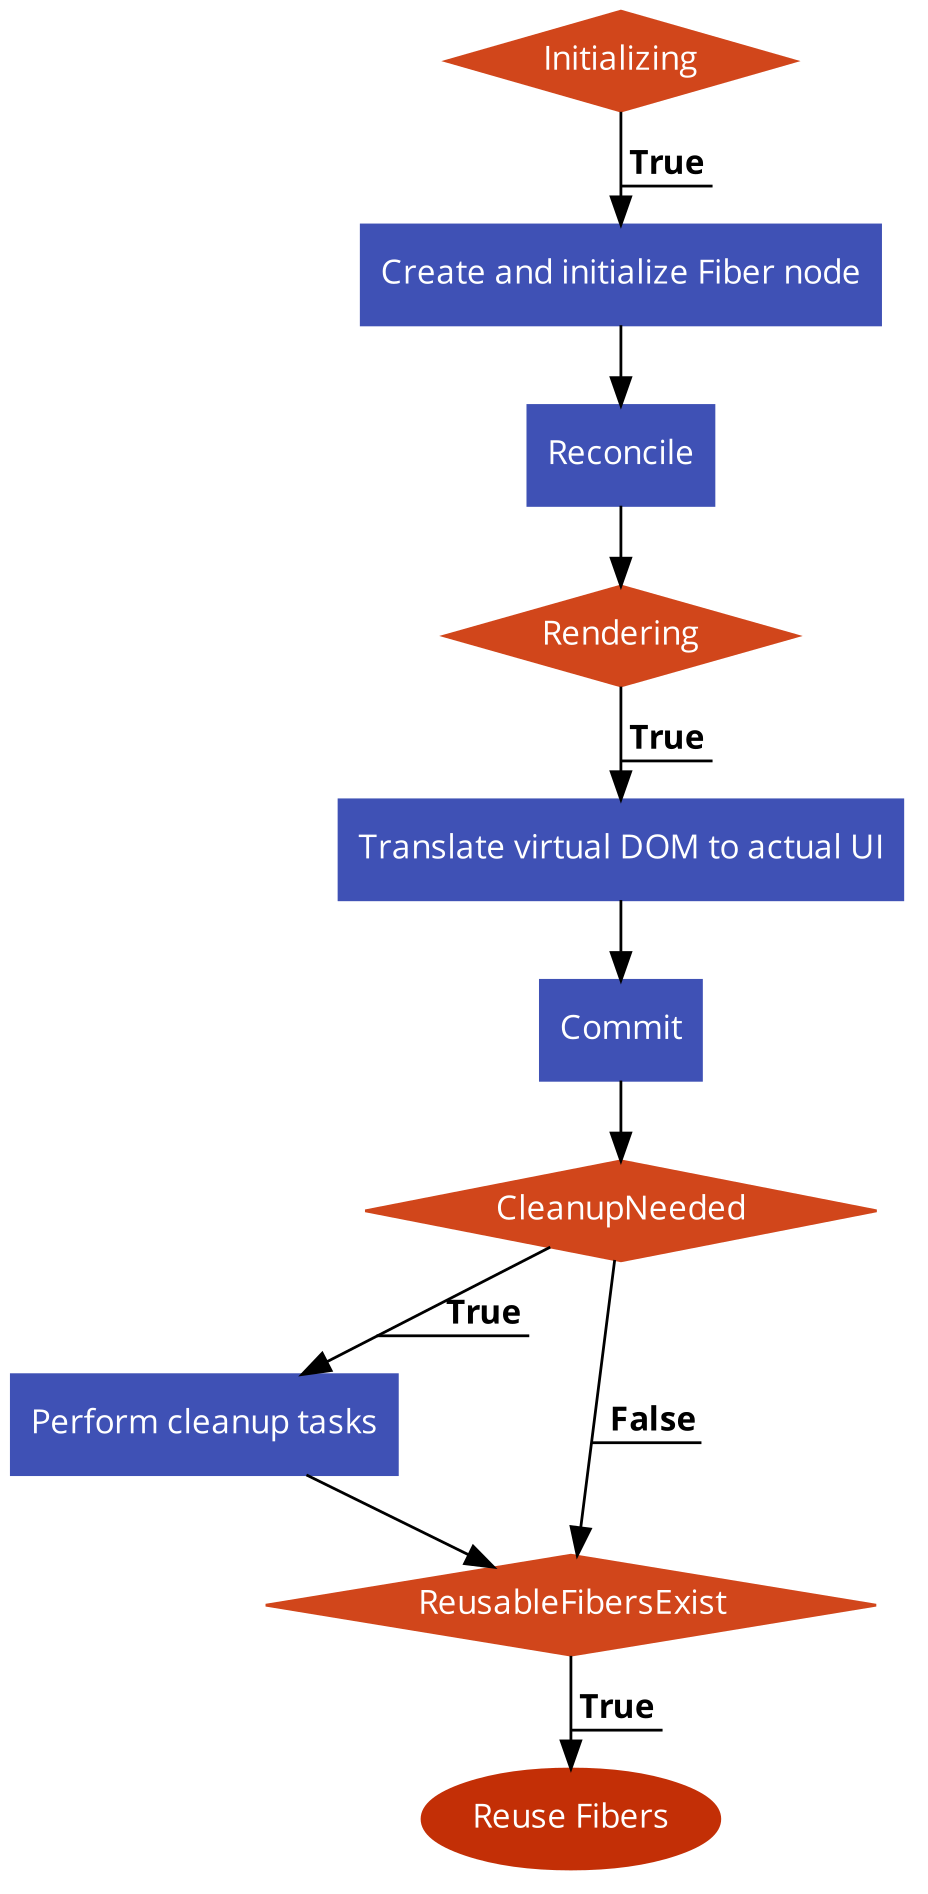
Fiber Node Lifecycle
The lifecycle of a Fiber node is a dynamic process that goes through various stages during rendering. Understanding these stages is vital for building a custom React renderer.
- Initialization: When a component is first rendered, a Fiber node is created and initialized. This involves setting the type, props, and state. It marks the beginning of the reconciliation process.
- Reconciliation: During reconciliation, React compares the current and new states of the Fiber nodes. It identifies what changed and builds a plan for updating the UI. This process involves propagating changes through the Fiber tree.
- Rendering: The rendering phase involves translating the virtual
DOMrepresentation into the actual UI. This process utilizes the committed Fiber tree, ensuring that only the necessary updates are applied. - Commit: Once the rendering is complete, React commits the changes to the
DOM. This step ensures that the user sees the updated UI. The committed Fiber tree becomes the new basis for future updates. - Cleanup: After committing the changes, React performs cleanup tasks. It might involve releasing resources or updating internal data structures to prepare for the next rendering cycle.
- Reusable Fibers: React optimizes performance by reusing Fibers across renders. This reusability reduces the need to create new objects, enhancing efficiency.
A flowchart illustrating fiber node lifecycle.
Steps to Build a Custom React Renderer
The custom renderer applies to any React application; this article specifically focuses on testing it with the default React Single Page Application (SPA).
To demonstrate the creation of our custom renderer, we deliberately remove the default renderer used by the React app and substitute it with our custom renderer. This custom renderer is responsible for displaying the contents of the default React page on the actual webpage.
The removal of the default renderer initially breaks our app, triggering an error. However, as we incorporate fundamental functionalities into our custom renderer, the default page resurfaces and becomes visible on the webpage again. This step-by-step process helps us understand how the renderer works behind the scenes to showcase our app on the webpage. Additionally, it serves as a guide for constructing a custom renderer.
Setting Up the Development Environment
- Initiate a new React application by executing the following command in your terminal. Ensure to replace
<app_name>with your desired application name.
npx create-react-app <app_name>Once the app is created, navigate to the project directory using the following command:
cd <app_name>With the project directory as your current location, install the required dependencies:
npm installStart the application.
npm startFor the custom renderer, install the necessary dependency, react-reconciler, by running the following command in the terminal:
npm install react-reconcilerIntegrating the Custom React Renderer
Follow these steps to integrate a custom React renderer:
- Create a new file named
ReactDOMCustominside thesrcfolder. Import thereact-reconcilerlibrary in this file:
import ReactReconciler from "react-reconciler";- Open the
index.jsfile, importReactDOMCustom, and remove the import statement forReactDOM:
import ReactDOMCustom from './ReactDOMCustom';- Utilize the custom renderer file (
ReactDOMCustom) to render the app by replacing the following code block:
const root = ReactDOM.createRoot(document.getElementById("root"));
root.render(
  <React.StrictMode>
    <App />
  </React.StrictMode>
);
With the following line, render the app using our custom renderer file:
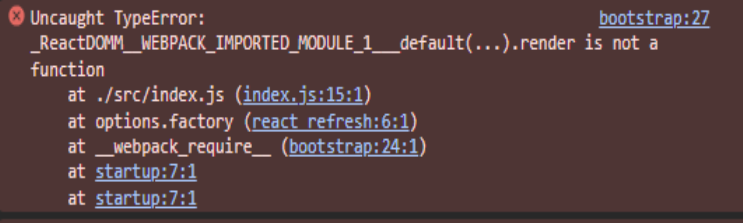
ReactDOMCustom.render(<App />, document.getElementById('root'));As a result of these changes, your app will break, and an error will be displayed in the browser console. In the following sections, we will implement the logic for the custom renderer to ensure that our React app functions as expected in the browser.
Here is an image capturing the displayed error.
Creating a Custom Host Config
A host config file refers to a JavaScript module that defines the behavior and capabilities of the host environment where React is being used. The host environment is the platform or runtime where your React application runs, and it could be a web browser, a mobile app environment, or any other runtime.
The host config typically includes a set of methods the custom renderer must implement. These methods correspond to different aspects of the rendering process, such as creating and updating instances, appending children, handling text content, and more. You can control how React elements are created, updated, and manipulated within your target environment by providing a custom implementation for these methods.
In the ReactDOMCustom file, instantiate the react-reconciler by creating a reconciler object and adding the following methods:
let reconciler = ReactReconciler({
  // host config options
  supportsMutation: true,
  createInstance(
    type,
    props,
    rootContainerInstance,
    hostContext,
    internalInstanceHandle
  ) {
    // Logic for creating new instance
  },
  createTextInstance(
    text,
    rootContainerInstance,
    hostContext,
    internalInstanceHandle,
  ) {
    // Logic for creating a text instance
  },
  appendChildToContainer(container, child) {
    // Logic for appending a child to the container
  },
  appendChild(parent, child) {
    // Logic for appending a child to a parent
  },
  appendInitialChild(parent, child) {
    // Logic for appending initial child
  },
  prepareUpdate(
    instance,
    type,
    oldProps,
    newProps,
    rootContainerInstance,
    currentHostContext,
  ) {
    // Logic for preparing an update
  },
  commitUpdate(
    instance,
    updatePayload,
    type,
    oldProps,
    newProps,
    finishedWork
  ) {
    // Logic for committing an update
  },
  finalizeInitialChildren() {
    // Logic for finalizing initial children
  },
  getChildHostContext() {
    // Logic for getting child host context
  },
  getPublicInstance() {
    // Logic for getting public instance
  },
  getRootHostContext() {
    // Logic for getting root host context
  },
  prepareForCommit() {
    // Logic before committing changes
  },
  resetAfterCommit() {
    // Logic after committing changes
  },
  shouldSetTextContent() {
    return false;
  },
});
Let’s complete the implementation of a few methods to ensure that our host configuration effectively renders and mounts components onto the DOM.
createInstance Function
This function generates and configures HTML elements based on the provided type and props. It utilizes the document.createElement method to create a new HTML element with the specified type. The function then checks for specific attributes, such as className and src in the props object, and applies them to the created element if they are present.
An array of strings representing HTML attributes (alt, className, href, rel, src, target) is created to achieve this. The function iterates through this array, setting corresponding attributes on the element if they exist in the props object. Finally, the function returns the created HTML element.
// Define a function to create a new instance of an element
createInstance(
  type, // The type of element to create (e.g., 'div', 'span')
  props, // The properties (attributes) to apply to the element
  rootContainerInstance, // The root container instance to which the element belongs
  hostContext, // The host context of the element
  internalInstanceHandle // The internal instance handle of the element
) {
  // Create a new HTML element based on the provided type
  let element = document.createElement(type);

  // Apply the className and src properties from the props object if they exist
  if (props.className) element.className = props.className;
  if (props.src) element.src = props.src;

  // Iterate through an array of specific attributes to check if they exist in the props object
  ["alt", "className", "href", "rel", "src", "target"].forEach((attr) => {
    // If the attribute exists in the props object, set it on the element
    if (props[attr]) element[attr] = props[attr];
  });

  // Log information about the created text instance
  console.log("Created instance:", type, props);

  // Return the created element
  return element;
}
createTextInstance Function
The purpose of this function is to generate text nodes in the user interface. It accomplishes this by returning a text node with the provided content. The implementation involves calling the document.createTextNode function and passing the text as the argument.
// Define a function to create a new text instance
createTextInstance(
  text, // The text content of the instance
  rootContainerInstance, // The root container instance to which the text belongs
  hostContext, // The host context of the text instance
  internalInstanceHandle // The internal instance handle of the text instance
) {
  console.log("Created text instance:", text);

  // Create a new text node with the provided text content
  return document.createTextNode(text);
}appendChildToContainer, appendChild, and appendInitialChild Functions
These functions facilitate the addition of child elements to parent containers within a user interface. The distinction between them is based on specific use cases or lifecycle events in the UI rendering process. Each function achieves this by utilizing the appendChild API inherent in browsers and passing the child element as the argument.
// Function to append a child to a container
appendChildToContainer(container, child) {
  // Log information about appending child to container
  console.log("Appending child to container:", child);
  // Append the child to the container
  container.appendChild(child);
}

// Function to append a child to a parent element
appendChild(parent, child) {
  // Log information about appending child to parent
  console.log("Appending child to parent:", child);
  // Append the child to the parent element
  parent.appendChild(child);
}

// Function to append an initial child to a parent element
appendInitialChild(parent, child) {
  // Log information about appending initial child to parent
  console.log("Appending initial child to parent:", child);
  // Append the initial child to the parent element
  parent.appendChild(child);
}
Enabling the Render Method
The reconciliation object’s API differs slightly from the top-level React DOM API. To incorporate the render method into the index.js file, define an object with the render method in the ReactDOMCustom.js file. This render method will take two arguments: the component to render and the container where it should be placed.
let ReactDOMCustom = {
  render(component, div) {
    // Logic for rendering
  },
};
Within the render function, create a container using the createContainer method, which takes three arguments: the container itself and two boolean values set to false, representing concurrent mode and server-side hydration.
let container = reconciler.createContainer(div, false, false);Next, call the updateContainer function to initiate the rendering process. This function requires four arguments: the component to be rendered, the pre-established container, and two null values, which indicate options for hydration and callback execution.
reconciler.updateContainer(whatToRender, container, null, null);For reference, here’s the complete render method:
// ReactDOMM object to encapsulate custom rendering logic
let ReactDOMM = {
  // Render method to render a React component into a specified container
  render(whatToRender, div) {
    // Create a container using the reconciler's createContainer method
    let container = reconciler.createContainer(div, false, false);

    // Update the container with the specified component to trigger the rendering process
    reconciler.updateContainer(whatToRender, container, null, null);
  },
};
Export ReactDOMCustom.
export default ReactDOMM;We have successfully configured and exported ReactDOMCustom. This setup enables the rendering of your React app using the custom React DOM.
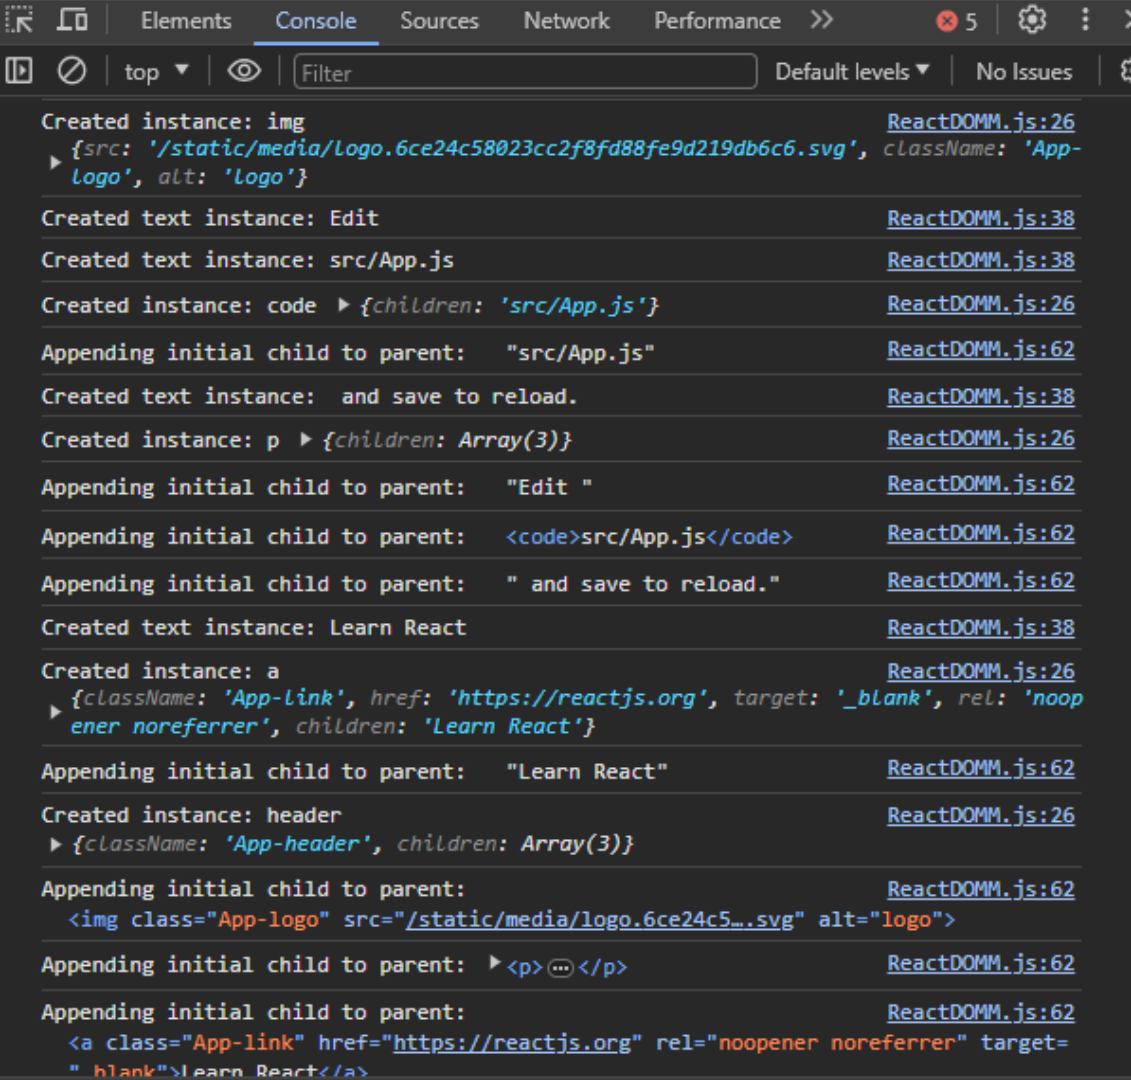
Previously, when we initiated the development of our custom renderer, we intentionally disabled the default React renderer. This temporarily disrupted our app’s display. With our custom renderer in place, we can observe our React app being displayed.
Here’s a snapshot of the React app being rendered through our customized React DOM`.

Below is a snapshot of the browser console log messages that show created elements, their types, and how they are arranged as children in a hierarchy when rendered on the DOM.
We’ve now integrated several methods into the host config file to render components onto the DOM. You can explore additional functions to further tailor the custom renderer according to your project’s specific needs.
Real-World Examples
Real-world examples of custom React renderers demonstrate the versatility and adaptability of React’s architecture. These examples showcase how developers can tailor React to suit specific needs, foster innovation, and provide solutions for diverse application domains.
Case Studies of Custom React Renderers
-
- Description:
React Three Fiberis a custom React renderer designed for creating 3D graphics using the popular WebGL library, Three.js. - Use Case: It allows developers to use familiar React patterns to create and manage 3D scenes and objects declaratively.
- Description:
-
- Description: While not a custom renderer in the same sense,
React Nativecan be considered a custom renderer for React. It takes React components and renders them into native UI components on iOS and Android. - Use Case:
React Nativeenables developers to use React to build mobile applications with a single codebase, bridging JavaScript and native platform APIs.
- Description: While not a custom renderer in the same sense,
-
- Description:
React ARTis a library for drawing vector graphics using React. It provides a custom React renderer that outputs to Canvas or SVG. - Use Case: It allows developers to create complex vector graphics using React components, making it easier to manage and update the graphics through React’s component lifecycle.
- Description:
-
- Description:
React PDFis a custom renderer for React that enables the generation of PDF documents using React components. - Use Case: Developers can leverage their React skills to create dynamic PDF documents by defining the document structure using React components.
- Description:
-
- Description:
React Hardwareis a custom renderer that targets hardware components like Arduino and Raspberry Pi, enabling developers to use React to build Internet of Things (IoT) applications. - Use Case: This allows developers to apply their React knowledge to create interactive experiences on hardware devices.
- Description:
Use Cases
Here are some general use cases associated with custom React renderers.
- Specialized UI Components: Create custom React renderers for specialized UI components that require low-level rendering optimizations or integration with specific technologies (e.g., graphics libraries, game engines).
- Custom Platforms or Devices: Develop React applications for non-standard platforms or devices (e.g., Internet of Things devices, custom hardware) by creating custom renderers tailored to their unique requirements.
- Domain-Specific Languages (DSLs): Build domain-specific languages using React for specific use cases, such as generating dynamic PDF documents, where the components define the structure and content of the document.
- Graphical User Interfaces (GUIs) for 3D Applications:
Use custom React renderers for creating GUIs in 3D applications by integrating with libraries like
Three.js, enabling developers to manage UI components within a 3D space. - Performance Optimization: Optimize rendering performance by creating a custom React renderer tailored to an application’s specific needs, especially in scenarios where the default rendering process might introduce unnecessary overhead.
Benefits
Custom renderers offer several advantages, including:
- Declarative Syntax: Leverage React’s declarative syntax to express UI components clearly and concisely, making it easier for developers to understand and maintain code.
- Code Reusability: Encapsulating rendering logic within React components enhances code reusability. This allows developers to reuse components across different projects or scenarios.
- Ecosystem Compatibility: Leverage the existing React ecosystem and developer community, taking advantage of the vast array of libraries, tools, and resources available to React developers.
- Familiar Development Workflow: Maintain a familiar development workflow for developers already experienced with React. Custom renderers allow developers to apply React patterns and best practices in various domains.
- Abstraction of Complexity: Abstract away the complexity of lower-level rendering details by providing a high-level API that simplifies the creation and management of UI components, reducing the cognitive load on developers.
- Cross-Platform Development:
Facilitate cross-platform development by creating custom renderers for platforms like
React Native, enabling developers to use a single codebase for building applications across multiple platforms.
Conclusion
Custom React renderers offer developers a versatile solution for tailoring front-end development to specific platforms and use cases. Leveraging React’s core rendering concept and the react-reconciler package, developers can efficiently build custom renderers, as exemplified by real-world cases like React Three Fiber and React Native. These renderers provide benefits such as declarative syntax, code reusability, and compatibility with diverse ecosystems. The step-by-step guide underscores the innovation potential, demonstrating how developers can optimize performance and address unique challenges in a concise and adaptable manner. Ultimately, custom React renderers empower developers to shape React for efficient and flexible user interfaces in the dynamic landscape of front-end development.
Additional Resources
Explore further with the following resources: React-reconciler Fiber Reconciliation
Gain Debugging Superpowers
Unleash the power of session replay to reproduce bugs, track slowdowns and uncover frustrations in your app. Get complete visibility into your frontend with OpenReplay — the most advanced open-source session replay tool for developers. Check our GitHub repo and join the thousands of developers in our community.
