Building a drawing application with HTML5 Canvas
Build a practical app using HTML5 Canvas to draw on


Building a drawing application with HTML5 Canvas is a great way to create interactive and dynamic drawing experiences in a web browser. The HTML5 Canvas element provides a drawing surface allowing you to manipulate pixels and programmatically create various shapes and graphics. This article will give you an overview and guidance on creating a drawing app using HTML5 Canvas. In addition, it will help you understand the steps in building a drawing application by explaining the HTML setup, JavaScript implementation, user interactions, and drawing functionality.

Discover how at OpenReplay.com.
The HTML canvas tag is an HTML element that provides a blank drawing surface on which graphics, shapes, and images can be rendered using JavaScript. Drawing applications uses the capabilities of HTML5 canvas to enable users to create artwork, sketches, and illustrations digitally. In addition, the drawing applications built with HTML5 canvas allow users to interact with the canvas, capturing mouse movements and clicks to draw, erase, or manipulate elements in real-time.
The HTML5 canvas is well-suited for creating drawing applications for the following reasons:
- It provides a dynamic drawing surface that can be updated in real-time.
- It offers a rich set of drawing APIs for creating various drawing tools and features.
- Automatically scales and adapts to different screen sizes for responsiveness.
- Native browser support across modern web browsers.
- Supports interactivity and event handling for capturing user input.
- Enables animations and special effects to bring drawings to life.
- Allows image manipulation, including loading, displaying, and transforming images.
HTML Setup
You can set up the HTML structure for your drawing application using HTML5 Canvas in the following ways:
- Create a new HTML file or open an existing one in a code editor.
- Start with the basic HTML structure by including the
<!DOCTYPE html>declaration, opening the<html>tag and adding the<head>and<body>sections. - In the
<head>section, you can set the title of your application and include any necessary CSS styles or external libraries. - Within the
<body>section, add an<canvas>element, which will serve as the drawing surface for your application. You can specify the desired width and height attributes to define the dimensions of the canvas. - Below the
<canvas>element, you can add any additional HTML elements you want to include in your drawing application, such as buttons, color pickers, or toolbars. - You can customize the HTML structure based on your requirements, adding any necessary elements, styles, and IDs for the drawing application. Here’s an example of a basic HTML setup for a drawing application:
<!DOCTYPE html>
<html>
<head>
 <title>Drawing Application</title>
 <style>
  body {
   margin: 3px;
   padding: 6px;
   font-size: 22px;
  }
  canvas {
   border: 2px solid black;
  }
  .toolbar button,
  #clearButton,
  #saveButton {
   padding: 15px;
   font-size: 24px;
  }
 </style>
</head>
<body>
 <h1>HTML Setup for a Drawing Application Using HTML5 Canvas</h1>
 <canvas id="myCanvas" width="700" height="400"></canvas>
 <button id="clearButton">Clear</button>
</body>
</html>
The outcome:
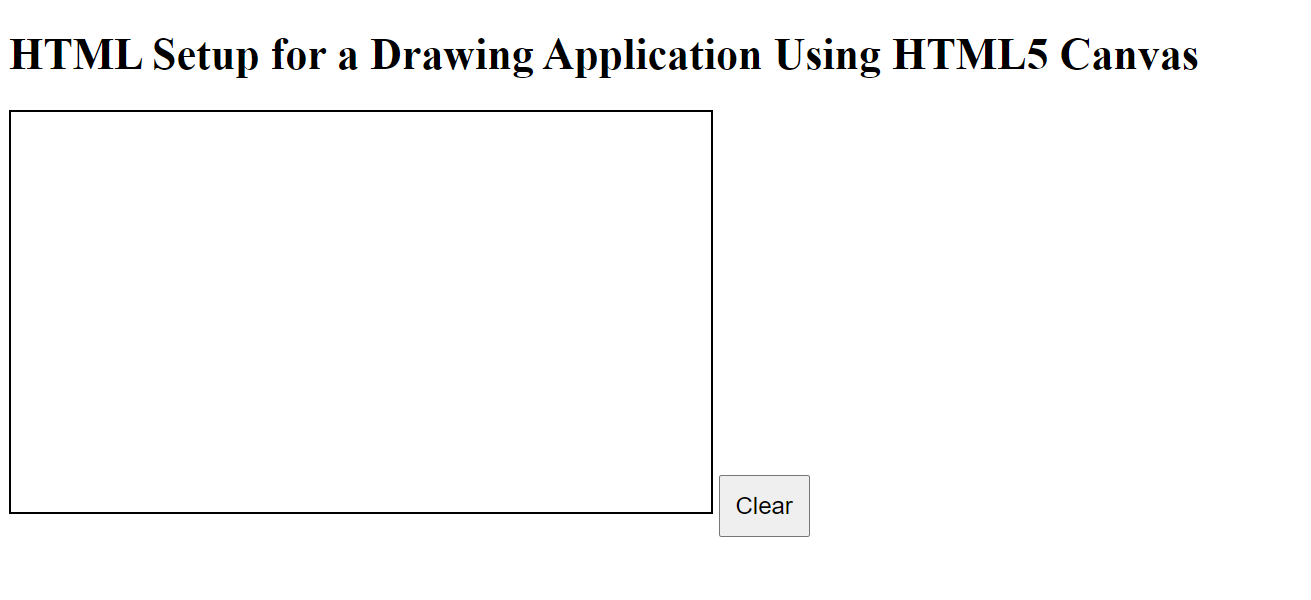
In the above example, we have structured the HTML of the drawing application by adding the canvas element with the ID of “myCanvas” and specifying its width and height as 700 and 400 pixels, respectively. We have also included a “clear” button below the canvas with an ID of “clearButton,” which provides a convenient way for users to remove all the drawn elements from the canvas and create a blank slate for new drawings.
Styling the Drawing Application
Add some elements and features with additional HTML and CSS to make the drawing application look more like an application. For example, you can add a toolbar, a color palette, a brush size, and a status bar. Here is an example with some additional elements to enhance the appearance and layout of the drawing application:
<div class="toolbar">
 <button id="pencilTool">Pencil</button>
 <button id="brushTool">Brush</button>
 <button id="eraserTool">Eraser</button>
 <input type="color" id="colorPicker" />
 <select id="brushSize">
  <option value="1">1px</option>
  <option value="3">3px</option>
  <option value="5">5px</option>
 </select>
</div>
<div class="color-palette">
 <div class="color-swatch" style="background-color: black"></div>
 <div class="color-swatch" style="background-color: red"></div>
 <div class="color-swatch" style="background-color: green"></div>
 <div class="color-swatch" style="background-color: blue"></div>
</div>
For styling with CSS:
.toolbar {
 margin-bottom: 12px;
}
.toolbar button {
 padding: 10px;
 margin-right: 7px;
 background: white;
 color: black;
 border: none;
 cursor: pointer;
}
.color-palette {
 display: flex;
 justify-content: center;
 margin-bottom: 12px;
}
.color-palette .color-swatch {
 width: 32px;
 height: 32px;
 border: 3px solid white;
 cursor: pointer;
 margin-right: 6px;
}
.status-bar {
 padding: 7px;
 background: white;
 color: black;
}
The outcome:
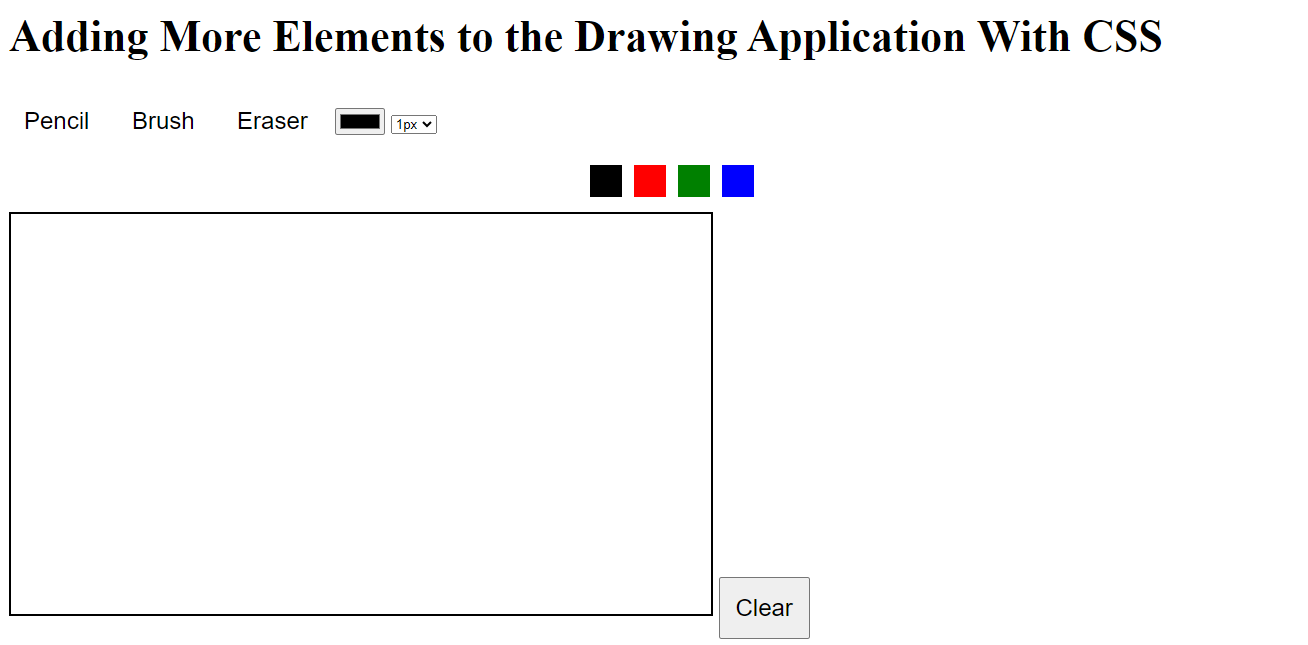
The above example includes the necessary structure and styles to create a drawing application with elements such as the toolbar with buttons for different tools (pencil, brush, eraser), a color palette, a brush size selection dropdown, a canvas for drawing, a status bar, and a clear button. You can customize the elements based on your desired functionality.
JavaScript Setup
Without the JavaScript functionality, the above examples’ buttons, color swatches, and clear buttons will not perform any actions. To use the drawing application, you must add the corresponding JavaScript source code to handle the functionality and interaction with the canvas element. Here are several ways you can use JavaScript to handle functionality and interaction of the canvas element:
- You need to access the canvas element in JavaScript using its ID and obtain the drawing context. The drawing context provides methods for drawing on the canvas.
- To do this, add the following JavaScript code inside the
<script>tag:
const canvas = document.getElementById("myCanvas");
const context = canvas.getContext("2d");-
To enable drawing functionality, you must handle user interactions such as mouse clicks and movements.
-
Attach event listeners to the canvas element to capture the
mousedown,mousemove,mouseup, andmouseoutevents. -
Use the
mousedownevent to start drawing,mousemoveevent to draw while the mouse is moved,mouseupevent to stop drawing when the mouse button is released, andmouseoutevent to stop drawing when the cursor moves outside the canvas. -
To implement the event handler functions for drawing, use
startDrawing,last position, andstopDrawing. -
The
startDrawingsets the drawing flag and saves the starting position,drawdraws lines based on mouse movements from the last position to the current position, andstopDrawingresets the drawing flag. -
To initialize variables to track the drawing state, use
isDrawing,lastX, andlastY. They can track the drawing state and the previous coordinates of the cursor or pointer. -
The variables
isDrawingis a boolean flag indicating whether the user is currently drawing, whilelastXandlastYstore the previous coordinates of the cursor or pointer, enabling smooth and connected lines to be drawn on the canvas. Example of how you can use JavaScript to improve the functionality of the drawing application:
const canvas = document.getElementById("myCanvas");
const ctx = canvas.getContext("2d");
let isDrawing = false;
let selectedTool = "pencil";
function startDrawing(event) {
 isDrawing = true;
 draw(event);
}
function draw(event) {
 if (!isDrawing) return;
 const x = event.clientX - canvas.offsetLeft;
 const y = event.clientY - canvas.offsetTop;
 ctx.lineTo(x, y);
 ctx.stroke();
}
function stopDrawing() {
 isDrawing = false;
 ctx.beginPath();
}
canvas.addEventListener("mousedown", startDrawing);
canvas.addEventListener("mousemove", draw);
canvas.addEventListener("mouseup", stopDrawing);
canvas.addEventListener("mouseout", stopDrawing);
const clearButton = document.getElementById("clearButton");
clearButton.addEventListener("click", function() {
 ctx.clearRect(0, 0, canvas.width, canvas.height);
});
const colorSwatches = document.querySelectorAll(".color-swatch");
colorSwatches.forEach((swatch) => {
 swatch.addEventListener("click", function() {
  const color = this.style.backgroundColor;
  ctx.strokeStyle = color;
 });
});
const brushSizeSelect = document.getElementById("brushSize");
brushSizeSelect.addEventListener("change", function() {
 const brushSize = this.value;
 ctx.lineWidth = brushSize;
});
const pencilToolButton = document.getElementById("pencilTool");
pencilToolButton.addEventListener("mousedown", function() {
 selectedTool = "pencil";
 ctx.globalCompositeOperation = "source-over";
});
const brushToolButton = document.getElementById("brushTool");
brushToolButton.addEventListener("mousedown", function() {
 selectedTool = "brush";
 ctx.globalCompositeOperation = "multiply";
});
const eraserToolButton = document.getElementById("eraserTool");
eraserToolButton.addEventListener("mousedown", function() {
 selectedTool = "eraser";
 ctx.globalCompositeOperation = "destination-out";
});
const colorPicker = document.getElementById("colorPicker");
colorPicker.addEventListener("input", function() {
 const color = this.value;
 ctx.strokeStyle = color;
});
The outcome:

In the example above, the functionality of the drawing application is activated, and you can easily use it to draw what you want.
Notice that all the elements are functioning now, and you can draw on the canvas, select different drawing tools (pencil, brush, eraser), choose colors, adjust brush size, and clear the canvas.
The JavaScript code specifies the canvas element from the HTML document, gets the 2D drawing context, and sets up event listeners on various elements of the HTML document, such as the canvas, buttons, color swatches, and input fields.
These event listeners respond to user actions like mouse clicks, movements, and value changes. When triggered, the corresponding JavaScript functions execute and modify the canvas drawing context (ctx) based on the user’s actions.
It selects the clear button from the HTML document and adds a click event listener. It clears the entire canvas using the clearRect method of the 2D drawing context when clicked.
For example, when you click and drag the mouse on the canvas, the startDrawing, draw, and stopDrawing functions are called, which track the mouse coordinates and draw lines on the canvas.
Usage of the drawing application
A drawing application allows you to create digital artwork using the abovementioned tools and features. It provides a canvas for users to draw, paint, and apply different effects to create visual compositions. Drawing applications are used by artists, designers, hobbyists, and anyone interested in expressing their creativity through digital art by creating visually appealing illustrations, paintings, sketches, and other digital art forms.
How to save HTML5 canvas drawing as an image file
Saving an HTML5 canvas drawing as an image file can be helpful if you want to share the drawing with others or use it in other applications. Users can store the drawing locally on their device or upload it to various platforms such as social media, websites, or online galleries by providing the option to save it as an image file. In addition, saving the drawing enables users to revisit and showcase their creations later, enhancing the usability and value of the drawing application.
Here is how you can save your HTML5 canvas draw as an image file:
Using JavaScript, you can save the canvas drawing as an image file.
Use the canvas element’s toDataURL() method. This method converts the canvas content into a data URL, which can be used to create an image file.
For example:
<button id="saveButton">Save</button>const canvas = document.getElementById('myCanvas');
const link = document.createElement('a');
function saveCanvasAsImage() {
const dataURL = canvas.toDataURL('image/png');
link.href = dataURL;
link.download = 'drawing.png';
link.click();
}
saveCanvasAsImage();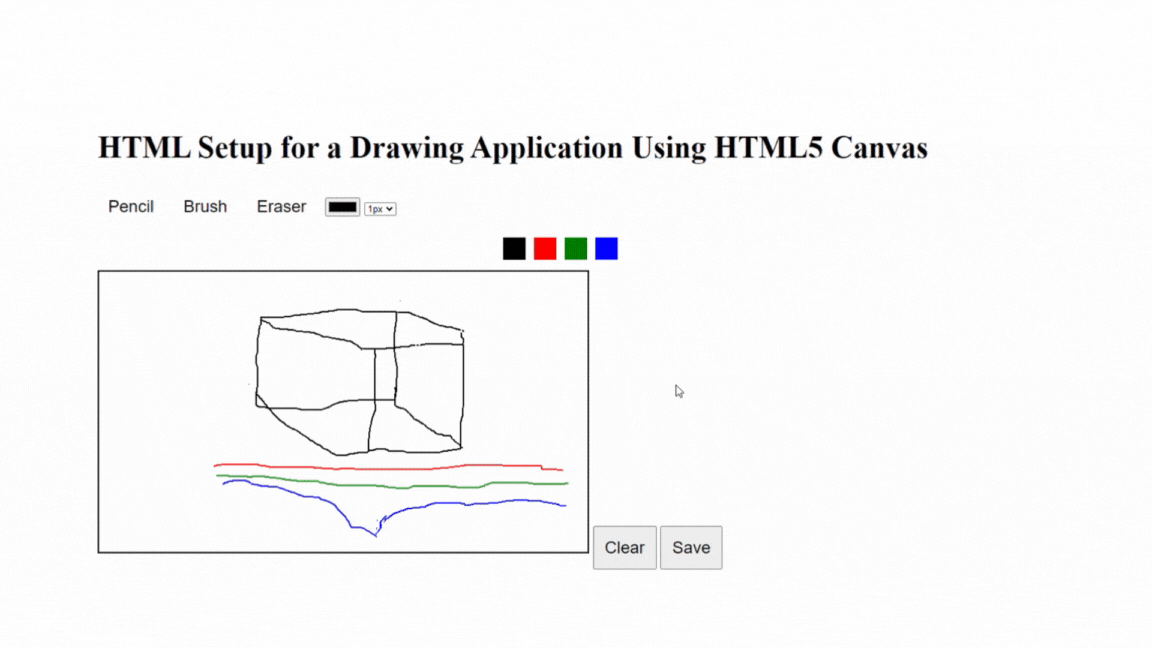
In the example above, a new button element with the id “saveButton” was added, with a click event listener. When you click the “Save” button, it triggers a function that retrieves the data URL of the canvas using toDataURL(). Then, it creates a dynamically generated link element, sets the data URL as the href attribute, and specifies the desired file name as “drawing.png” using the download attribute to initiate the image file download.
How to save the drawing in different formats
The toDataURL() method supports different image formats such as PNG, JPEG, and GIF. You can change the format by modifying the type of file you need (e.g., ‘image/jpeg’ for JPEG format).
Once saved, you can share the image file through various means, such as email, messaging apps, or social media platforms.
Conclusion
The drawing application utilizing HTML5 canvas opens up a world of possibilities for artists, designers, educators, and anyone with a creative spirit. Whether used as a standalone tool or integrated into other applications, the drawing application empowers users to express their creativity, share their work with others, and explore new realms of visual expression. With its wide range of features, the drawing application continues to inspire and delight users in their artistic endeavors. So pick up your digital brush and let your imagination run wild on the canvas of possibilities! For a more sophisticated approach, you can check out 2D Sketches With React And The Canvas API.