Building an eCommerce Mobile App with React Native and WooCommerce
Use the WooCommerce platform to quickly build your own ecommerce app

React Native is a mobile app development framework used for creating multi-platform (iOS and Android apps) applications using native development with React. React Native allows you to create intuitive UI components to quickly compile and launch multi-platform apps. Conversely, WooCommerce is the most popular open-source platform for creating WordPress-based eCommerce stores. It helps you to flexibly integrate vital store features into your eCommerce applications. This includes inventory management, secure payments, and shipping integrations.
A Headless CMS? React Native and WordPress
WooCommerce is built for WordPress. WordPress is a Content management system(CMS). One thing to note about WordPress is that it runs a monolith architecture, which means both the backend and the frontend are tightly coupled. This way, running your content on different channels can be challenging.
However, due to the growth of Headless CMS, where the backend and frontend can be loosely decoupled and run differently, we can still use WordPress for content management and still consume the content on other platforms. Let’s say you have built your WordPress WooCommerce store. However, you need to spawn the same store and its content to other channels, such as mobile applications. You can use the content of your WooCommerce store and generate APIs. These APIs can then be consumed with any framework of your choice and still meet your target customers while using the same products running on your WooCommerce store.
In this article, we will build an eCommerce application. We will use WordPress as the content manager WooCommerce to provide robust eCommerce data. Using WooCommerce, we will generate the store data and channel it using API. We will then use the API to consume and WooCommerce store using a React Native mobile app.
To follow along with this article, it is essential to have the following:
- Nodejs runtime installed on your computer.
- Prior knowledge working with React/React Native.
- A ready setup for React Native development environment.
- A functional WordPress website.
- Postman installed for testing API endpoints.
- WooCommerce 3.5+ and WordPress 4.4+.
Setting WooCommerce on WordPress
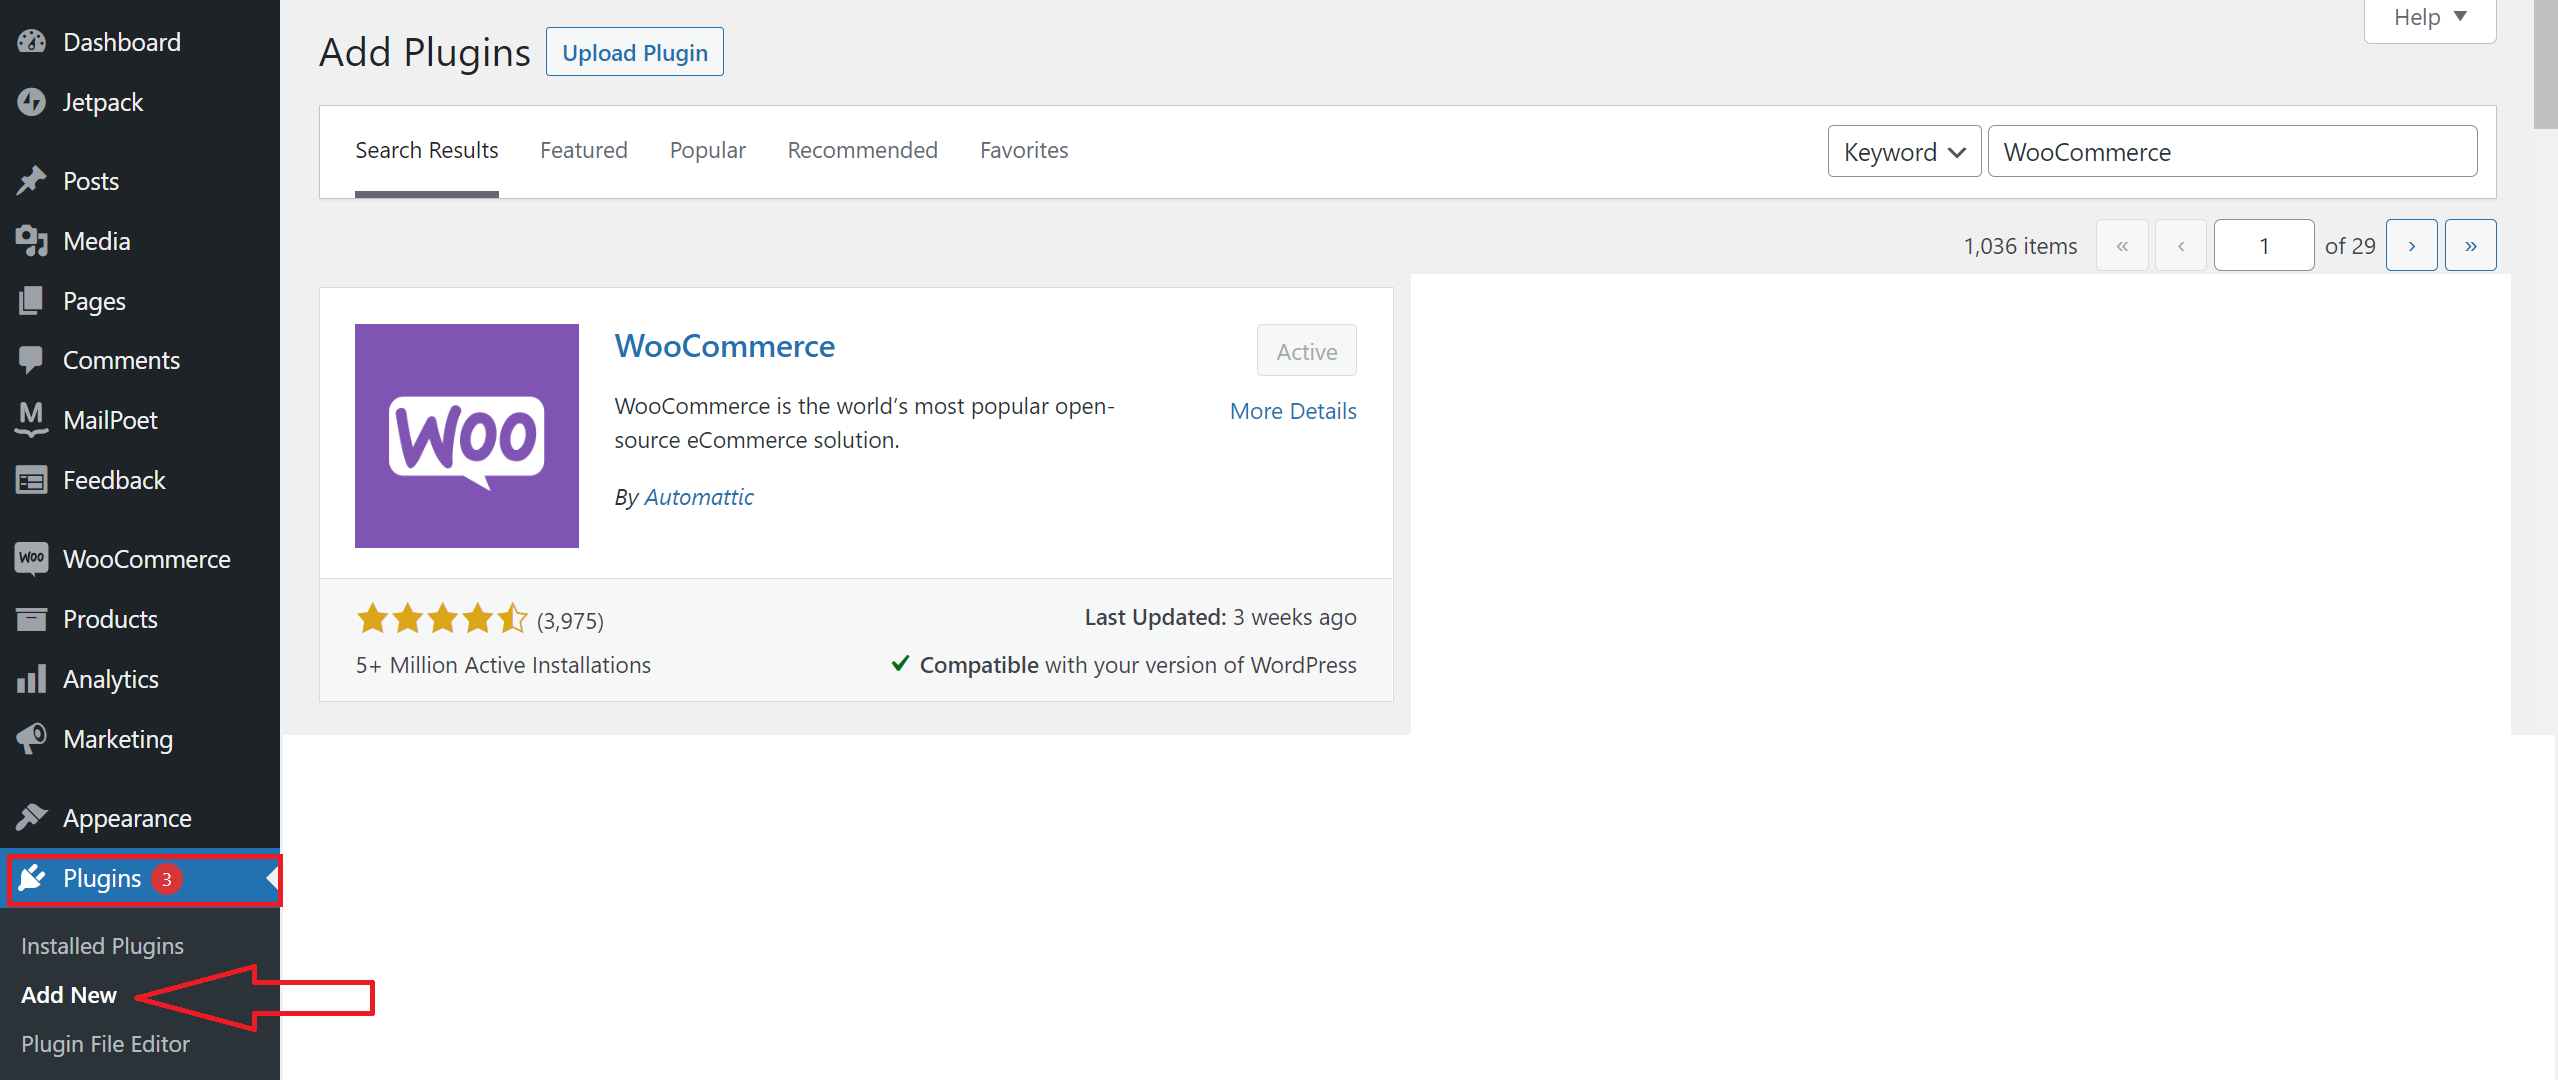
Once you have the WordPress site up and running, let’s dive and set up WooCommerce. On your WordPress admin page, on the left pane, click on plugins. From the plugins page, go to Add Plugins and search for WooCommerce. You have the following plugin as such:
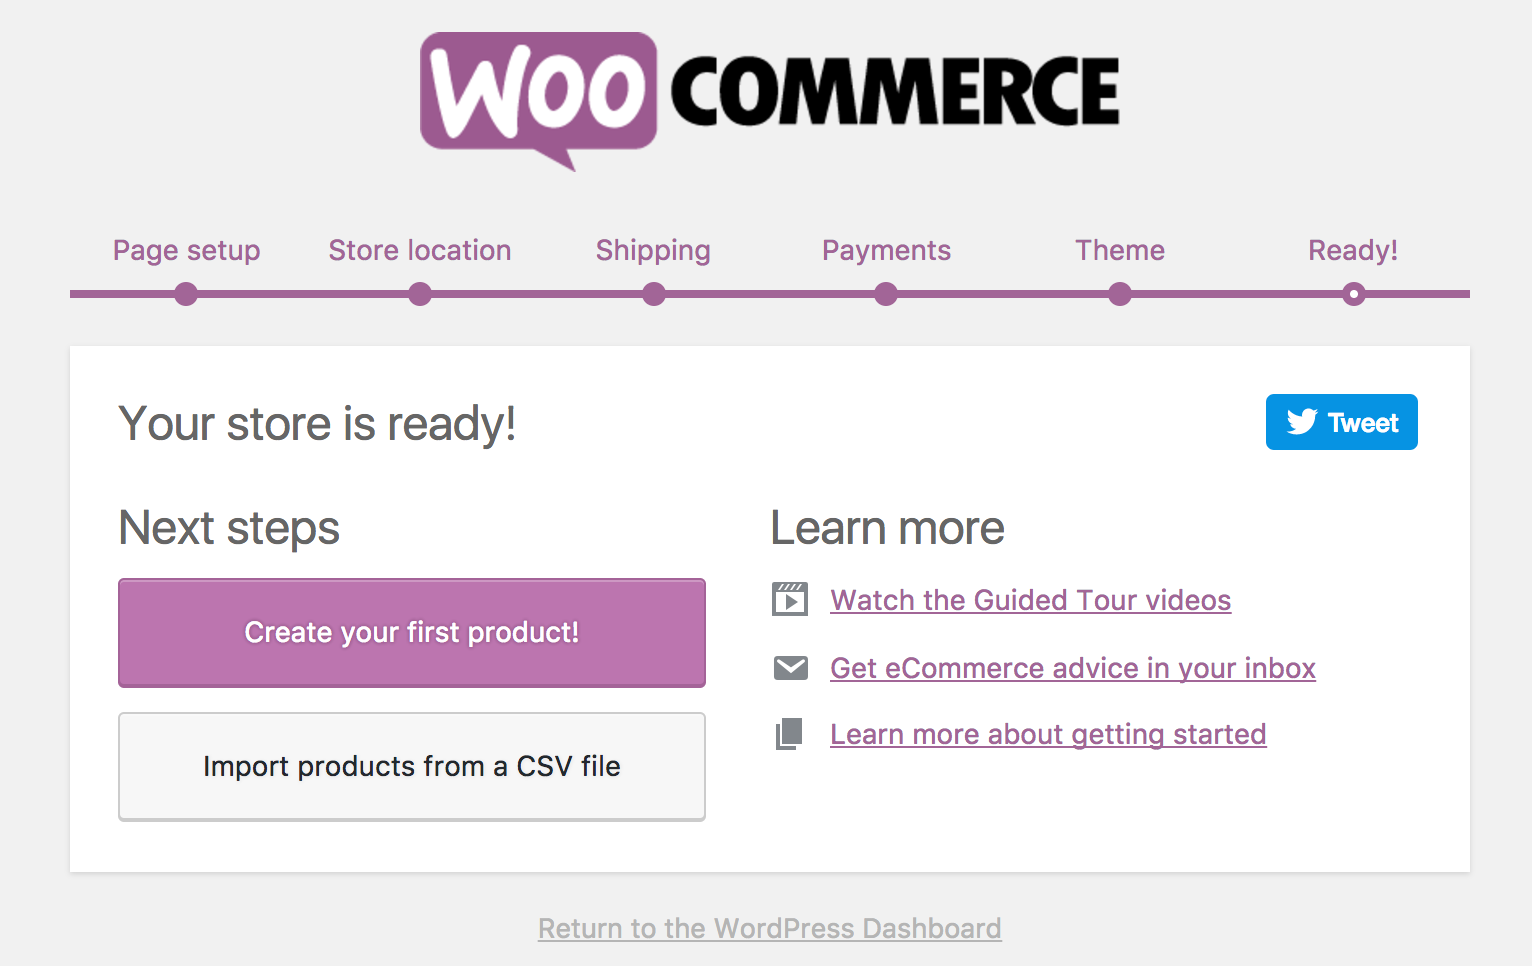
Go ahead and Activate the plugin. From the activation process, you will be taken through a six-step process, where you are supposed to configure your store.
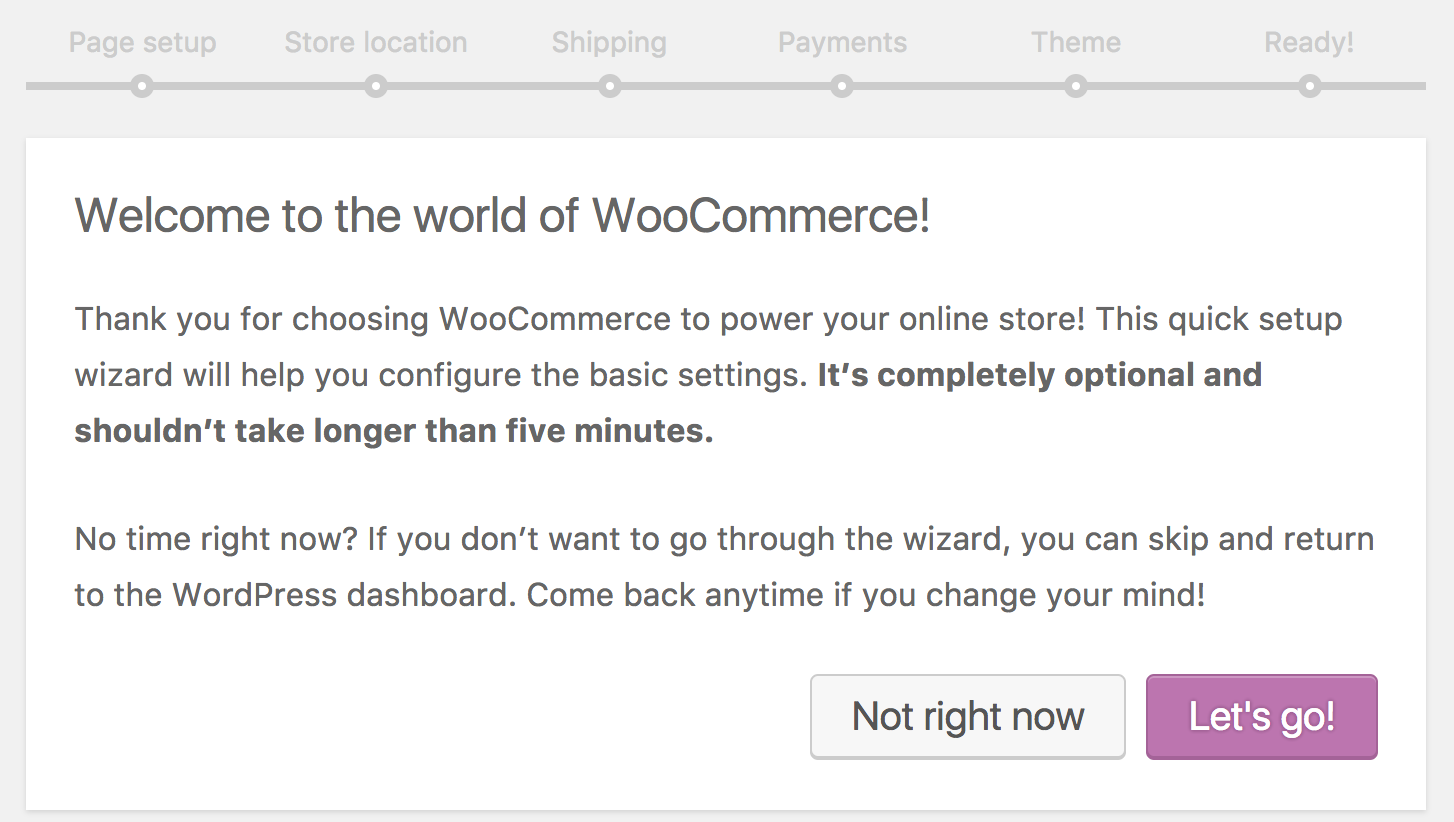
Go ahead and configure your WooCommerce to your liking.
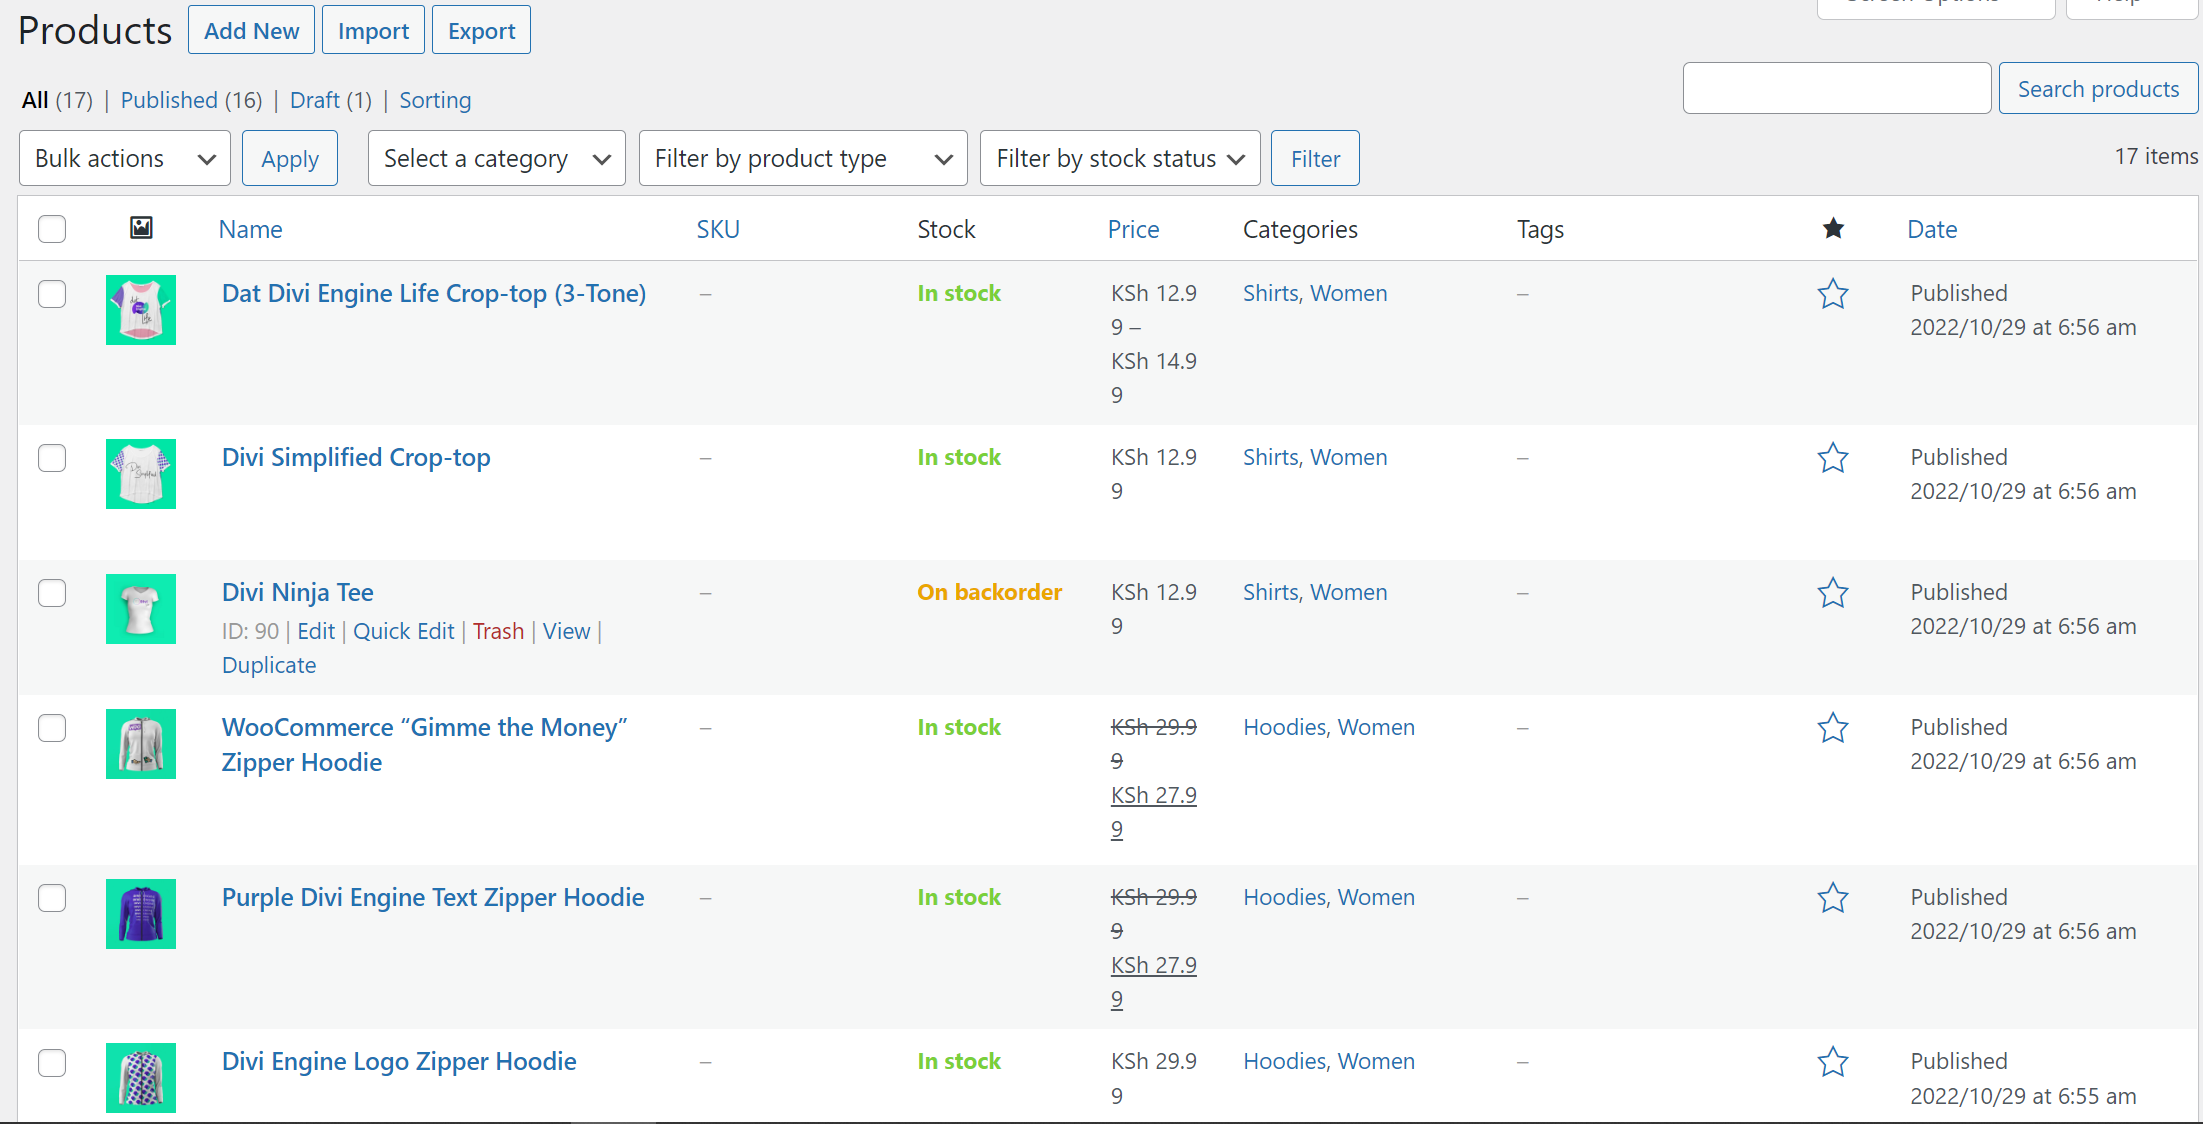
Once ready, let’s add some products. At this point, if you have some custom products, you can go ahead and add them. Here we will import some dummy products from a CSV file to the store.
Go ahead and Download a CSV file with dummy products using this WooCommerce Sample Products CSV Import File.
Upon downloading, import the products from the above Wizard. Or, on the left pane of your admin page under Products, hover over it, click on Add Products, and import the downloaded products’ CSV files.
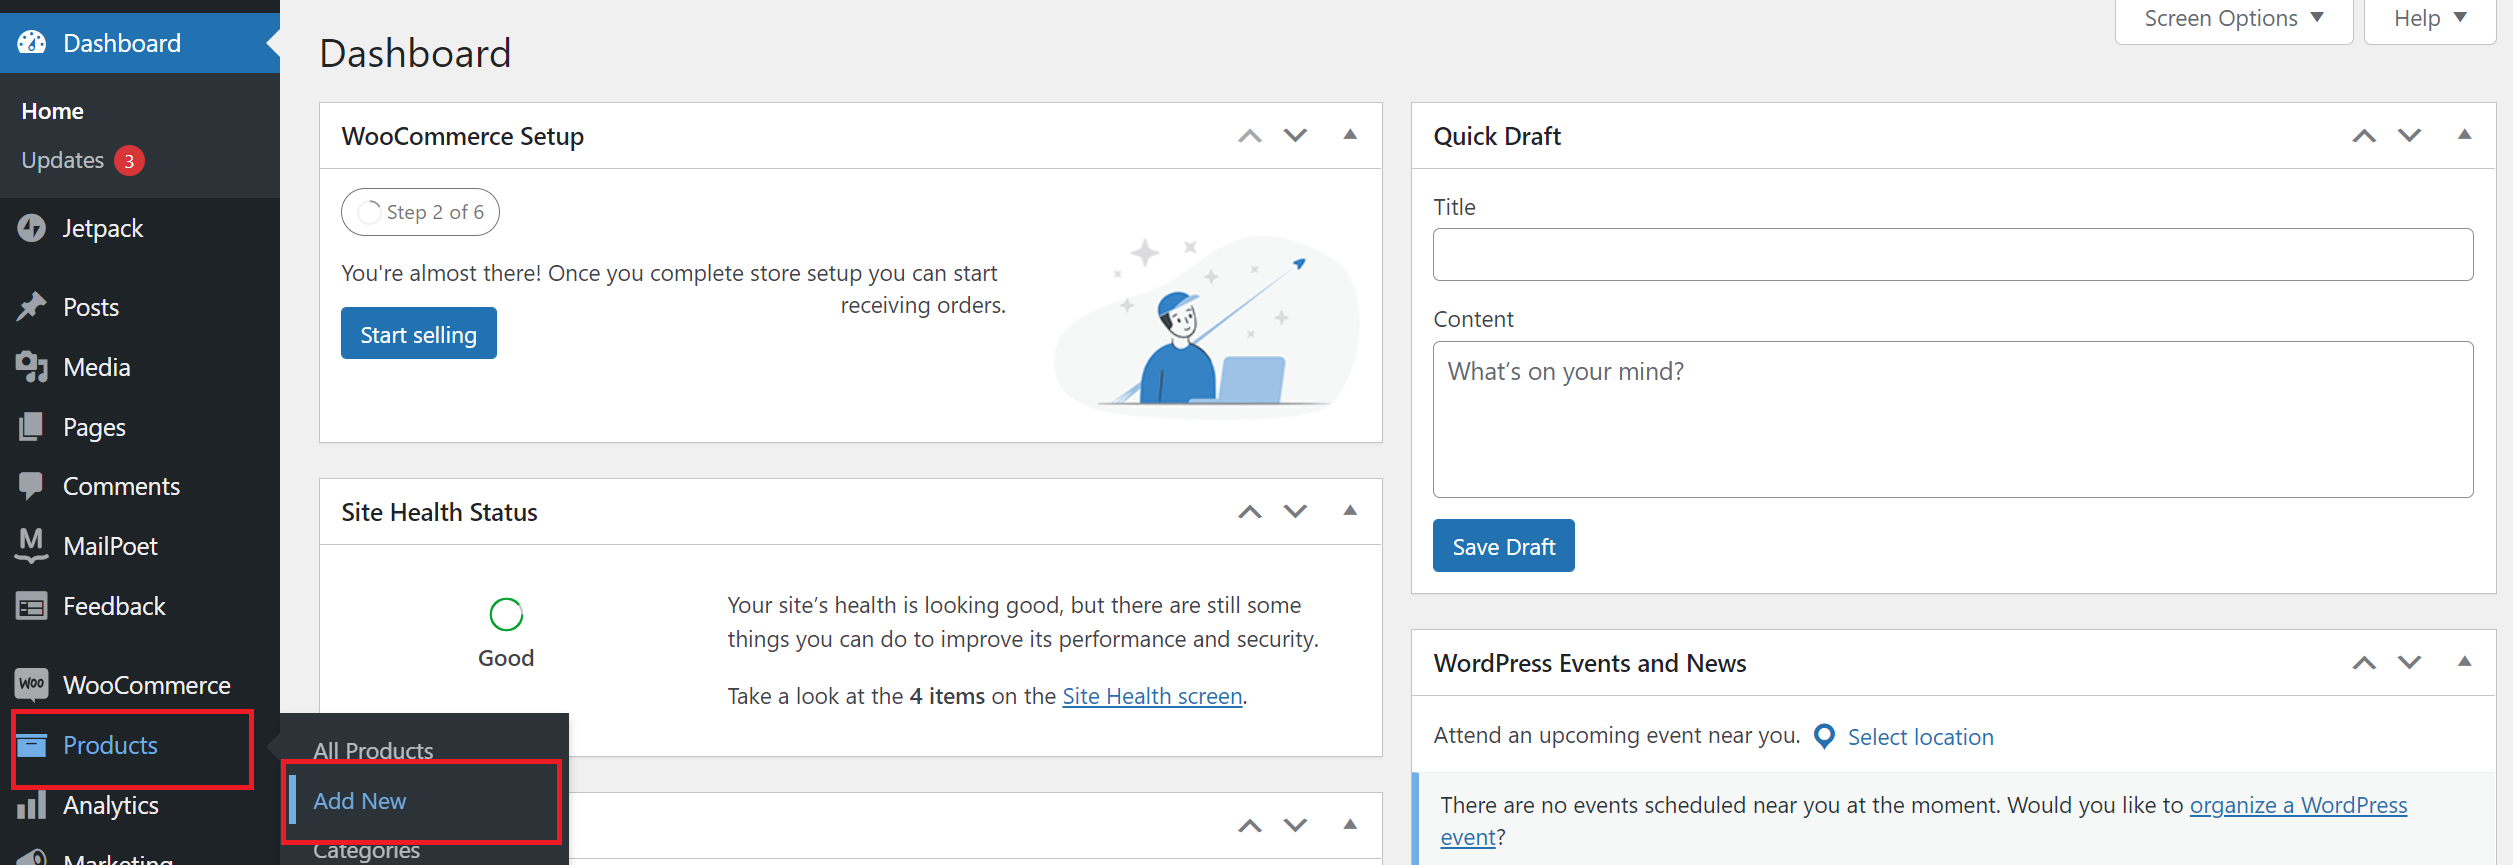
On the resulting screen, click on import products. You should have the products ready on your Dashboard.
Setting up the REST API
Let’s now generate an API to consume WooCommerce outside WordPress.
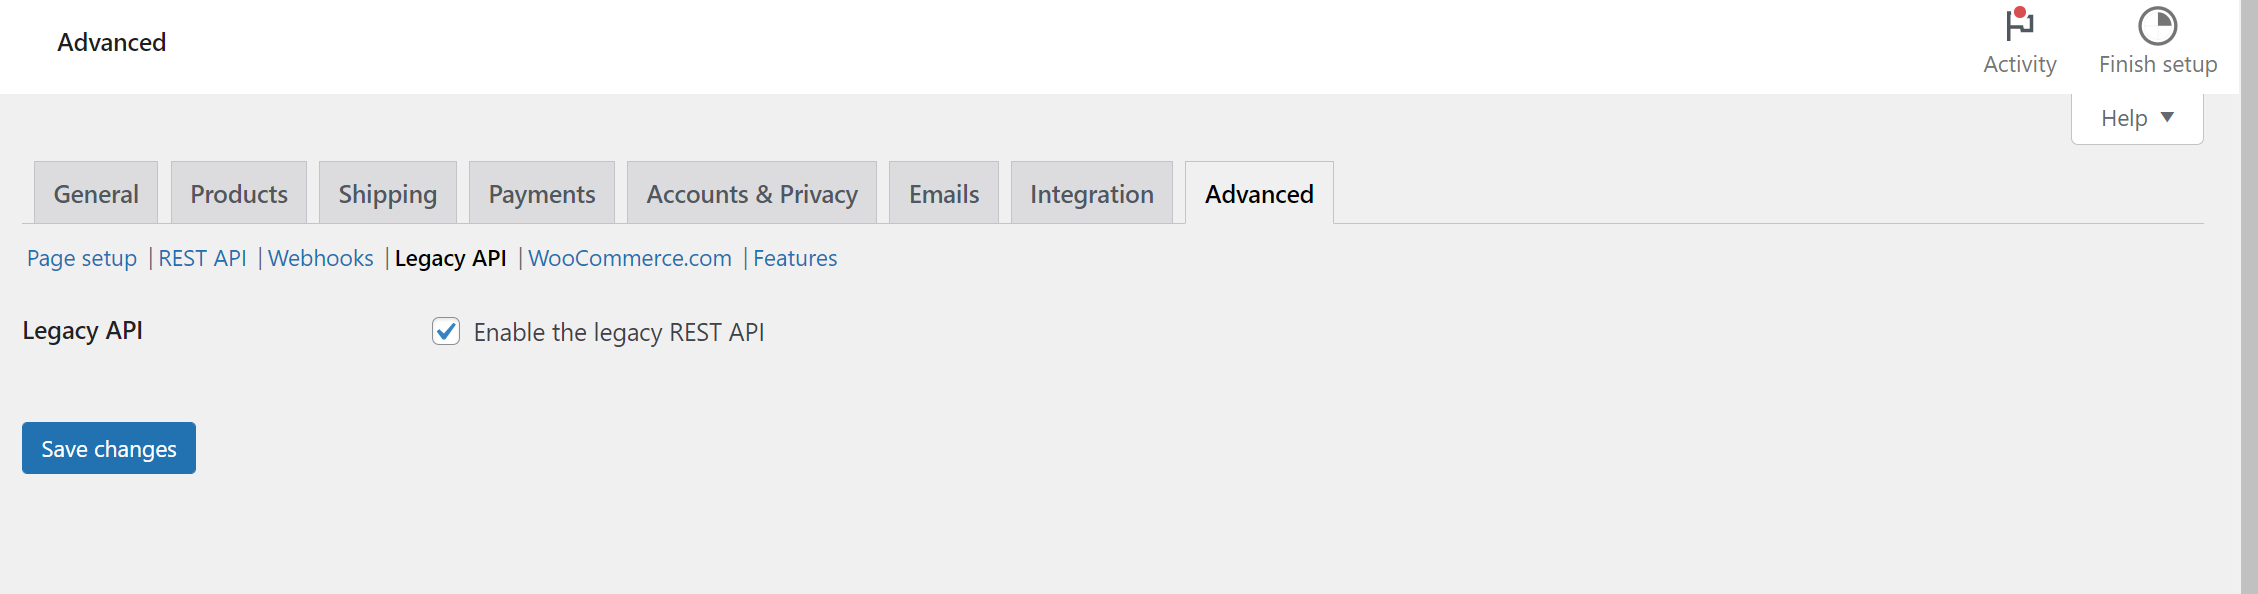
From the left pane of your WordPress admin page, click on WooCommerce, and click on Settings.
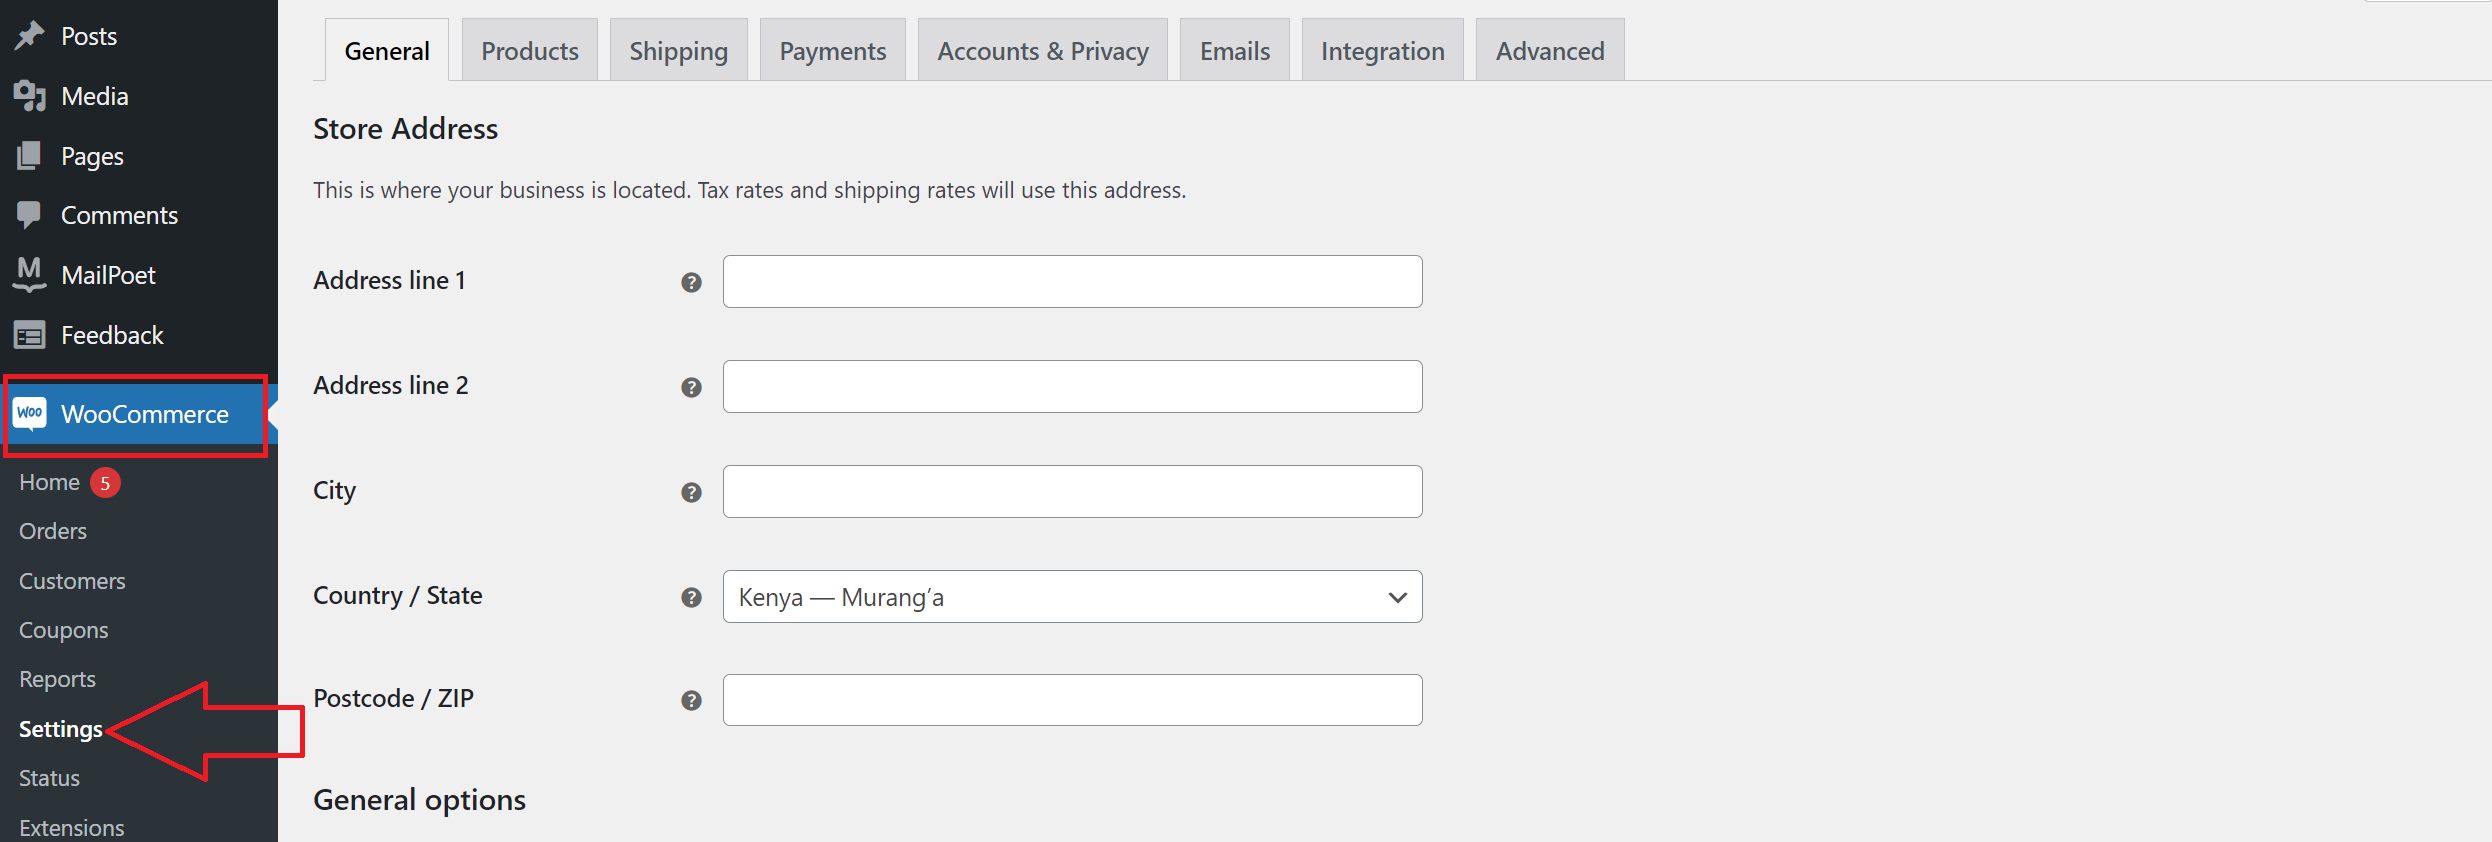
On the resulting screen, Navigate to the Advanced tab. Click on the Legacy API.
Ensure you have enabled it and saved the changes.
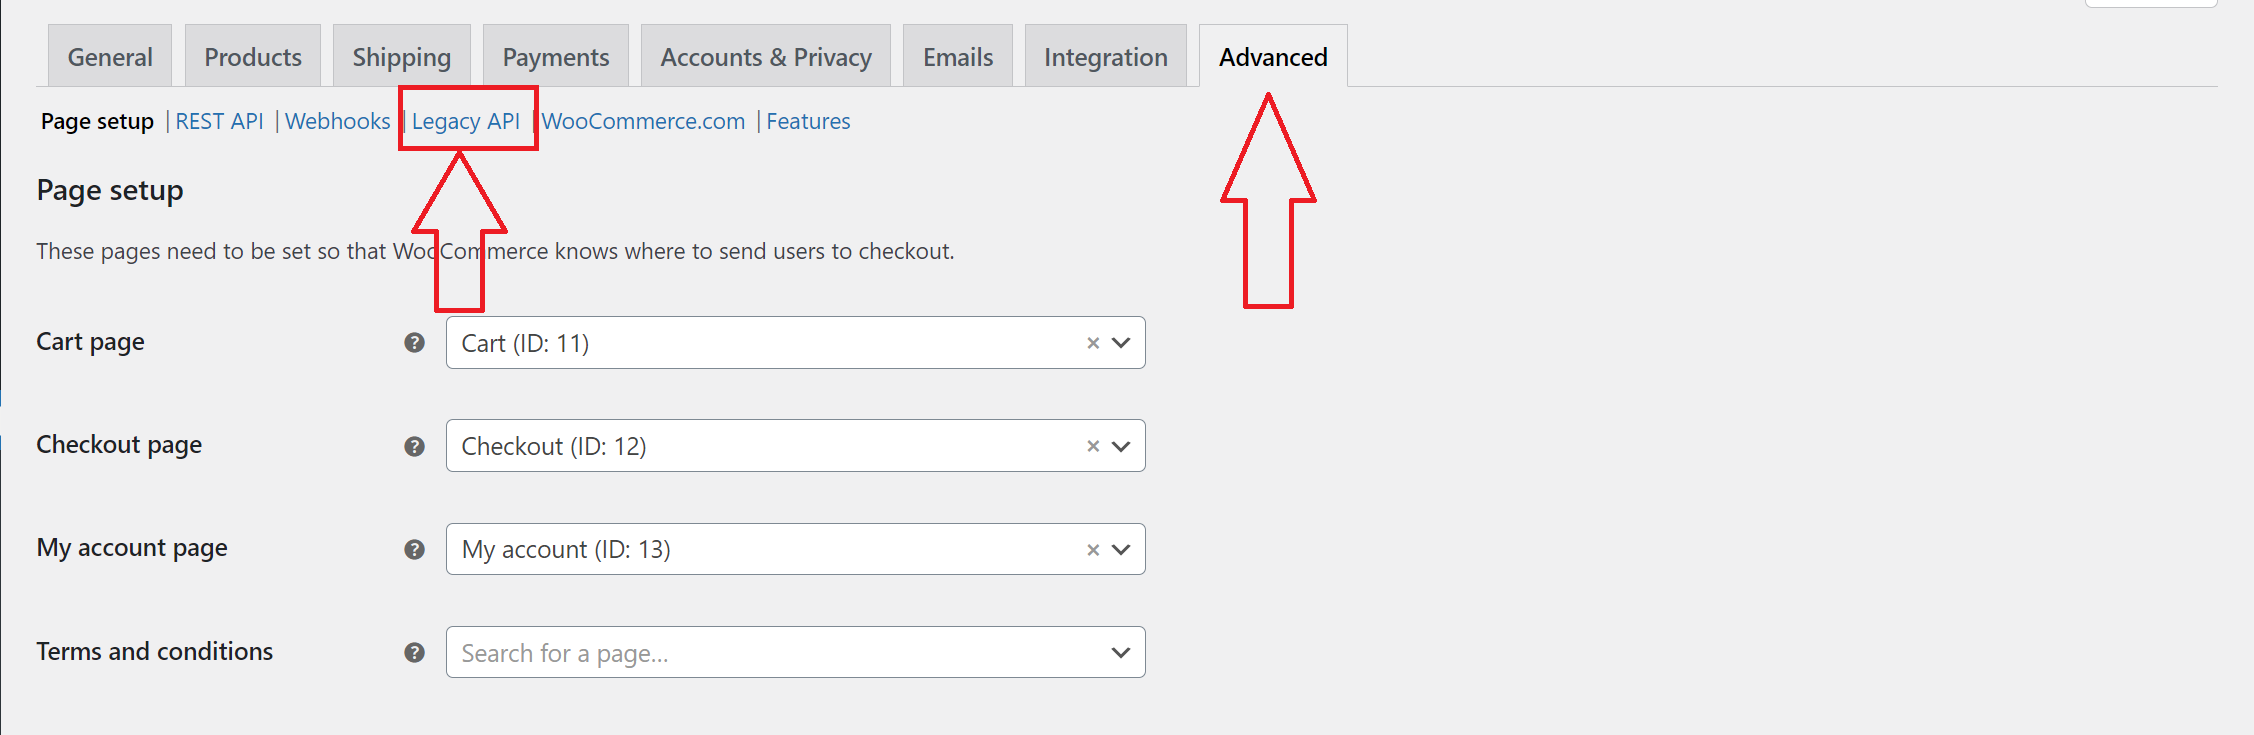
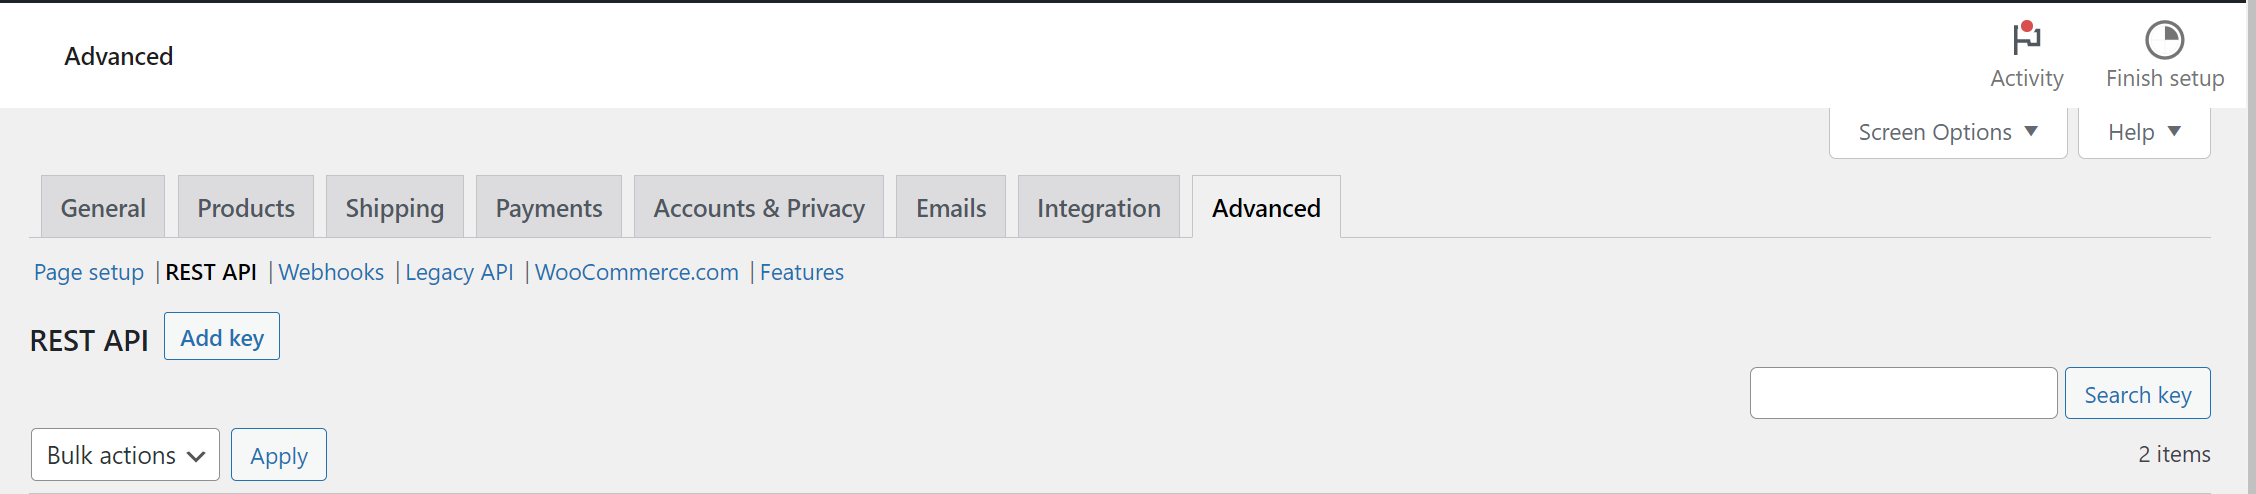
Click on the REST API, and on the resulting page, click on Add key to add a key that we will use to consume WooCommerce.
In the resulting page, enter a description and ensure you set the Read permissions since that is the one we will use to get products from WooCommerce.
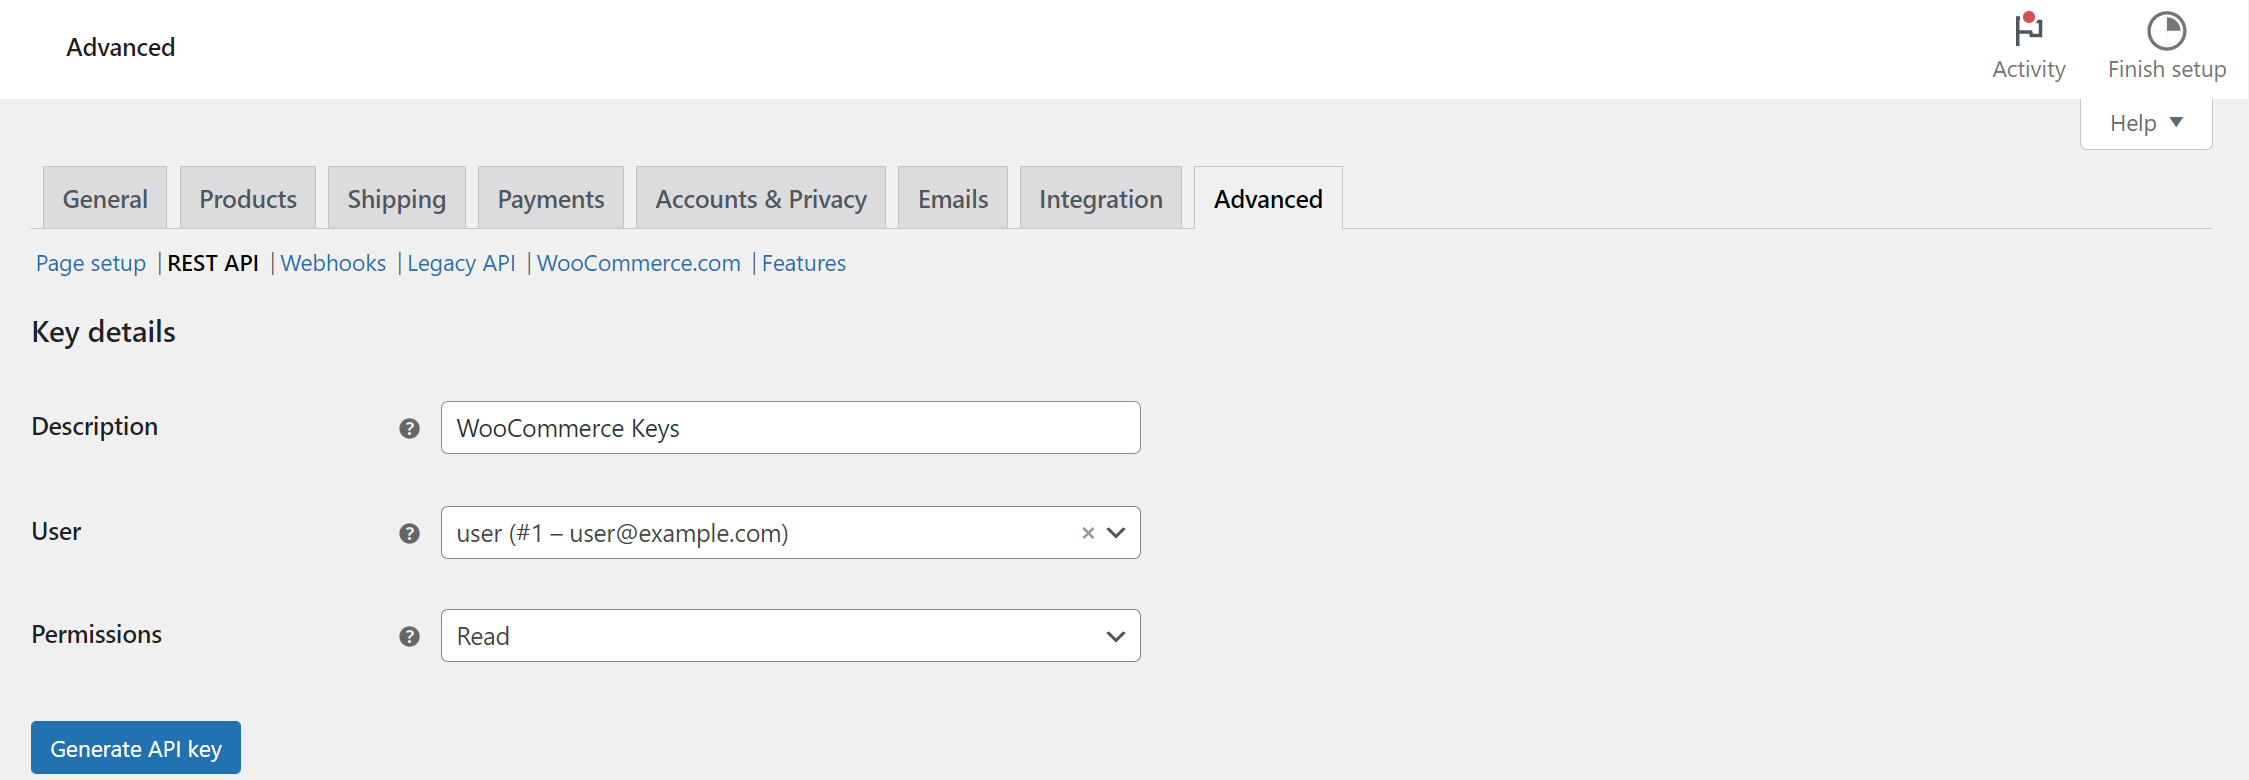
Click the Generate API key to save these changes. Once the key has been generated, you will be directed to a page with your WooCommerce consumer key and secret.
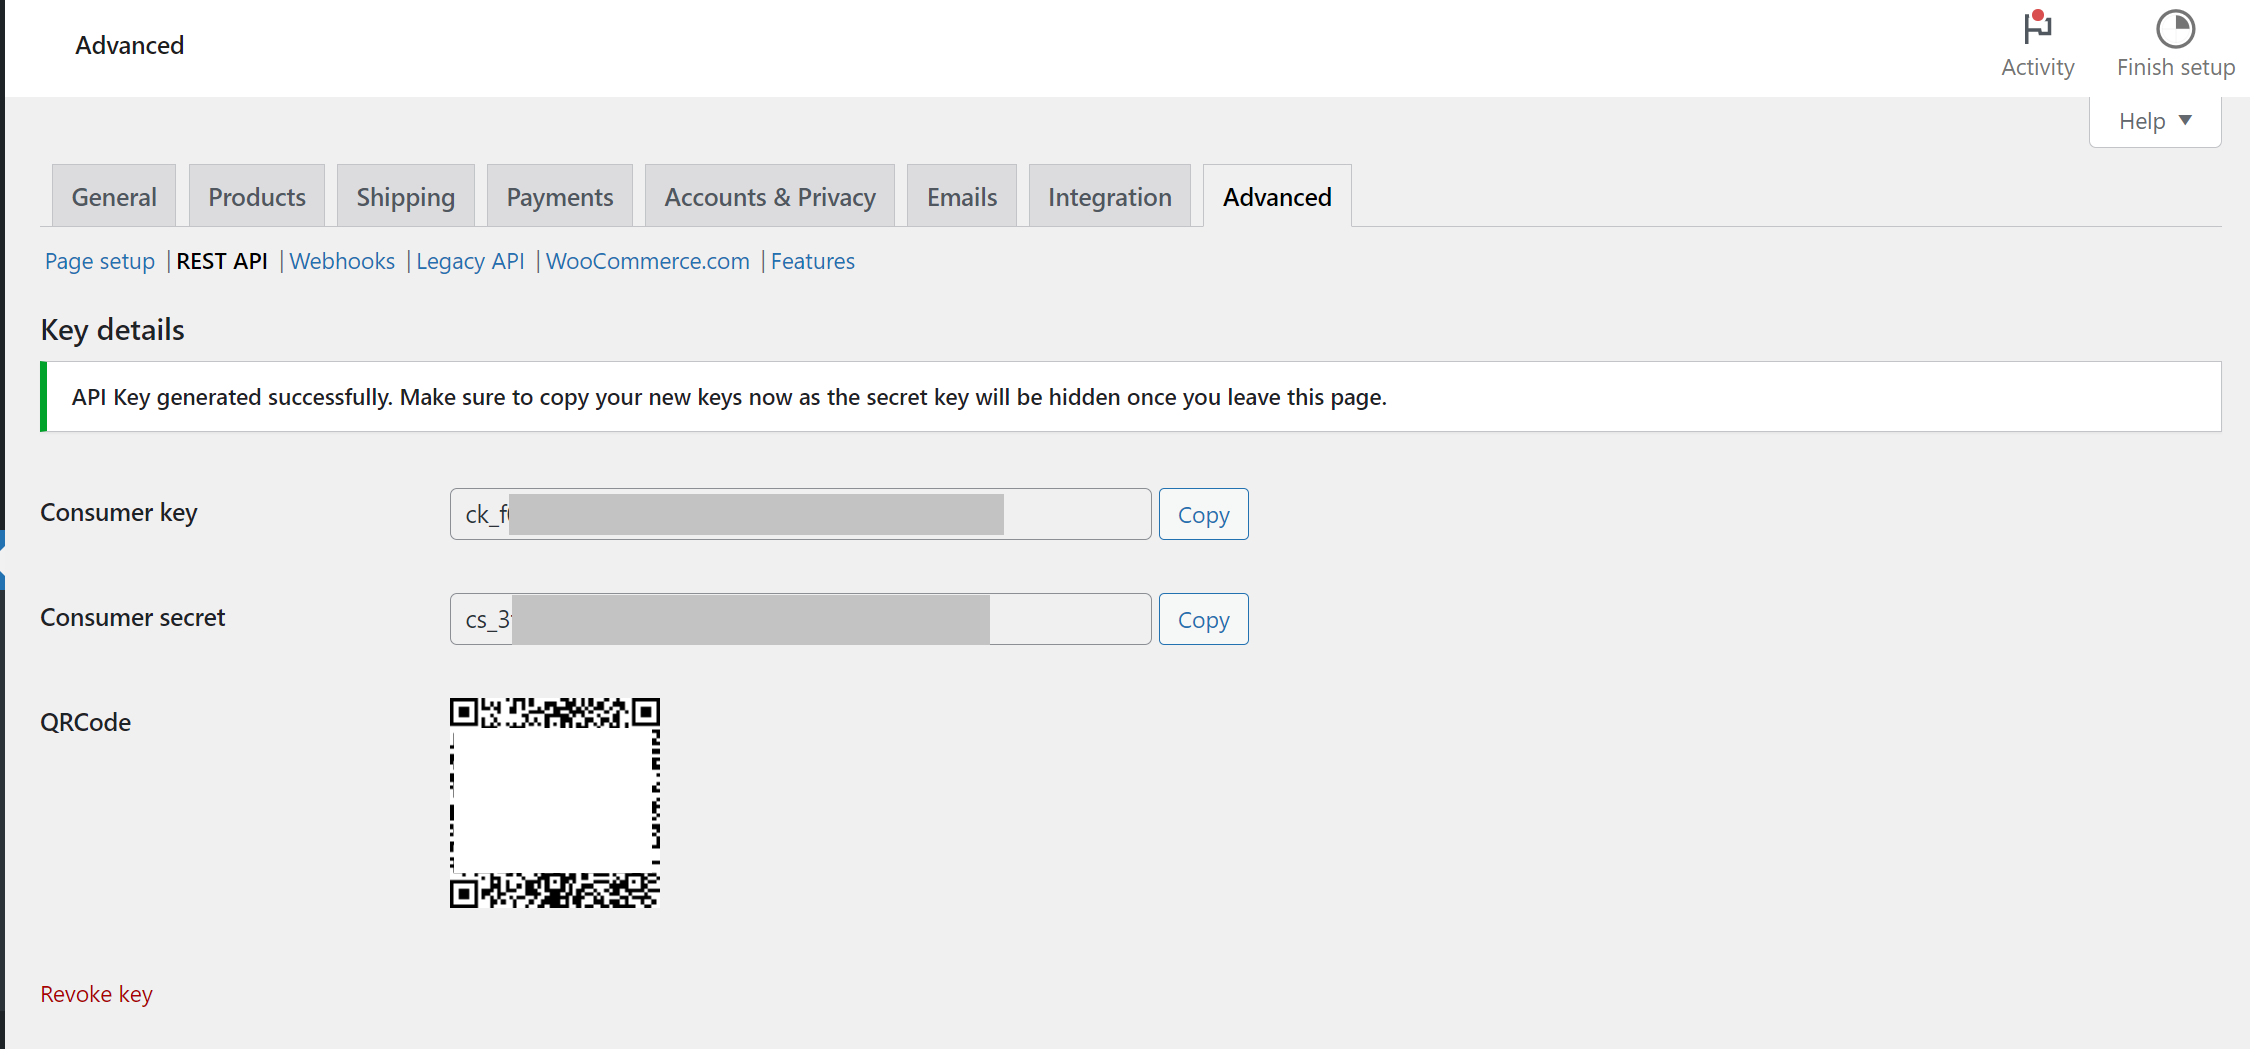
At this point, Make sure to copy your new keys now as the secret key will be hidden once you leave this page. Save the keys somewhere safe, as we need them to set up the React Native eCommerce.
Testing the API
Once the above steps are ready, let’s test if we can query the products from our WordPress WooCommerce store backend.
There are two ways we can test this:
- If your website is SSL enabled.
This means your store can be accessed using the alias HTTPS. If you have SSL support for your WordPress website, you can test the API as follows:
Launch postman from your computer. Send a GET request to https://your_domain/wp-json/wc/v3/products. In the Authorization tab, select Basic Auth. Enter the previously generated WooCommerce consumer key as a Username and the consumer secret key as a Password.
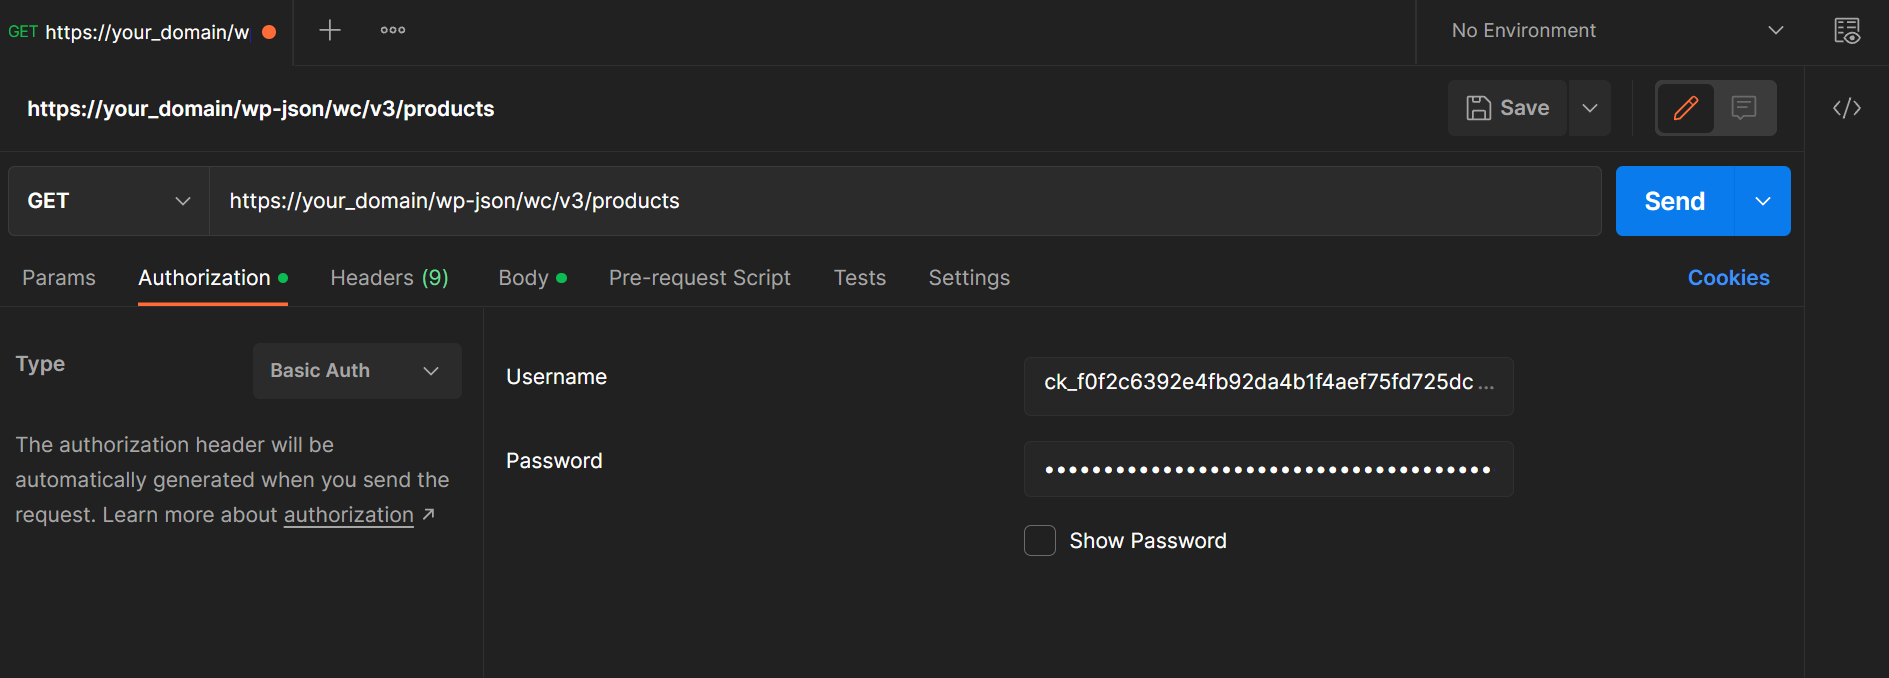
Then Click Send to execute the request.
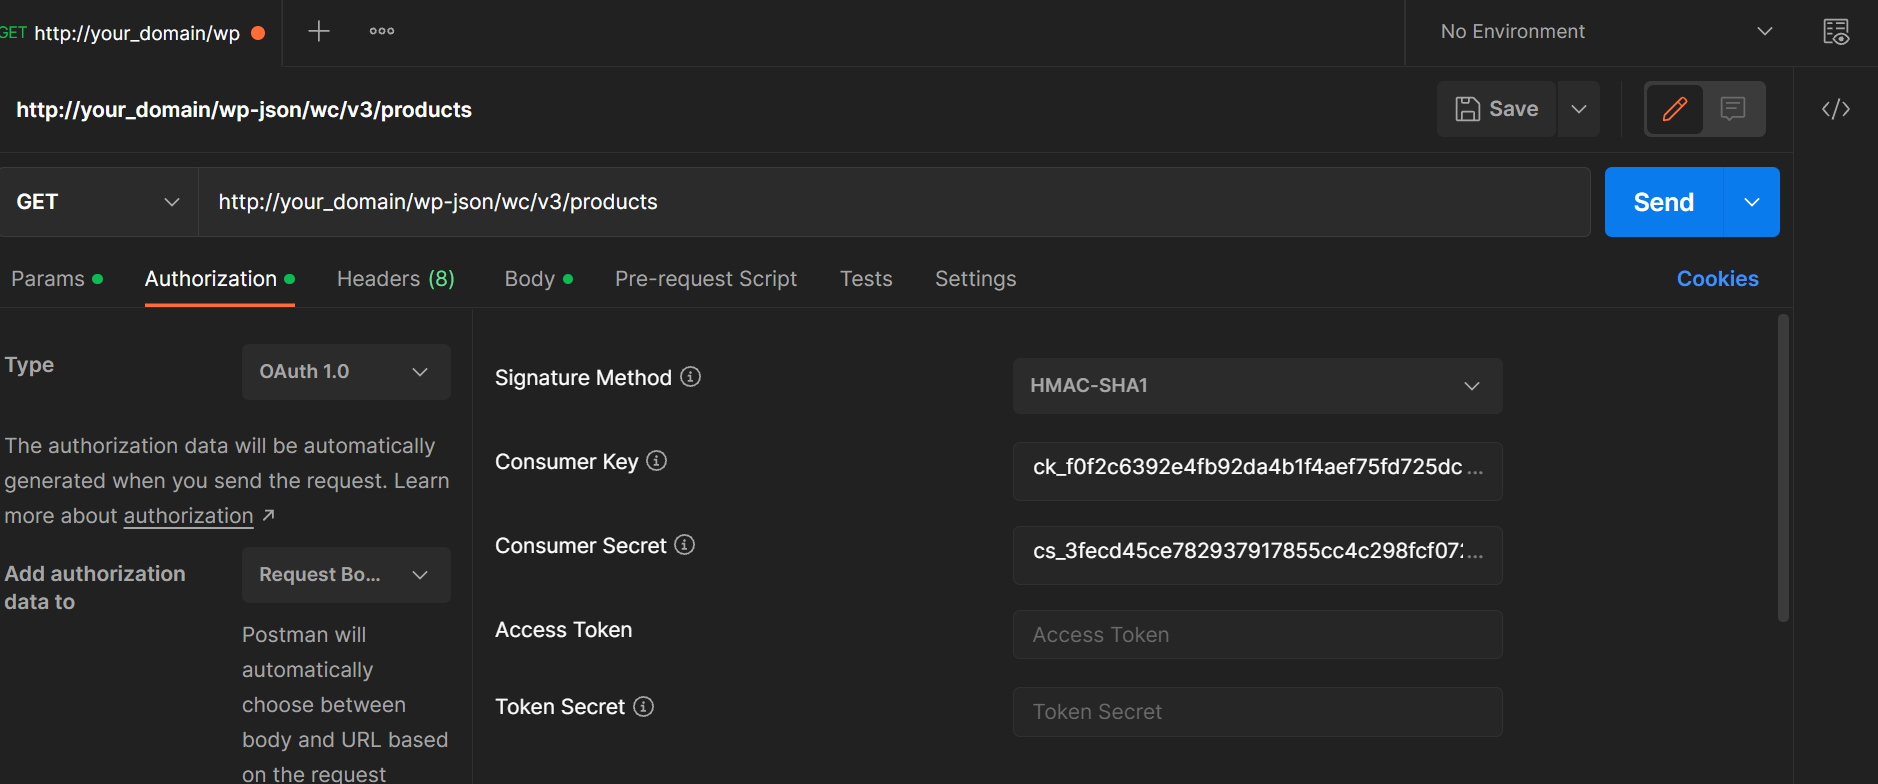
- If your website is not SSL enabled, use the Postman OAuth 1.0 as follows:
Launch postman from your computer, and send a GET request to http://your_domain/wp-json/wc/v3/products. In the Authorization tab, select OAuth 1.0, In the resulting right pane, enter your consumer key and consumer secret respectively, then click Send.
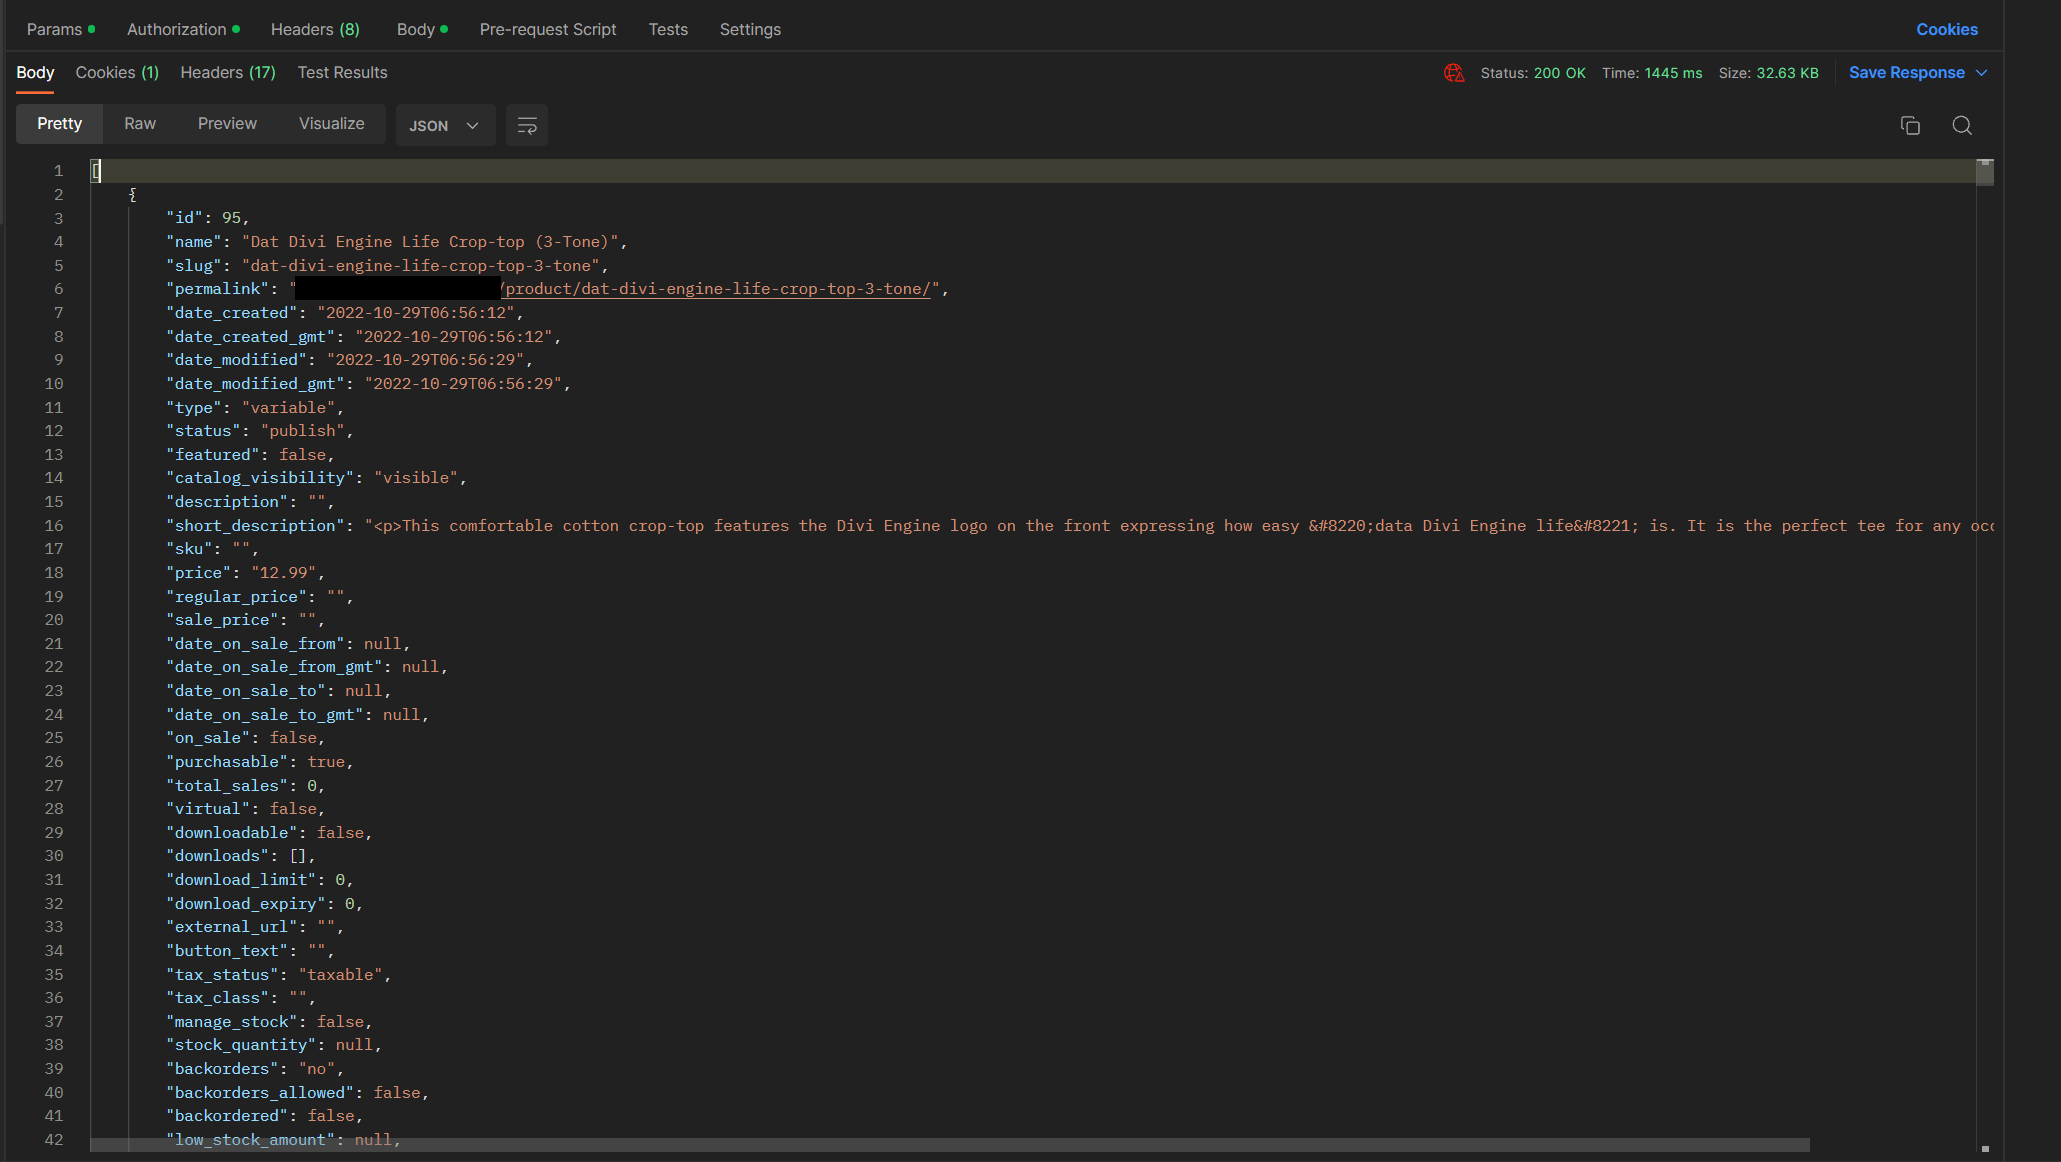
Based on the request you sent, you should get a response with all the products hosted on your WooCommerce store as follows:
Note that the alias v3 added to the above test depends on your WordPress version.
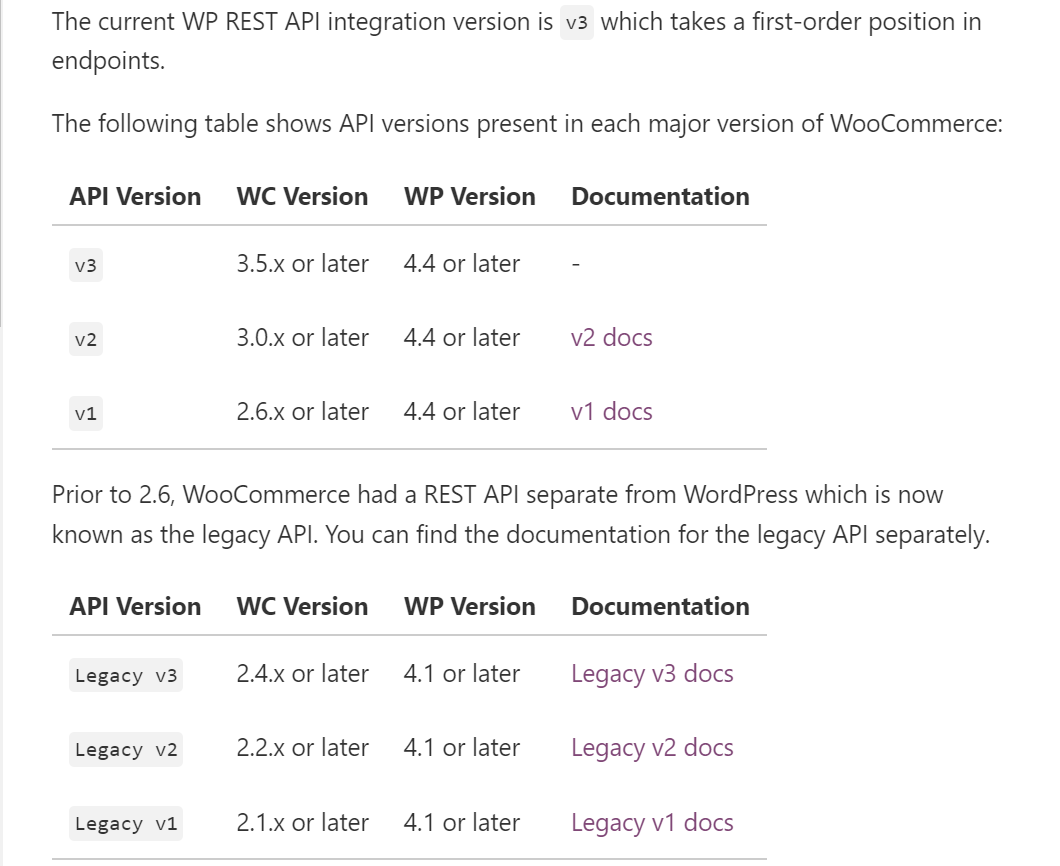
Based on your WordPress and WooCommerce version, check the above figure and use this WooCommerce WordPress REST API guide and learn more.
Setting up React Native Application
From your preferred directory, run the following command to bootstrap a React Native application:
npx react-native init woocommerce_mobile_storeOnce the installation has been completed, proceed to the newly created directory:
cd woocommerce_mobile_storeWe will use the following packages:
- For sending requests to WordPress API: Axios.
- For authentication, while sending requests: oauth-1.0a.
- For encrypting the consumer key and the consumer secret: crypto-js.
- For Navigation: @react-native-masked-view/masked-view,@react-navigation/drawer @react-navigation/native, react-native-gesture-handler, react-native-reanimated, react-native-safe-area-context and react-native-screens.
Install the above packages using the following command:
npm i @react-native-masked-view/masked-view @react-navigation/drawer @react-navigation/native react-native-gesture-handler react-native-reanimated react-native-safe-area-context react-native-screensSession Replay for Developers
Uncover frustrations, understand bugs and fix slowdowns like never before with OpenReplay — an open-source session replay tool for developers. Self-host it in minutes, and have complete control over your customer data. Check our GitHub repo and join the thousands of developers in our community.
Connecting WooCommerce with React Native
From there, we need to set up a service that will communicate with the WordPress API. This way, the client can connect to WordPress and send requests to WooCommerce.
In the project root directory, create a directory named services. Inside the services directory, create a wooCommerce.js file.
We will connect to WordPress based on your domain protocol. If you are using HTTPS, use the following script in your wooCommerce.js file.
- Import the necessary packages:
const Buffer = require('buffer');- Define your WordPress configuration:
export const config = {
    WC_BASE_URL: 'https://your_domain',
    WC_API_URL: '/wp-json/wc/v2',
    WC_CONSUMER_KEY: 'your_consumer_key',
    WC_CONSUMER_SECRET: 'your_consumer_secret'
};- Define the encoded consumer key and consumer secret:
let encodedAuth = new Buffer(`${config.WC_CONSUMER_KEY}:${config.WC_CONSUMER_SECRET}`).toString("base64");- Define a
getterfor getting the products:
const get = async (path) => {
    const request = {
        url: `${config.WC_BASE_URL}${config.WC_API_URL}${path}`,
        method: 'GET'
    };

    let response = await fetch(request.url, {
        method: request.method,
        headers: {
            'Authorization': `Basic ${encodedAuth}`
        }
    });

    response = await response.json();

    return response;
};- Define a function for sending
postrequest, i.e., creating an order dynamically:
const post = async (path, body) => {
    const request = {
        url: `${config.WC_BASE_URL}${config.WC_API_URL}${path}`,
        method: 'POST'
    };

    let response = await fetch(
        request.url,
        {
            method: request.method,
            body: JSON.stringify(body),
            headers: {
                'Authorization': `Basic ${encodedAuth}`
            }
        }
    );

    response = await response.json();

    return response;
};- Export the defined functions above:
export default {
    get, post, config
}
If you are using HTTP, use the following script:
- Import the necessary packages:
import axios from 'axios';
import OAuth from 'oauth-1.0a';
import hmacSHA1 from 'crypto-js/hmac-sha1';
import Base64 from 'crypto-js/enc-base64';- Define your WordPress configuration:
export const config = {
    WC_BASE_URL: 'http://your_domain',
    WC_API_URL: '/wp-json/wc/v3',
    WC_CONSUMER_KEY: 'your_consumer_key',
    WC_CONSUMER_SECRET: 'your_consumer_secret'
};- Define the auth function for hashing:
const getOAuth = () => new OAuth({
    consumer: {
        key: config.WC_CONSUMER_KEY,
        secret: config.WC_CONSUMER_SECRET
    },
    signature_method: 'HMAC-SHA1',
    hash_function: (baseString, key) => Base64.stringify(
        hmacSHA1(baseString, key)
    )
});- Define a
getterfor getting the products:
const get = async (path) => {
    const request = {
        url: `${config.WC_BASE_URL}${config.WC_API_URL}${path}`,
        method: 'GET'
    };
    const oauth = getOAuth().authorize(request);

    return axios.get(request.url, { params: oauth });
};- Define a function for sending a
postrequest, i.e., creating an order dynamically:
const post = async (path, body) => {
    const request = {
        url: `${config.WC_BASE_URL}${config.WC_API_URL}${path}`,
        method: 'POST'
    };
    const oauth = _getOAuth().authorize(request);

    return axios.post(request.url, body, { params: oauth });
};- Export the defined functions above:
export default {
    get, post, config
}
Note: It’s always recommended to have SSL enabled on your site to ensure secure connections. Therefore, only use HTTP if you use this example for development purposes. The HTTP connection above uses oauth-1.0a, which is depreciated. Having your site under HTTPS is good to ensure a safe connection.
Creating the application Navigations
Since we will be using react navigation, we will also need to do some modifications as below:
- Edit your
babel.config.jsas below to includereact-native-reanimatedas a plugin:
module.exports = {
    presets: ['module:metro-react-native-babel-preset'],
    plugins: ['react-native-reanimated/plugin']
};- In
android/app/build.gradle, ensure thatproject.ext.reacthasenableHermesset to true:
project.ext.react = [
    enableHermes: true,
]- In
android/app/src/main/java/com/your_project_name/MainApplication.java, add the following imports:
import com.facebook.react.bridge.JSIModulePackage;
import com.swmansion.reanimated.ReanimatedJSIModulePackage;- In the
MainApplicationclass, underReactNativeHost,add theReanimatedplugin:
@Override
protected JSIModulePackage getJSIModulePackage() {
    return new ReanimatedJSIModulePackage();
}- Your
MainApplicationclassReactNativeHostdefinition should be similar to:
public class MainApplication extends Application implements ReactApplication {

private final ReactNativeHost mReactNativeHost =
    new ReactNativeHost(this) {
        @Override
        public boolean getUseDeveloperSupport() {
            return BuildConfig.DEBUG;
        }

        @Override
        protected List<ReactPackage> getPackages() {
            @SuppressWarnings("UnnecessaryLocalVariable")
            List<ReactPackage> packages = new PackageList(this).getPackages();
            // Packages that cannot be autolinked yet can be added manually here, for example:
            // packages.add(new MyReactNativePackage());
            return packages;
        }

        @Override
        protected String getJSMainModuleName() {
            return "index";
        }

        @Override
        protected JSIModulePackage getJSIModulePackage() {
            return new ReanimatedJSIModulePackage(); // <- add
        }
    };
}
Edit App.js to add navigation as follows:
- Import the navigation packages:
import {NavigationContainer} from '@react-navigation/native';
import {createDrawerNavigator} from '@react-navigation/drawer';- Wrap the
Appcomponent with the navigation package:
const App = () => {
    const Drawer = createDrawerNavigator();
    return(
        <NavigationContainer>
            <Drawer.Navigator initialRouteName='Home'>
                {/** the screen pages */}
            </Drawer.Navigator>
        </NavigationContainer>
    )
};
Setting up the Application Context
To manage the application states, we will use the context API. It will help us collect and store the application CART products. Go ahead and set the Context store as follows:
-
In the project root directory, create a
storedirectory. Inside thestoredirectory, create acontext.jsfile as follows: -
Import the necessary dependencies:
import React from "react";
import { createContext, useState, useEffect } from 'react';
import wooCommerce from '../services/wooCommerce';- Define the Application context:
const AppContext = createContext();- Define the Application Context Provider:
const AppContextProvider = ({ children }) => {
    const [products, setProducts] = useState([]);
    const [cart, setCart] = useState([]);
    const [loading, setLoading] = useState(false);

    useEffect(() => {
        // start loading..
        setLoading(true);
        // get the products from woocommerce store..
        wooCommerce.get('/products')
            .then(response => {
                setProducts(response.data);
                setLoading(false);
            }).catch(error => {
                console.log("an error occurred ", error);
                setLoading(false);
            });

    }, [products, cart]);

    // remove item from cart.
    const removeItemFromCart = id => {
        setCart(cart => cart.filter(item => item.id !== id));
    };

    return (
        <AppContext.Provider value={{ products, cart, setProducts, setCart, removeItemFromCart }}>
            {children}
        </AppContext.Provider>
    )
}- Export the application context and the Application context provider.
export {
    AppContext,
    AppContextProvider
}
To use the above-defined store, edit App.js as follows:
- Import the context provider:
import { AppContextProvider } from './store/context'; - Wrap the
Appcomponent with the context provider:
const App = () => {
    const Drawer = createDrawerNavigator();
    return(
        <AppContextProvider>
        <NavigationContainer>
            <Drawer.Navigator initialRouteName='Home'>
                {/** The screens */}
            </Drawer.Navigator>
        </NavigationContainer>
        </AppContextProvider>
    )
};
Displaying Products
In the project’s root directory, create a screens directory. Inside the screens directory, create a Home.js file as follows:
- Import the necessary packages:
import React, { useContext } from 'react';
import { Text, StyleSheet, View, Image, Button, ScrollView } from 'react-native';
import { AppContext } from '../store/context';- Render the products:
export default function Home() {
    const { products, cart, setCart, loading } = useContext(AppContext);
    return (
        <ScrollView>
            <View style={styles.container}>
                {
                    loading ? (
                        <Text style={styles.text}>Loading...</Text>
                    ) : (
                        products.map((product, index) => {
                            let product_in_cart = cart.find(prod => prod.id === product.id);
                            return (
                                <View key={index} style={styles.productCard}>
                                    <Image source={{ uri: product.images[0].src }} style={styles.image} />
                                    <Text style={styles.text}>{product.name}</Text>
                                    <Text style={styles.text}>${product.price}</Text>
                                    <Button
                                        title={
                                            product_in_cart ? "Added to cart": "Add to cart"
                                        }
                                        onPress={
                                            product_in_cart ? () => null :
                                                () => { // add to cart
                                                    setCart([...cart, {
                                                        id: product.id,
                                                        name: product.name,
                                                        price: product.price,
                                                        quantity: 1
                                                    }])
                                                }
                                        }
                                    />
                                </View>
                            )
                        })
                    )
                }
            </View>
        </ScrollView>

    )
}- Define product display styles:
const styles = StyleSheet.create({
    text: {
        color: "#000"
    },
    container: {
        flex: 1,
        display: 'flex',
        flexDirection: 'row',
        flexWrap: 'wrap'
    },
    image: {
        width: 100,
        height: 100,
        borderRadius: 10
    },
    productCard: {
        width: 180,
        height: 220,
        backgroundColor: '#ccc',
        alignItems: 'center',
        justifyContent: 'center',
        margin: 10
    }
});
To display the products, import the Home.js screen in the App.js file:
import Home from './screens/Home';Render it in the screen section inside the drawer navigator:
const App = () => {
const Drawer = createDrawerNavigator();
    return(
        <AppContextProvider>
        <NavigationContainer>
            <Drawer.Navigator initialRouteName='Home'>
                <Drawer.Screen name="Home" component={Home} />
            </Drawer.Navigator>
        </NavigationContainer>
        </AppContextProvider>
    )
};
At this point, ensure your development server is running:
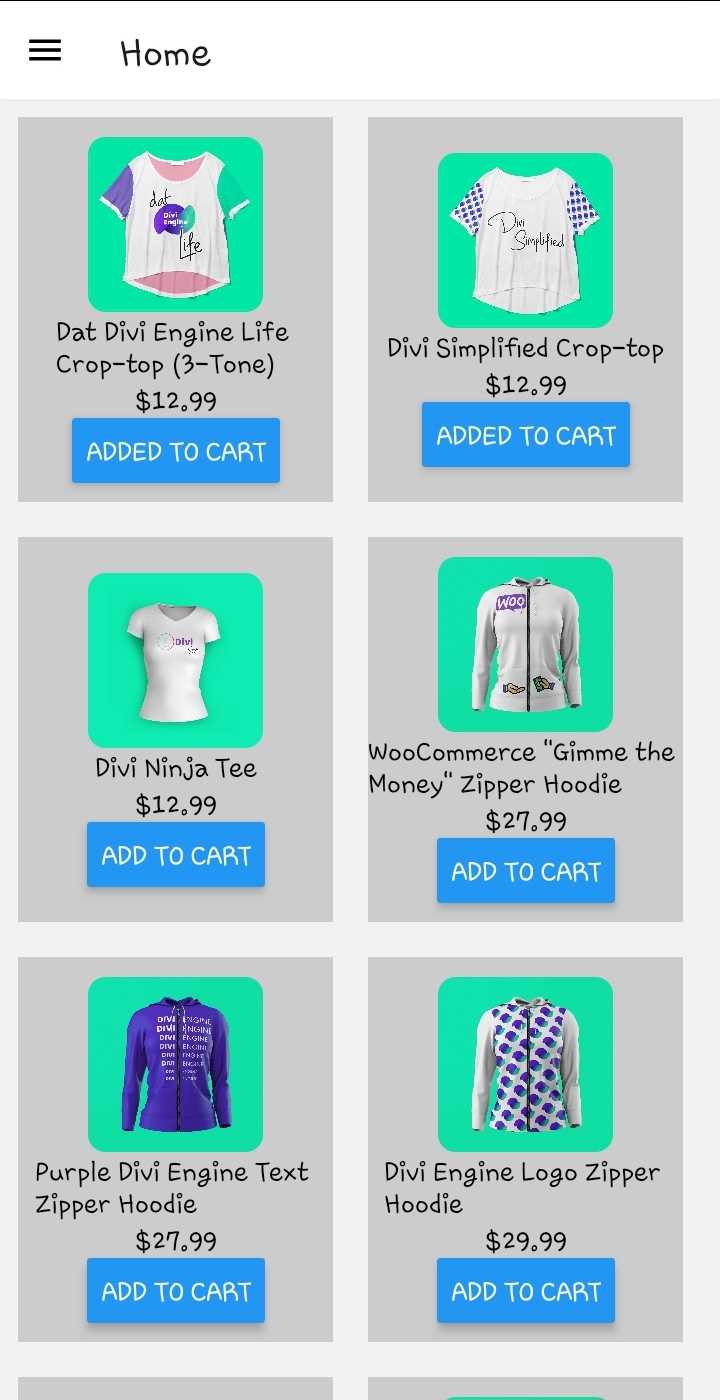
npx react-native run-androidYou should be able to have the below view on the home screen:
Adding Product to CART
In the screens directory, create a Cart.js file as follows:
- Import the necessary packages:
import React, { useContext } from 'react';
import { Text, StyleSheet, View, Button } from 'react-native';
import { AppContext } from '../store/context';- Render the cart items:
export default function Cart() {
    const { cart, removeItem } = useContext(AppContext);
    return (
        cart.length > 0 ? (
            cart.map((item, index) => (
                <View key={index} style={styles.cart}>
                    <Text style={styles.text}>{item.name}</Text>
                    <Text style={styles.text}>${item.price}</Text>
                    <Text style={styles.text}>{item.quantity}</Text>
                    <Button title="Remove" onPress={() => removeItem(item.id)} />
                </View>
            ))
        ) : (
            <Text style={styles.text}>Cart is empty</Text>
        )
    );
}- Define the CART styles:
const styles = StyleSheet.create({
    container: {
        flex: 1,
        justifyContent: 'center',
        alignItems: 'center'
    },
    text: {
        color: '#000'
    },
    cart: {
        padding: 10,
        backgroundColor: '#fff',
        width: "90%",
        borderRadius: 20,
        margin: 10
    }
});
In the App.js file, import the Cart.js screen:
import Cart from './screens/Cart';Include the screen in the drawer navigator component down there:
const App = () => {
const Drawer = createDrawerNavigator();
return (
<AppContextProvider>
<NavigationContainer>
<Drawer.Navigator initialRouteName='Home'>
<Drawer.Screen name="Home" component={Home} />
<Drawer.Screen name="Cart" component={Cart} />
</Drawer.Navigator>
</NavigationContainer>
</AppContextProvider>
)
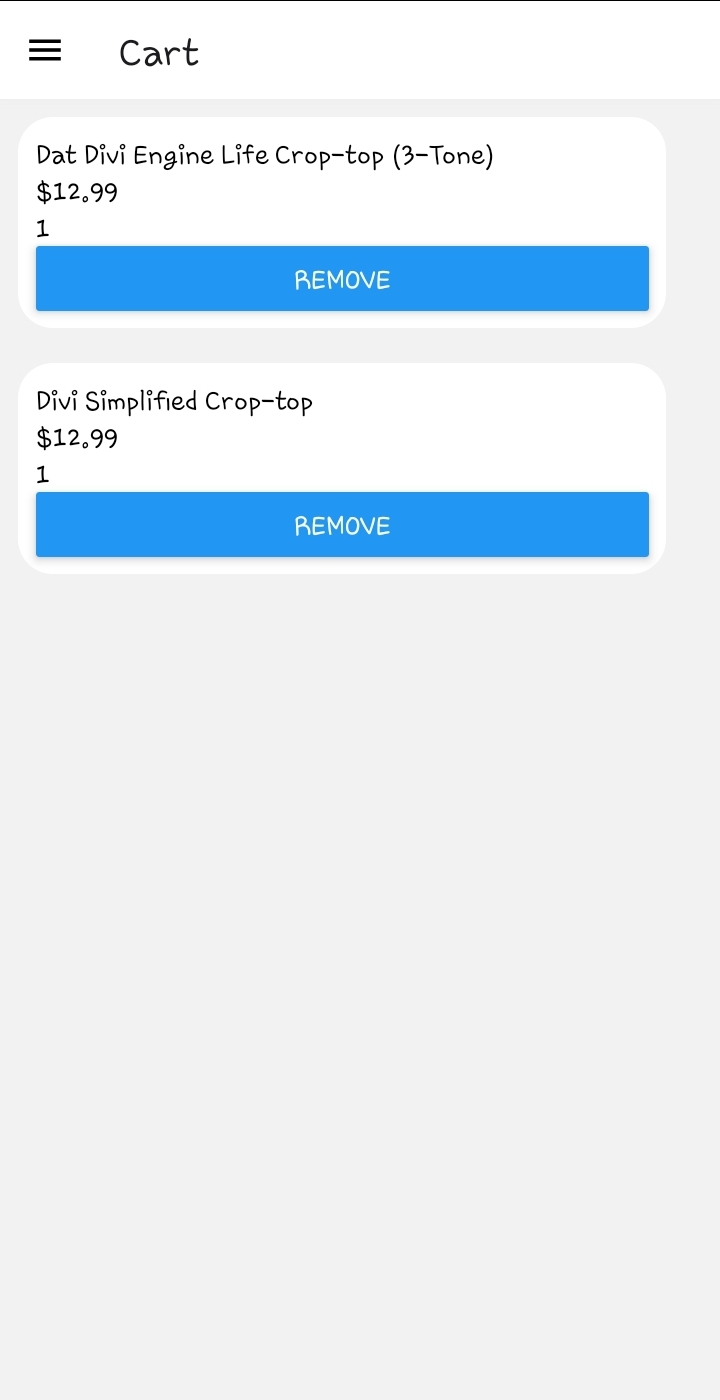
};Ensure your development server is up and running. After adding some products to the cart, you will be able to interact with the below cart screen:
Handling Checkouts
In the screen directory, create a checkout.js file as follows:
- Import the necessary packages:
import React, { useContext, useState } from 'react';
import { Text, StyleSheet, View, TextInput, Button, Linking } from 'react-native';
import { AppContext } from '../store/context';
import wooCommerce from '../services/wooCommerce';- Define a render function for showing the amount to be paid, and processing payment:
export default function Checkout() {
    const { cart } = useContext(AppContext);
    const [showOrderForm, setShowOrderForm] = useState(false);
    const total_amount = cart.length > 0 ? cart.map(item => item.price).reduce((a, b) => parseFloat(a) + parseFloat(b)) : 0;

    const [first_name, setFirstName] = useState('');
    const [last_name, setLastName] = useState('');
    const [address_one, setAddressOne] = useState('');
    const [address_two, setAddressTwo] = useState('');
    const [city, setCity] = useState('');
    const [state, setState] = useState('');
    const [post_code, setPostCode] = useState('');
    const [country, setCountry] = useState('');
    const [email, setEmail] = useState('');
    const [phone, setPhone] = useState('');

    // handling checkout
    const renderCheckout = () => {

        const handleSubmit = async () => {
            if (first_name && last_name && address_one && address_two && city && state && post_code && country && email && phone) {

                // compose user info
                const userInfo = {
                    first_name,
                    last_name,
                    address_1: address_one,
                    address_two: address_two,
                    city,
                    state,
                    postcode: post_code,
                    country,
                    email,
                    phone
                };

                // creating an order.
                const order = {
                    billing: userInfo,
                    shipping: userInfo,
                    line_items: cart.map(({ id, quantity }) => ({
                        product_id: id,
                        quantity
                    }))
                };

                const { data: { id, order_key } } = await wooCommerce.post('/orders', order);

                // define the payment URL
                const orderPayURL = `${wooCommerce.config.WC_BASE_URL}/checkout/order-pay/${id}` + `?pay_for_order=true&key=${order_key}`;

                return Linking.openURL(orderPayURL);
            } else {
                return;
            }
        }
        return (
            <View style={styles.orderForm}>
                <TextInput
                    label= "FirstName"
                    placeholder= "Your FirstName"
                    onChangeText={val => setFirstName(val)}
                    value={first_name}
                    style={styles.input}
                    placeholderTextColor="#000"
                />
                <TextInput
                    label= "LastName"
                    placeholder= "Your LastName"
                    onChangeText={val => setLastName(val)}
                    value={last_name}
                    placeholderTextColor="#000"
                />
                <TextInput
                    label= "Address One"
                    placeholder= "Address One"
                    onChangeText={val => setAddressOne(val)}
                    value={address_one}
                    placeholderTextColor="#000"
                />
                <TextInput
                    label= "Address Two"
                    placeholder= "Address Two"
                    onChangeText={val => setAddressTwo(val)}
                    value={address_two}
                    placeholderTextColor="#000"
                />
                <TextInput
                    label= "City"
                    placeholder= "City"
                    onChangeText={val => setCity(val)}
                    value={city}
                    placeholderTextColor="#000"
                />
                <TextInput
                    label= "State"
                    placeholder= "state"
                    onChangeText={val => setState(val)}
                    value={state}
                    placeholderTextColor="#000"
                />
                <TextInput
                    label= "Post Code"
                    placeholder= "post code"
                    onChangeText={val => setPostCode(val)}
                    value={post_code}
                    placeholderTextColor="#000"
                />
                <TextInput
                    label= "Country"
                    placeholder= "country"
                    onChangeText={val => setCountry(val)}
                    value={country}
                    placeholderTextColor="#000"
                />
                <TextInput
                    label= "Email"
                    placeholder= "email"
                    onChangeText={val => setEmail(val)}
                    value={email}
                    placeholderTextColor="#000"
                />
                <TextInput
                    label= "Phone"
                    placeholder= "phone"
                    onChangeText={val => setPhone(val)}
                    value={phone}
                    placeholderTextColor="#000"
                />
                <Button title="Make Payment" onPress={handleSubmit} />
            </View>
        )
    }

    return (
        <View style={styles.container}>
            <View style={styles.checkout}>
                {
                    cart.length > 0 ? (
                        <View style={styles.checkoutActions}>
                            <Text style={styles.text}>
                                Total amount to Pay: ${total_amount}
                            </Text>
                            <Button title="Checkout " onPress={() => setShowOrderForm(true)} />
                            {
                                showOrderForm && renderCheckout()
                            }
                        </View>
                    ) : (
                        <Text style={styles.text}>
                            Cart is empty
                        </Text>
                    )
                }

            </View>
        </View>
    )
};- Define the checkout styles:
const styles = StyleSheet.create({
    container: {
        flex: 1,
        justifyContent: 'center',
        alignItems: 'center'
    },
    text: {
        color: '#000'
    },
    checkout: {
        padding: 10,
        padding: 10,
        backgroundColor: '#fff',
        width: "90%",
        borderRadius: 20,
        margin: 10
    },
    orderForm: {
        backgroundColor: "#ccc",
        padding: 10,
        borderBottomColor: "#000"

    },
});
Edit the App.js and import the Checkout.js screen:
import Checkout from './screens/Checkout';- Include the screen in the drawer navigator:
const App = () => {
    const Drawer = createDrawerNavigator();
    return (
        <AppContextProvider>
            <NavigationContainer>
                <Drawer.Navigator initialRouteName='Home'>
                    <Drawer.Screen name="Home" component={Home} />
                    <Drawer.Screen name="Cart" component={Cart} />
                    <Drawer.Screen name="Checkout" component={Checkout} />
                </Drawer.Navigator>
            </NavigationContainer>
        </AppContextProvider>
    )
};
Ensure your development server is running. After adding items to the cart, your checkout section will be as below:

Conclusion
That’s a wrap for this guide. You can now comfortably use WooCommerce with React Native to create mobile store. For code references, check the application on this GitHub repository.
I hope you found this helpful. Happy coding!
A TIP FROM THE EDITOR: For an alternative way to create your eCommerce app, look at our Building An E-Commerce App With Keystone article.
Gain Debugging Superpowers
Unleash the power of session replay to reproduce bugs and track user frustrations. Get complete visibility into your frontend with OpenReplay, the most advanced open-source session replay tool for developers.