
A Complete Guide to Building a Professional Docs Website from your GitHub README file


Are you tired of struggling to create a professional-looking documentation website for your project? Look no further! In this article, you will learn how to easily build a beautiful docs website using just your GitHub README file.
We will go through the setup process for GitHub Pages, customizing your website with docsify, and adding all the important elements like meta tags, badges, a custom domain name, a favicon, and a banner image. By the end, you’ll have a outstanding documentation website that’s visually appealing, easy to navigate, and optimized for search engines.
Setting up GitHub Pages to host the documentation website
The first step in creating a documentation website is to set up GitHub Pages to host it. GitHub Pages is a free service provided by GitHub that allows you to host static websites directly from your repository.
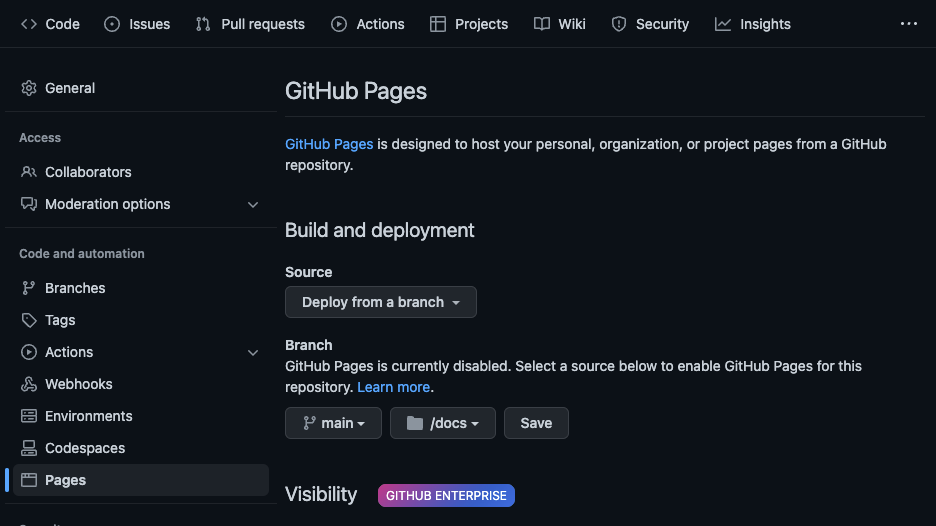
- Go to your repository on GitHub and click on the Settings tab and Scroll down to the GitHub Pages section. Or go to https://github.com/username/repo-name/settings/pages
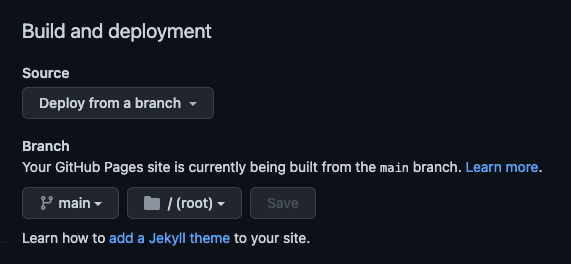
- Select the “main” option and the “/docs” option in the Branch dropdown.
- Click the Save button to enable GitHub Pages for your repository.
Create a docs directory and move the README.md file to that directory.
Please note that it can take up to 10 minutes for changes to your site to publish after you push the changes to GitHub.
Your GitHub repo page can render the README file from either the root directory or the docs directory.
When you change the content of README.md and refresh doesn’t show your change, try to hard-refresh with Shift+CMD+R for macOS and Ctrl+Reload(or Ctrl+F5) button.
NPM package
It’s important to note that if you plan to publish your project on NPM (Node Package Manager), the README.md file must be placed in the root directory of your repository. This is because NPM looks for the README.md file in the root directory when displaying the documentation for a package.
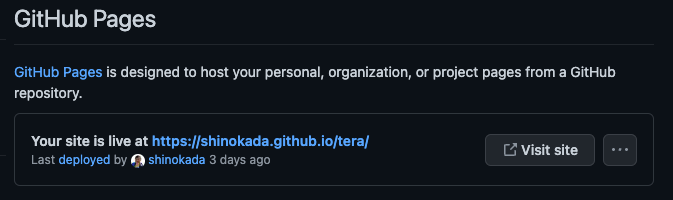
Once you have enabled GitHub Pages, your documentation website will be available at the URL provided in the GitHub Pages section. Visit https://username.github.io/repo-name/.
Custom domain
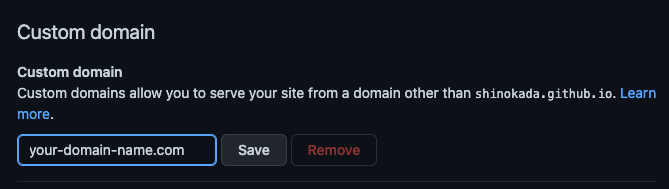
If you want to use a custom domain for your documentation website, go to the Settings tab and scroll down to the GitHub Pages section in your GitHub repository.
Enter your domain in the Custom Domain field and click the Save button to save the changes.
Update the DNS settings for your domain to point to the GitHub Pages server. The following example shows how to add a sub-domain on namecheap.com:

Creating Docs using docsify.js
Docsify is a tool that generates documentation from your README file. It parses and displays your Markdown files as a website in a smart and efficient manner. You can add a search field and add more plugins. Getting started with Docsify is easy. You simply create an index.html file and deploy it on GitHub Pages.
index.html
<!DOCTYPE html>
<html lang="en">
<head>
  <meta charset="UTF-8" />
  <title>Your Title</title>
  <meta http-equiv="X-UA-Compatible" content="IE=edge,chrome=1" />
  <meta name="description"
    content="Your repo description." />
  <meta name="viewport"
    content="width=device-width, user-scalable=no, initial-scale=1.0, maximum-scale=1.0, minimum-scale=1.0" />
  <link rel="stylesheet" href="//cdn.jsdelivr.net/npm/docsify/lib/themes/vue.css" />
  <style>
    .markdown-section {
      max-width: 700px;
    }
  </style>
</head>
<body>
  <div id="app"></div>
  <script>
    window.$docsify = {
      subMaxLevel: 1,
      maxLevel: 3,
      auto2top: true,
      repo: 'github-username/repo-name',
      routerMode: 'history',
      crossOriginLinks: [
        'https://twitter.com/your-twitter-line',
        'https://www.npmjs.com/package/npm-link',
        'http://www.apache.org/licenses/',
        'https://opensource.org/licenses/MIT'
      ],
      search: 'auto',
      search: [
        '/docs/README.md', // => /README.md
      ],
      // complete configuration parameters
      search: {
        maxAge: 180000,
        paths: 'auto',
        placeholder: 'Type to search',
        noData: 'No Results!',
        // Headline depth, 1 - 6
        depth: 3,
        hideOtherSidebarContent: false, // whether or not to hide other sidebar content
      },
    };
    };
  </script>
  <script src="//cdn.jsdelivr.net/npm/docsify/lib/docsify.min.js"></script>
  <script src="//cdn.jsdelivr.net/npm/docsify/lib/plugins/search.min.js"></script>
</body>

</html>
This code sets up the basic structure of the documentation website and includes the necessary CSS and JavaScript files for docsify. Please don’t forget to change the title, description, and repo values.
If you use links and badges pointing to external domains, you need to add the crossOriginLinks option to the $docsify object in the JavaScript code. This will allow the website links to access external websites.
A search function allows users to easily find specific information within your documentation. You can use the search option in the $docsify object to enable a search function on your documentation website.
The scripts just before the ending body tag are necessary to import docsify and search javascripts.
Next, you must deploy the index.html file on GitHub Pages. Commit the changes to your repository and push them to the main branch. GitHub Pages will automatically build and deploy the documentation website.
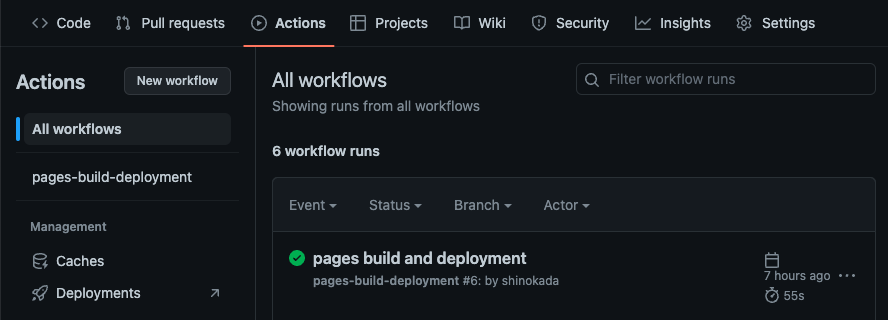
Please note that GitHub may take some time to update your website. You can check the progress in the Actions tab on your repo.
Badges
Badgen.net and Shields.io are excellent places to find your badges.
The following examples show the GitHub version, size, GitHub starts, and license.
<p align="center">
<a href="https://www.npmjs.com/package/your-package-name" rel="nofollow"><img src="https://img.shields.io/npm/v/your-package-name" alt="npm"></a>
<a href="https://twitter.com/your-twitter-name" rel="nofollow"><img src="https://img.shields.io/badge/created%20by-@your-twitter-name-4BBAAB.svg" alt="Created by Shin Okada"></a>
<a href="https://opensource.org/licenses/MIT" rel="nofollow"><img src="https://img.shields.io/github/license/shinokada/svelte-awesome-icons" alt="License"></a>
<a href="https://www.npmjs.com/package/your-package-name" rel="nofollow"><img src="https://img.shields.io/npm/dw/your-package-name.svg" alt="npm"></a>
</p>
Please don’t forget that if you use badges pointing to external domains, you need to add the crossOriginLinks option to the $docsify object as explained in the previous section.
Adding an empty .nojekyll file
Jekyll is the default static site generator used by GitHub Pages. Since we are not using a Jekyll, we need to add the .nojekyll file to disable Jekyll. By adding an empty .nojekyll file to the root directory of your GitHub Pages repository, you are telling GitHub to use the files as-is rather than processing them through Jekyll. The content of the file is empty.
Meta tags
Meta tags are HTML elements that provide metadata about your website, such as the title, description, and other information. These tags are important because they help search engines understand the content of your website and improve its ranking in search results.
To make your documentation website SEO-friendly, you should add the following meta tags to the <head> section of your index.html file:
<title>Title of your website</title>
<meta name="description" content="Description of your website">
In addition to the basic meta tags, you should also add Open Graph and Twitter meta tags to your website. These tags allow your website to be properly displayed when shared on social media platforms such as Facebook, Twitter, Discord, and other social media platforms.
OG Image Generation and GitHub Image
To generate an image for the Open Graph and Twitter meta tags, you can use a tool called OG Image Generation. This tool allows you to create an image that represents your website and is displayed when the website is shared on social media platforms.
Alternatively, you can use the profile image of your GitHub repository as the image for the meta tags. To do this, add the following code to the <head> section of your index.html file:
<meta property="og:image" content="https://opengraph.githubassets.com/1cac1150838995e1f7d1643c00eee51a5d884f2054f995c9d3225b07b0eddb39/USERNAME/REPO">
<meta name="twitter:image" content="https://opengraph.githubassets.com/1cac1150838995e1f7d1643c00eee51a5d884f2054f995c9d3225b07b0eddb39/USERNAME/REPO">
Change the USERNAME and REPO in the above code to show it properly.
Setting up OG Image Generation
Let’s set up one OG image generation website that will serve OG images for all your docs and websites. You can host it at Vercel for free.
Clone the starter repo:
npx create-next-app --example https://github.com/vercel/examples/tree/main/edge-functions/vercel-og-nextjs
# or
yarn create next-app --example https://github.com/vercel/examples/tree/main/edge-functions/vercel-og-nextjs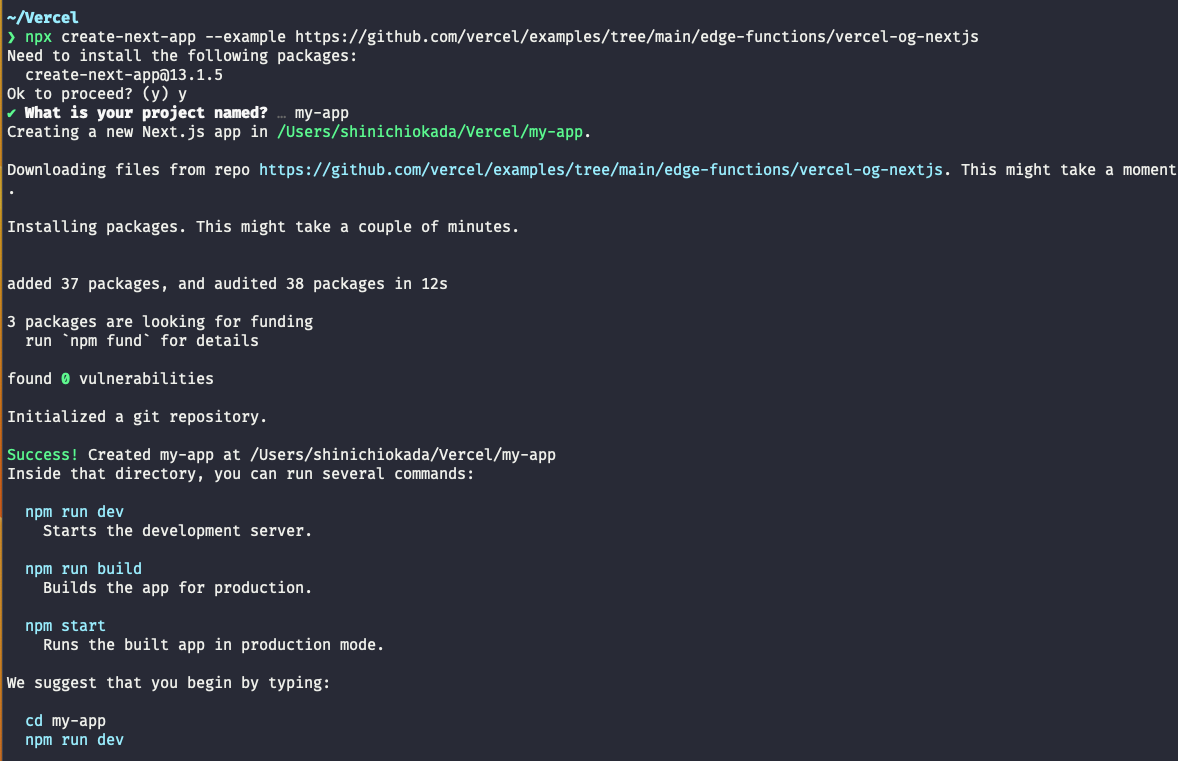
I call it my-app. Run Next.js in development mode:
cd my-app
// npm, pnpm, yarn, bun
npm install
npm run dev
Create a tsx file in the my-app/pages/api directory and paste the following example:
import { ImageResponse } from '@vercel/og';
import { NextRequest } from 'next/server';
export const config = {
runtime: 'experimental-edge',
};
export default async function handler(req: NextRequest) {
try {
const { searchParams } = new URL(req.url);
return new ImageResponse(
(
<div
style={{
backgroundColor: '#0a262d',
height: '100%',
width: '100%',
display: 'flex',
textAlign: 'center',
alignItems: 'center',
justifyContent: 'center',
flexDirection: 'column',
flexWrap: 'nowrap',
}}
>
<div
style={{
fontSize: 50,
fontStyle: 'normal',
color: 'white',
padding: '0 20px',
lineHeight: 1.4,
whiteSpace: 'pre-wrap',
}}
>
MY AWESOME APP
</div>
<div
style={{
fontSize: 100,
fontStyle: 'normal',
color: 'white',
padding: '0 20px',
lineHeight: 1.4,
whiteSpace: 'pre-wrap',
}}
>
Subtitle here
</div>
<div
style={{
fontSize: 40,
fontStyle: 'normal',
letterSpacing: '-0.025em',
color: 'white',
marginTop: 30,
padding: '0 120px',
lineHeight: 1.4,
whiteSpace: 'pre-wrap',
}}
>
https://my-awesome-app.com
</div>
</div>
),
{
width: 1200,
height: 630,
},
);
} catch (e: any) {
console.log(`${e.message}`);
return new Response(`Failed to generate the image`, {
status: 500,
});
}
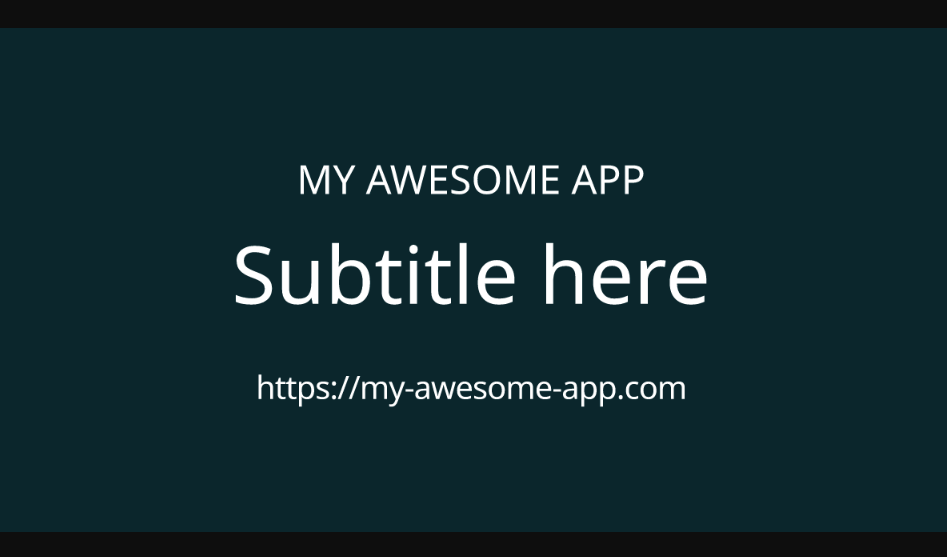
}If your file name is my-awesome-app, the above code will create the following image at http://localhost:3000/api/my-awesome-app
The cloned repo has many examples you can explore.
Once you deploy your OG generator, you can add the image link to the meta tags.
Open Graph and Twitter meta tag
The following example shows how you can add the Open Graph and Twitter meta tags. Update it according to your needs and add them to the head tag in the index.html we have created previously.
  <meta name="twitter:card" content="summary_large_image" />
  <meta name="twitter:creator" content="@your-twitter-name" />
  <meta name="twitter:title" content="My Awesome App" />
  <meta name="twitter:description" content="My description" />
  <meta name="twitter:image" content="https://my-app.vercel.app/api/my-awesome-app" />
  <meta name="twitter:image:alt" content="My Awesome App" />
  <meta property="fb:app_id" content="your-fb-app-id" />
  <meta property="og:url" content="https://my-awesome-app.com" />
  <meta property="og:type" content="website" />
  <meta property="og:title" content="My Awesome App" />
  <meta property="og:description" content="My description" />
  <meta property="og:image" content="https://my-app.vercel.app/api/my-awesome-app" />
  <meta property="og:image:alt" content="My Awesome App" />
  <meta property="og:image:width" content="1200" />
  <meta property="og:image:height" content="630" />
Session Replay for Developers
Uncover frustrations, understand bugs and fix slowdowns like never before with OpenReplay — an open-source session replay tool for developers. Self-host it in minutes, and have complete control over your customer data. Check our GitHub repo and join the thousands of developers in our community.
Package.json
If you are a JavaScript developer, you can use the “homepage” field in the package.json file to specify the URL of your documentation website. This is particularly useful if you publish your project on NPM, as it allows users to easily access your website on the NPM page.
To set the “homepage” field in your package.json file, simply add the following line of code:
"homepage": "https://your-username.github.io/your-repository"Replace “your-username” with your GitHub username and “your-repository” with the name of your repository.
Favicon
A favicon is a small icon displayed in the browser’s address bar and bookmark menu. Adding a favicon to your documentation website helps to brand your website and make it more visually appealing.
There are many online favicon generators you can use.
Once you have created your favicon, you can add it to your website by including the following code in the <head> section of your index.html file:
<link rel="shortcut icon" type="image/x-icon" href="/path/to/favicon.ico">Replace “/path/to/favicon.ico” with the path to your favicon file.
Banner image
Adding a banner image to your documentation website can help make it more visually appealing and give it a professional look. There are several options for creating a banner image, such as using a design tool like Canva or Teffects, or using a text to photo editor:
To add the banner image to your website, simply include the following code in the <body> section of your README.md file:
<p align="center">
<img width="600" src="https://raw.githubusercontent.com/shinokada/tera/main/images/tera.png" />
<a href="https://tera.codewithshin.com/">https://tera.codewithshin.com/</a>
</p>
Replace your GitHub handle name and image name in the above code.
Custom styles
If you want to further customize the appearance of your documentation website, you can add custom styles using CSS. You can either create a separate CSS file and link to it in the <head> section of your index.html file, or include your styles directly in the <style> tag.
Analytics tracking
Adding analytics tracking to your documentation website allows you to track the performance of your website, such as the number of visitors, the most popular pages, and the sources of traffic. You can use tools like Google Analytics or Mixpanel to add analytics tracking to your website.
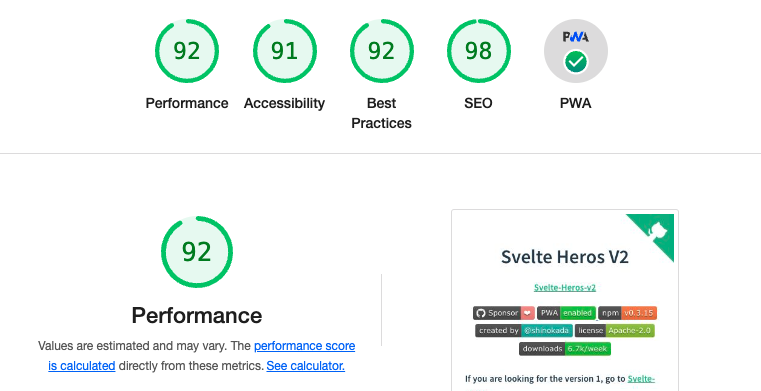
Accessibility
Ensuring that your documentation website is accessible to users with disabilities is important for inclusivity. You can use tools like Lighthouse or aXe to check the accessibility of your website and make any necessary improvements. Nu Html Checker is another useful tool to use.
Schema.org
By adding schema.org, you help search engines understand your website better, resulting in more traffic, clicks, and conversions. It also improves accessibility and how your website appears in search results. Use the following tools to get started.
- Schema Markup Generator
- Rich Results Test
- Schema Markup Validator
- The Busy Web Developer’s Guide to Adding Schema.org: Tips and Resources
- Structured Data Markup Helper
Conclusion
Creating a well-organized documentation website for a project requires a developer to plan and structure the content, design intuitive navigation, and ensure it is easily searchable. Tools mentioned above can be used to quickly and easily set up a professional-looking documentation website.
Gain Debugging Superpowers
Unleash the power of session replay to reproduce bugs and track user frustrations. Get complete visibility into your frontend with OpenReplay, the most advanced open-source session replay tool for developers.
