
Connect a React app to the NEAR Blockchain

You must’ve heard of blockchain, decentralized applications, web3, and the hype surrounding them. As a software developer, you’re expected to be flexible, evolve with the time, and learn new and exciting techs. Web3 development involves building applications on a distributed blockchain or decentralized network over single servers; an example of this network is the NEAR blockchain. For additional information on web3, you can check out this article.
NEAR is a development platform built on a new layer-1, Proof-of-stake blockchain. You can interact with the NEAR blockchains with a set of instructions/programs called smart contracts; smart contracts for NEAR blockchain are written in AssemblyScript or Rust; for additional information on writing smart contracts on the NEAR blockchain, you can look over the official documentation here.
For this article, we will focus on how to connect to the NEAR blockchain and make smart contract calls. We will be working with a dice game smart contract deployed on the blockchain. You can find additional information on the smart contract here. To continue with this article, you need knowledge of Reactjs and Javascript; You will also need access to the smart-contract address deployed on the near blockchain: dev-1641682453576-30872819216475 and a NEAR wallet. The NEAR wallet is an in-browser wallet for creating and interacting with NEAR accounts. The wallet exists on the web and stores account keys in your browser’s localStorage. You can find information on creating a wallet on the NEAR blockchain here.
Near tokens are the native cryptocurrency used on the NEAR blockchain, with units in yocto. 1 NEAR token is equivalent to 10^24 yocto.
Project Resources
We will work with a Smart Contract Address/Name dev-1641682453576-30872819216475. The game rules are very simple:
- Users are allowed to create a new game with a 0.5 NEAR token attached as the game fee; a user creating a game is automatically entered into the game.
- Other users can join a created game with 0.5 NEAR attached as the game fee.
- Game fees are added to a price pool for game-winner(s).
- Each game has a 30 minutes countdown from when it starts.
- Players in a game can roll the dice once; When a player rolls the first dice, the game countdown starts.
- Once a game ends, the player(s) with the highest dice count will claim the winnings from the game.
Getting Started
The first order will be to create a React Application and set up the configuration file for interacting with the NEAR blockchain; you can find the repository with the complete project here. The NEAR blockchain has different development environments, the most popular two being the testnet and the mainnet; for this article, we will be working with the testnet. The testnet is a development network that mocks the behaviors of the main network; this allows you to test your smart contract functions and verify that everything works correctly without incurring any cost.
Once you have successfully cloned the repository navigate to src/config.js file:
const CONTRACT_NAME = process.env.CONTRACT_NAME || "dev-1641682453576-30872819216475";

export default function getConfig(env) {
  switch (env) {
    case "production":
    case "development":
    case "testnet":
      return {
        networkId: "testnet",
        nodeUrl: "https://rpc.testnet.near.org",
        contractName: CONTRACT_NAME,
        walletUrl: "https://wallet.testnet.near.org",
        helperUrl: "https://helper.testnet.near.org",
      };
    default:
      throw Error(`Unconfigured environment '${env}'. Can be configured in src/config.js.`);
  }
}
We have the smart contract address on line 1 in the code block above. This file holds the configuration file for the environment the smart contract is deployed on (testnet). The getConfig function accepts an environment and returns the configuration that matches that environment. You can find the configuration for other environments in the code repository. The next step will be to hook up the configuration to your React application — see src/index.js.
import React from "react";
import ReactDOM from "react-dom";
import App from "./App";
import getConfig from "./config.js";
import * as nearAPI from "near-api-js";
import "./index.css";

// Initializing contract
async function initContract() {
  const nearConfig = getConfig(process.env.NODE_ENV || "testnet");

  // Initializing connection to the NEAR TestNet
  const near = await nearAPI.connect({
    deps: {
      keyStore: new nearAPI.keyStores.BrowserLocalStorageKeyStore(),
    },
    ...nearConfig,
  });

  // Needed to access wallet
  const walletConnection = new nearAPI.WalletConnection(near);

  // Load in account data
  let currentUser;
  if (walletConnection.getAccountId()) {
    currentUser = {
      accountId: walletConnection.getAccountId(),
      balance: (await walletConnection.account().state()).amount,
    };
  }

  // Initializing our contract APIs by contract name and configuration
  const contract = await new nearAPI.Contract(walletConnection.account(), nearConfig.contractName, {
    // View methods are read-only – they don't modify the state, but usually return some value
    viewMethods: ["getWinners", "getGameDetails", "getPlayersDetails", "getProfileDetails", "getActiveGames", "getCreatedGames", "getCompletedGames"],
    // Change methods can modify the state, but you don't receive the returned value when called
    changeMethods: ["createNewGame", "joinGame", "rollDice", "claimWinnings"],
    // Sender is the account ID to initialize transactions.
    // getAccountId() will return empty string if user is still unauthorized
    sender: walletConnection.getAccountId(),
  });

  return { contract, currentUser, nearConfig, walletConnection };
}

window.nearInitPromise = initContract().then(({ contract, currentUser, nearConfig, walletConnection }) => {
  ReactDOM.render(
    <React.StrictMode>
      <App contract={contract} currentUser={currentUser} nearConfig={nearConfig} wallet={walletConnection} />
    </React.StrictMode>,
    document.getElementById("root")
  );
});
On line 9, we have the initContract function. On line 13, we assign the connection configuration to the near variable and follow that up by calling the WalletConnection method on the near-js-api library accepts the connection configuration as params. The WalletConnection method allows connection to the near wallet; this allows you to sign/authenticate transactions/requests.
The next step will be to set up the contract connection; this is accomplished on lines 33 through 41 by calling the Contract method from the near-js-api. It accepts three arguments: the wallet account, smart contract address, and contract methods.
Wallet Connection
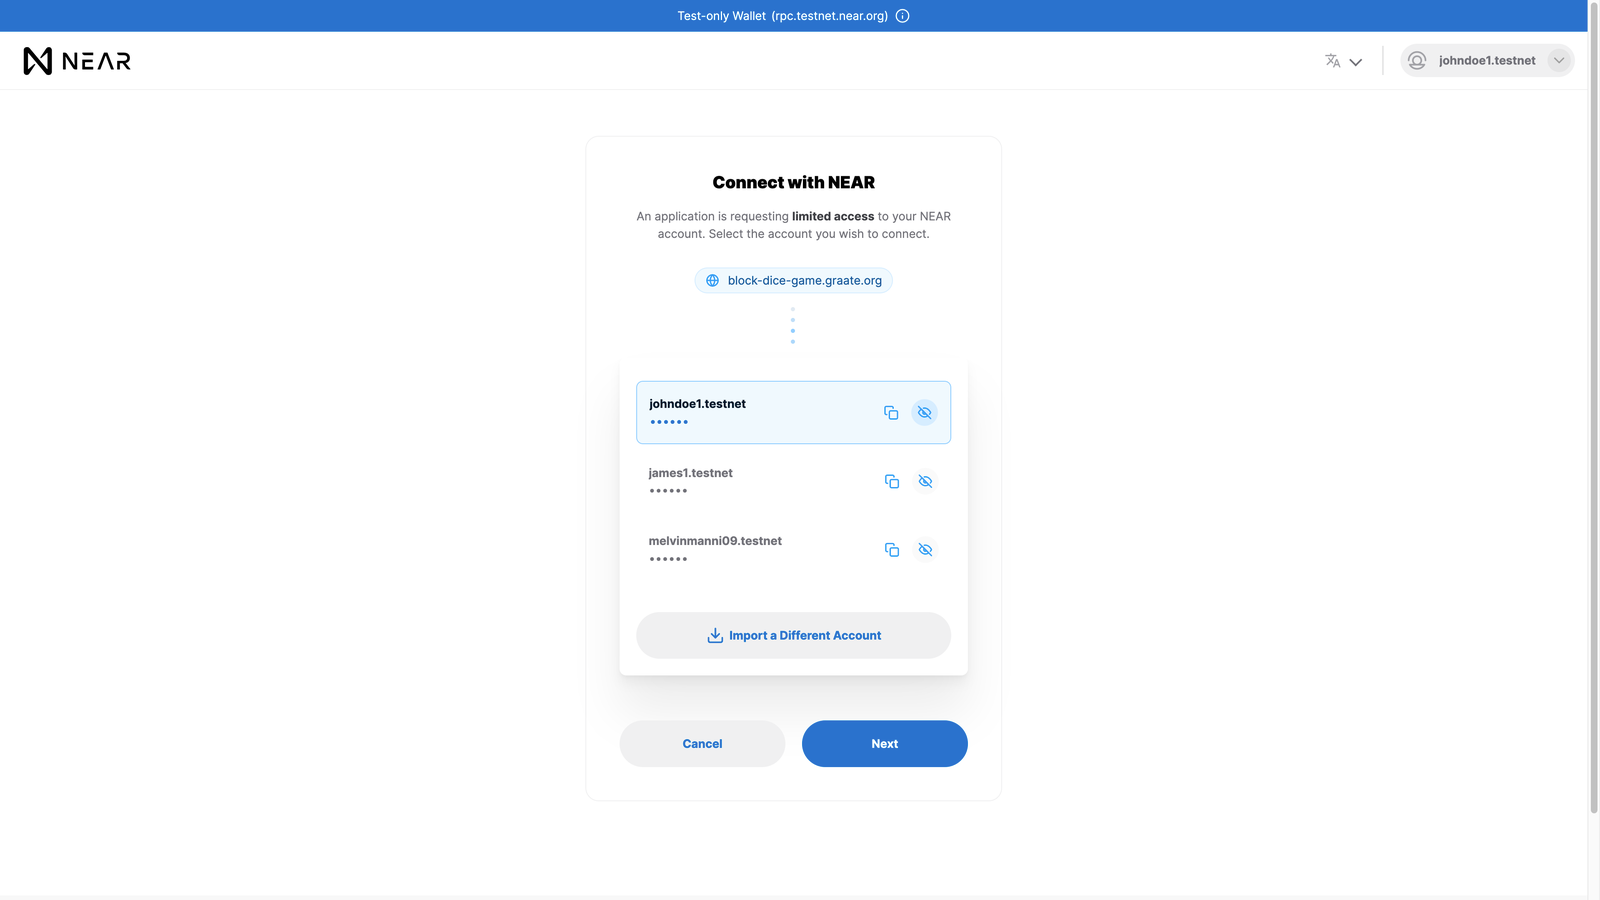
The NEAR wallet is a browser-based wallet. You will be redirected to the website to authenticate your wallet/account - see src/components/Navbar/Navbar.jsx.
...
const handleUser = (e) => {
    if (currentUser && e.target.textContent === "Sign Out") {
      (function signOut() {
        wallet.signOut();
        window.location.replace(
          window.location.origin + window.location.pathname
        );
      })();
    } else if (!currentUser && e.target.textContent === "Login") {
      (function signIn() {
        wallet.requestSignIn(nearConfig.contractName, "NEAR Block Dice");
      })();
    }
  };
...
On line 12, the wallet.requestSignIn function accepts two arguments: the contract address and the application name. The wallet.requestSignIn function will trigger a wallet connection request, which, once approved, will redirect back our application from the NEAR browser wallet;
The wallet connection can be revoked by calling wallet.signOut() function.
Open Source Session Replay
OpenReplay is an open-source, session replay suite that lets you see what users do on your web app, helping you troubleshoot issues faster. OpenReplay is self-hosted for full control over your data.

Start enjoying your debugging experience - start using OpenReplay for free.
Smart Contract Interaction
NEAR smart contracts have view and change methods.
- View Methods are smart contract methods that do not mutate the contract storage; they are used to read data stored on the smart contract storage.
- Change Methods are the opposite of the View methods in the sense that they alter smart contract storage. Change methods must be signed by a wallet to execute successfully; Signing contract calls usually requires gas fees. Gas fees are the number of NEAR tokens needed to perform a transaction on the NEAR Blockchain.
On lines 35 and 37, we can see the contract methods defined. You can find additional information on the smart contract method interface here.
We have successfully connected to the NEAR blockchain and the smart contract provided. The next action order will be to make smart contract calls using the defined contract methods.
createNewGame
This change function allows you to create a new game with a 0.5 NEAR token fee - see src/pages/home/index.jsx.
...
const txFee = Big(0.5)
  .times(10 ** 24)
  .toFixed()

const GAS = Big(3)
  .times(10 ** 13)
  .toFixed()
...
const query = useQuery()
const hash = query.get('transactionHashes')
const createNewGame = async () => {
    try {
      await contract.createNewGame({}, GAS, txFee)
    } catch (error) {
      console.log(error)
    }
  }

  useEffect(() => {
    if (hash) {
      txReturnArgsFromHash({ hash, accountId: currentUser.accountId }).then(
        (res) => {
          handleShowGameId(decodeArgs(res))
        },
      )
    }
    // eslint-disable-next-line
  }, [])
On line 2 above, we calculate the transaction fee required to create a game(0.5 NEAR tokens), and on line 6, the gas fee required for the transaction: 30000000000000 yocto.
On line 12, we are making the smart contract call for creating a new game by calling the createNewGame method on the contract, which accepts three arguments: the arguments required to execute createNewGame on the smart contract, the gas fee, and the transaction fee. The createNewGame method returns the gameId of newly created games; this value can be read by querying the transaction hash appended to url query after the transaction is redirected from the NEAR wallet and decoding the value, as seen on line 22. See src/utils/near.js.
import Big from "big.js";
import { connect, keyStores } from "near-api-js";
import { hexy } from "hexy";
...
export const txReturnArgsFromHash = async ({ hash, accountId }) => {
  const config = {
    keyStore: new keyStores.BrowserLocalStorageKeyStore(),
    networkId: "testnet",
    nodeUrl: "https://rpc.testnet.near.org",
    walletUrl: "https://wallet.testnet.near.org",
    helperUrl: "https://helper.testnet.near.org",
    explorerUrl: "https://explorer.testnet.near.org",
  };
  const near = await connect(config);

  const {
    receipts_outcome: [
      {
        outcome: { status },
      },
    ],
  } = await near.connection.provider.txStatus(hash, accountId);

  return status.SuccessValue;
};

export const decodeArgs = (args) => {
  const decodedArgs = Buffer.from(args, "base64");
  let prettyArgs;
  try {
    prettyArgs = JSON.parse(decodedArgs.toString());
    // prettyArgs = JSON.stringify(parsedJSONArgs, null, 2);
  } catch {
    prettyArgs = hexy(decodedArgs, { format: "twos" });
  }

  return prettyArgs;
};
...
On line 22 above, we are querying the transaction hash and destructuring the status value from the query. On line 24, we return the SuccessValue value from the transaction status in base64 format; this is the value returned when the transaction is successful. The decodeArgs function takes the SuccessValue returned and decodes the value to JSON.
joinGame
Like createNewGame, this is also a change method that allows other players to join an existing game. The joinGame method accepts the gameId as an execution argument. See src/pages/game/index.jsx.
await contract.joinGame({ gameId: id }, GAS, txFee)rollDice
This accepts a gameId as an argument and rolls the dice for the wallet/sender signing the contract call; the dice roll will only execute successfully if the sender is a player in the game with the gameId specified. The rollDice method returns the values of the dice rolled. See src/pages/game/index.jsx.
await contract.rollDice({ gameId: id })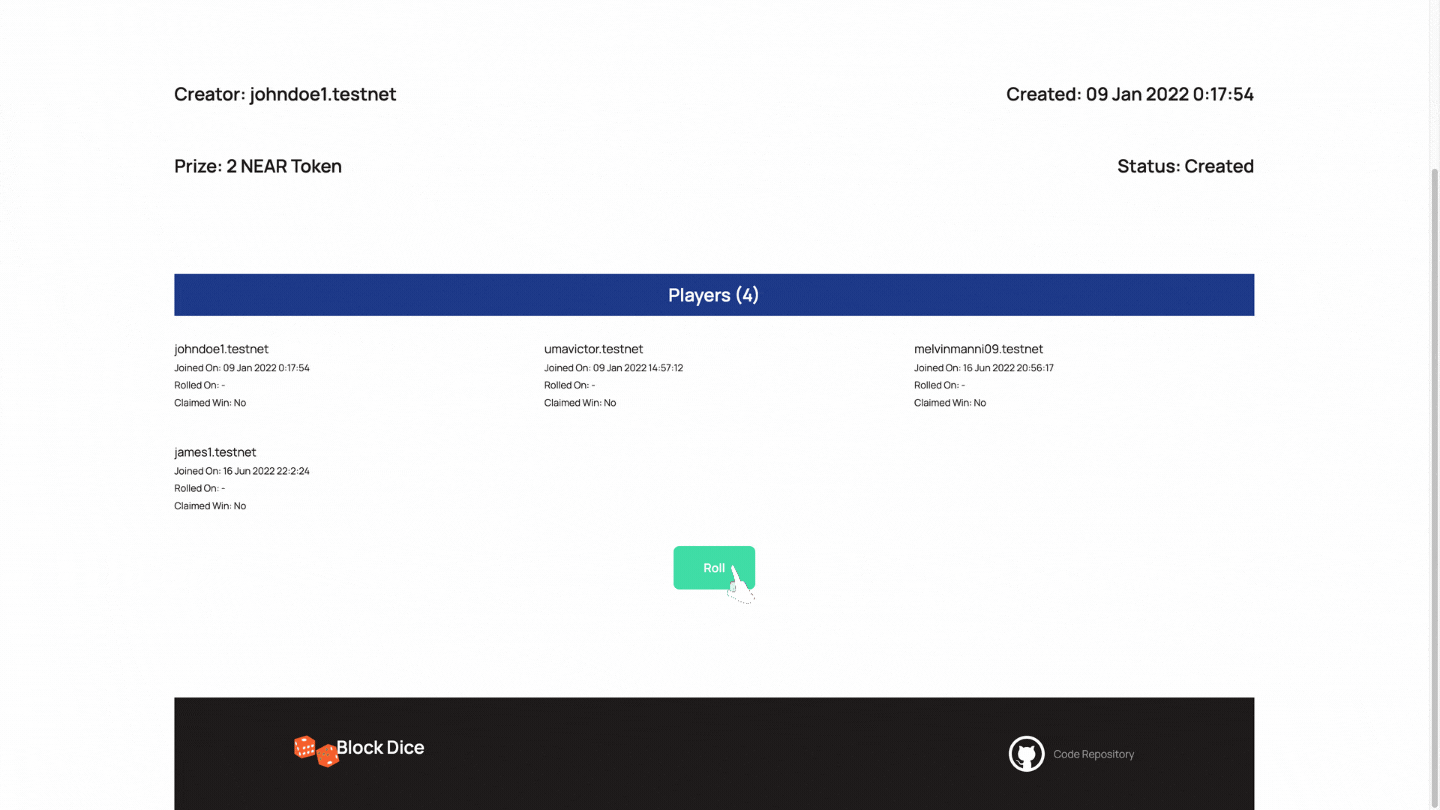
claimWinnings
The claimWinnings is a change method that allows players that won a game to redeem their share of the winning pool in their wallet. See `src/pages/game/index.jsx.
await contract?.claimWinnings({ gameId: id })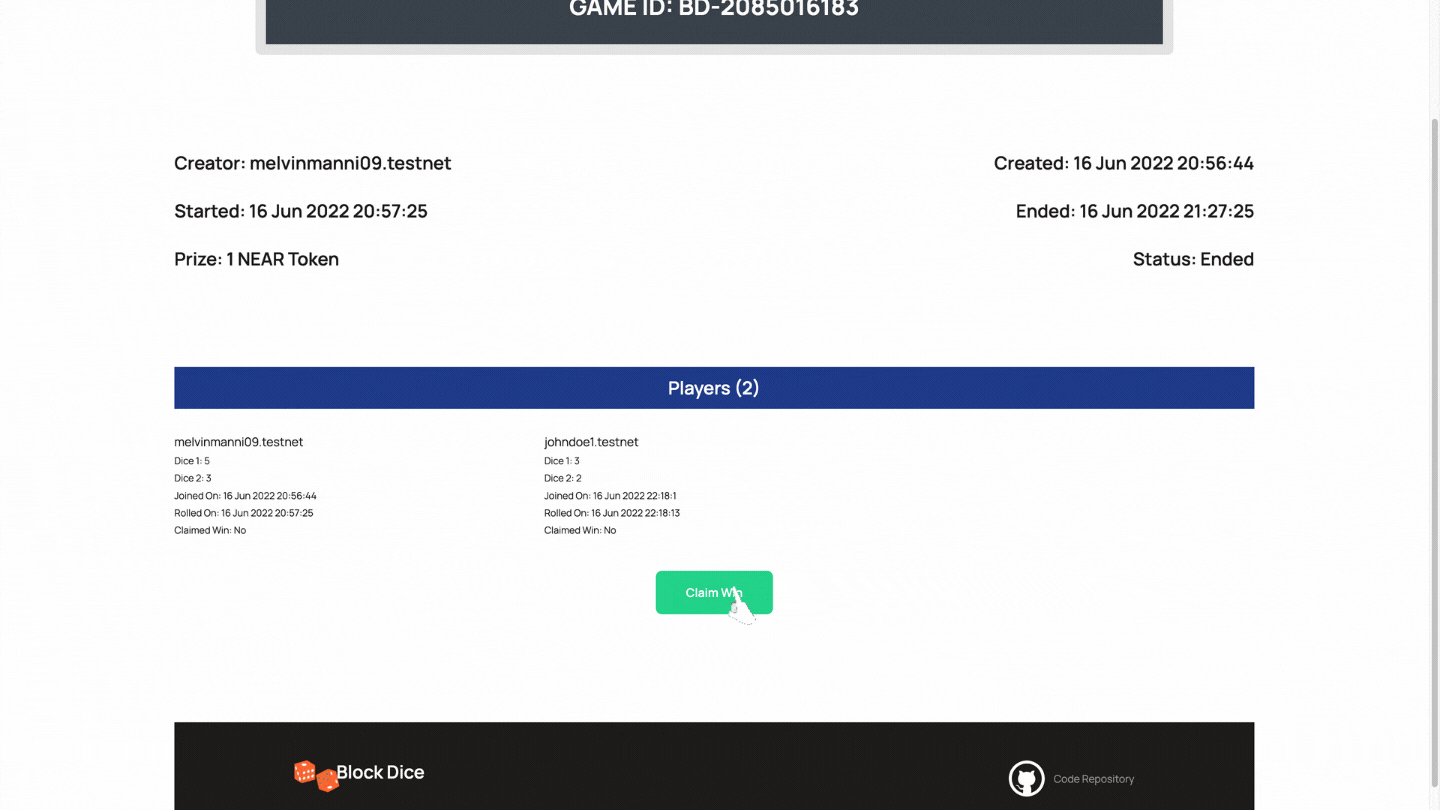
getGameDetails
This is a view method that returns the details of the gameId passed as an argument. See src/pages/game/index.jsx.
const [game] = await contract?.getGameDetails({ gameId: id })

console.log(game)
//output
// {
//   createdAt: "1655411037283823319"
//     createdBy: "james1.testnet"
//   ended: "0"
//   id: "BD-4077698424"
//   players: 1
//   pool: null
//   prize: "500000000000000000000000"
//   started: "0"
//   status: 0
// }
getPlayersDetails
This method returns every player’s details for the gameId passed as an argument. See src/pages/game/index.jsx.
const players = await contract?.getPlayersDetails({ gameId: id })

console.log(players)
// output
// [
//   {
//     claimedWin: 0,
//     gameId: 'BD-2085016183',
//     playerId: 'melvinmanni09.testnet',
//     roll1: 5,
//     roll2: 3,
//     timeJoined: '1655409404439293761',
//     timeRolled: '1655409445158884992',
//   },
// ]
getProfileDetails
getProfileDetails returns the profile details for the account passed as an argument to the method. This will return an array of all games that an account joined. See src/pages/profile/.
...
const getProfile = async () => {
    setGames([])
    const profile = await contract?.getProfileDetails({
      account: currentUser?.accountId,
    })
    console.log(profile) //['BD-3568281945', 'BD-4077698424', 'BD-3306428487']
    profile.forEach(async (el) => {
      const data = await contract?.getGameDetails({ gameId: el })
      setGames((prev) => [data[0], ...prev])
    })
  }
...
getWinners
This view method returns an array with the account id of the winners for the gameId passed in as an execution argument. See src/pages/game/index.jsx.
const resWinners = await contract?.getWinners({ gameId: id })
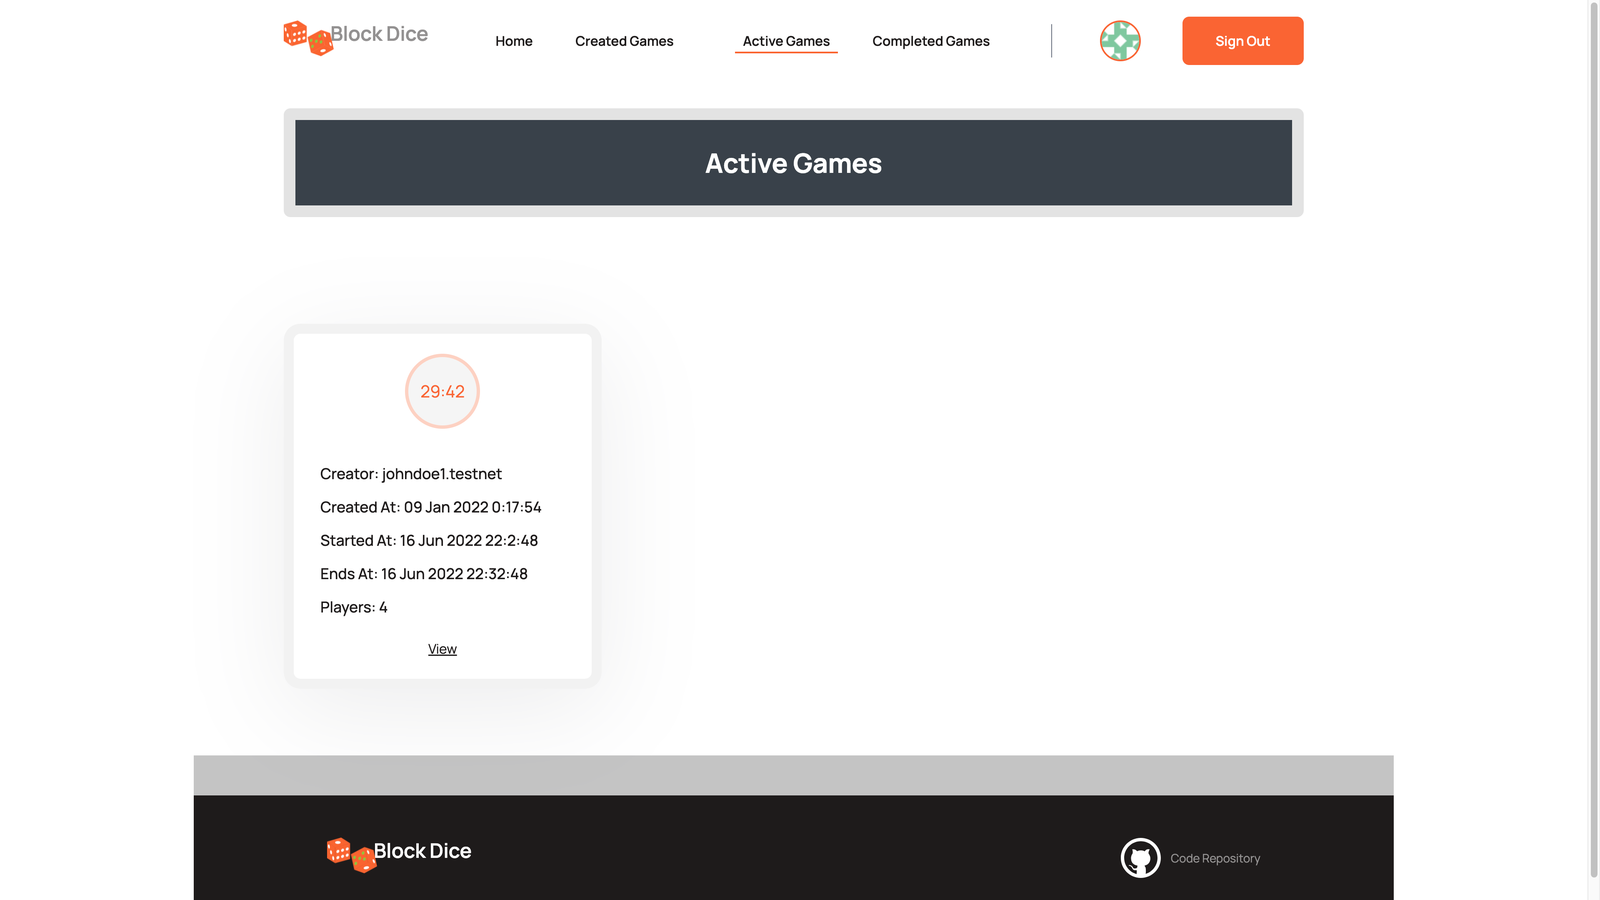
//resWinners will return an array of account(s) that won the game id passedgetActiveGames, getCompletedGames and getCreatedGames
These are change methods because they update games before returning the queried game state based on the game status.
Conclusion
We have covered initializing a connection to the NEAR blockchain, connecting to a wallet on the NEAR blockchain, and making smart contract calls. There is no doubt that at this point, you should be able to make smart contract calls to the NEAR blockchain. If you are interested in previewing the live project, you will find that here and the link to the smart contract repository.