
As a web developer, you may have encountered the z-index property in CSS when dealing with the layout and stacking of HTML elements. It is an essential tool for controlling the visual order of HTML elements on a web page. However, understanding how it works can be tricky, and many developers find using it difficult.
However, the z-index property can be confusing, and it is often misused or misunderstood by web designers and developers.
In this article, we will explore the z-index property in CSS and explain how it works, what it does, and how to use it effectively.
The Stacking Context
Before we dive deep into the z-index property, let’s look at a term called Stacking Context.
The idea of stacking context is used in web development to control how things are presented and layered on a web page. When creating and executing web layouts, particularly ones that have overlapping elements, it’s crucial to understand the stacking context.
Each element in a stacking context is given a stacking order, establishing its location along the z-axis. The element’s position in the DOM, its CSS values, and whether it has a child stacking context are some criteria that affect the stacking order.
An element is positioned relative to its parent element’s stacking order when placed within a stacking context. Higher stacking order components will be shown on top of lower stacking order ones. However, a number of CSS properties, including z-index, opacity, transform, and mix-blend-mode, can influence how an element is stacked within a stacking context.
It’s critical to remember that stacking contexts can be nested, which enables a child element to have a separate stacking context and stacking order. In this situation, the stacking context of the parent element will determine the child element’s stacking order.
The z-index property only affects positioned items; it has no bearing on non-positioned elements, it is vital to note. Moreover, the z-index property only affects the stacking order of the positioned elements; it does not impact the document flow or the layout of other items on the page.
How does the z-index property work?
The z-index property is a CSS property that specifies the stacking order of positioned elements. It determines which elements should appear in front of or behind other elements on the screen.
The z-index property only works on elements that have been positioned using one of the following CSS positioning properties:
position: relative / absolute / fixedThe z-index property takes a numeric value as its input, including negative values with higher numbers indicating that an element should be placed on top of other elements. Elements with a higher z-index value will appear in front of elements with a lower z-index value. If two elements have the same z-index value, the element appearing later in the HTML document will be placed on top.
Here’s an example of how the z-index property can be used:
HTML
<div class="container">
  <div class="box box-1"></div>
  <div class="box box-2"></div>
  <div class="box box-3"></div>
</div>
CSS
.container {
  position: relative;
}

.box {
  position: absolute;
  width: 100px;
  height: 100px;
}

.box-1 {
  background-color: red;
  z-index: 3;
}

.box-2 {
  background-color: green;
  top: 56px;
  left: 20px;
  z-index: 2;
}

.box-3 {
  background-color: blue;
  top: 96px;
  left: 40px;
  z-index: 1;
}
Your output result will be:
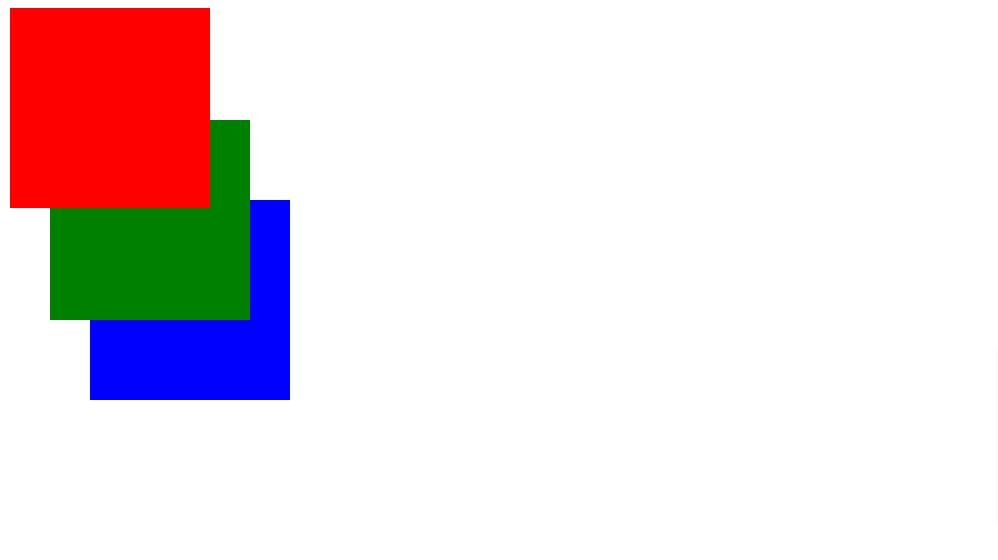
This example shows three boxes with different z-index values. The container has a relative position, which allows the absolute-positioned boxes to be positioned inside.
The box with the highest z-index (box-1) will be on top of the other boxes, followed by box-2, and then box-3. The z-index property determines the stacking order of the boxes.
It’s important to note that the z-index property only applies to elements positioned using one of the CSS positioning properties mentioned above. If an element is not positioned, then the z-index property will have no effect. Static elements will always be displayed behind positioned elements, regardless of their z-index value.
Possible z-index values
Some common values for z-index are:
-
<integer>: Elements with higher values appear on top of elements with lower values. While elements with lower values appear on top of elements with higher values. Generally, it is best to use positive numbers for thez-indexvalue and avoid using negative values, and negative values can be confusing and may cause unexpected behavior. -
auto: Theautovalue inz-indexindicates that an element’s stacking order should be determined automatically based on the default order of the document. This means the element will be placed in the stacking order according to its position in the DOM hierarchy without any explicit or relative values being set.
There are also global values that can be used with the z-index property:
-
initialvalue: Settingz-indexto initial is equivalent to not setting it at all. It sets the property to its default value, which is auto. So, if you set thez-indexinitial on an element, it will be positioned in the stacking order based on its position in the document and the default order of the rendering tree. -
unsetvalue: Theunsetvalue inz-indexis used to reset thez-indexproperty back to its default value, allowing the element to follow the natural stacking order based on its position in the HTML structure. It is often used when you want to remove or reset any previously definedz-indexvalue on an element. -
revertvalue: In the case ofz-index, revert can be used to undo any changes made to the stacking order of elements. When thez-indexof an element is set to revert, it will be placed back in its original position in the stacking order, as if noz-indexvalue had been set for it.
How Does z-index Property Affect Stacking Contexts?
The z-index property creates stacking contexts, determining the order in which elements are stacked. A stacking context is created when an HTML element has a position property value other than static, and one of the following properties is set: z-index, opacity, or transform.
Session Replay for Developers
Uncover frustrations, understand bugs and fix slowdowns like never before with OpenReplay — an open-source session replay tool for developers. Self-host it in minutes, and have complete control over your customer data. Check our GitHub repo and join the thousands of developers in our community.
Practical Examples of z-index Property
Now that we’ve covered the basics of the z-index property and how it interacts with other CSS layout properties, let’s look at some practical examples of using the z-index property.
Creating Dropdown Menus
Another common use case for the z-index property is creating dropdown menus. Dropdown menus typically appear on top of other page elements, so we need to use the z-index property to ensure that they appear in front of other content.
To achieve this effect, we can use the following CSS code:
HTML:
<div class="dropdown">
  <button class="dropbutton">Dropdown</button>
  <div class="dropdown-options">
    <a href="#">Option 1</a>
    <a href="#">Option 2</a>
    <a href="#">Option 3</a>
  </div>
</div>
CSS:
body {
  background-color: black;
}

.dropbutton {
  background-color: #04AA6D;
  color: white;
  padding: 16px;
  font-size: 16px;
  border: none;
}

.dropdown {
  position: relative;
  display: inline-block;
}

.dropdown-options {
  display: none;
  position: absolute;
  background-color: #f1f1f1;
  min-width: 160px;
  box-shadow: 0px 8px 16px 0px rgba(0, 0, 0, 0.2);
  z-index: 1;
}

.dropdown-options a {
  color: black;
  padding: 12px 16px;
  text-decoration: none;
  display: block;
}

.dropdown-options a:hover {
  background-color: #ddd;
}

.dropdown:hover .dropdown-options {
  display: block;
}

.dropdown:hover .dropbutton {
  background-color: red;
}
Creating Modal Dialog Boxes
Finally, the z-index property is often used to create modal dialog boxes, which are temporary windows that appear on top of other page content.
To create a modal dialog box, we can use the following CSS code:
CSS
.modal {
  position: fixed;
  top: 50%;
  left: 50%;
  transform: translate(-50%, -50%);
  z-index: 3;
}

.overlay {
  position: fixed;
  top: 0;
  left: 0;
  width: 100%;
  height: 100%;
  background-color: rgba(0, 0, 0, 0.5);
  z-index: 2;
}
In this case, the modal dialog box has a z-index of 3, which ensures that it appears on top of all other page content. The overlay, a semi-transparent layer covering the entire page, has a lower z-index of 2. This ensures the overlay appears on top of all other page content except for the modal dialog box.
Common issues with the z-index property
Several common issues can arise when using the z-index property. Here are some of the most common issues:
-
Inconsistent behavior across browsers: The
z-indexproperty can behave differently across different browsers, which can lead to unexpected results. It is important to test the layout on different browsers to ensure that the stacking order is maintained. -
Conflicts with other elements: The
z-indexproperty can conflict with other elements in the document, especially when used in conjunction with absolute or fixed positioning. It is important to carefully consider the layout and ensure that thez-indexvalues are assigned appropriately. -
Overlapping elements: Overlapping elements can occur when the
z-indexvalues are not assigned correctly. This can lead to elements appearing on top of each other, making it difficult to interact with the underlying elements. -
z-indexstacking context: Thez-indexproperty can create a stacking context, which can affect the stacking order of elements within the context. It is important to understand how the stacking context works and how it can affect the layout.z-indexconflicts can occur when two or more elements have the samez-indexvalue or when the position and parent elements of two elements conflict. In such cases, the element that appears later in the HTML code will be placed on top. To avoidz-indexconflicts, you should always use uniquez-indexvalues for each element.
Best practices for using z-index
Now that we understand how the z-index property works and how it can be affected by stacking contexts, let’s take a look at some best practices for using z-index effectively.
-
You must always specify a
z-indexvalue for positioned elements: As mentioned earlier, it is a good practice to always specify az-indexvalue for positioned elements, even if the value is simply 0. This can help prevent unexpected behavior and ensure that elements are displayed in the intended order. -
Use meaningful values for
z-index: When assigning values to thez-indexproperty, it is important to use meaningful values that are easy to understand and remember. For example, you might use a value of 1 for the header of a page, a value of 2 for the content, and a value of 3 for the footer. -
Avoid using extremely high or low values for z-index: While it is possible to use very high or low values for the
z-indexproperty, it is generally not recommended. Extremely high values can cause performance issues and make it difficult to maintain the code, while extremely low values may be overwritten by other elements or not display as expected. -
Be aware of stacking contexts: As we have seen, stacking contexts can affect the stacking order of elements on a web page. When working with
z-index, it is important to be aware of stacking contexts and how they can impact the display of elements. In general, it is best to avoid creating unnecessary stacking contexts and to ensure that elements are placed in the correct stacking order.
Conclusion
The z-Index property in CSS is a powerful tool that can be used to enhance your web design, but it’s important to use it correctly to avoid layout issues. By understanding how the z-Index property works and by following the tips outlined in this article, you can use the z-Index property effectively to create visually appealing designs.
Gain Debugging Superpowers
Unleash the power of session replay to reproduce bugs and track user frustrations. Get complete visibility into your frontend with OpenReplay, the most advanced open-source session replay tool for developers.