Custom Data Attributes in HTML5


HTML5 custom data attributes enable embedding custom data directly into HTML elements. This allows developers to store more information in the DOM without interfering with HTML semantics. This functionality provides an easy way for website components to have metadata of their own to serve different functions, including identifying users, storing configuration settings, and managing the application state, as this article shows.

Discover how at OpenReplay.com.
Efficient data organization is crucial in web development for several reasons:
- Enhanced Performance: Well-arranged data can prompt quicker recovery and treatment, which betters the ultimate performance of a web application. This is critical for all large-scale applications where each millisecond matters.
- Maintainability: Clean and well-structured data makes code easier to read, understand, and maintain. This reduces the likelihood of bugs and simplifies implementing new features or changing existing ones.
- Scalability: When web applications expand, they also process more data. For the application to scale smoothly without significant performance degradation, efficient data organization is vital. User Experience: Effective data management directly influences user experience. Faster page loads and quicker information processing make faster page loads possible. These two elements are key to maintaining user engagement. Security: Proper data organization can also help identify and mitigate security vulnerabilities. If it is well-organized, sensitive data can be easily separated and secured.
With the help of HTML5 custom data attributes, developers can put additional data straight inside HTML elements and control it from there, leading to more efficient and organized web applications. By doing so, we simplify development and improve website performance and user engagement.
What Are Custom Data Attributes?
HTML5’s Custom data attributes assist in storing extra details inside one’s HTML components. They essentially begin with data-, then a custom name (tailored by the user). They sometimes facilitate the encoding of peculiar information without distortion of HTML build or its meaning; hence, they can be simply selected through JavaScript for any necessary alterations.
The Basic Syntax
The syntax for custom data attributes is as follows:
<div data-attribute-name="value"></div>div: The HTML element that will hold the custom data attribute.data-attribute-name: The name of the custom data attribute, prefixed withdata-.value: The value assigned to the custom data attribute.
Example of Setting Custom Data Attributes in HTML
Here’s an example of how to set custom data attributes in an HTML document:
<!DOCTYPE html>
<html lang="en">
  <head>
    <meta charset="UTF-8" />
    <meta name="viewport" content="width=device-width, initial-scale=1.0" />
    <title>Custom Data Attributes Example</title>
  </head>
  <body>
    <div id="user" data-user-id="12345" data-role="admin">User Info</div>
  </body>
</html>
Benefits of Using Custom Data Attributes
For applications to be built so they can be maintained and scaled easily, web development requires high-quality data management and organization. Custom data attributes in HTML5 provide flexibility and power for embedding extra information into HTML elements. Below are various advantages accrued from the usage of custom data attributes:
- Separation of Concerns: Advanced data attributes might be useful for maintaining a clear separation of concerns in web development. It is possible to keep the page structure semantic and clean, storing additional information if needed by just adding any metadata within HTML tags. The structure (HTML), behavior (JavaScript), and data (custom attributes) are all separated when this technique is utilized, therefore making code more segmented and making it easier to debug.
- Simplicity and Ease of Use: Implementing and working with custom data attributes is quite easy. The
data-prefix is adhered to under a simple naming convention within which they operate, making it simple to understand what they are meant for and how they help meet particular requirements. Besides, it is simple to usedatasetproperty in JavaScript while accessing these attributes. Such simplicity results in smaller learning curves that enable developers to integrate custom data attributes into projects. - Flexibility in Storing Various Types of Data: Storing diverse data types is an important benefit of custom data attributes. Custom data attributes offer greater flexibility than adding libraries or server-side modifications; thus, they suit a variety of use cases, from simple standalone applications to complex ensure ones across the web.
Significant advantages can be obtained through HTML5 custom data attributes in web development practice. This separation of concerns makes it easier for maintainers to control the pages’ data, functions, and design. This ability to simplify things makes it good for newcomers in web development and helps with more advanced work because different sorts of information can be placed on it easily.
Accessing and Modifying Data Attributes with JavaScript
JavaScript allows you to easily work with custom data attributes; therefore, it allows you to have interactive and dynamic interfaces because they can be changed depending on the data contained in DOM elements. The dataset property can provide a convenient interface for reading and writing custom data attributes in an element.
Accessing Data Attributes Using the dataset Property
The dataset property is a special property of HTML elements that allows access to all the custom data attributes of an element as an object’s properties. These properties are named after what follows after data- in their attribute name, but then they are turned into camelCase.
HTML:
<!DOCTYPE html>
<html lang="en">
  <head>
    <meta charset="UTF-8" />
    <meta name="viewport" content="width=device-width, initial-scale=1.0" />
    <title>Document</title>
    <script src="script.js" defer></script>
  </head>
  <body>
    <div
      id="user-profile"
      data-user-id="12345"
      data-role="admin"
      data-name="John Doe"
    >
 User Profile
    </div>
  </body>
</html>
JavaScript:
const userProfile = document.getElementById("user-profile");
// Accessing data attributes using dataset
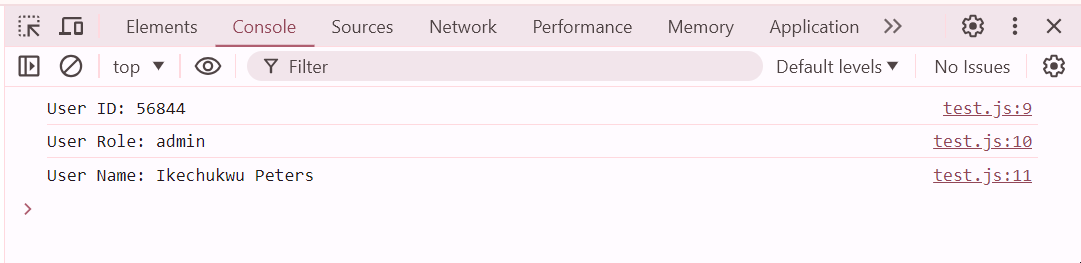
const userId = userProfile.dataset.userId; // "56844"
const userRole = userProfile.dataset.role; // "admin"
const userName = userProfile.dataset.name; // "Ikechukwu Peters"
console.log(`User ID: ${userId}`);
console.log(`User Role: ${userRole}`);
console.log(`User Name: ${userName}`);In this example, the data-user-id attribute is accessed using userProfile.dataset.userId, the data-role attribute is accessed via userProfile.dataset.role, and the data-name attribute is accessed through userProfile.dataset.name.
Modifying Data Attributes with JavaScript
You can also use the dataset property to change the values of any custom data attributes. This allows you to dynamically alter the data attached to an element.
HTML:
<!DOCTYPE html>
<html lang="en">
  <head>
    <meta charset="UTF-8" />
    <meta name="viewport" content="width=device-width, initial-scale=1.0" />
    <title>Document</title>
    <script src="script.js" defer></script>
  </head>
  <body>
    <div
      id="user-profile"
      data-user-id="56844"
      data-role="admin"
      data-name="Ikechukwu Peters"
    >
 User Profile
    </div>
  </body>
</html>
JavaScript:
const userProfile = document.getElementById("user-profile");
// Modifying data attributes using dataset
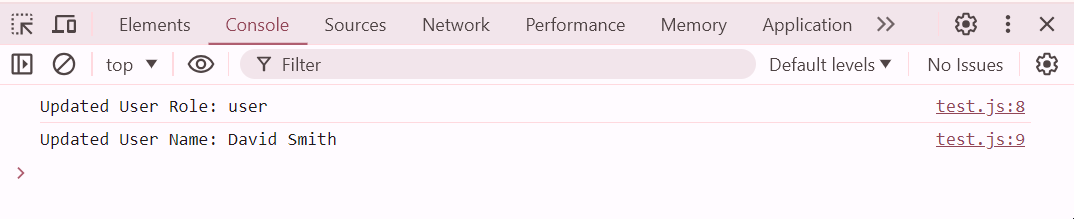
userProfile.dataset.role = "user";
userProfile.dataset.name = "David Smith";
console.log(`Updated User Role: ${userProfile.dataset.role}`); // "user"
console.log(`Updated User Name: ${userProfile.dataset.name}`); // "David Smith"The data attributes are then modified using the dataset property. Specifically, userProfile.dataset.role = 'user'; changes the data-role attribute from “admin” to “user”, and userProfile.dataset.name = David Smith; updates the data-name attribute from “Ikechukwu Peters” to “David Smith”.
Practical Examples
HTML elements allow developers to increase interaction and functionality on web applications by enabling them to store and manipulate additional data. Here are a few examples of when they can be used.
Storing User Information
This example will show you how to store user information in a list of user profiles using custom data attributes. In the list of user profiles, user ID, role, and user name have all been stored as custom data attributes for each user profile.
<!DOCTYPE html>
<html lang="en">
  <head>
    <meta charset="UTF-8" />
    <meta name="viewport" content="width=device-width, initial-scale=1.0" />
    <title>User Information</title>
  </head>
  <body>
    <ul id="user-list">
      <li data-user-id="101" data-role="admin" data-name="Alice">Alice</li>
      <li data-user-id="102" data-role="user" data-name="Bob">Bob</li>
      <li data-user-id="103" data-role="guest" data-name="Charlie">Charlie</li>
    </ul>
    <script>
      const userList = document.getElementById("user-list");
      userList.addEventListener("click", (event) => {
        const userItem = event.target;
        if (userItem.tagName === "LI") {
          const userId = userItem.dataset.userId;
          const userRole = userItem.dataset.role;
          const userName = userItem.dataset.name;
          alert(`User ID: ${userId}\nName: ${userName}\nRole: ${userRole}`);
 }
 });
    </script>
  </body>
</html>
In this instance, every listing in the user listing encompasses specified data attributes such as user ID, name, and role. On clicking a specific user profile, an alert pops up showing saved data including user ID, role, and name. This has been achieved by attaching an event listener to that listing. The script for the event listener takes specific data attributes from the clicked item to populate the alert message.
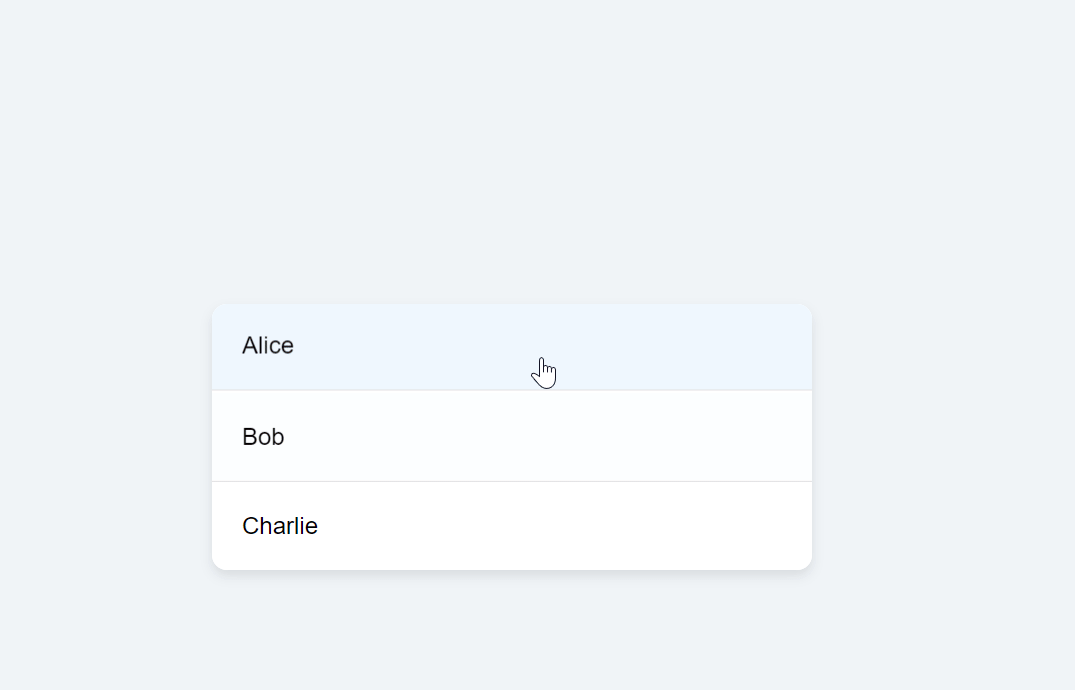
This approach does not require extra data structures and allows you to control and show dynamic user content straight from the HTML attributes, which boosts the code’s usability and sustainability.
Dynamic Product Information
This example highlights how to dynamically filter products based on categories and sort them by price using custom data attributes.
<!DOCTYPE html>
<html lang="en">
  <head>
    <meta charset="UTF-8" />
    <meta name="viewport" content="width=device-width, initial-scale=1.0" />
    <title>Product Filtering and Sorting</title>
  </head>
  <body>
    <div class="container">
      <div class="controls">
        <button class="filter-button" data-category="all">All</button>
        <button class="filter-button" data-category="electronics">
 Electronics
        </button>
        <button class="filter-button" data-category="furniture">
 Furniture
        </button>
        <button class="sort-button" data-sort="asc">
 Sort by Price: Low to High
        </button>
        <button class="sort-button" data-sort="desc">
 Sort by Price: High to Low
        </button>
      </div>
      <div class="products">
        <div
          class="product"
          data-product-id="001"
          data-category="electronics"
          data-name="Laptop"
          data-price="999.99"
        >
          <h2>Laptop</h2>
          <p>Price: $<span class="price">999.99</span></p>
        </div>
        <div
          class="product"
          data-product-id="002"
          data-category="furniture"
          data-name="Sofa"
          data-price="299.99"
        >
          <h2>Sofa</h2>
          <p>Price: $<span class="price">299.99</span></p>
        </div>
        <div
          class="product"
          data-product-id="003"
          data-category="electronics"
          data-name="Smartphone"
          data-price="499.99"
        >
          <h2>Smartphone</h2>
          <p>Price: $<span class="price">499.99</span></p>
        </div>
        <div
          class="product"
          data-product-id="004"
          data-category="furniture"
          data-name="Table"
          data-price="199.99"
        >
          <h2>Table</h2>
          <p>Price: $<span class="price">199.99</span></p>
        </div>
      </div>
    </div>
    <script>
      // Filter products by category
      document.querySelectorAll(".filter-button").forEach((button) => {
        button.addEventListener("click", (event) => {
          const category = event.target.dataset.category;
          document.querySelectorAll(".product").forEach((product) => {
            if (category === "all" || product.dataset.category === category) {
              product.classList.remove("hidden");
 } else {
              product.classList.add("hidden");
 }
 });
 });
 });
      // Sort products by price
      document.querySelectorAll(".sort-button").forEach((button) => {
        button.addEventListener("click", (event) => {
          const sortOrder = event.target.dataset.sort;
          const products = Array.from(document.querySelectorAll(".product"));
          products.sort((a, b) => {
            const priceA = parseFloat(a.dataset.price);
            const priceB = parseFloat(b.dataset.price);
            return sortOrder === "asc" ? priceA - priceB : priceB - priceA;
 });
          const container = document.querySelector(".products");
          products.forEach((product) => container.appendChild(product));
 });
 });
    </script>
  </body>
</html>
This sample showcases products of your choice using custom data attributes, such as ID, category, price, or name. Filter buttons facilitate product navigation. The sort buttons allow you to arrange by price (ascending or descending) using data-sort. JavaScript handles these interactions, dynamically updating the product display based on user clicks.
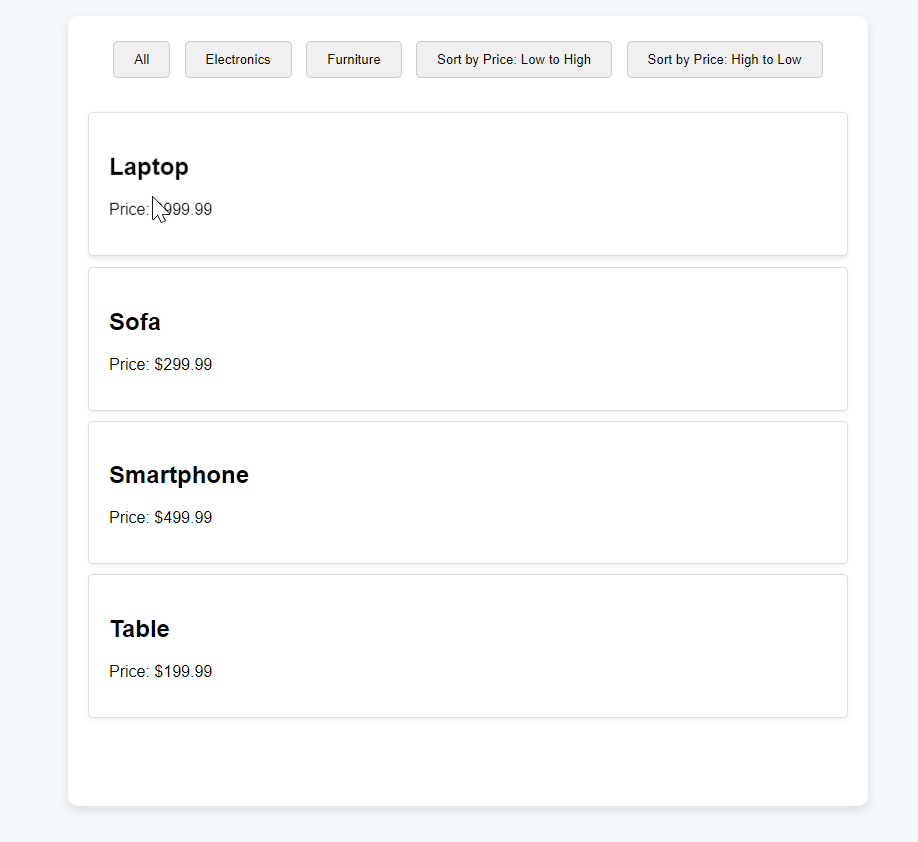
This example demonstrates how personalized data details increase interactivity in the product catalog, allowing effortless sorting and filtration according to varying user preferences.
Storing State Information
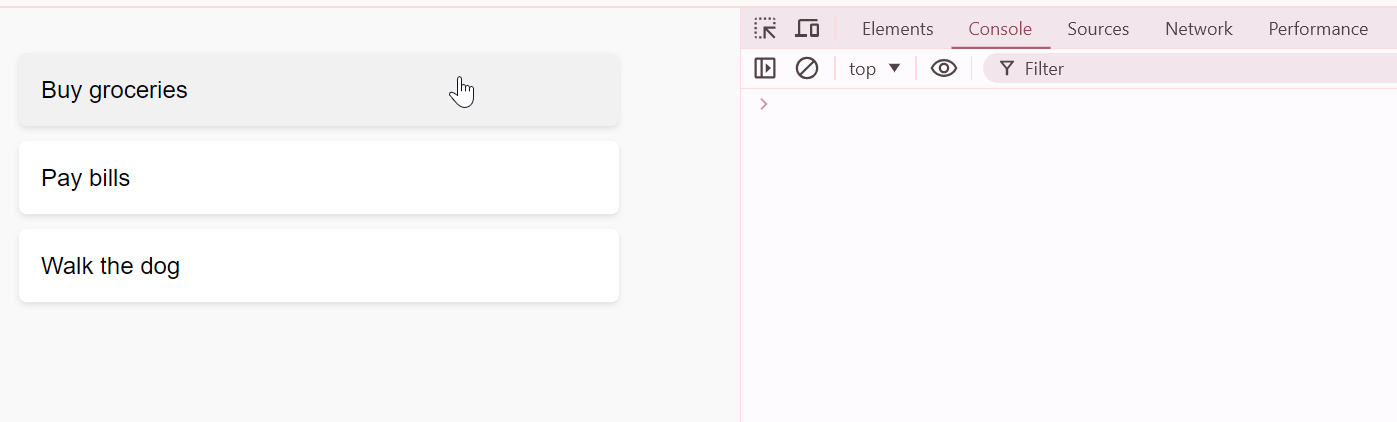
This example shows how to use custom data attributes to store and toggle the state of to-do list items.
<!DOCTYPE html>
<html lang="en">
  <head>
    <meta charset="UTF-8" />
    <meta name="viewport" content="width=device-width, initial-scale=1.0" />
    <title>To-Do List</title>
  </head>
  <body>
    <ul id="todo-list">
      <li data-id="1" data-status="pending">Buy groceries</li>
      <li data-id="2" data-status="pending">Pay bills</li>
      <li data-id="3" data-status="pending">Walk the dog</li>
    </ul>
    <script>
      document
 .getElementById("todo-list")
 .addEventListener("click", (event) => {
          if (event.target.tagName === "LI") {
            const item = event.target;
            if (item.dataset.status === "pending") {
              item.dataset.status = "completed";
              item.classList.add("completed");
 } else {
              item.dataset.status = "pending";
              item.classList.remove("completed");
 }
            console.log(
              `Item ID: ${item.dataset.id}, Status: ${item.dataset.status}`
 );
 }
 });
    </script>
  </body>
</html>
In this example, each to-do list item has custom data attributes for ID and status. When an item is clicked, its status toggles between “pending” and “completed”, and the visual representation (strikethrough for completed items) is updated accordingly.
In this example, every item from the to-do list has its custom data attribute which keeps its identity and state. Whenever an item is clicked, it toggles between “pending” and “completed”; hence, it is updated by striking through for any completed item(s).
Best Practices for Using Custom Data Attributes
Adding extra information to HTML elements becomes flexible when custom data attributes are used. However, it is important to use them correctly for better code clarity, performance, and security. Due to these practices, custom data attributes can be made more effective in web development.
Descriptive Naming Conventions
Custom data attributes should have clear names and describe them to make it easy to know their purpose. Begin each custom attribute with data- and use a name that pertains to its material or function. This makes it possible for developers and maintainers to understand what each particular attribute is meant to do in no time.
Avoid Overuse of Large Data
Do not store loads of data or intricate structures using custom data attributes. Such attributes are more appropriate for holding simple metadata or configuration settings concerning an element. Do not use these attributes to store sensitive information or large data sets directly, as this affects performance and usability.
Security Considerations
When using custom data attributes to hold sensitive or critical information, caution is necessary. It should not be forgotten that anyone inspecting the HTML source or using developer tools can see these attributes. Do not keep passwords, authentication tokens, or personally identifiable information (PII) in the custom attributes. Always use server-side validation and secure storage mechanisms for sensitive data.
Conclusion
In HTML5, custom data attributes store and manage additional information inside an HTML element. They allow for added interactivity and functionality in web apps. This article defines custom data attributes, explains the syntax method of utilizing them with examples, and offers information on how to access and modify them using JavaScript.
We have also discussed the crucial role that naming standards, data handling procedures, and security concerns play in keeping up a clear, sustainable, and safe code base.
To create dynamic and interactive web experiences that are both user-friendly and maintainable, developers can use custom data attributes. Therefore, as you make use of these attributes in your projects; give more focus on clarity, efficiency, and security to realize maximum benefits.
Gain control over your UX
See how users are using your site as if you were sitting next to them, learn and iterate faster with OpenReplay. — the open-source session replay tool for developers. Self-host it in minutes, and have complete control over your customer data. Check our GitHub repo and join the thousands of developers in our community.