Picture this scenario: You get a music album link from a friend. When you click on the link, it takes you straight to the exact album in your music app, saving you from the hassle of searching among thousands of other albums. The concept behind this smooth navigation that elevates the user experience lies in deep links. This article will explore the concept of deep linking, unravel its workings, grasp its significance, and walk through the steps to implement deep links in Flutter.

Discover how at OpenReplay.com.
Let’s begin by understanding the concept of links before delving into the specifics of deep links. In simple terms, links are strings of characters that direct us to particular destinations. These character strings take the form of Uniform Resource Identifiers or URIs. URIs are employed to identify and access resources.
Essentially, a deep link serves as a URI guiding us to a specific resource within an application. Creating these deep links is what we refer to as deep linking.
Deep links consist of various components, with the scheme, authority, and path being the key. Let’s take a closer look at each of these essential components.
-
Scheme: The scheme usually comes first. It specifies the protocol used to identify the resource type and how to handle it. In Flutter deep linking, the URL scheme is used to identify and open the Flutter app upon clicking a link. A common example of a URL scheme is
https://. -
Host: After the scheme, we have the host component, which defines the domain or network location linked with the deep link. This part specifies the server or location where the resource is hosted. In the deep link
https://deeplink-example.com,deeplink-example.comis the host. -
Path: The path component identifies the specific route or location within the app. For example, in the deep link:
https://deeplink-example.com/profile, the path component is/profile. In Flutter, the path is crucial for determining which widget or screen to display when the deep link is activated.
Significance of Deep Linking
The following outlines the significance of deep linking:
-
Seamless UX: Deeplinks delivers a seamless user experience by directing users to specific locations within your app.
-
Increase Traffic: Deep links allow you to drive more traffic into your apps. They can be used in various scenarios, such as marketing, emails, SMS, etc.
-
Personalized app experience: With deep links, you can include targeted URL parameters to create a personalized app experience, increasing in-app signups, activations, and post-install retention.
-
Drive engagement: Deeplink drives long-term engagement and boosts the return on investment (ROI) you get from your app.
How Deep Linking Works
When working with deep linking on mobile devices, you set up an app and its screens to open a specific screen when a particular link is clicked. This setup includes assigning the app a unique URI, referred to as the URI scheme. The primary role of this URI scheme is to locate and open the app, assuming it’s installed on the device. Additionally, various components, such as the host and path, play integral roles in this process by facilitating the accurate identification and retrieval of the specific resource or functionality within the app.
How Deep Links are created and shared
Creating a deep link for a mobile app involves crafting a URL with a specific protocol recognized by the app, pointing to the desired screen in the app. To share a deep link, you simply provide the generated URL to another person via email, social media, or other communication channels. When they click the link, it directly opens the specified content or location within the app, bypassing the initial navigation steps.
Setting up the flutter project
Now that we have a basic understanding of what deep linking is let’s create and set up our project for deep linking using the following steps:
- Use the
flutter createcommand on your terminal to create a project named deeplink_demo.
flutter create deeplink_demo- Modify the main.dart file to set up the initial structure of your Flutter app.
import 'package:flutter/material.dart';
import 'package:deeplink_demo/screens/home.dart';

void main() {
  runApp(const MyApp());
}

class MyApp extends StatelessWidget {
  const MyApp({super.key});

  @override
  Widget build(BuildContext context) {
    return MaterialApp(
      title: 'Flutter Demo',
      debugShowCheckedModeBanner: false,
      home: const Home(),
    );
  }
}- Create a
home.dartfile with a basic home screen containing a text and two buttons that navigate to different screens (blue screen and red screen).
import 'package:flutter/material.dart';
class Home extends StatelessWidget {
const Home({super.key});
@override
Widget build(BuildContext context) {
return Scaffold(
appBar: AppBar(
title: const Text('Home Screen'),
),
body: Center(
child: Column(
mainAxisAlignment: MainAxisAlignment.center,
children: [
const Text('Welcome to Flutter DeepLinking tutorial!'),
MaterialButton(
onPressed: () {
// Navigate to the Blue Screen
},
child: const Text('Blue Screen'),
),
MaterialButton(
onPressed: () {
// Navigate to the Red Screen
},
child: const Text('Red Screen'),
),
],
),
),
);
}
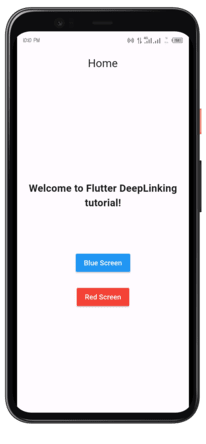
}Having established a foundational Flutter project with a home screen, you can enhance the visual appeal by customizing the Home widget and implementing the navigation logic to transition to the blue and red screens. Below is the home screen for our project:
Implementing Flutter deep linking
Now that we’ve gained a basic understanding of deep links and configured our project to incorporate them let’s delve into the specifics of the configuration process. We’ll begin by addressing the setup for Android, and subsequently, we’ll proceed to the iOS configuration. So, without further ado, let’s dive right in.
Setting up Deep Links on Android
To implement deep linking for Android, follow these steps by incorporating configuration codes into the AndroidManifest.xml file:
-
Navigate to
android/app/src/main/AndroidManifest.xml. -
Add a meta-data tag to the main activity to configure the Flutter framework for handling deep links.
-
Incorporate an intent filter within the activity tag to configure the Android app to handle intents originating from the URL and initiate the main activity.
-
Integrate data tags to specify the host component and URL scheme within the intent filter.
Consider the following code snippet as an illustrative example:
<meta-data
  android:name="flutter_deeplinking_enabled"
  android:value="true"
/>
<intent-filter android:autoVerify="true">
  <action android:name="android.intent.action.VIEW" />
  <category android:name="android.intent.category.DEFAULT" />
  <category android:name="android.intent.category.BROWSABLE" />

  <data android:scheme="https" />
  <data android:host="deeplink-demo-site.vercel.app" />
</intent-filter>
Replace the hostname deeplink-demo-site.vercel.app with your domain.
If you are implementing a custom scheme, add the following code to your AndroidManifest.xml file:
<data android:scheme="scheme" />
<data android:host="Domain.com" />
Your custom scheme implementation would open links like this: scheme://domain.com.
Application-side configurations are now complete. Now, hosting a digital asset link on the web server is essential. This digital asset establishes a secure and reliable connection between your web domain and your app. The asset link is in the form of a JSON file and should be stored in a .well-known folder in the root directory of your website. Your assetlinks.json should adhere to the following structure:
[
  {
    "relation": [
      "delegate_permission/common.handle_all_urls"
    ],
    "target": {
      "namespace": "android_app",
      "package_name": "com.example.deeplink_demo",
      "sha256_cert_fingerprints": [
        "71:D0:76:BE:32:DE:D8:53:33:9C:95:14:55:52:3B:2C:98:C9:4E:C6:5A:D9:56:9C:C9:CB:19:BE:9F:49:F8:05"
      ]
    }
  }
]
The package name can be found in android/app build.gradle. It typically follows the format: com.example.yourProjectName.
Execute the following command in your terminal within the android directory of your project to obtain the sha256_cert_fingerprints:
$ ./gradlew signingReportUpon running the command, you will receive your app’s signing report, including the SHA-256 hash function.
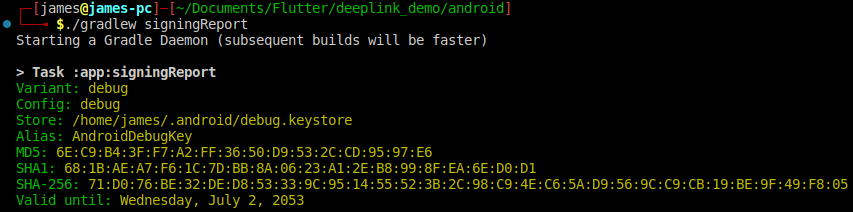
In the screenshot above, three hash functions are visible: MD5, SHA1, and SHA-256. Among these, the SHA-256 hash function is used due to its significantly higher bit length compared to the others. This higher bit length enhances its security and makes it a stronger hash function.
After successfully hosting the assetlinks.json on your web server, ensure its accessibility. Confirm that it can display the contents of the JSON file in your web browser, similar to the following:

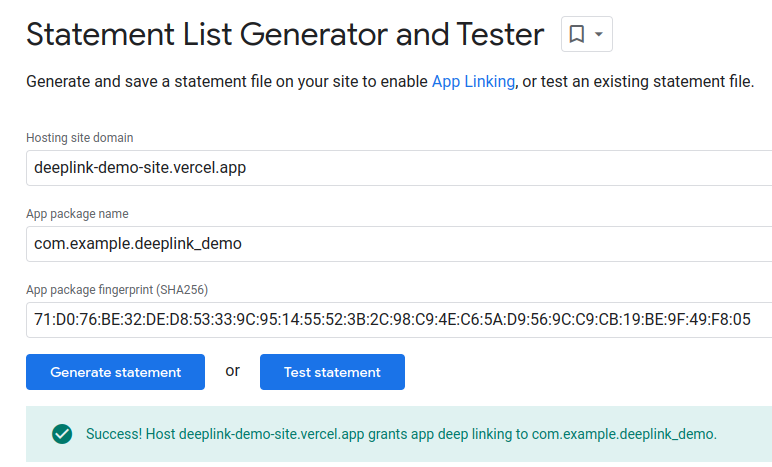
Verify proper configuration setup by visiting this page. Enter the needed details, and click the “Test statement” button. If you receive a successful response, as shown below, your Android setup is complete.
Setting up Deep Links on iOS
Declare the scheme in ios/Runner/Info.plist to enable custom URL capabilities for iOS. Add the following configuration to the Info.plist file.:
<key>CFBundleURLTypes</key>
<array>
  <dict>
    <key>CFBundleURLSchemes</key>
    <array>
      <string>https</string>
    </array>
    <key>CFBundleURLName</key>
    <string>deeplink-demo-site.vercel.app</string>
  </dict>
</array>
For server-side verification, host a file named apple-app-site-association with no extensions. Store this file in the .well-known directory on your web server, similar to the assetlinks.json file for Android.
The content of the apple-app-site-association file should look like this:
{
  "applinks": {
    "apps": [],
    "details": [
      {
        "appIDs": [
          "teamId.bundleId"
        ],
        "paths": [
          "*"
        ]
      }
    ]
  }
}
Replace teamId.bundleID with your app’s team ID and bundle ID. Find your team ID in your Apple Developer account, and the bundle ID can be located in the Xcode project. The bundle ID is similar to the app package name for Android.
Handling Deep Links
We will utilize the go_router package, available on pub.dev, to handle deep links in our Flutter project by following the steps below:
- Add the go_router package to your dependencies using the following terminal command:
flutter pub add go_router - Import the
GoRouterlibrary in your Dart file.import 'package:go_router/go_router.dart'; - Update your
main.dartfile to useMaterialApp.routerinstead ofMaterialApp.void main() { runApp(const MyApp()); } class MyApp extends StatelessWidget { const MyApp({super.key}); @override Widget build(BuildContext context) { return MaterialApp.router( routerConfig: goRouter, ); } } - Define your app’s routes using the
GoRouterinstance.
In the code snippet above, an instance of thefinal goRouter = GoRouter( routes: [ GoRoute( path: '/', builder: (context, state) => const Home(), ), GoRoute( path: '/blue', builder: (context, state) => const Blue(), ), GoRoute( path: '/red', builder: (context, state) => const Red(), ), ], );GoRouterclass is created, and three routes are defined using theGoRouteclass. Each route is associated with a specific path and a builder function that determines the screen to be displayed.
Now, your Flutter app is configured to handle deep links using the go_router package, and you have defined routes for the home, blue, and red screens. The app will navigate to the appropriate screen based on the specified deep link paths.
Testing Deep Links
To test the deep link on an Android device, utilize the Android Debugger Bridge (ADB) and the activity manager (am) tool to verify the intent filter URIs specified for deep linking. Follow these steps:
-
Open your emulator or connect your physical device.
-
Run the following command in your terminal:
adb shell am start -a android.intent.action.VIEW -c android.intent.category.BROWSABLE -d https://deeplink-demo-site.vercel.app/blueEnsure you are in the directory where your Android SDK is stored, specifically the
android/sdk/platform-toolsdirectory, or include this directory in your system path before executing the command.
An alternative method for testing on Android is to directly open the link on the device from an email, messaging app, or any application that supports clicking on a link, as demonstrated below:
For testing on iOS, you can either tap the link directly on the device or use the following command:
xcrun simctl openurl booted https://deeplink-demo-site.vercel.app/redPlease be aware that our deep link did not include a path parameter. To support deep links with path parameters, it is possible to include these parameters directly in the route paths. Let’s adjust the example to demonstrate this concept:
final goRouter = GoRouter(
      routes: [
        GoRoute(
          path: '/',
          builder: (context, state) => const Home(),
        ),
        GoRoute(
          path: '/blue/:id',
          builder: (context, state) {
            final id = state.uri.queryParameters['id'];
            return Blue(id: id!);
          },
        ),
        GoRoute(
          path: '/red',
          builder: (context, state) => const Red(),
        ),
      ],
    );
In the revised code snippet, the path for the /blue route includes a parameter :id, which can be accessed using state.pathParameters['id'], and the builder function of the /blue route extracts the id and uses it to construct the Blue widget.
The final step involves updating the destination page (in this case, the blue screen) to access and use the query parameters. Here is what the Blue widget looks like:
import 'package:flutter/material.dart';

class Blue extends StatelessWidget {
  const Blue({super.key, required this.id});

  final String id;

  @override
  Widget build(BuildContext context) {
    return Scaffold(
      appBar: AppBar(
        title: const Text('Blue Screen'),
        centerTitle: true,
      ),
      body: Center(
        child: Text(
          'ID: $id',
          style: const TextStyle(
            fontSize: 28,
          ),
        ),
      ),
      backgroundColor: Colors.blue,
    );
  }
}
Upon testing the deep link with /blue/12345 included in the link, the Flutter app should launch and navigate to the blue screen. Subsequently, the app will use the provided ID (12345) within the page, as seen below:
Conclusion
Deep linking is crucial for improving user experience and engagement in mobile applications. This article demonstrated how implementing deep linking in Flutter gives developers a powerful way to connect users with targeted content. By integrating deep links into your Flutter project and using packages like go_router, you can build a strong and user-focused app experience. This not only meets but also surpasses user expectations.
Gain control over your UX
See how users are using your site as if you were sitting next to them, learn and iterate faster with OpenReplay — the open-source session replay tool for developers. Self-host it in minutes, and have complete control over your customer data.
Star on GitHub12k