Distribute Mobile Apps Artifacts via Telegram using Codemagic
Learn how to compile and distribute a mobile app via Telegram

Creating mobile apps has never been more accessible in this time and age. You could use several tools to build your apps, such as Flutter, React Native, Native app languages like Java, Swift, and even Javascript’s very own Capacitor JS. One could choose to build their platform with any of these tools. Since one of the primary purposes of building such apps is for distribution, these apps would have to be distributed to end-users or testers at some point.
Although platforms like the Play Store or Apple Store exist for this specific reason, there are still some cases where you do not want to start publishing your apps to the store. Cases such as during internal testing or where the app needs to be private because it contains companies’ secret information.
This tutorial demonstrates how to automate the process of compiling and distributing an application to a specified Telegram channel using Codemagic. We’ll be using Mac OS and building for Android. You can download the sample app project from the github repo. You will also need Codemagic, GitHub, and Telegram accounts.
An Overview of Distributing an Application to Telegram Group
Social platforms like Telegram and Slack have existed for a while, and online communities and companies have chosen to use them as their communication medium. Hence, wouldn’t it be easier to share the app on these platforms since they facilitate this communication? The developers could efficiently distribute the product (App) on a communication platform’s channel housing the end users.
Achieving this distribution is difficult; first, the developers must compile the code to an installable format and manually upload the app to the communication platform. Next, we’ll learn about “Codemagic,” which we will use to automate the distributing and compiling process of the sample app used in this tutorial.
What is Codemagic?
According to this website, Codemagic is a fully hosted and managed CI/CD platform for mobile apps that provides tools for automating the testing, building, and releasing of mobile apps. In addition, Codemagic provides a server for executing the build and deploy processes and a command sheet for adding test, build and release instructions.
Next, we’ll learn about the Telegram bot used in this tutorial.
Introducing The Telegram Bot
Telegram is a social media app that provides tools such as Bots, APIs, etc. A Telegram Bot is a third-party application that can run inside a Telegram, enabling private interaction between users or groups. As the name bot (the short form for robot) implies, It serves as an account we can programmatically use to communicate with our desired group. Bots are robust and have several functions, such as publishing daily updates to clients. We need to create a Telegram bot to move our artifact to Telegram.
Demo: Distributing the app from Codemagic to Telegram
Before we start, ensure that you clone the sample code from the Github repo on a folder on your system. Afterward, create a new repository in your Github account and do the following:
- Open your terminal and change the directory into the folder that contains the sample code with
cd your-desired-folder-name - Create a fresh start for your project by removing the ‘.git’ folder in your cloned clone with
sudo rm -r ./.git - Then, run the following commands to push your code to the new repository:
git init
git add .
git commit -m "first commit"
git remote add origin https://github.com/<your-repo>.git
git branch -M main
git push -u origin main
Next, we’ll learn how to add the project to Codemagic.
Adding Project to Codemagic
Here, we’ll add the project to Codemagic with the steps outlined below:
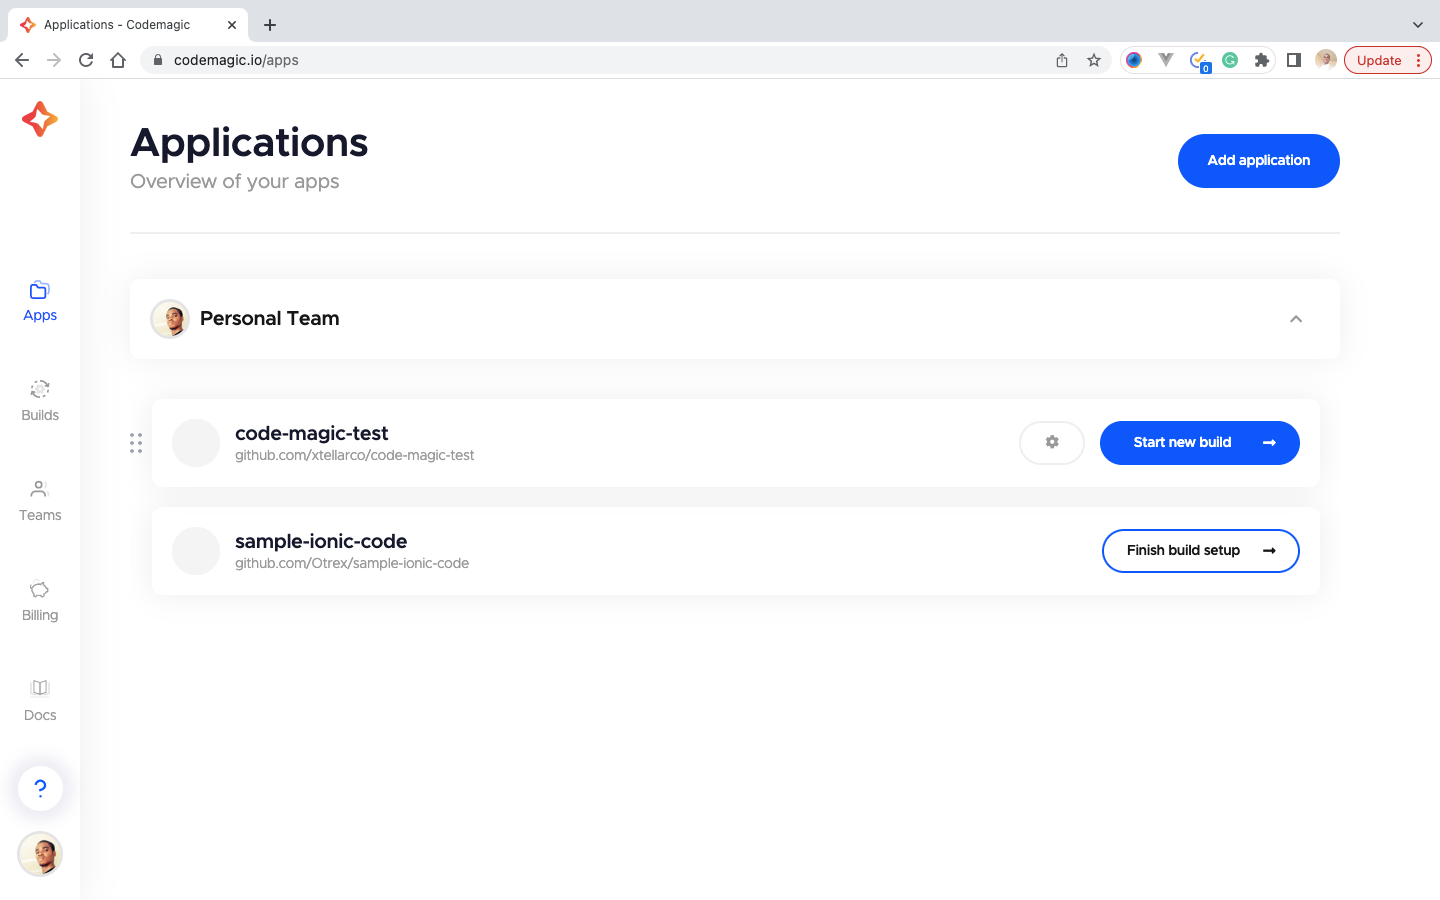
- To begin, sign up/login to get access to the functionalities of Codemagic.
- Click on the Add Application button at the screen’s top right corner.
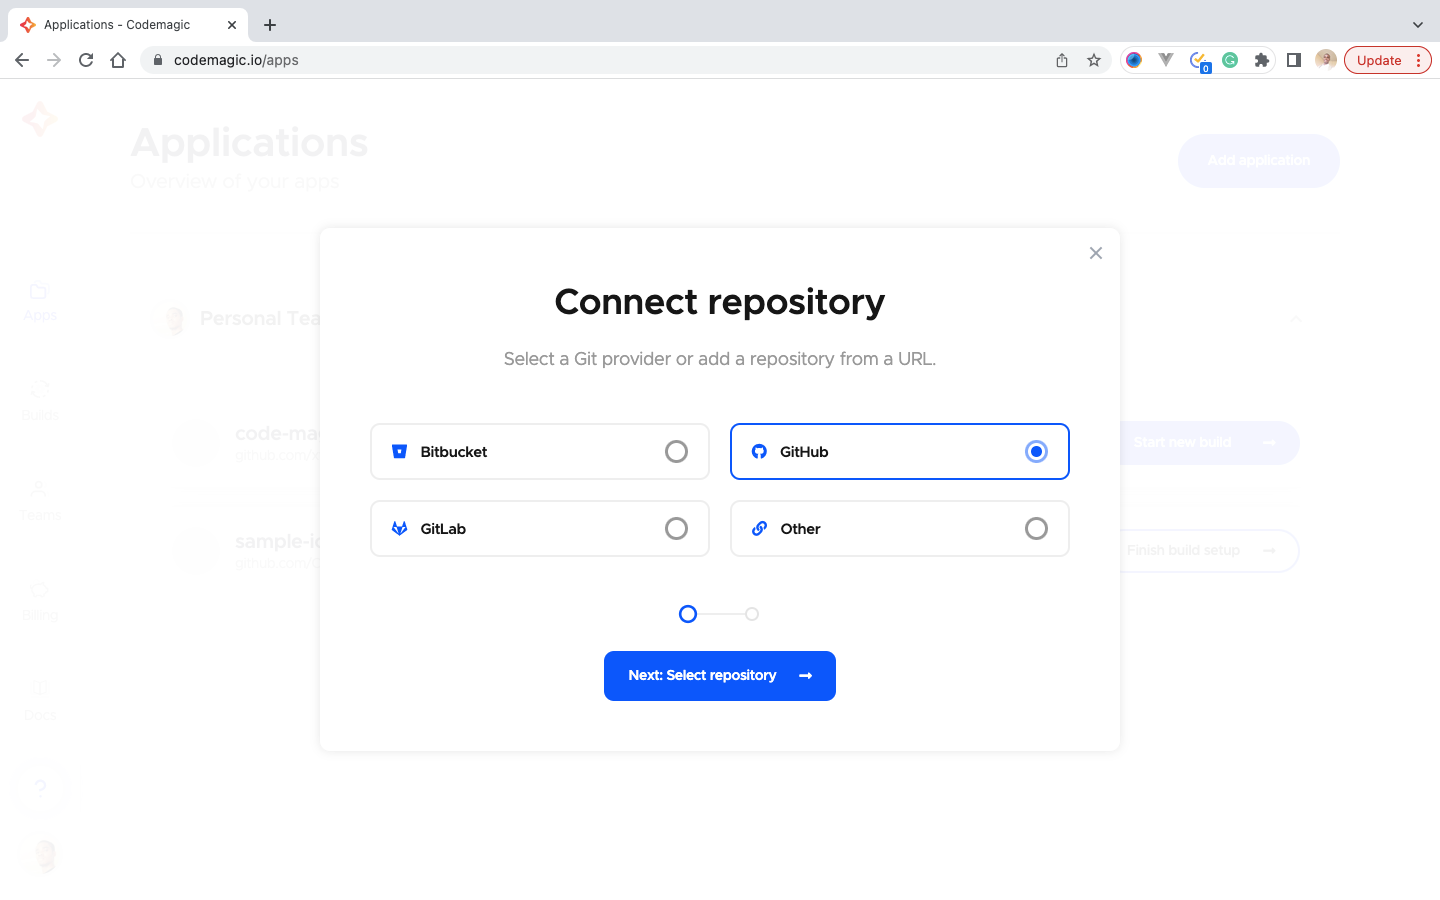
- Select our Github, then click next.
- On the Set up application, Check the Github integration settings, then allow Codemagic access to the git repository.
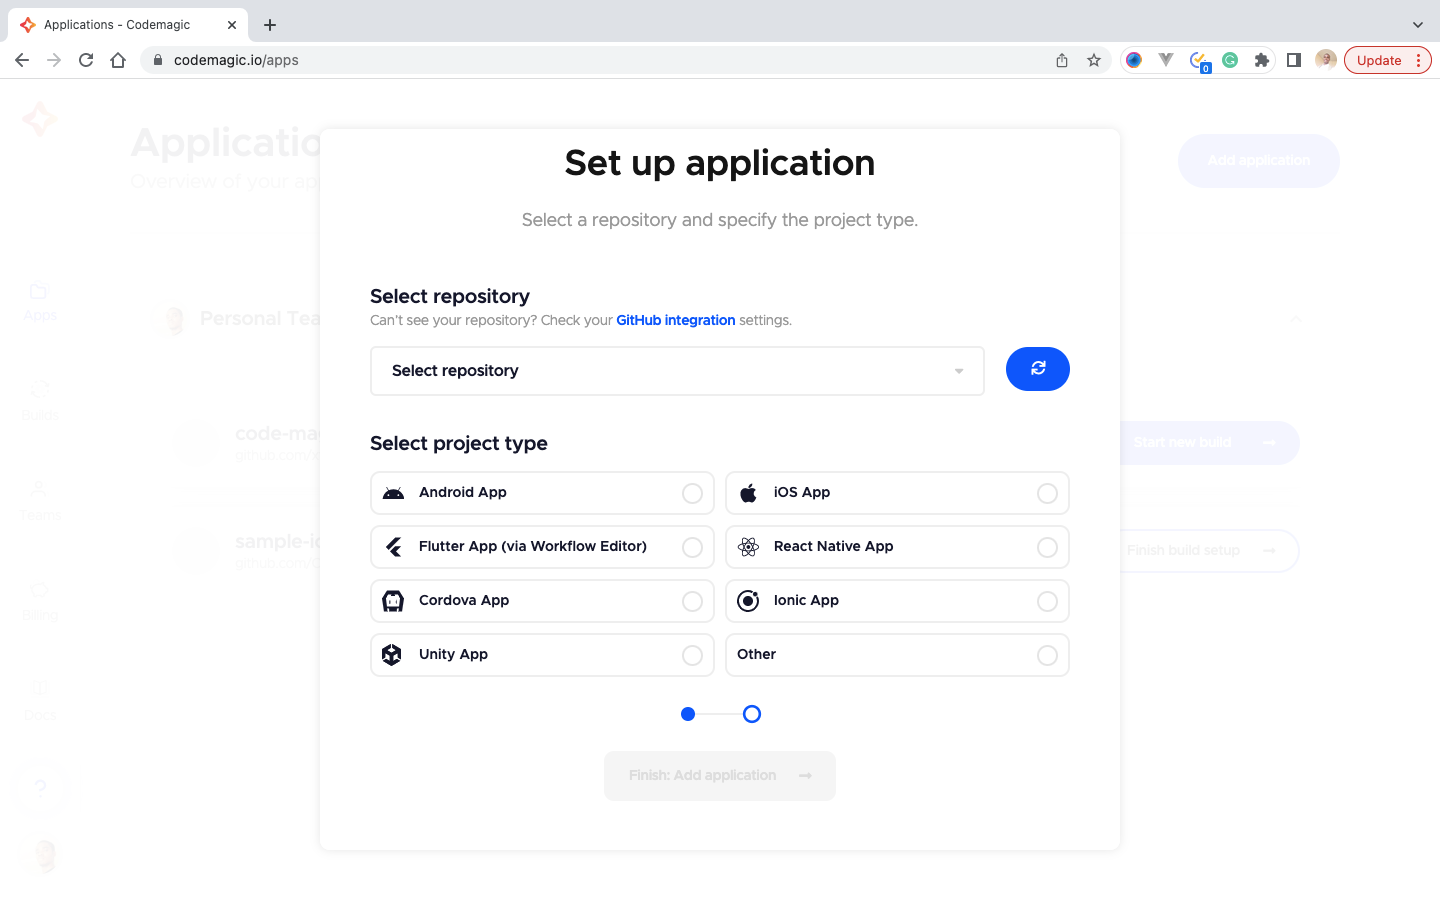
- Select the repository of the sample code project

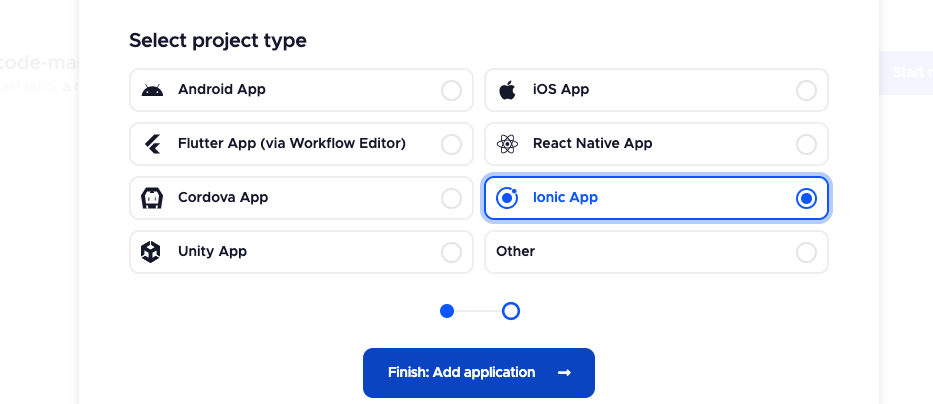
- Select the project type
Afterward, move forward by adding the Codemagic's YAML file to the project.
Adding Codemagic.yaml File to Code-base
In this section, we will create a set of instructions for Codemagic to perform the building and publishing of our artifact successfully.
For defining the set of instructions, we will create a codemagic.yaml file in the root directory with the following script:
workflows:
    ionic-capacitor-android-app:
        name: Ionic App
        triggering:
        events:
            - push
        branch_patterns:
            - pattern: '*'
            include: true
            source: true
        environment:
            node: latest
            groups:
            - dev
        scripts:
            - npm install
            - npm run build
            - npx cap sync android
            - |
                cd android
                ./gradlew assembleDebug

        artifacts:
            - android/app/build/outputs/**/*.apk
        publishing:
        scripts:
            - chmod +x ./telegram.sh
            - bash ./telegram.sh $CHATID $APP_TOKEN ./android/app/build/outputs/apk/**/*
The above yaml script is the instruction that Codemagic uses to execute our operations. The commands defined in the script are described as follows:
workflowdescribes the entire flow, from how the process is being triggered to start to how the output publishing will be. You can create multiple workflows for different platforms your artifact will be published to.ionic-capacitor-android-app: This is a label for the workflow. It can be any name you choose and must be created without spaces, and it also serves as the workflow ID.name: This is another type of label for the workflow, and it can be used to identify a workflow.triggering: This section defines how the workflow can be triggered to start running. It takes an event parameter which is a list in which its possible values includepush(that implies the process would be triggered on pushing to the repository connected to Codemagic),pull_request(which, as the name implies, triggers when there is a pull request on the GitHub branch)branch_patterns: The branch pattern indicates the branches to monitor for the event to be executed on.environment: The environment variables (like credentials and API keys) can be specified in the environment section. Pre-installed frameworks and tools can also be defined at this point. In our case, we would be using the node environment. We set it to the latest and specify the group todevwhich can be used to indicate the version of the environment variable to be used.script: As the name implies, it houses the CLI commands to be executed. Since we are working with Javascript, we would need to run the command specified below.- we install all the npm packages
- we run the npm build command to prepare our app
- since it is a capacitor app, we synchronize the JS files to generate the Android app files
./gradlew assembleDebugbuilds and generates the artifact to be sent.
artifact: This specifies the directory in which the built artifact is stored.publishing: At this point, the artifact is ready to be published to telegram. In the publishing stage, we can specify the script section and run other CLI scripts allowed by the system provisioned by Codemagic. We will take advantage of this feature and use it to run the upload script to the telegram channel.
Next, we will set up the Telegram Bot.
Open Source Session Replay
OpenReplay is an open-source, session replay suite that lets you see what users do on your web app, helping you troubleshoot issues faster. OpenReplay is self-hosted for full control over your data.

Start enjoying your debugging experience - start using OpenReplay for free.
Creating And Setting Up Our Telegram Bot
To create our Telegram bot, we need to obtain an official API token from Telegram with Botfather, which is the father of all bots on Telegram, used to create bots and perform several other actions. Ensure that you have the following:
-
Access to Telegram: This implies you must have Telegram installed on one of your devices. If you don’t have access to a telegram, you can visit Telegram for the installation and account creation process. For this tutorial, we will use our Telegram Desktop.
-
A group on Telegram: This channel will act like our company/testers channel. We can add several users of our choice to the group. to create the group, Firstly, we ensure we are on the chat section, as indicated by
1, then we click on the edit icon, indicated in the image below as2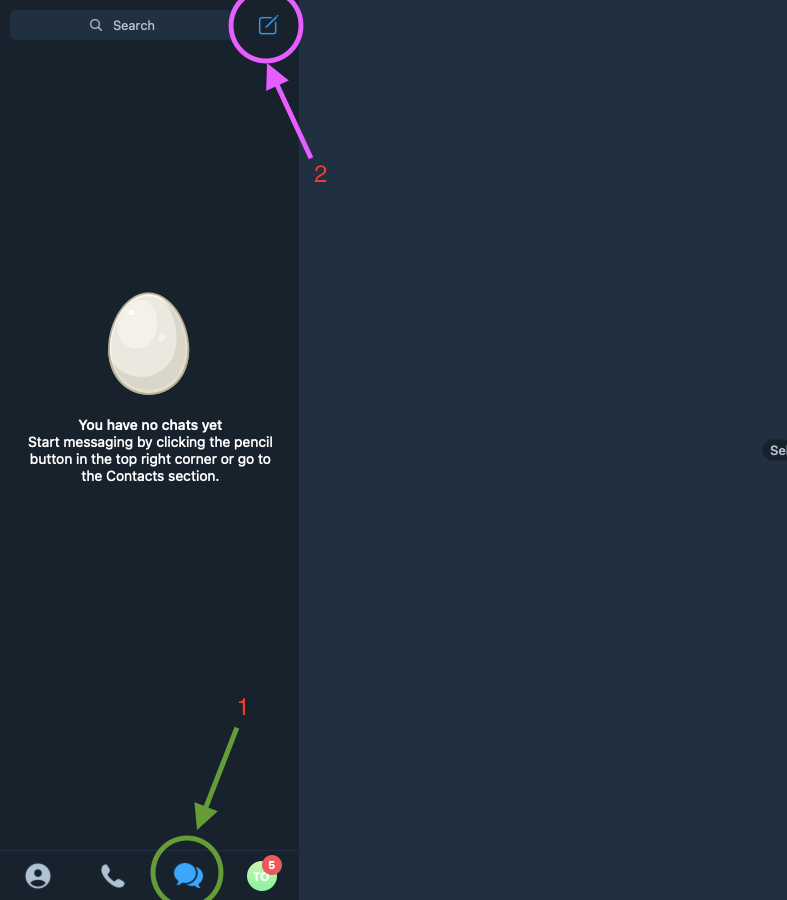
-
But firstly, we need to add a contact to our chat since having at least one member is a major requirement for creating a group. This can be achieved by clicking on the button indicated by the image below.

-
We then enter the contact information of the user
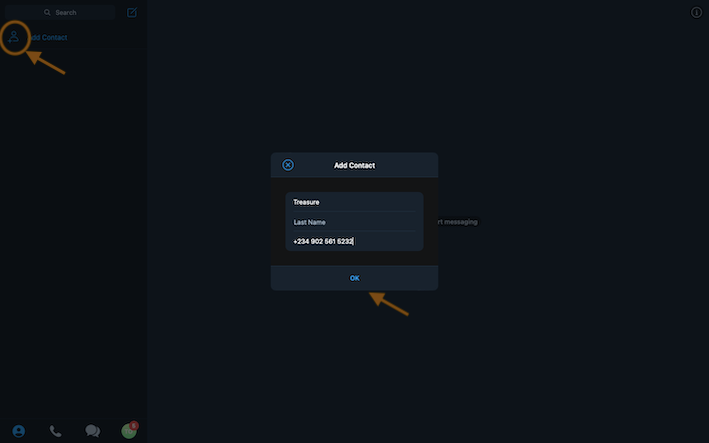 -Then, we click on OK to continue
-
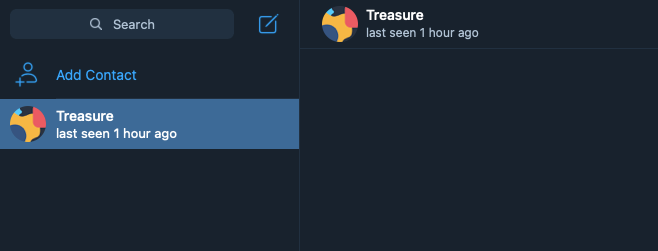
We then create a new group by clicking on the edit icon, selecting add new group, add the contact we just added to our telegram to the group
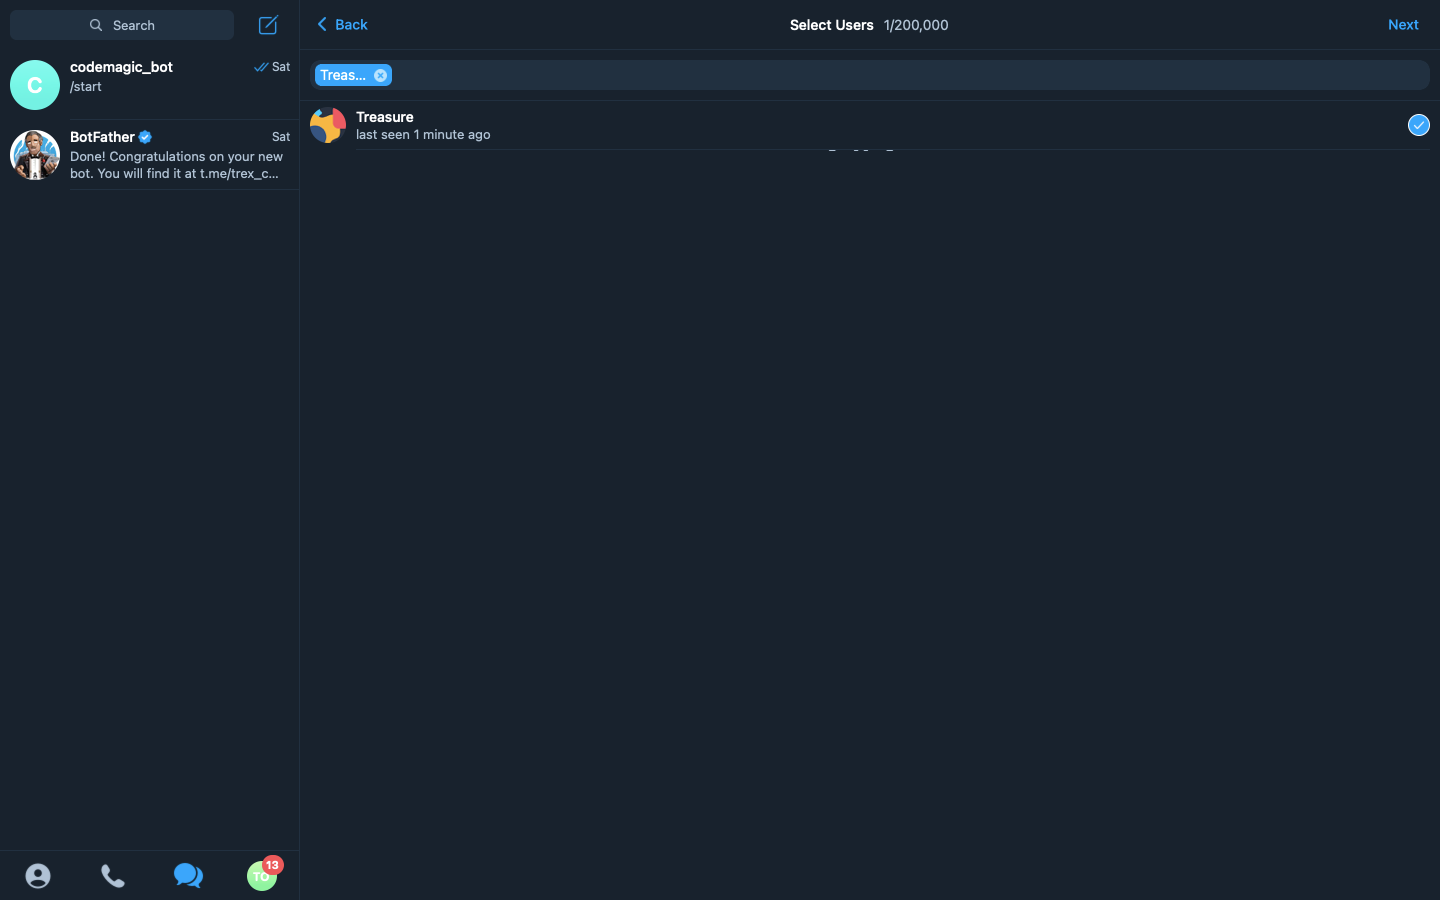 -After adding the contact, click on next, type in the name of our group
 app-release, then click on create. At this point, the group is successfully created.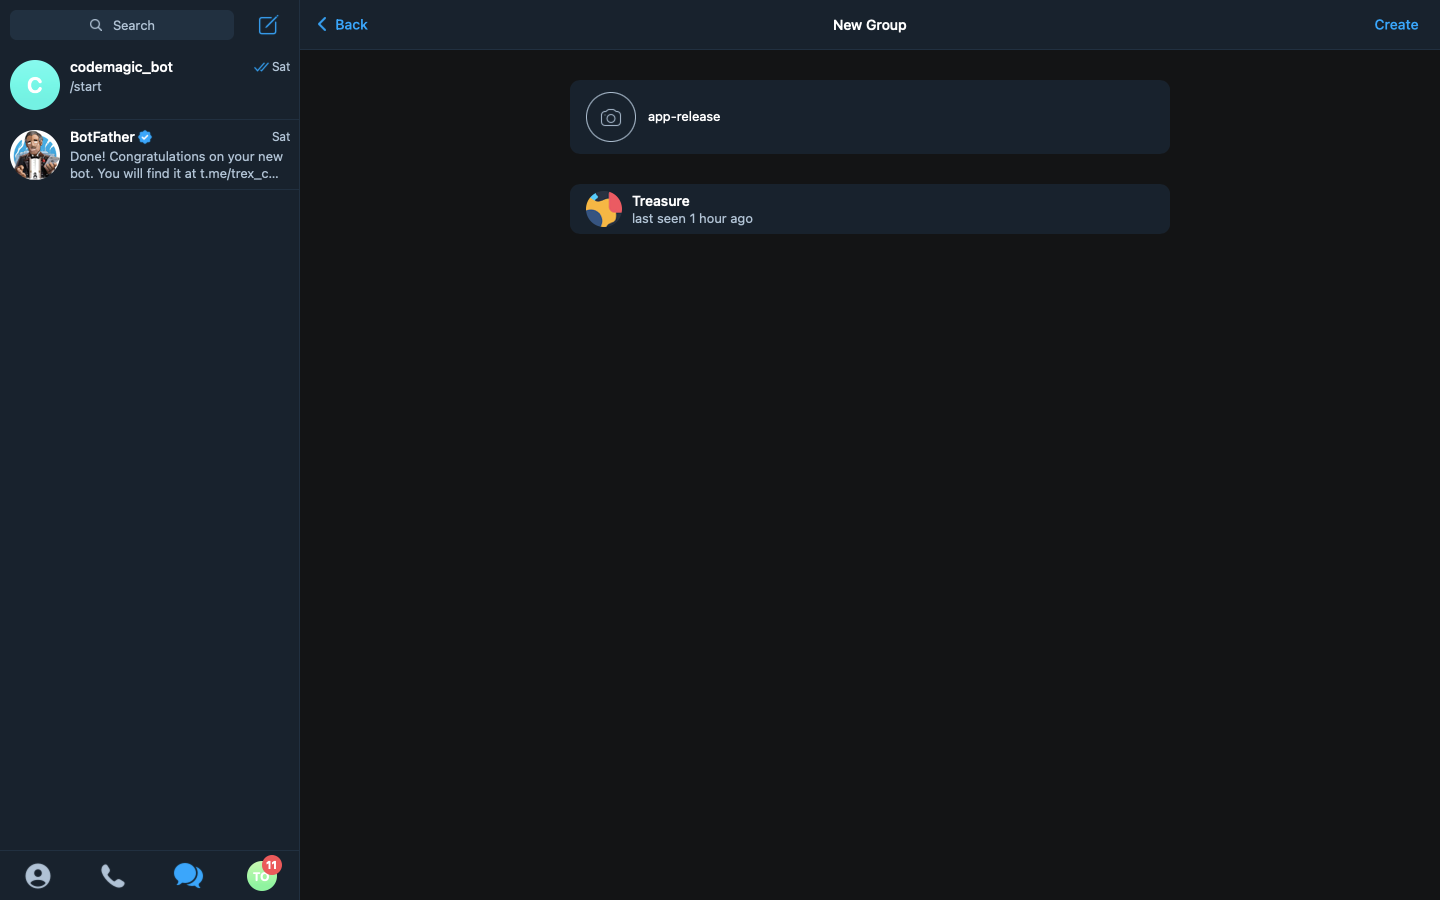
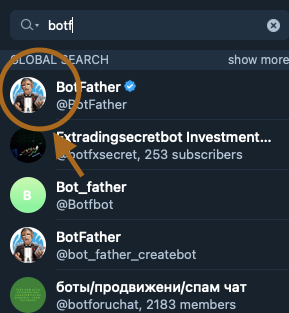
Now that the group is ready to be used, we move on to creating our bot. To create the bot, we need to go to our search tab, lookup Botfather, and click on the first result.
Then we click on the start followed by the command */newbot* and follow the instructions given by Botfather:
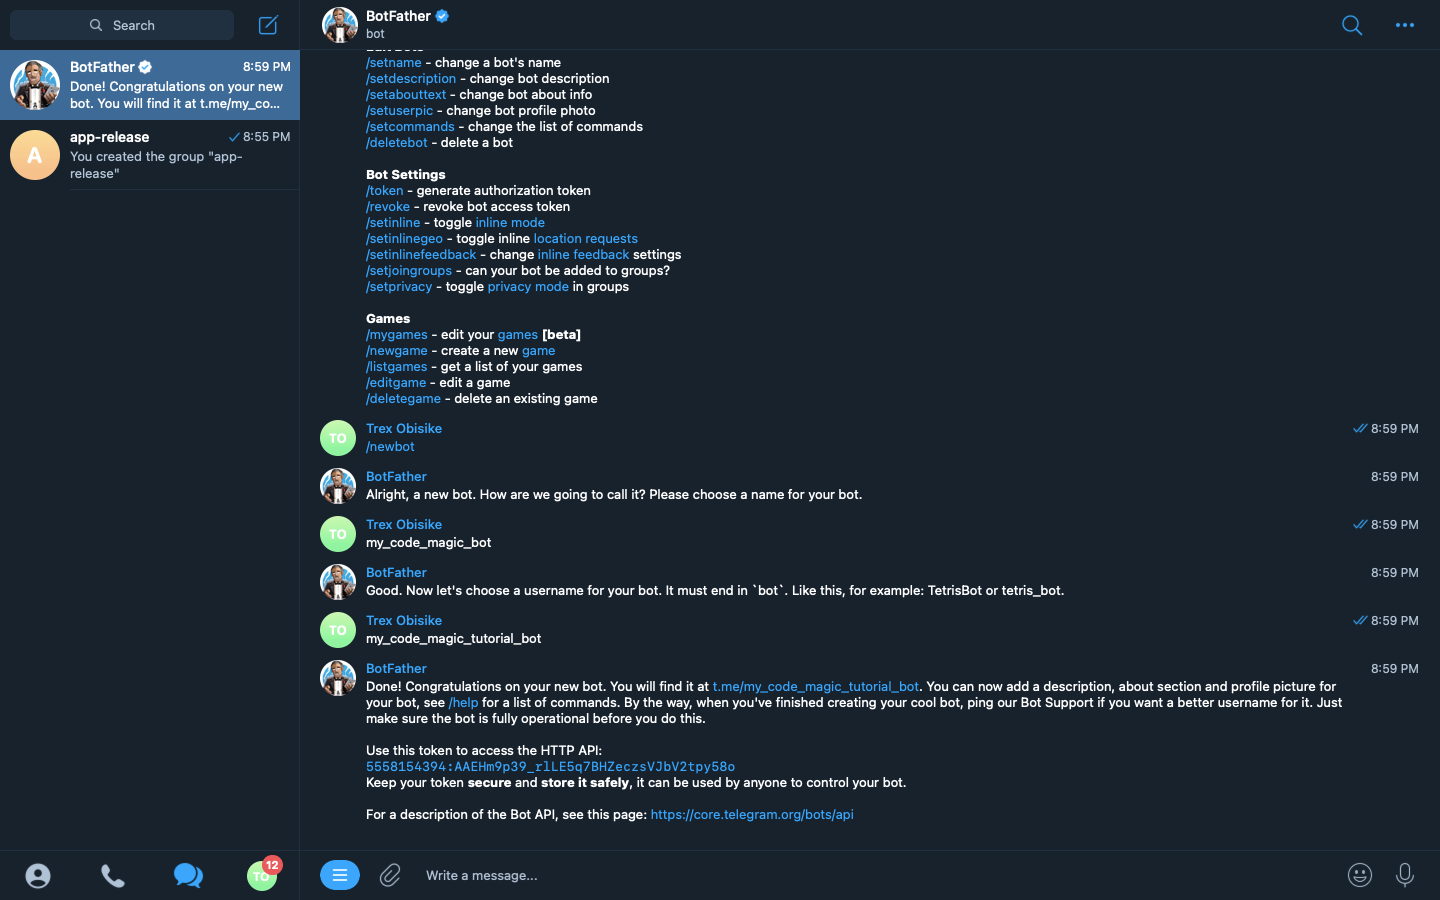
We click on the link t.me/my_code_magic_tutorial_b provided by Botfather. This opens the bot in a chat box and provides us with a start button to which we would click to start the bot.
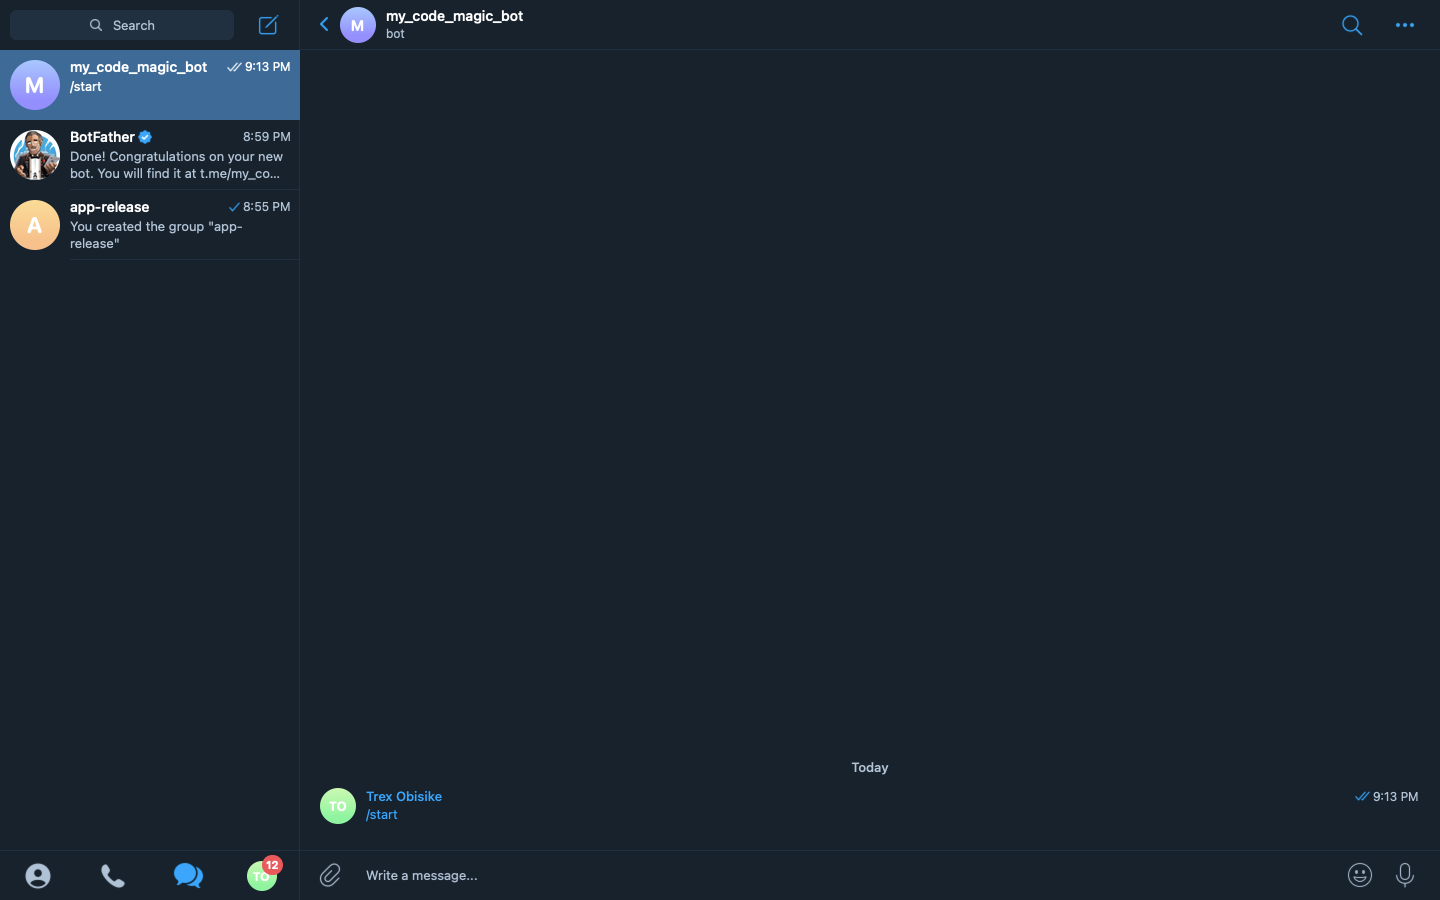
Here is the bot started. At this point, the Telegram Bot is successfully created, and we can now use it to perform our desired action.
TELEGRAM_BOT_TOKEN=5558154394:AAEHm9p39_rlLE5q7BHZeczsVJbV2tpy58oAdding the Telegram bot to the group
This step is essential because it means getting another vital token called the chatId. The chatId is necessary for the bot to identify the group or chat instance with which it would be communicating. To proceed, We do the following:
-
Select our bot
my_code_magic_botthe open up the chat.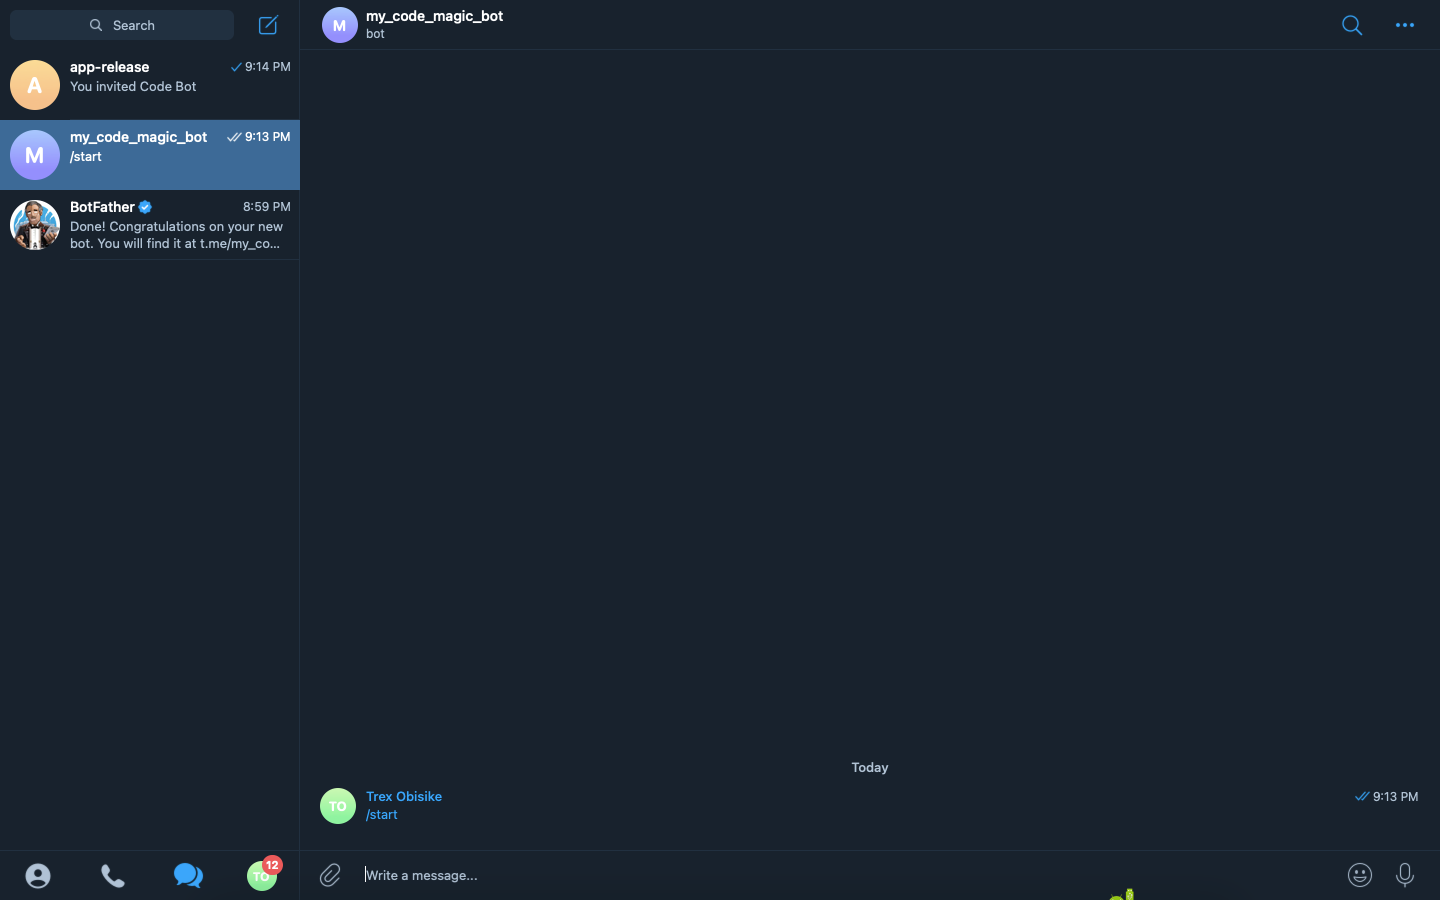
-
Then click on the
my_code_magic_botlabel at the top of the chat box or click on the...label, then select the info to open the bot’s chat info.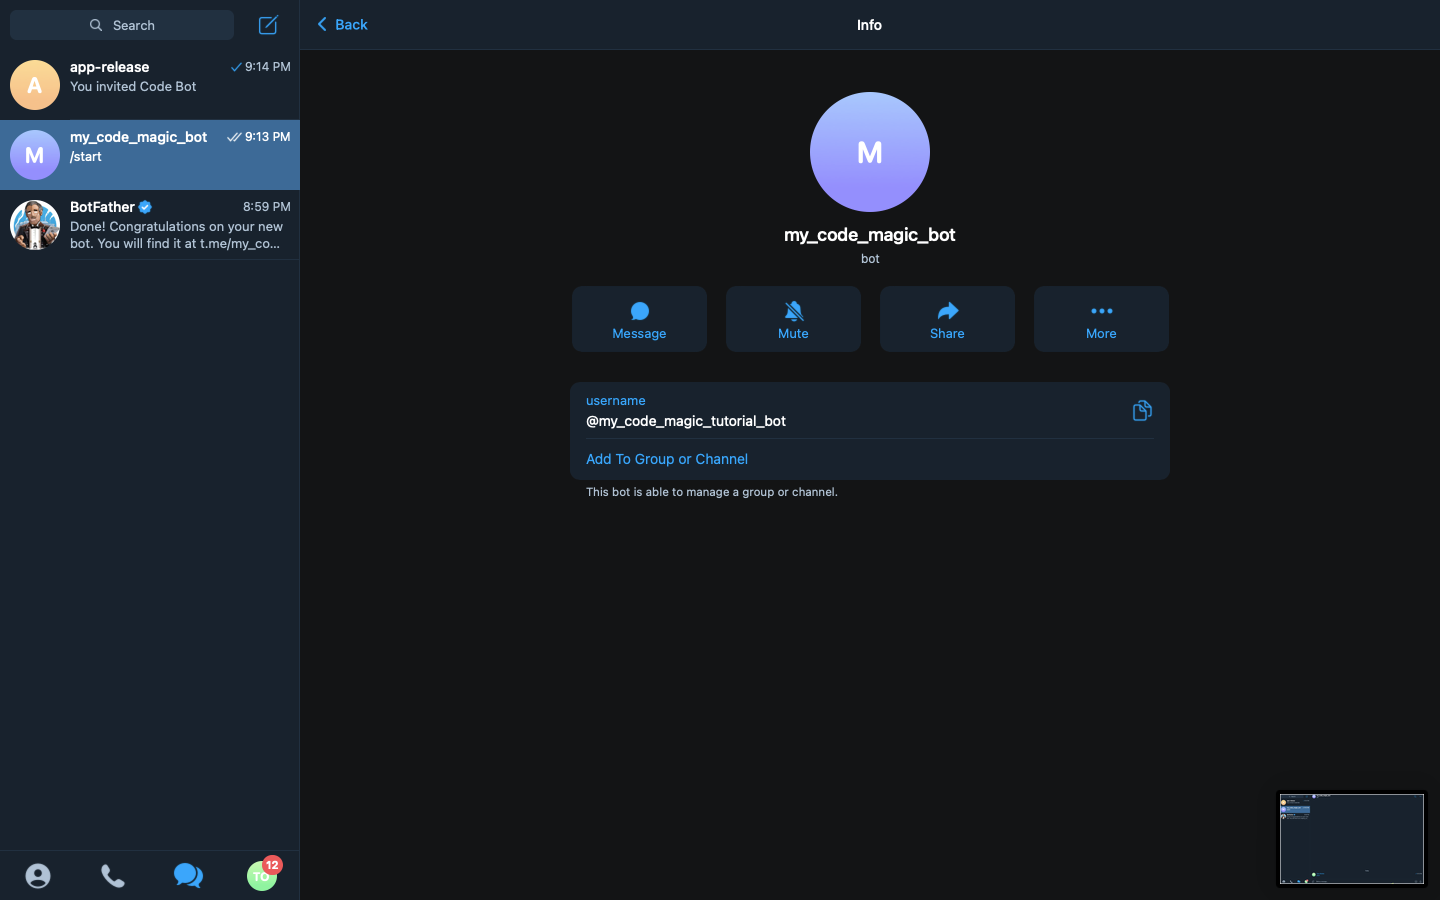
-
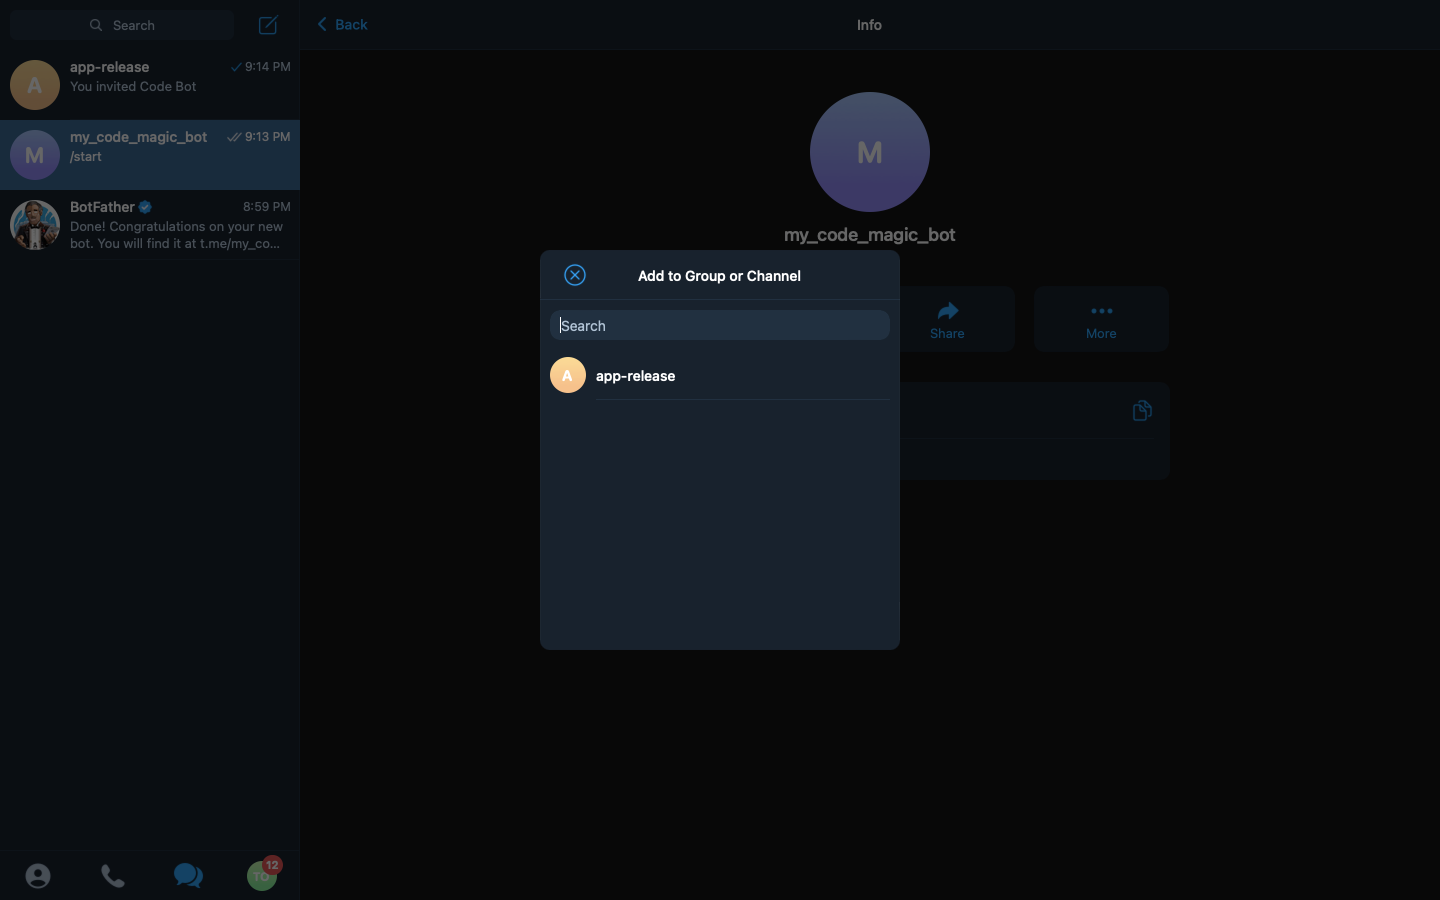
We then click on the Add to Group or Channel button and select our group, app-release from the options available.
-
After selecting the app-release option, we are presented with the permissions to set for our bot. We set the Admin Right option to false/off, as it is unnecessary for what we want to do with our bot.
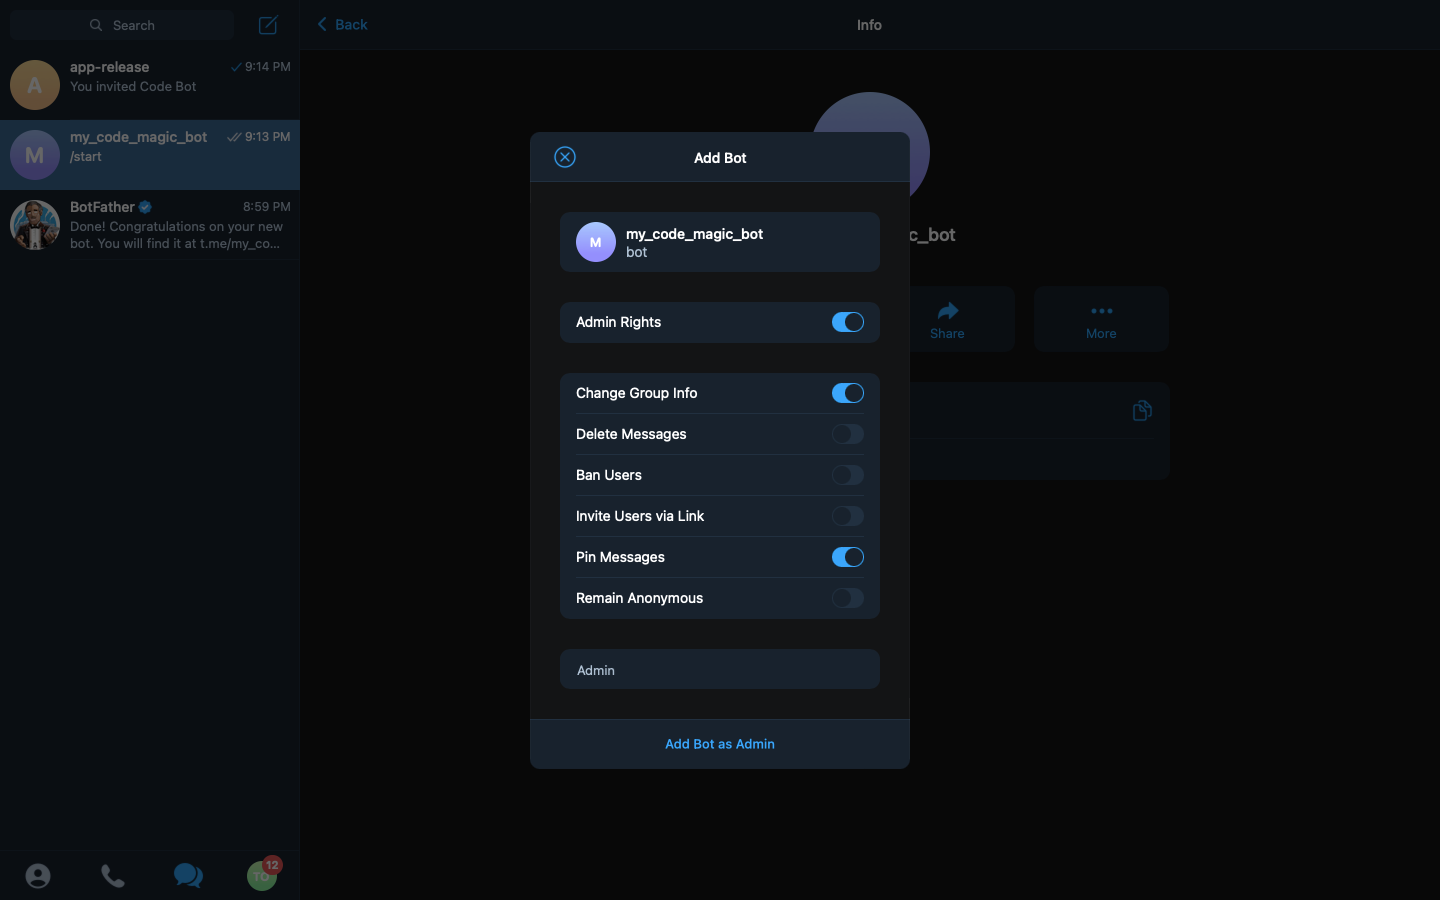
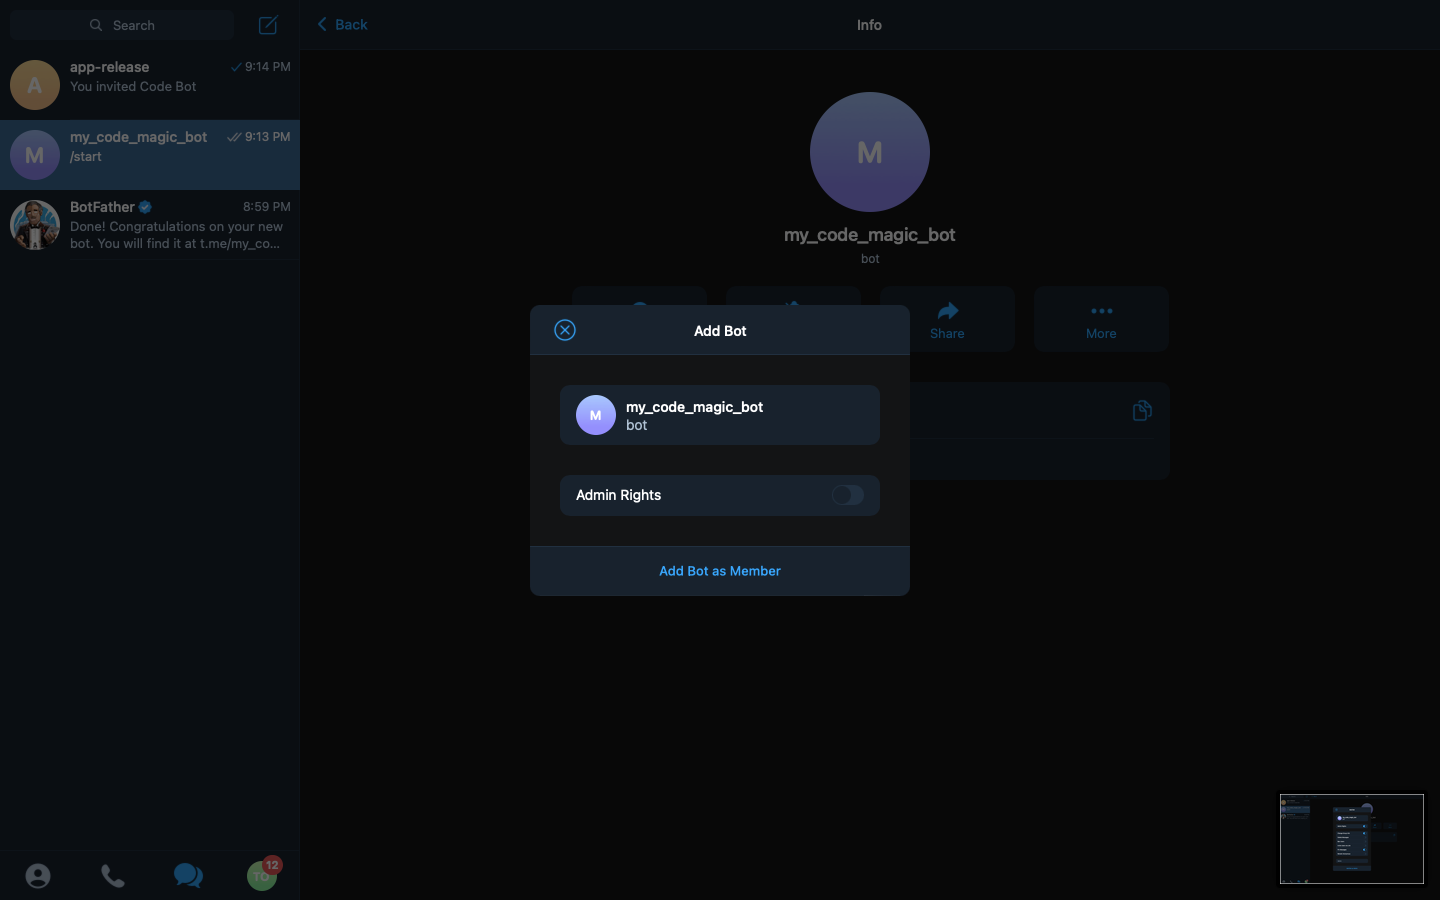
Then we click on Add Bot as Member, and accept the confirmation message. So at this point, our bot has been added to the group and is ready to send messages to this group.
Getting ChatID for Bot
To get the chatId, We would use Telegram’s bot API.
https://api.telegram.org/bot<TELEGRAM_BOT_TOKEN>/getUpdatesThis endpoint allows us to query the bot and get some information about the bot. It is necessary not to let the TELEGRAM_BOT_TOKEN be exposed, as this can allow anyone to access your bot. So, our endpoint after adding our token would look like this.
https://api.telegram.org/bot5558154394:AAEHm9p39_rlLE5q7BHZeczsVJbV2tpy58o/getUpdatesWe can copy and paste it into our browser URL search bar.
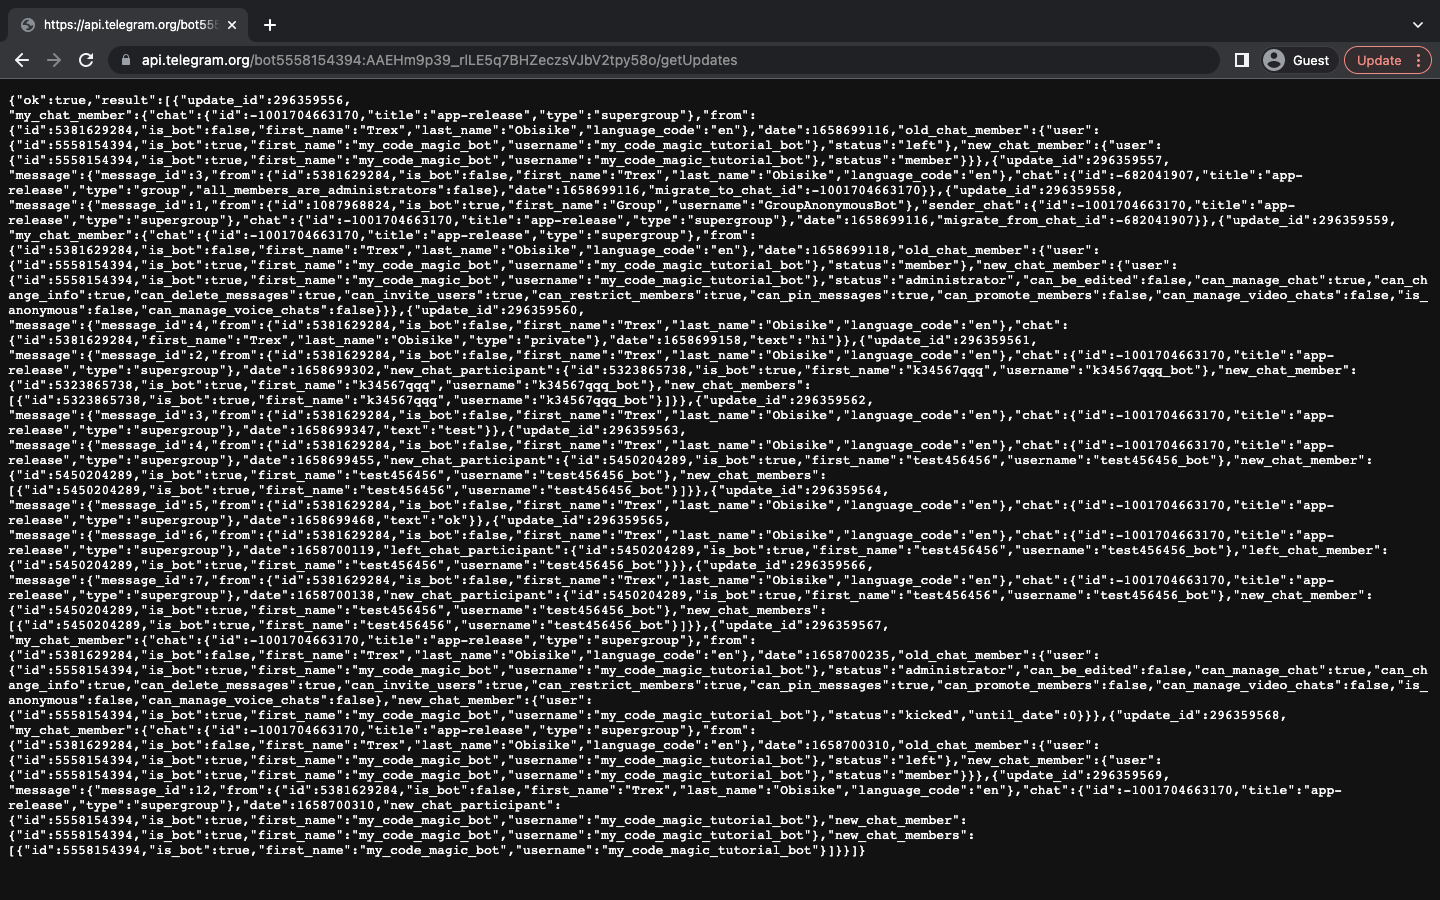
If we get something like this,
{
    "ok":true,
    "result":[]
}
Just remove the bot from the group and add the bot back again, following the previously described steps. To remove the bot, go to the info page of the group, then right click on the member you want to remove to bring out more options. Then click delete.
After we have the data we need, it is time to extract our chatId from the data. The chat id for the groups starts with a - symbol, and we can find our id in the object:
{
    "chat": {
    "id": <chat-id>,
    "title": <name-of-our-group>,
    ...
    }
    ...
}
So, from our data, our CHAT_ID = -1001704663170. Since we have all the necessary information, we can now add our environmental variables.
Adding Our Environmental Variables To Codemagic
To add our environmental variables, first we need to push the updates on our code to the repository we created. Our code should contain the codemagic.yaml file as this is what Codemagic would use to detect a build, and Codemagic automatically detects the file. After pushing, we visit the Codemagic platform to finish our build setup.
Completing our build setup
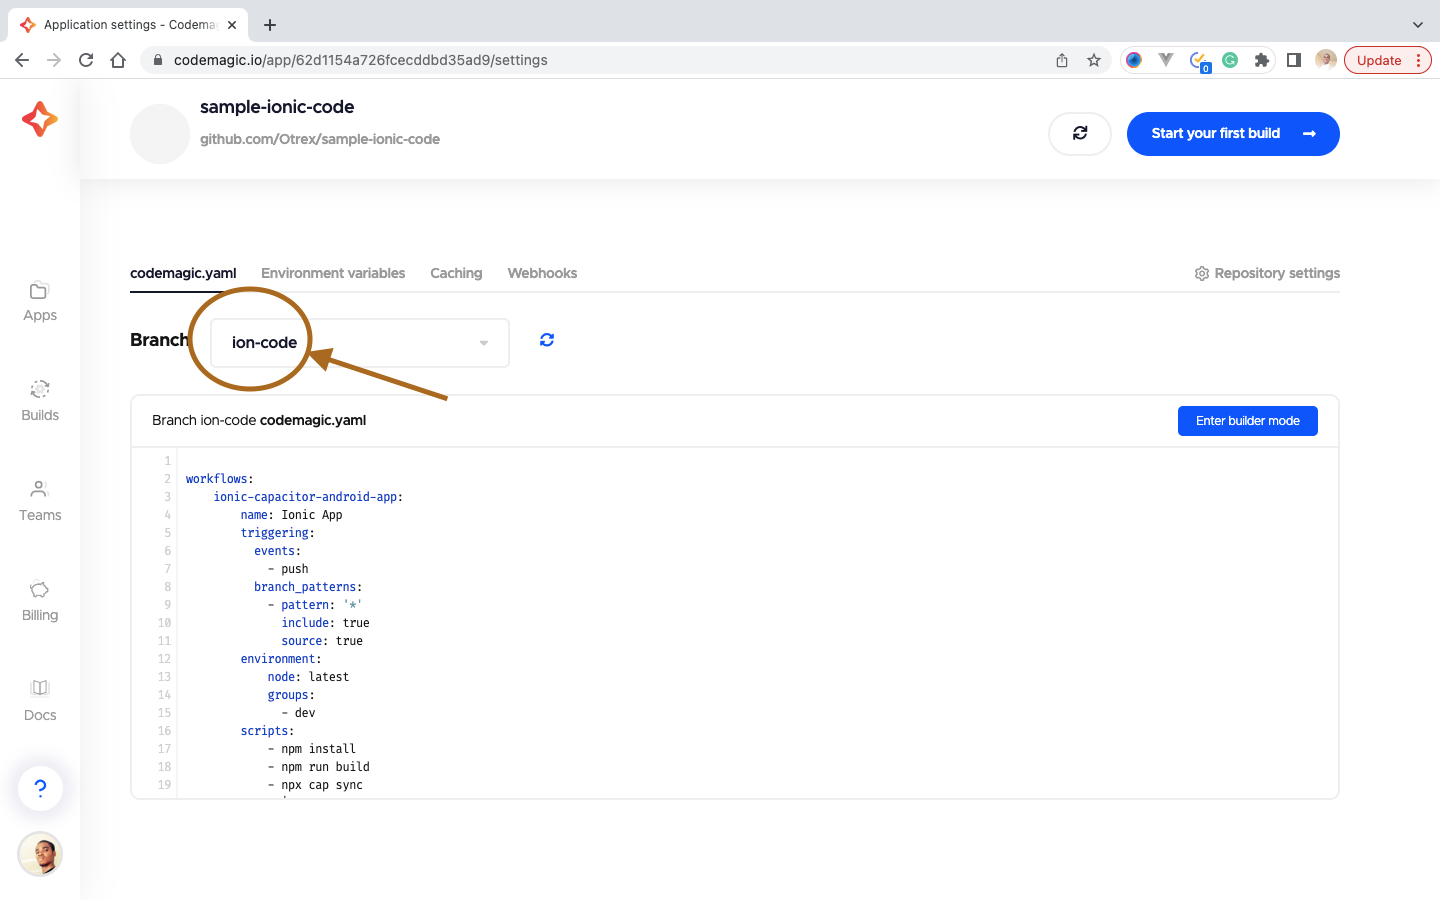
Firstly, we click on finish build setup,

Then we select the branch in which our project is on. For this tutorial, our branch is ion-code.
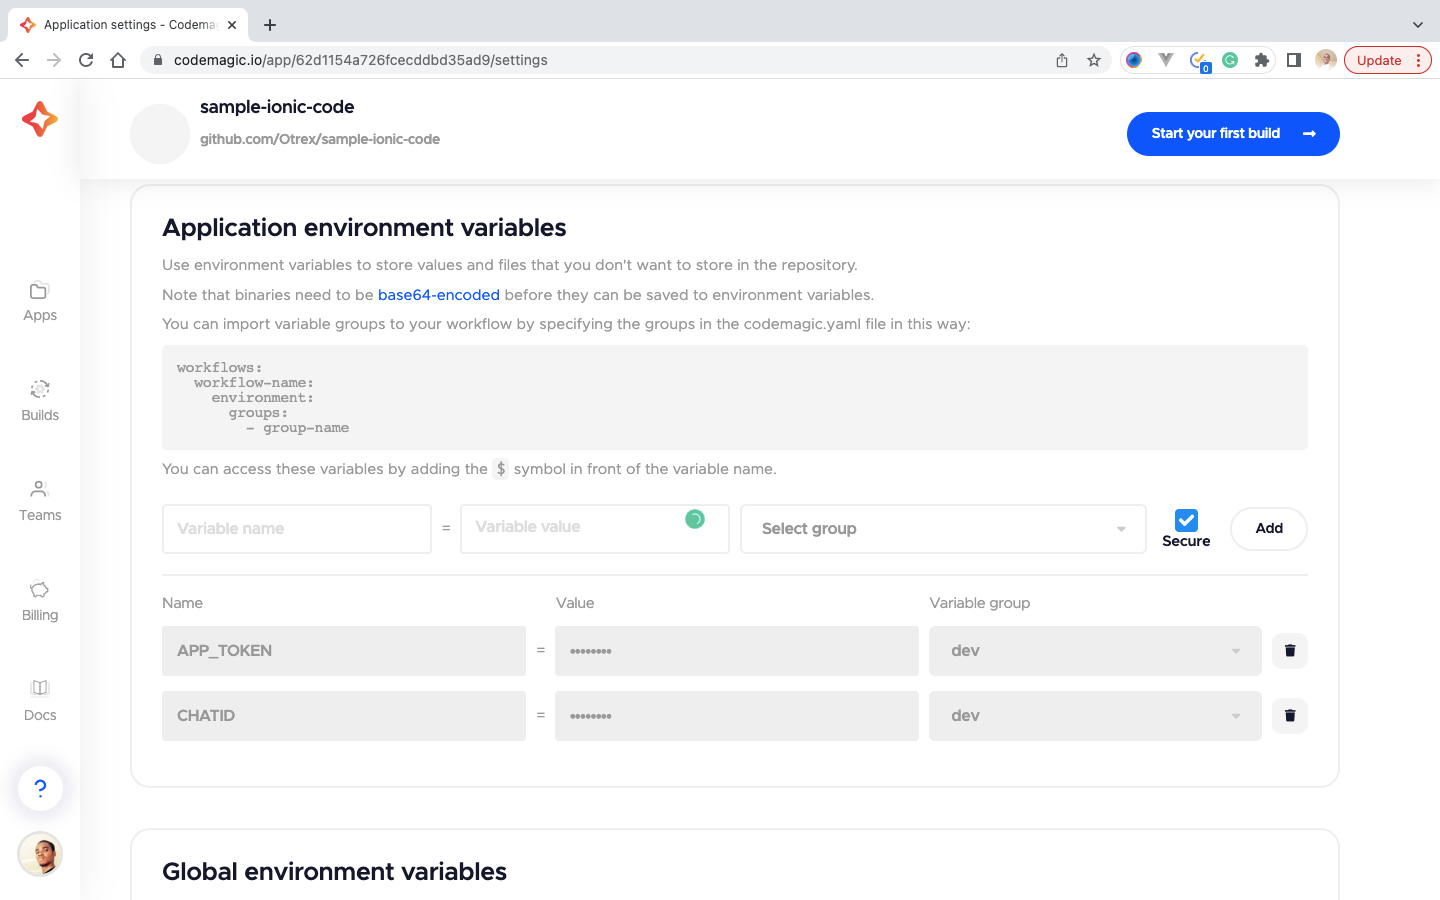
Then we move to the next tab, Environment variables, and add our credentials as indicated below. After each entry, click on the Add button to save the entry.
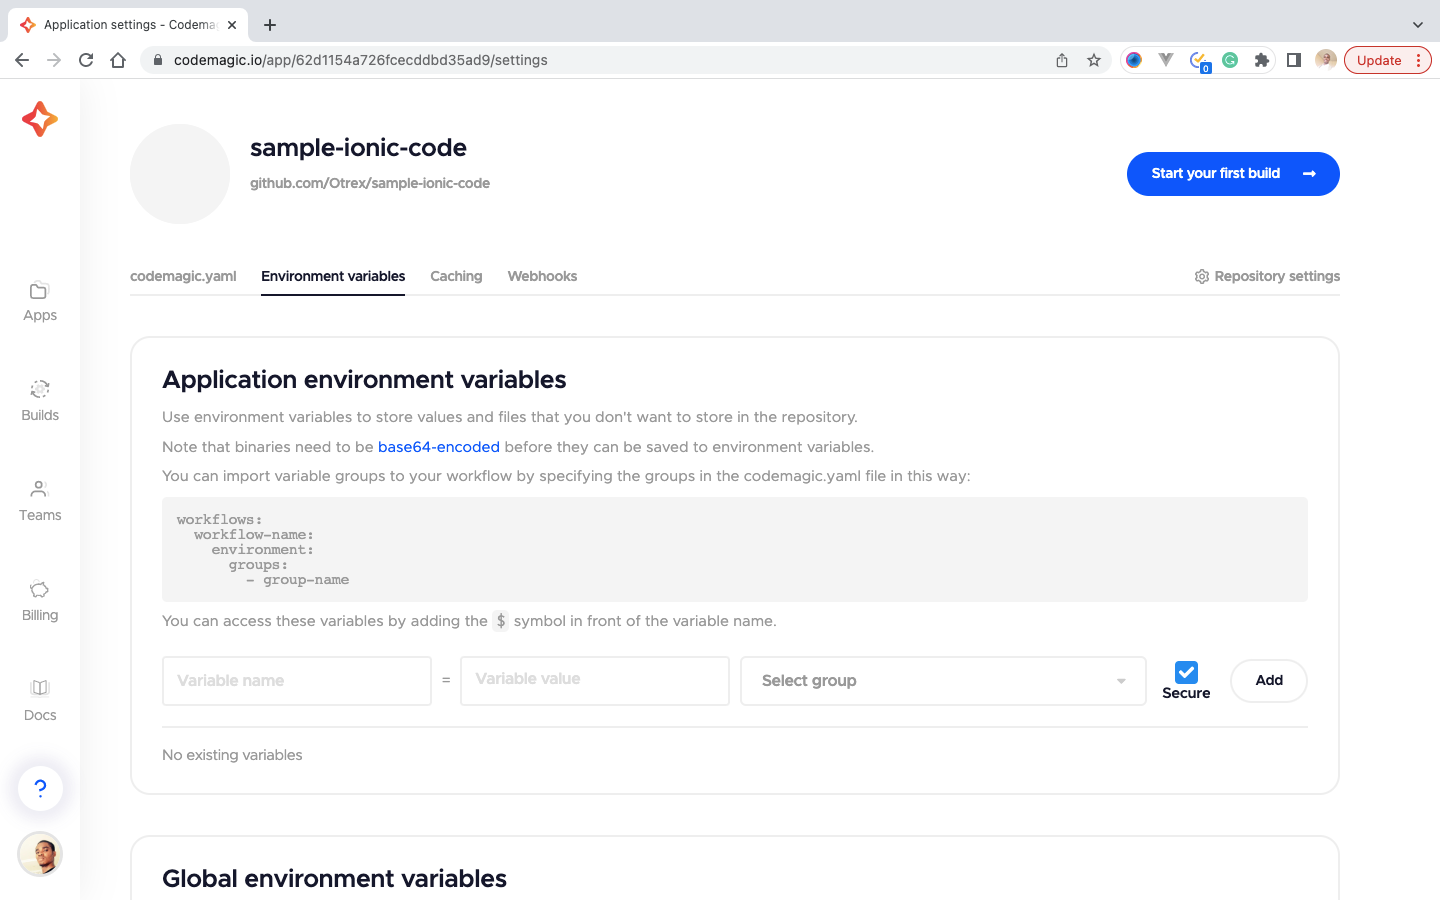
Note: APP_TOKEN takes the value of TELEGRAM_BOT_TOKEN.
Next, we’ll add the Telegram publish script.
Adding the Telegram Publish script
Adding our publishing script, we create a new file called telegram.sh in our project’s root directory. Then we paste the following code:
curl -v -F chat_id=$1 -F document=@$3 https://api.telegram.org/bot$2/sendDocumentTo explain this:
curlis a bash way of making URL request,$1,$2, and$3represent environmental variables passed into the script from the Codemagic environment.-Fflag indicates the request to send a filedocumenttakes the absolute path to the file. In our case, the build file.
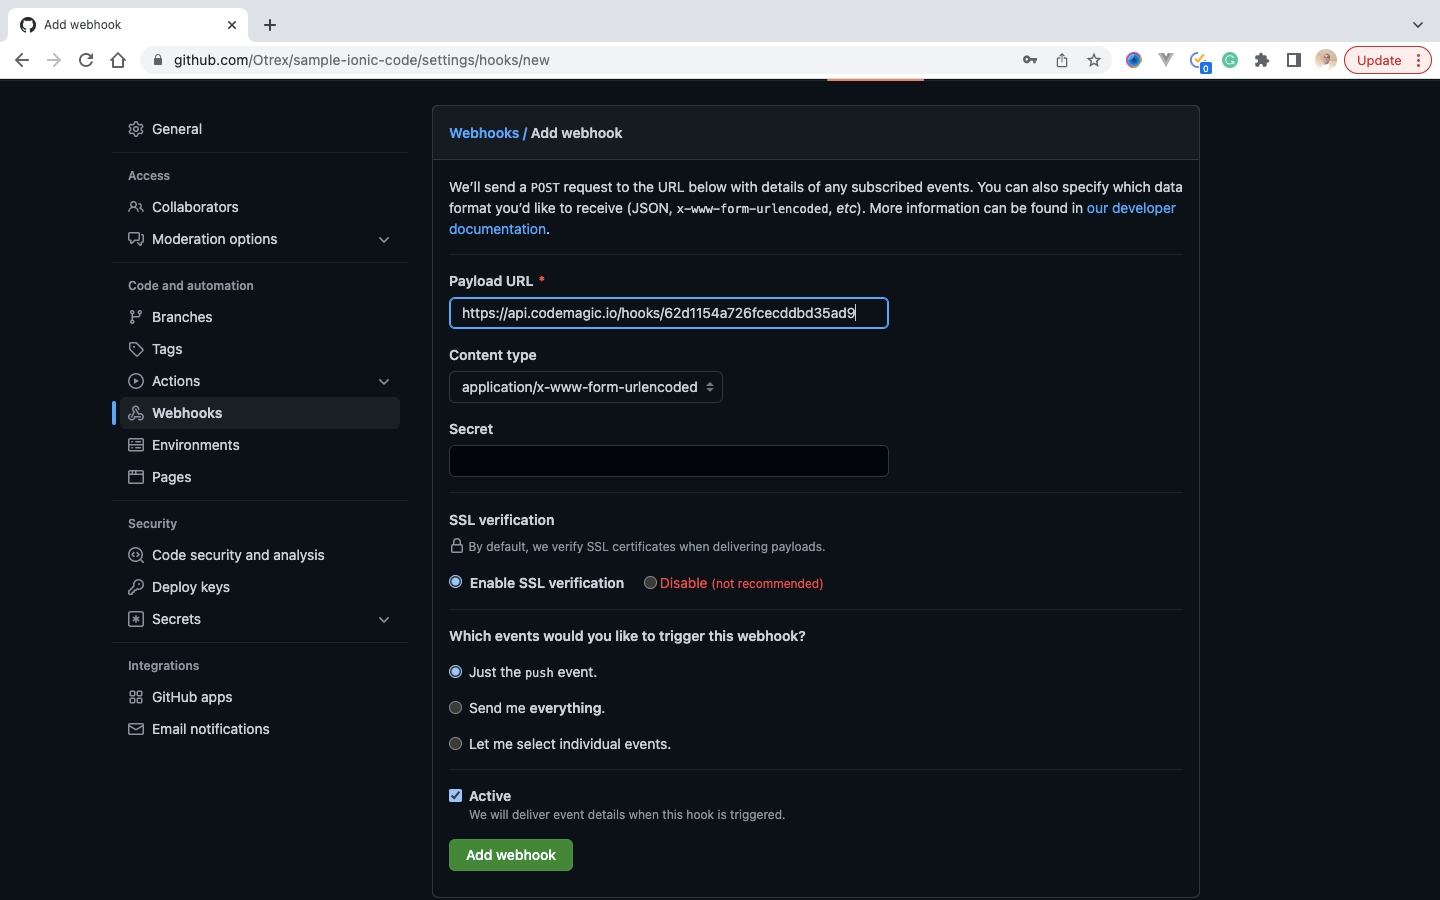
Adding our Webhook to Github
It is necessary to add the webhook provided by Codemagic to our Github. This would facilitate the communication between our code on Github with Codemagic. To add this,
- Firstly, we click the webhooks tab on our Codemagic app
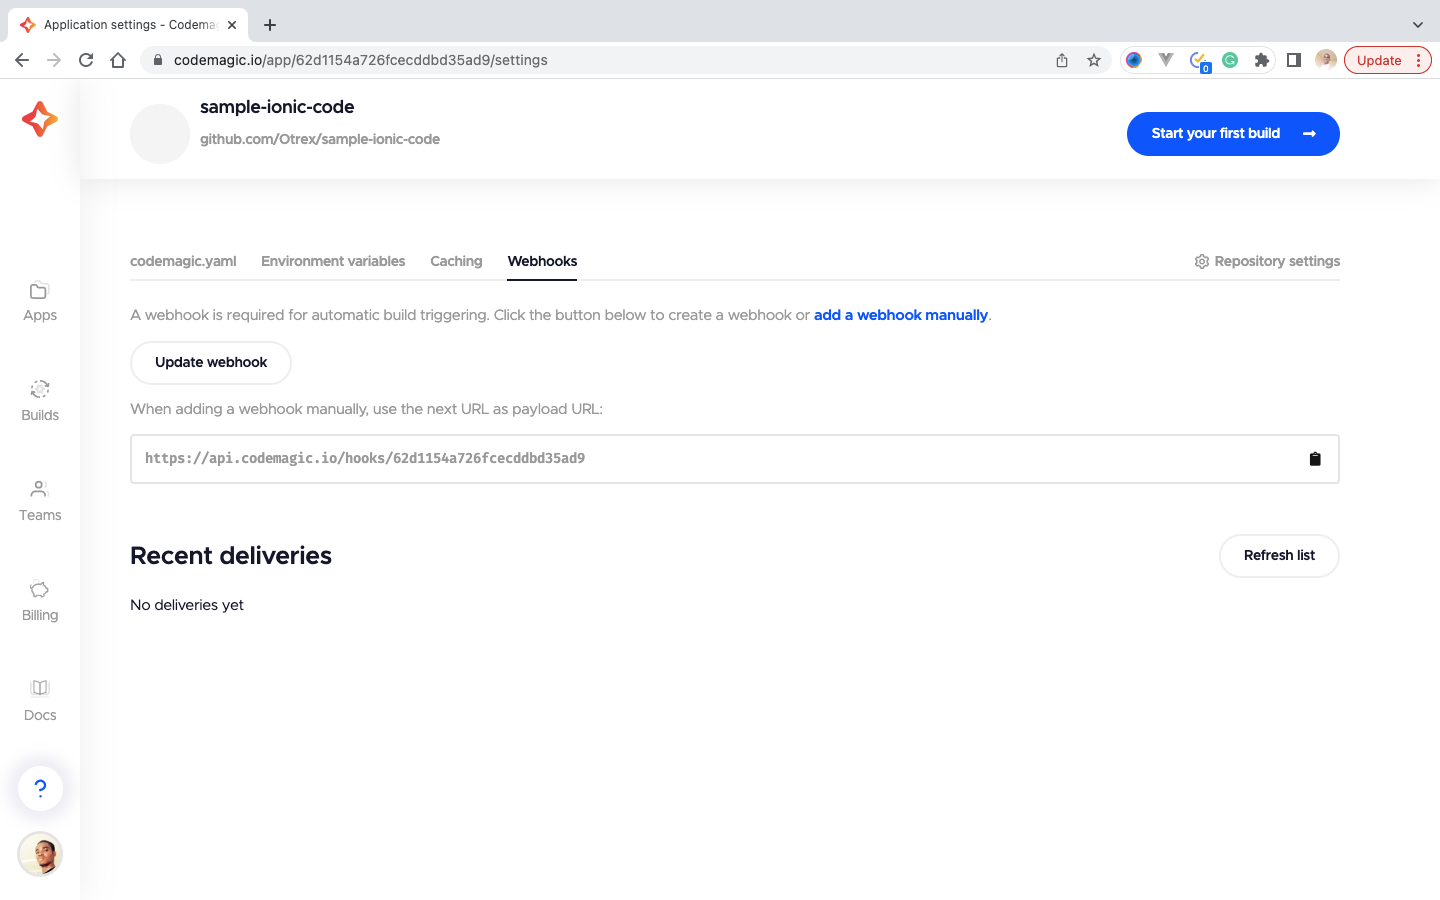
- Then copy our webhook URL, which would be used:
https://api.codemagic.io/hooks/62d1154a726fcecddbd35ad9 - Visit our Github, select our branch and click on the settings tab
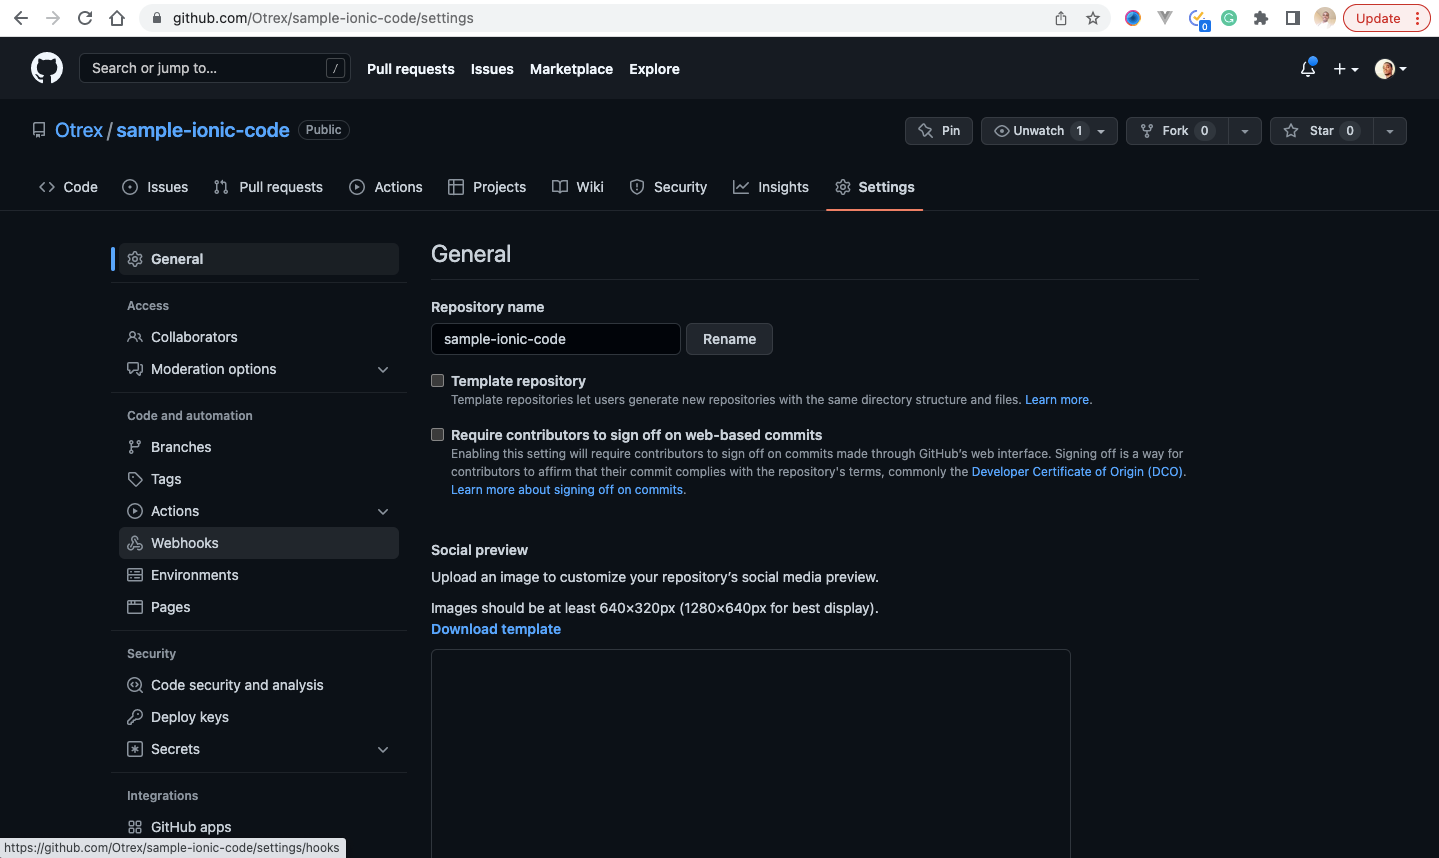
- Click on webhooks navigation tab, and click on the Add webhook button, to add the webhook. It would require we enter our Github password, which we would enter, and click on confirm password to continue
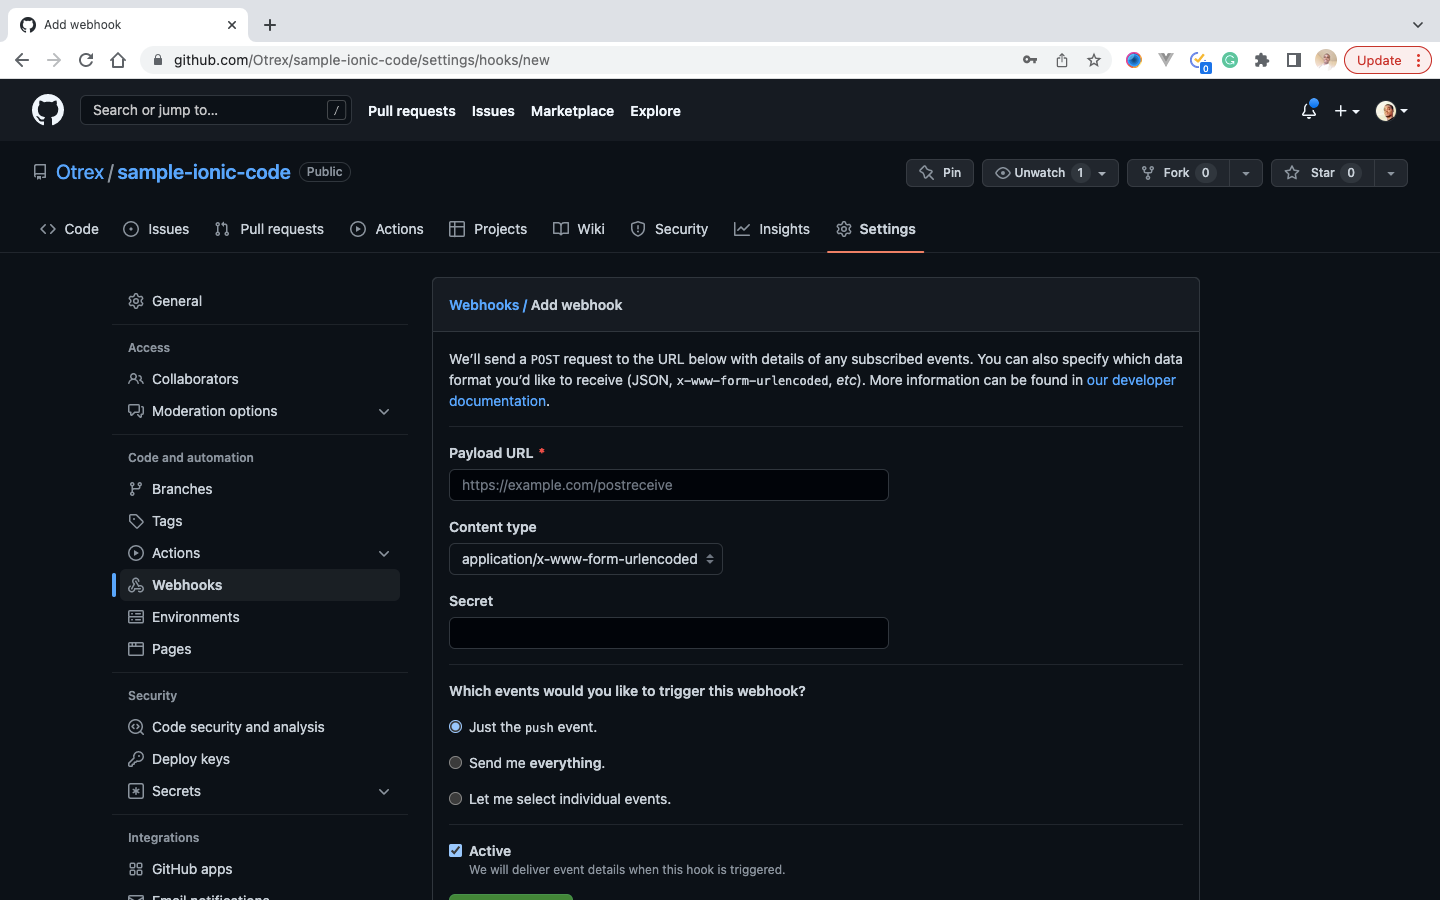
- Paste the webhook URL we copied during the initial step, and click Add Webhook button
At this point, the automatic build setup has been completed.
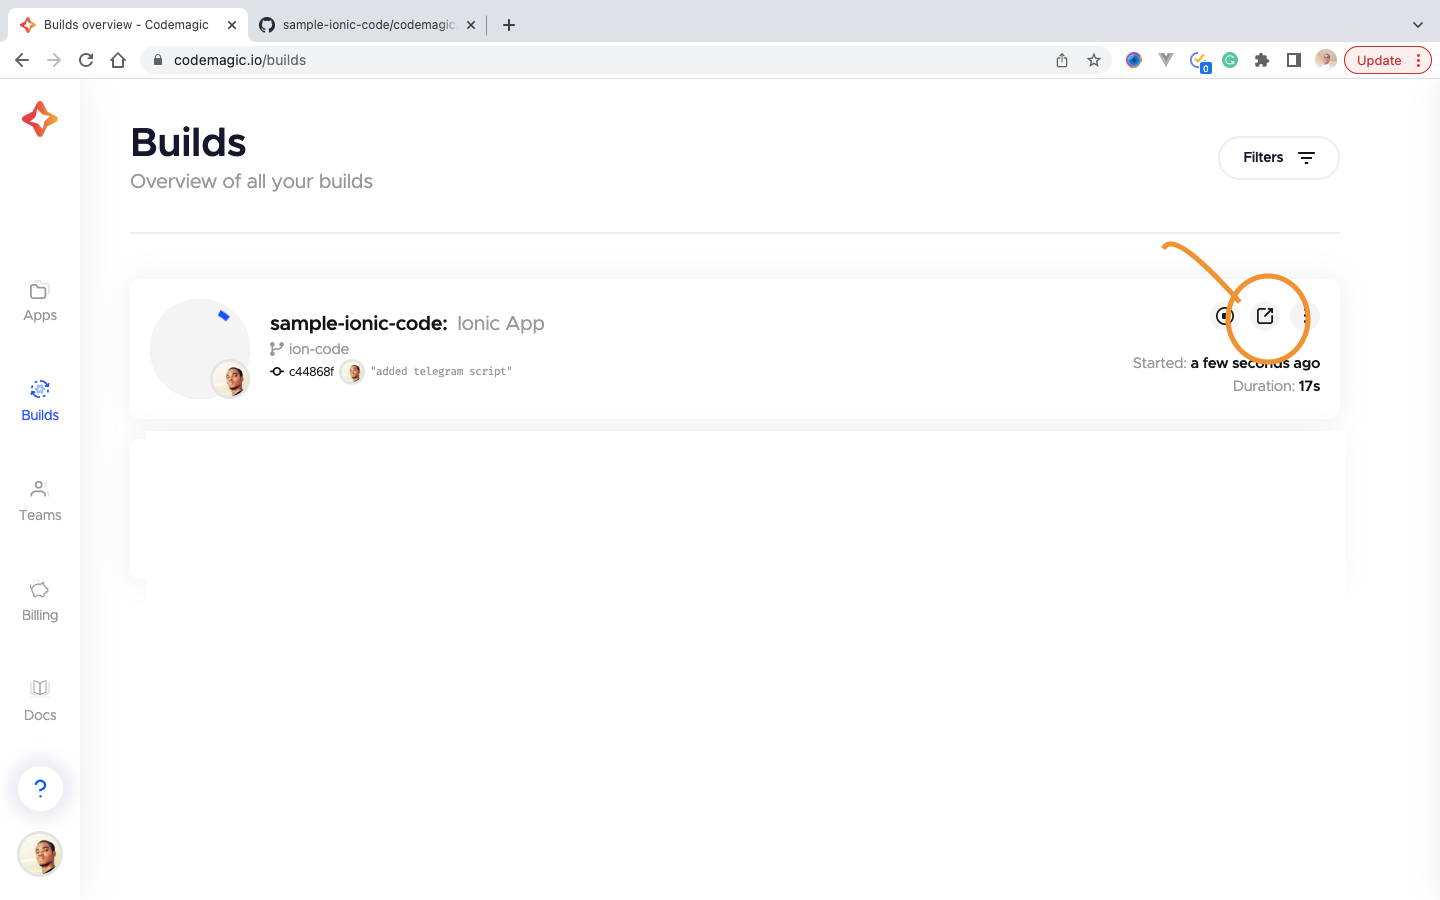
Triggering A build
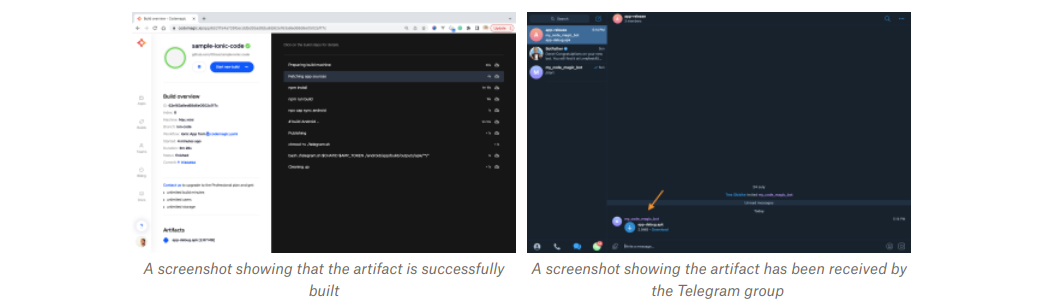
Now, the process can be triggered on push to the selected branch or manually. We have to make an update to the code and then push. This would, in turn, trigger the build process. You can monitor the build process by visiting:
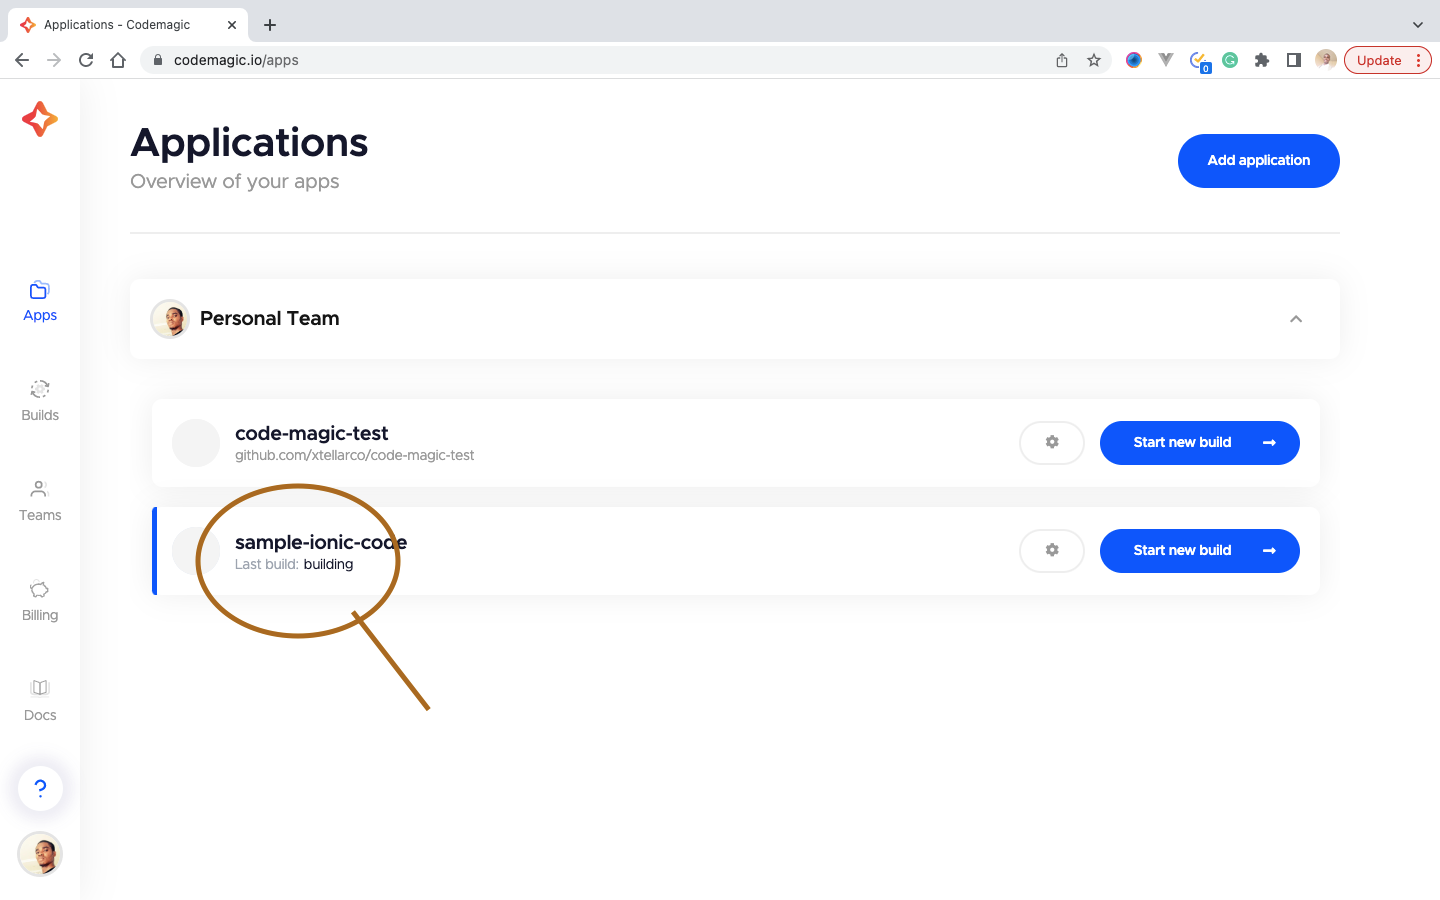
Then click on the button indicated below.
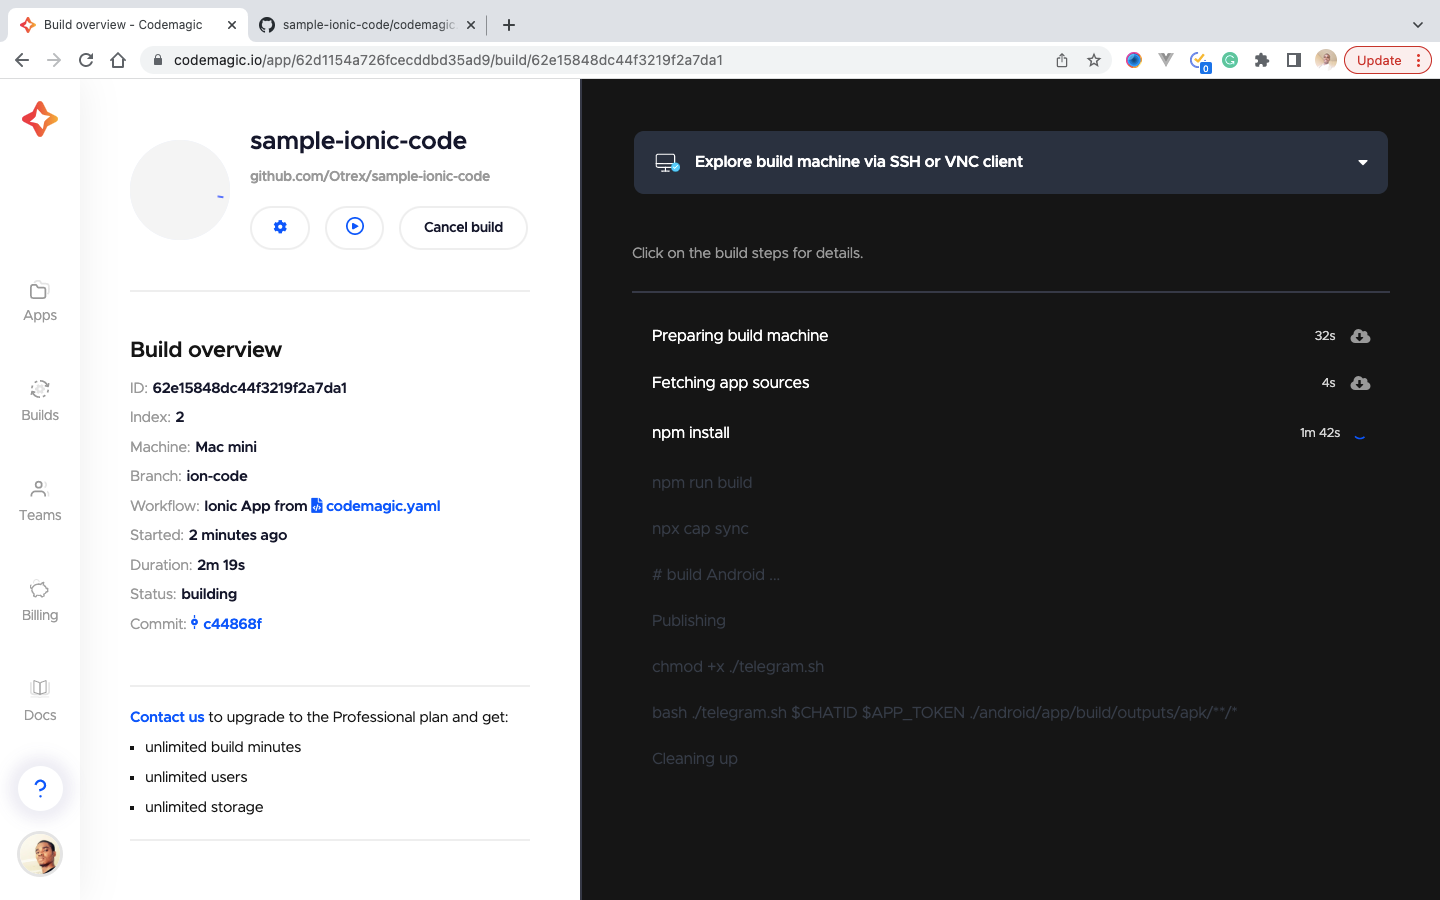
After the build process is completed, Our artifact is sent to our telegram group. Here is our artifact on Telegram.
Conclusion
We covered the meaning of Codemagic, the creation of telegram bots, adding Codemagic scripts to an application, adding the code-base to Codemagic, and adding the automation webhook, and publishing the artifacts to the telegram group.
References
- Codemagic www.codemagic.io
- Telegram API core.telegram.org
- Ionic Framework ionicframework.com
- Capacitor capacitorjs.com
A TIP FROM THE EDITOR: In this article the sample app was built using Ionic, but if you want to work in a more “basic” way, look at our Building a Mobile App using HTML, CSS, and JavaScript article.