
Many developers refrain from including animation in their web apps because animation scripts might be challenging. On the other hand, React Reveal allows you to run animations with just a few lines of code. In addition, this 3rd package library in React.js simplifies animation, enabling the developer to focus on other project elements.
React Reveal is a powerful library that allows developers to easily add stunning animation effects to their React applications. By leveraging the power of React and CSS transitions, React Reveal provides a simple and intuitive interface for creating beautiful animations without having to write complex code.
Why use react-reveal?
One of the most significant benefits of React Reveal is that it is easy to use and integrates seamlessly with React. As a result, developers may apply animation effects to their components without writing additional CSS or JavaScript code. This can save developers time and effort, enabling them to focus on developing the core functionality of their apps.
- It provides a wide range of animation effects. So whether you want to fade in an element, slide it up from the bottom of the screen, or zoom in on it, React Reveal has an animation effect to suit your needs. This flexibility allows developers to create animations tailored to their specific project requirements.
- It is highly customizable, allowing developers to fine-tune their animation effects to achieve the exact look and feel they want. This level of control allows developers to create unique and eye-catching animations, helping to differentiate their applications from the competition.
- It allows developers to create animation effects triggered only when the user scrolls down to the relevant element on the page. As a result, animation effects will not run on page load, reducing the page’s initial load time and optimizing the application’s overall performance.
Getting started with react-reveal
To start with React Reveal, you will need to install the library using npm or yarn.
To install React Reveal using npm, run the following command:
npm install react-revealTo install React Reveal using yarn, run the following command:
yarn add react-revealFade Animation
Let’s see how to perform different types of animations. Once React Reveal is installed, you can import the animation components you want to use in your project. For example, to import the Fade component, you can use the following code:
import { Fade } from 'react-reveal';Once you have imported the animation components, you can add them to your React components to create animation effects. For example, to create a fade animation for a component, you can use the following code sample:
<Fade>
  <MyComponent />
</Fade>
Let’s create a simple React functional component that returns a div width and height of 300px, respectively:
const Box = ({ color }: BoxProps) => {
  return <div className="box" style={{ background: `${color}` }}></div>;
};
Next, we’d update our App.js by importing our Box component and wrapping our Box component with the Fade animation imported from react-reveal:
import Box from "./Box/Box";
import Fade from "react-reveal";
function App() {
  return (
    <div className="">
      <Fade right>
        <Box color= "red"/>
      </Fade>
      <Fade left>
        <Box color= "purple"/>
      </Fade>
      <Fade bottom>
        <Box color=" chocolate"/>
      </Fade>
      <Fade top>
        <Box color="chartreuse" />
      </Fade>
      <Fade left>
        <Box color="#61dafbaa" />
      </Fade>
    </div>
  );
}
Notice the direction passed as props to the Fade component. These props are available in specific animation effects in React Reveal, allowing you to specify the direction of the animation.
For example, the Fade animation effect allows you to use the direction prop to specify the direction in which the element or component should slide. Possible values for the direction prop include up, down, left, or right.
Here’s a preview of our above code:
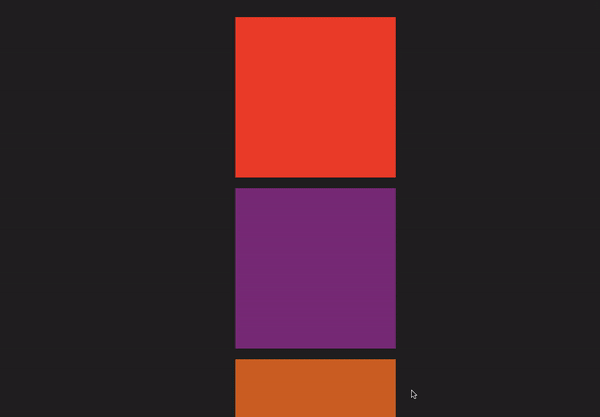
N/B: The direction prop is also available in other animation effects, such as Zoom and Rotate, and it may have different possible values depending on the specific animation effect.
Flip Animation
To create a Flip animation with react-reveal, we’d import the Flip animation component. The Flip component allows you to specify the direction and duration of the animation. Here is an example:
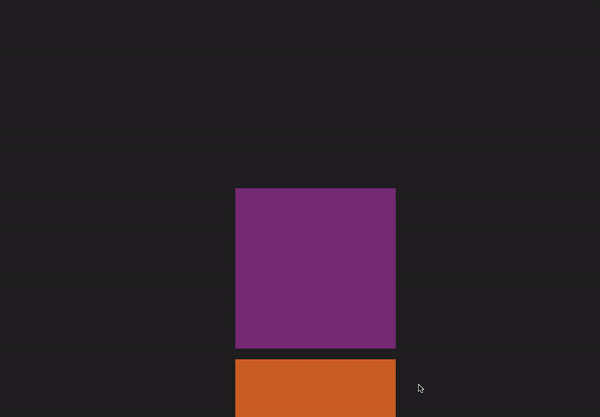
import Box from "./Box/Box";
import {Flip }from "react-reveal";
function App() {
  return (
    <div className="">
      <Flip right>
        <Box color= "red"/>
      </Flip>
      <Flip left>
        <Box color= "purple"/>
      </Flip>
      <Flip bottom>
        <Box color=" chocolate"/>
      </Flip>
      <Flip top>
        <Box color="chartreuse" />
      </Flip>
      <Flip left>
        <Box color="#61dafbaa" />
      </Flip>
    </div>
  );
}
The Flip component also supports other customization options, such as specifying the delay before the animation starts and the easing function to use for the animation.
Here’s a preview of the Flip:

Rotate Animation
To create a Rotate animation with react-reveal, we’d import the Rotate animation component. The rotate component also allows you to specify the direction and duration of the animation. Here is an example:
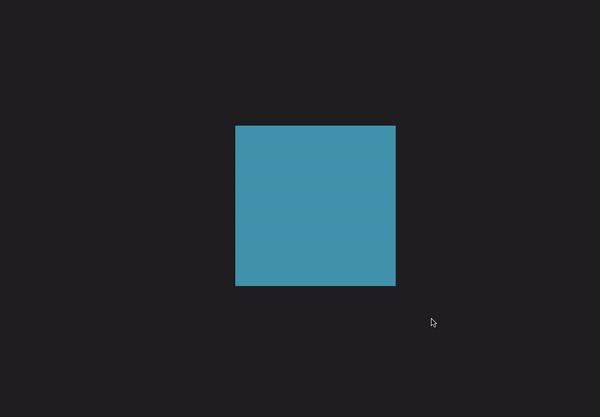
import Box from "./Box/Box";
import { Rotate } from "react-reveal";
function App() {
  return (
    <div className="">
      <Rotate right>
        <Box color= "red"/>
      </Rotate>
      <Rotate left>
        <Box color= "purple"/>
      </Rotate>
      <Rotate bottom>
        <Box color=" chocolate"/>
      </Rotate>
      <Rotate top>
        <Box color="chartreuse" />
      </Rotate>
      <Rotate left>
        <Box color="#61dafbaa" />
      </Rotate>
    </div>
  );
}
Here’s a preview of the rotate animation:

Session Replay for Developers
Uncover frustrations, understand bugs and fix slowdowns like never before with OpenReplay — an open-source session replay tool for developers. Self-host it in minutes, and have complete control over your customer data. Check our GitHub repo and join the thousands of developers in our community.
Zoom Animation
To create a Zoom animation with react-reveal, we’d import the Zoom animation component. Just like the rotate animation and flip animation, the rotate animation also supports other customization options, such as specifying the delay before the animation starts and the easing function to use for the animation.
import { useState } from "react";
import "./App.css";
import Box from "./Box/Box";
import { Zoom } from "react-reveal";
function App() {
  return (
    <div className="">
      <Zoom right duration={1000} delay={1000}>
        <Box />
      </Zoom>
      <Zoom left>
        <Box />
      </Zoom>
      <Zoom down>
        <Box />
      </Zoom>
      <Zoom up>
        <Box />
      </Zoom>
      <Zoom left>
        <Box />
      </Zoom>
    </div>
  );
}
export default App;
Bounce Animation
To create a Bounce animation with react-reveal, we’d import the Bounce animation component:
import Box from "./Box/Box";
import { Bounce } from "react-reveal";
function App() {
  return (
    <div className="">
      <Bounce right duration={1000} delay={1000}>
        <Box color= "red"/>
      </Bounce>
      <Bounce left>
        <Box color= "purple"/>
      </Bounce>
      <Bounce bottom>
        <Box color=" chocolate"/>
      </Bounce>
      <Bounce top>
        <Box color="chartreuse" />
      </Bounce>
      <Bounce left>
        <Box color="#61dafbaa" />
      </Bounce>
    </div>
  );
}
Custom CSS animation with React Reveal
You may use the Reveal component’s effect prop to apply custom CSS animations with React Reveal. This prop accepts a string value that defines the name of the CSS animation effect to be used.
Let’s start by importing the Reveal component:
import { Reveal } from 'react-reveal';We can define a new animation in the animation CSS property to create our custom CSS animation. For example, Let’s create an animation that makes our Box component slide in from the left.
In our App.css file:
.slide-in-left {
  animation: slide-in-left 0.5s ease-in-out;
}
@keyframes slide-in-left {
  from {
    transform: translateX(-100%);
  }
  to {
    transform: translateX(0);
  }
}
Once we’ve defined our custom animation, we can apply it to a React Reveal component using the effect prop.
import { Reveal } from "react-reveal";
function App() {
  return (
    <div className="">
      <Reveal effect="slide-in-left">
        <Box />
      </Reveal>
    </div>
  );
}
Here’s a preview of our CSS custom animation with React Reveal:
Note that for your custom animation to work, you will need to ensure that the animation CSS property is properly defined in your stylesheet and that it is being applied to the element you want to animate.
React-Reveal with Custom CSS animation
React Reveal provides several different animation components that we can use to add animations to your React application. In addition, each component accepts other props that allow you to customize the animation.
Here are some of the props that are common to all React Reveal animation components:
duration: This prop allows you to specify the time of the animation in milliseconds.delay: This prop enables you to set a delay before the animation begins in milliseconds.count: This prop allows you to specify the number of times the animation should run.forever: If this prop is set to true, the animation will run indefinitely.when: This prop allows you to specify a boolean condition that determines when the animation should run.
Conclusion
To learn more about using React Reveal and all available animation effects, you can check out the documentation on the React Reveal docs. There, you can find detailed guides and examples to help you get started with creating animations in your React projects.
A TIP FROM THE EDITOR: Take a look at more animation libraries, as shown in My Favorite 3 React Animation Libraries.
Gain Debugging Superpowers
Unleash the power of session replay to reproduce bugs and track user frustrations. Get complete visibility into your frontend with OpenReplay, the most advanced open-source session replay tool for developers.