

Firebase v.9 SDK introduces a new API surface that follows a modular approach, resulting in a change in its services, one of which is Firebase Cloud Storage which allows us to upload and work with user-generated content like images and videos. In this tutorial, we will learn how to upload images/files to Firebase storage with version 9 web SDK.
To follow along with this tutorial, you should be familiar with React and have a google account. You should also have Node.js installed on your machine.
Setting up Firestore
Before we can start using Firestore services, we need to create a project.
A Firebase project is like a container for our app. It lets us share data and analytics across platforms (e.g., Android, iOS, and web) so users have the same experience on any device they’re on. To add a project, make sure you’re logged into your Google account, then navigate to Firebase console and click Add project or Create a project button if this is your first time using Firebase. We should see a page like this:

Type in the project’s name; for this tutorial, we’ll call it firebase-storage. Then accept the Firebase terms and click Continue. We’ll be prompted to enable Google Analytics; we don’t need that in this tutorial, so let’s turn it off. Click on Create project and wait for the project to be created. Once all the steps for adding a project are completed, we will be redirected to our project page:

On the sidebar of our project page, click on Build and then click on Storage to navigate to the Storage page:
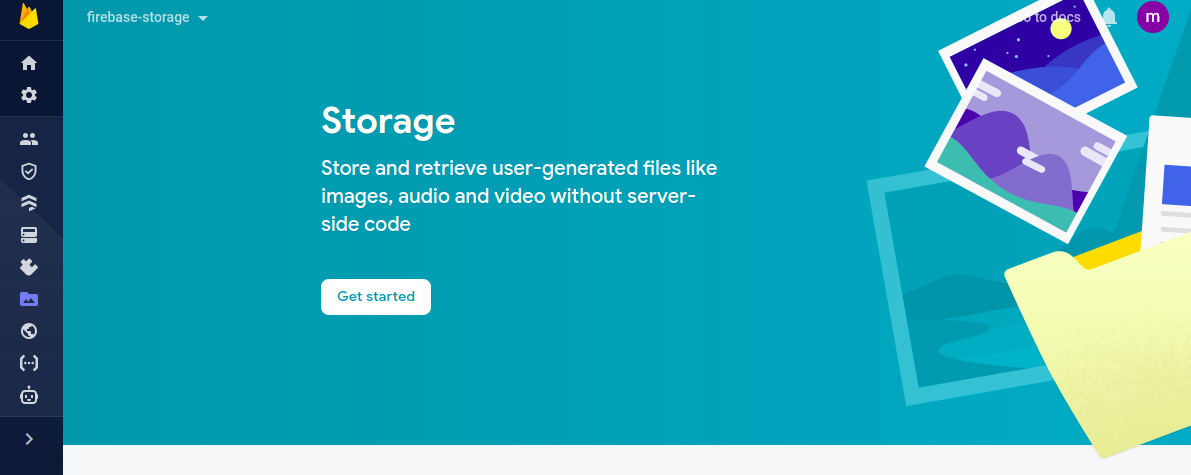
Click the Get started button, and a prompt will appear asking if to Set up Cloud Storage in production or test mode.

Choose Start in test mode and click Next. Then, on the next screen, click Done. Once the steps have been completed, an empty storage bucket will be created for us:

Setting up React and integrating with Firebase
First, create a new React app with the following command in the terminal:
$ npx create-react-app firebase-storageIn the above command, our app name is firebase-storage, but we can give it any other name. Next, navigate to the new app folder and install Firebase with the following commands:
$ cd firebase-storage
$ npm i firebase
To work with Firebase, we need to get the web configuration object and then use it to initialize Firebase in our react app. On our Firebase project page, we should see something like this:

Click on the web icon to configure our Firebase project for the web. We should see a page like this:
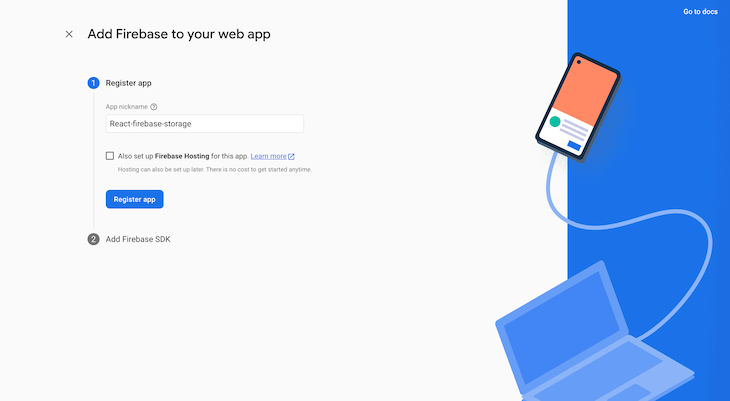
Give the web app a name. For this tutorial, we will call it firebase-storage-app. Click on the Register app button to move on to the next step, where our firebaseConfig object is revealed to us:
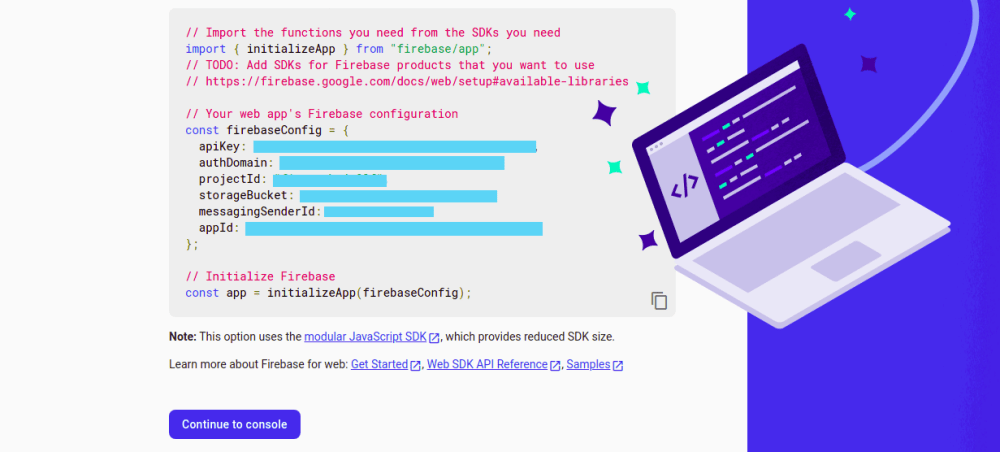
Copy the firebase config object to the clipboard as we will need it later on to initialize Firebase. Then click on the Continue to console button to complete the process.
Now, let’s initialize Firebase and Firebase storage so that we can start using them in our app. In the src directory of the React app we created earlier, create a firebase.js file and add the following lines of code:
// src/firebase.js
import { initializeApp } from "firebase/app"
import { getStorage } from "firebase/storage"

const firebaseConfig = {
  apiKey: "API_KEY",
  authDomain: "AUTH_DOMAIN",
  projectId: "PROJECT_ID",
  storageBucket: "STORAGE_BUCKET",
  messagingSenderId: "MESSAGING_SENDER_ID",
  appId: "APP_ID"
}

// Initialize Firebase and cloud storage
export const app = initializeApp(firebaseConfig)
export const storage = getStorage(app)
Replace the firebaseConfig object in the above code with the one we copied earlier.
Upload and Read Files/Images in Firebase storage
Before we can start using the ready-to-use function provided by Firebase for working the cloud storage, let’s first create a simple React app that will let us upload files. The app will contain a form for uploading files and a button for submitting them.
In the src directory, modify the App.js file to look like the following:
// src/App.js
import './App.css'

function App() {
  return (
    <div className="app" name='upload_file'>
      <form className='app__form'>
        <input type='file' />
        <button type='submit'>Upload</button>
      </form>
    </div>
  )
}

export default App
Now let’s add some styling to our app to make it look better. Modify the App.css file to look like the following:
// src/App.css
.app{
  height: 100vh;
  display: flex;
  align-items: center;
  justify-content: center;
  flex-direction: column;
}
.app__form{
  display: grid;
  grid-gap: 10px;
}
When we start the development server with $ npm start, this is what the app should look like:

Open Source Session Replay
OpenReplay is an open-source, session replay suite that lets you see what users do on your web app, helping you troubleshoot issues faster. OpenReplay is self-hosted for full control over your data.

Start enjoying your debugging experience - start using OpenReplay for free.
Uploading and reading files
To upload an input file to Firebase cloud storage, we can either use the uploadBytes or uploadBytesResumable functions. They both achieve the same result, but the difference is that using uploadBytesResumable will allow us to monitor our files’ progress and carry out specific actions like pausing or canceling the uploading of the file. At the same time, uploadBytes doesn’t have that functionality.
Firebase also provides a function for getting the URL of an uploaded file, ’ getDownloadURL. In this section, we will learn how to use the uploadBytesfunction to upload our files and read them withgetDownloadURL. Then, later on we will look at how we can monitor the progress of uploaded files using the uploadBytesResumable` function.
In the App.js file, add the following imports:
// src/App.js
import { storage } from './firebase'
import { ref, getDownloadURL, uploadBytes } from "firebase/storage"
Next, add the following function before the return statement in the App component:
// src/App.js
const handleSubmit = (e) => {
  e.preventDefault()
  const file = e.target[0]?.files[0]

  if (!file) return null;
  const storageRef = ref(storage, `files/${file.name}`)
  uploadBytes(storageRef, file)
  .then((snapshot) => {
    e.target[0].value = ''
    getDownloadURL(snapshot.ref).then((downloadURL) => {
      console.log(downloadURL)
    })
  })
}
In the above code, we are getting the file input with e.target[0]?.files[0]. With the if statement, we return null if no file is present, but if there is, we create a reference to the Firebase project storage we want to upload our file to using the ref function. The ref function receives the storage instance initialized in our firebase.js file as its first parameter and a path we want uploaded files to reside in as a second parameter (optional).
We upload the file by calling the uploadBytes function, which takes the reference and the file to be uploaded as a parameter. This function returns a promise. On a fulfilled promise, we empty the file input and then download the URL of the uploaded file by using the getDownloadURL function, which takes the file reference as a parameter.
Next, we need to call the above function when the form is submitted. We can do that by modifying the opening tag of the upload_file form:
// src/App.js
<form className='app__form' name='upload_file' onSubmit={handleSubmit}>
Now in our React app, when we choose a file and click the Upload file button, the file will be uploaded to cloud storage, and the URL to access the file will be logged in to the browser console. If we are working with a database, we can then save the URL in the database rather than logging it to the console.
Aside from uploading input files which is a JavaScript File type, using uploadBytes we can also upload Blob and Uint8Array. Depending on the use-case, our file might also be in base64, base64url, or data_url format for that we can use the uploadString function which is similar to using uploadBytes, but it receives the file form as its third parameter. You can check how uploadString works here.
Monitor Upload status while uploading
In cases where we are uploading a large file that will take some time before it completes uploading, we might want to monitor the upload progress of the file through a progress bar. For that, we will use the uploadBytesResumable function.
Now, let’s see how to use this function to display the progress of uploaded files on a progress bar and also get the download URL.
First, in the App.js file add the following import:
// src/App.js
import { useState } from 'react';
import { uploadBytesResumable } from 'firebase/storage';
Next, add the following state to the App component:
// src/App.js
const [progressPercent, setProgressPercent] = useState(0)
Next, modify the handleSubmit function in the App component to look like this:
// src/App.js
const handleSubmit = async (e) => {
  e.preventDefault()
  const file = e.target[0]?.files[0]

  if (!file) return null;
  const storageRef = ref(storage, `files/${file.name}`)
  const uploadTask = uploadBytesResumable(storageRef, file)

  uploadTask.on("state_changed",
    (snapshot) => {
      const progress = Math.round((snapshot.bytesTransferred / snapshot.totalBytes) * 100)
      setProgressPercent(progress)
    },
    (error) => {
      alert(error)
    },
    () => {
      e.target[0].value = ''
      getDownloadURL(storageRef).then((downloadURL) => {
        console.log(downloadURL)
      })
    }
  )
}
In the above code, after passing the reference and the file to upload as a parameter to the uploadBytesResumable function call, we call the on() method from the object returned, which listens to events of the ongoing upload. Above, we are listening to the state_changed event. Events have three callback functions next, error, and completed. These are the callbacks we passed in the on() method
The next callback listens to progress/state changes of the upload. It makes available a snapshot object with properties that we are using to calculate the progress of the upload. The error callback is used to handle errors. Right now, our code is just alerting the error, but there is more to handling errors; we will look more into this later in this tutorial. The last callback runs when an upload has been completed, and that’s where we are resetting the input and getting the download URL.
We can also manage uploads like pause, resume, and cancel uploads using the pause(), resume(), and cancel() methods which can be accessed in the object returned from calling the uploadBytesResumable function something like this:
const uploadTask = uploadBytesResumable(storageRef, file);

// Pause the upload
uploadTask.pause();

// Resume the upload
uploadTask.resume();

// Cancel the upload
uploadTask.cancel();
Finally, add the line of code after the closing form tag (</form>) in the return statement:
// src/App.js
<progress value={progressPercent} max="100"/>
In the above code, we are setting the value of the progress bar equal to the progressPercent state, which we are setting in the first observer of the uploadTask.on method, which runs every time the upload state changes.
When we go over to our React app and try to upload a large file like a video, we will notice the progress in the progress bar.

With this, we can now upload to cloud storage and also monitor our progress. What about the error handle?. To handle errors that might occur upon uploading, we can use the code available in the error object to show custom error messages. For example, to handle an error caused by canceling an upload, the error callback will look something like this:
(error) => {
  switch (error.code) {
    case 'storage/canceled':
      alert('Upload has been canceled')
      break;
  }
}
You can view the complete list of error codes here.
Conclusion
Using Firebase Cloud storage is pretty straightforward. With a few lines of code, we can upload and download files and monitor uploaded files’ progress with the ready-to-use function provided in the Firebase SDK. Hopefully, at this point, you should be able to work with Firebase cloud storage in your app.