Decorators - new style higher order functions
A look at decorators, an upcoming JavaScript feature


In previous articles, we discussed what a higher order function (HOF) was and how we could use them to extend the functionality of our code, both for JavaScript and for TypeScript programming. As a summary, a HOF is a function that takes functions as arguments, and possibly returns a function as a result. It happens that JavaScript is likely to get a particular version of these HOFs, called decorators, and in this article we’re going to discuss what they are and how we can use them to simplify our coding.
Decorators in JavaScript and Typescript
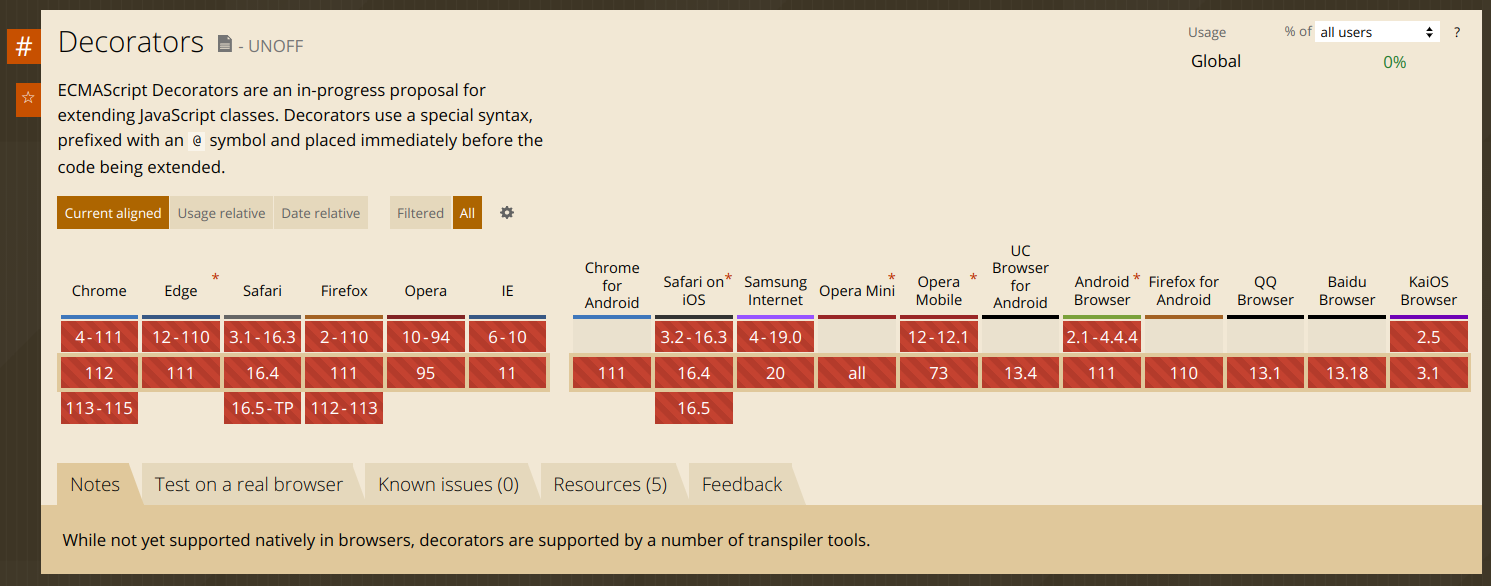
The idea for decorators has been around for a long time (for instance, Java has had them for years), and it seems to be an idea whose time has come. In terms of JavaScript support, the TC39 proposal is at stage 3 meaning that it’s completely designed, and no changes will be forthcoming without implementation or usage data, so it could advance soon to stage 4, which would mean a future inclusion in the language standard. However, as of today, no browser supports the feature, as www.caniuse.com tells us:
With TypeScript, the issue is different; the language already supports the proposal, so we can use them. Of course, when we get the official standard for decorators, there could be some changes, but let’s not get ahead; we may have 100% compatibility. However, the feature is classed as “experimental” at this time, so you must add the experimentalDecorators compiler option to your tsconfig.json file:
{
  "compilerOptions": {
    ...
    "experimentalDecorators": true
    ...
  }
}
So far, we haven’t really explained what decorators are; let’s fix that right now.
What are decorators?
In object-oriented programming, a decorator is a design pattern that allows us to modify the functionality of an object at run time. If you want to extend a class, you could always use inheritance, but this can get unwieldy over time if you end with multiple subclasses that just differ in the behavior of one or two methods.
A decorator lets you annotate (modify) classes and their members, most likely implementing some change to them. Applying a decorator to a method is equivalent to applying a HOF to a function to produce a new (modified) one.
There are five kinds of decorators, which work on different class parts, allowing us to observe or modify them:
- class decorators apply to the class constructor
- method decorators apply to class methods
- accessor decorators apply to accessors (setters and getters) and work similarly to method decorators
- property decorators apply to class properties
- parameter decorators apply to individual parameters for methods
Decorators can also be applied to instance or static methods, and this is done in a specific sequence; check this reference for more on that.
In this article, we will work with method decorators, which most closely match the HOF examples we saw in previous articles. Still, the code we’ll see would similarly apply to class and accessor decorators. This can sound mysterious, so let’s jump into a few examples. We’ll work with the following simple class:
class Person {
  name: string = "";
  birthYear: number = 0;

  constructor(name: string, birthYear: number) {
    this.name = name;
    this.birthYear = birthYear;
  }

  asString() {
    return `I'm ${this.name}, ${this.age(new Date().getFullYear())} year(s) old.`
  }

  age(currentYear: number) {
    return currentYear - this.birthYear; // not very precise...
  }
}
We are defining a Person class with two attributes (the person’s name and birth year) and a couple of methods to return a string describing the person and to (approximately…) calculate his age in some year. Let’s try the asString() method, which we’ll use in other examples.
const myself = new Person("John Doe", 2001)
console.log(myself.asString());
// I'm John Doe, 22 year(s) old.
Our code works, so let’s start decorating its methods.
A logging decorator
In our previous article, we wrote a logging HOF in JavaScript, which added logging when the function was called and when it returned, either normally or by throwing an error.
const addLogging =
  (fn) =>
  (...args) => {
    console.log("Enter", fn.name, ...args);
    try {
      const toReturn = fn(...args);
      console.log("Exit ", fn.name, toReturn);
      return toReturn;
    } catch (err) {
      console.log("Error", fn.name, err);
      throw err;
    }
  };
Let’s turn this code into a @withLogging() decorator. A decorator is a function that receives three arguments: the target object with which it will work, the propertyKey that names the decorated method, and a descriptor with more information about the property. In our case, we want to replace the original method with a new one that will include logging, as shown above.
function addLogging(
  target: Object,
  propertyKey: string,
  descriptor: PropertyDescriptor
) {
  const originalMethod = descriptor.value;                 // (1)
  descriptor.value = function (...args: any[]) {           // (2)
    console.log("Enter", originalMethod.name, ...args);    // (3)
    try {
      const toReturn = originalMethod.call(this, ...args); // (4)
      console.log("Exit ", originalMethod.name, toReturn);
      return toReturn;
    } catch (err) {
      console.log("Error", originalMethod.name, err);
      throw err;
    }
  };
}
We get the original method by using descriptor.value in (1), and we’ll substitute a version of our own in (2). Instead of logging fn.name, we use originalMethod.name in (3). How we call the method also changes: instead of fn(...args) we must use .call() in (4) to provide the correct context; we could have used .apply() instead.
Let’s apply this decorator to our asString() and age() methods.
class Person {
  .
  .
  .
  @addLogging
  asString(): string { ... }

  @addLogging
  age(currentYear: number): number { ... }
}
Note that we don’t add parentheses to the decorator call; it’s just a @ character followed by the decorator’s name. With the decorator added, our methods now do logging:
const myself = new Person("John Doe", 2001);
console.log(myself.asString());
// Enter asString
// Enter age 2023
// Exit  age 22
// Exit  asString I'm John Doe, 22 year(s) old.
// I'm John Doe, 22 year(s) old.
Great! Logging works; let’s also have a second decorator, which we’ll use for timing.
Session Replay for Developers
Uncover frustrations, understand bugs and fix slowdowns like never before with OpenReplay — an open-source session replay tool for developers. Self-host it in minutes, and have complete control over your customer data. Check our GitHub repo and join the thousands of developers in our community.
A timing decorator
Let’s go back to our timing HOF from the earlier article:
const addTiming = (fn) => (...args) => {
  let start = performance.now();
  try {
    const toReturn = fn(...args);
    console.log("Normal exit", fn.name, performance.now()-start, "ms");
    return toReturn;
  } catch (thrownError) {
    console.log("Exception thrown", fn.name, performance.now()-start, "ms");
    throw thrownError;
  }
};
We can apply a similar transformation to produce an @addTiming decorator.
function addTiming(
  target: Object,
  propertyKey: string,
  descriptor: PropertyDescriptor
) {
  const originalMethod = descriptor.value;
  descriptor.value = function (...args: any[]) {
    let start = performance.now();
    try {
      const toReturn = originalMethod.apply(this, args);
      console.log("Normal exit", originalMethod.name, performance.now() - start, "ms");
      return toReturn;
    } catch (err) {
      console.log("Exception thrown", originalMethod.name, performance.now() - start, "ms");
      throw err;
    }
  };
}
Using this decorator is equally straightforward.
class Person {
  .
  .
  .
  @addTiming
  asString(): string { ... }

  @addTiming
  age(currentYear: number): number { ... }
}

const myself = new Person("John Doe", 2001);
console.log(myself.asString());
// Normal exit age 0.0205250084400177 ms
// Normal exit asString 1.1684779822826385 ms
// I'm John Doe, 22 year(s) old.
OK, we now have a couple of valid decorators, and we could create more if needed. Let’s see how we can compose decorators, so we’ll apply several to the same method.
Composing decorators
Composing decorators means that we apply one decorator (which modifies the method it’s applied to), and we apply a second decorator to the result of the first one, then a third to the result of the second, etc. To compose decorators, just list them in order.
class Person {
  .
  .
  .
  @addLogging
  @addTiming
  age(currentYear: number): number {
    return currentYear - this.birthYear; // not very precise...
  }
}

const myself = new Person("John Doe", 2001);
console.log(myself.asString());
// Enter  2023
// Normal exit age 0.01621299982070923 ms
// Exit   22
// I'm John Doe, 22 year(s) old.
In this case, we are applying @addLogging to the result of applying @addTiming to the age() method — the output confirms this result. Keep in mind that the last listed decorator is applied first; it’s as if working with functions we had written something like addLogging(addTiming(age)).
Now we know how to create decorators and also how to compose them for more flexibility. Let’s finish this article by seeing how we can write decorator factories, that allow us to customize how decorators work.
Decorator factories
Let’s suppose we want to be able to decide when logging should occur. We could want to enable or disable each specific log: the one made at entering the function, the one when returning a value, and the one on error. We must write a decorator factory, a HOF by itself; it’s a function that will return a decorator, so we’ll have a HOF returning a HOF!
We’ll modify our logging decorator to receive an optional object with three boolean flags; if this parameter is not provided, we’ll log everything by default.
function addLogging2(
  when: { onEnter?: boolean, onReturn?: boolean, onError?: boolean } = {
    onEnter: true,
    onReturn: true,
    onError: true,
  }
) {
  return function (
    target: Object,
    propertyKey: string,
    descriptor: PropertyDescriptor
  ) {
    const originalMethod = descriptor.value;
    descriptor.value = function (...args: any[]) {
      if (when?.onEnter) {
        console.log("Enter", originalMethod.name, ...args);
      }
      try {
        const toReturn = originalMethod.apply(this, args);
        if (when?.onReturn) {
          console.log("Exit ", originalMethod.name, toReturn);
        }
        return toReturn;
      } catch (err) {
        if (when?.onError) {
          console.log("Error", originalMethod.name, err);
        }
        throw err;
      }
    };
  };
}
Study our function carefully: calling addLogging2(...) returns a decorator itself! Let’s use this factory to enable different types of logging for our Person class.
class Person {
  .
  .
  .
  @addLogging2({ onEnter: true })
  asString(): string { ... }

  @addLogging2()
  age(currentYear: number): number { ... }
}
We want asString() to log only on entry, but we’ll allow all logging for age(). — the output confirms that our decorators performs as expected; no “Exit” logs for asString().
const myself = new Person("John Doe", 2001);
console.log(myself.asString());
// Enter asString
// Enter age 2023
// Exit  age 22
// I'm John Doe, 22 year(s) old.
We’ve done it!
Conclusion
In this article, we’ve discussed decorators and how we can write them starting with the HOFs from previous articles. We focused on decorators for methods, but you should look into all their possibilities because they promise to let us write code in much more efficient ways.
Gain Debugging Superpowers
Unleash the power of session replay to reproduce bugs and track user frustrations. Get complete visibility into your frontend with OpenReplay, the most advanced open-source session replay tool for developers.