

xxxxxxxxxxxxxxxxxxxxxxxxxxxxx xx ABSTRACT TEXT GOES HERE xx xxxxxxxxxxxxxxxxxxxxxxxxxxxxx

Discover how at OpenReplay.com.
QR codes are 2D barcodes that represent text, originally designed for inventory tracking. Why should you use them in the first place? QR codes have a few shining points:
- They’re efficient ways to represent text that might otherwise take up much more space.
- QR codes are more durable than plain text. Unlike plain text, they fully preserve their meaning even when slightly damaged or obscured.
This article will briefly cover the structure of a QR code and show you how to generate them in Vue apps by building a QR code generator. Here’s what you need to follow along:
- Working knowledge of HTML, CSS, and JavaScript
- Working knowledge of Vue3 and the Composition API
- Working knowledge of npm and the command line
Understanding the structure of a QR code
A QR code is a square made of dots where each dot can be one of two colors. A dot in one color represents a bit set to zero, and a dot in the other color represents a bit set to one. You can use any pair of colors you want as long as there’s sufficient contrast between them.
Not all QR codes are the same size, and the size of a QR code is determined by its version, which can range from 1 to 40. A Version 1 code is 21 by 21 pixels, and a Version 40 code is 177 by 177 pixels.
A QR code can also be visually split into several parts, each of which serves a different function:

-
Finder or Position Patterns: These square-shaped patterns are located at three corners of the QR code, and they assist in identifying the code and recognizing the rotation of the code.
-
Alignment Patterns: These small square-shaped patterns found within larger QR codes serve as additional reference points for aligning the scanning device.
-
Timing Patterns: Thin lines on the QR code’s sides form timing patterns. These lines provide the scanning device with timing information to accurately interpret the code’s content.
-
Format Information: A small section within the QR code contains format information, such as the error correction level and mask pattern used. QR codes have four error correction levels:
- Low (L), which can restore 7% of the code’s data
- Medium (M), which can restore 15%,
- Quartile (Q), which can restore 25%,
- and High (H), which can restore 30% of the data
-
Version Information: In larger QR codes, a designated area holds version information, specifying the size and capacity of the QR code.
-
Data Region: The data region holds the encoded information. Several data types can be encoded with a QR code, including alphanumeric characters, numeric values, or even binary data.
-
Quiet Zone: The quiet zone is a margin of white space surrounding the QR code, providing a buffer between the code and its surroundings. This margin ensures accurate scanning by preventing interference from nearby visual elements.
QR codes are built by taking the attributes of the code (error correction, mask patterns, and version information) and the data of the code, encoding it all to binary, and then filling out the various parts of it as appropriate.
Thankfully, you don’t have to do this by hand. Several Vue.js libraries simplify the process, like vue-qrcode and qrcode.vue.
The library you’ll be using to build the generator is vue-qrcode.
Building the QR code generator
Here’s a sneak peek at the finished generator:
Your first step is to build a new Vite project. Open your terminal and run the following command:
npm create vite@latestThen follow the prompts like this:

Run the following commands:
cd qr-generator-demo
npm install
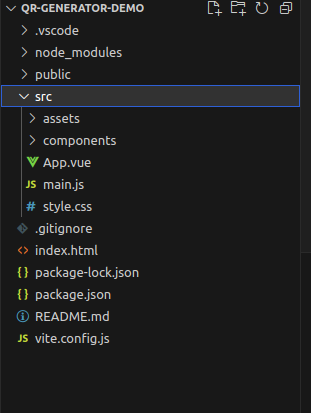
npm run devIf done correctly, your project folder should look like this:
Your next step is to delete the boilerplate you won’t need. Delete the src/assets folder, as well as the src/components folder, and replace the contents of App.vue with an empty template tag.
Now, you can start building the UI for the generator. Write all the styling for the project by replacing the contents of the style.css file with this:
body {
  background-color: #f1f3f4;
  margin: 0;
  padding: 0;
}

button {
  all: unset;
}

header {
  background-color: #fff;
  padding: 1rem 2rem;
  font-size: 2rem;
  font-weight: 600;
}

.container {
  display: flex;
  background-color: white;
  width: 1000px;
  box-shadow: 0px 0px 5px #e5e7e8;
  margin: 3rem auto;
  min-height: 350px;
  border-radius: 5px;
  padding: 2rem 0;
}

.left {
  width: 50%;
  border-right: 3px dashed black;
  padding: 0 2rem;
}

.right {
  flex-grow: 1;
  display: flex;
  flex-direction: column;
  padding: 0 2rem;
}

.user-input-field {
  display: block;
  border: none;
  font-size: 1.5rem;
  height: 100%;
  width: 100%;
  box-sizing: border-box;
}

.qrcode-box {
  flex-grow: 1;
  display: flex;
  justify-content: center;
  align-items: center;
}

.qrcode {
  display: inline-block;
  font-size: 0;
  margin-bottom: 0;
  position: relative;
}

.qrcode__image {
  background-color: #fff;
  border: 0.25rem solid #fff;
  border-radius: 0.25rem;
  box-shadow: 0 0.125rem 0.25rem rgba(0, 0, 0, 0.25);
  height: 15%;
  left: 50%;
  overflow: hidden;
  position: absolute;
  top: 50%;
  transform: translate(-50%, -50%);
  width: 15%;
}

.download-button {
  text-transform: capitalize;
  width: fit-content;
  border: 1px solid black;
  border-radius: 5px;
  margin: 1rem 0;
  padding: 0.5rem 1rem;
  cursor: pointer;
  text-align: center;
}

.placeholder {
  display: flex;
  justify-content: center;
  align-items: center;
  height: 100%;
  width: 100%;
}

.spinner {
  width: 20px;
  height: 20px;
  border: 3px solid black;
  border-top: 3px solid white;
  border-radius: 50%;
  display: inline-block;
  animation: spin linear 1s infinite;
}

@keyframes spin {
  from {
    transform: rotate(0deg);
  }
  to {
    transform: rotate(360deg);
  }
}
Next, you’ll write the markup for the application’s shell. Replace the contents of App.vue with this code:
<script setup>
import { ref } from "vue";

const userInput = ref("");
</script>

<template>
  <header>
    <span>QR Code Generator</span>
  </header>

  <div class="container">
    <div class="left">
      <textarea
        class="user-input-field"
        placeholder="Enter your text here"
        v-model="userInput"
      />
    </div>

    <div class="right">
      <template v-if="userInput && userInput.length > 0">
        <div class="qrcode-box">
          <div
            v-if="userInput && userInput.length > 0"
            class="qrcode"
            ref="templateReference"
          ></div>
        </div>
      </template>

      <div v-else class="placeholder">
        <p>Enter some text on the left to generate a code</p>
      </div>
    </div>
  </div>
</template>
The code above does a few things:
- declares a
refcalleduserInput - Creates a header and a container for the rest of the elements and splits it in two
- the left side contains the
textareathe user will type data into - the right side contains the container for the rendered QR code and renders a placeholder if the user hasn’t supplied any input.
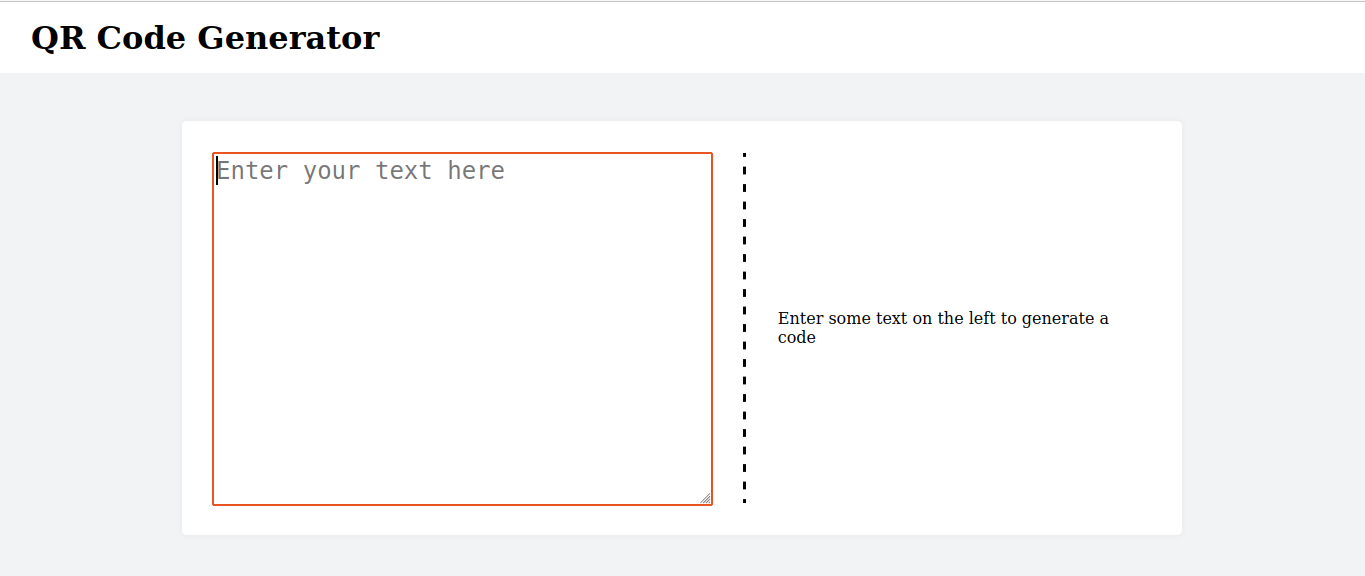
If you visit it in your browser, your application should now look like this:
And you’re done with the shell of the UI.
Integrating vue-qrcode
Add vue-qrcode to the project by running this command:
npm install qrcode@1 @chenfengyuan/vue-qrcode@2Before we go on, we need to understand the fundamentals of the library. The Vue-qrcode library offers all its functionality by providing you with a single component called VueQrcode. Vueqrcode receives the data to encode and the width of the QR code as props, then renders a valid QR code to the screen.
Import it at the top of App.vue by adding this line to the top of your <script> tag:
import VueQrcode from '@chenfengyuan/vue-qrcode';Now, you only need to use the component in your template. Inside your <template> tag, add this code inside the <div> with a class of qrcode:
<vue-qrcode :value="userInput" :options="{ width: 200 }"></vue-qrcode>The value prop accepts the text that will be encoded, and the options prop receives an object that allows you to specify the width. When you type into the textarea, you should see a QR code generated.
Downloading the QR code
The generator isn’t very useful if people have to take screenshots of the code to use it, so let’s implement a feature that will let users download the generated QR code.
The approach we’ll take is simple: convert the rendered QR code to an image, then download the image to the user’s device. But first, we need a library to handle the HTML-to-image conversion.
We’ll use the html-to-image library for this. Install it by running the following in the terminal:
npm install --save html-to-imageWe’ll need a reference to the HTML element we will convert to use the library. Create one by adding a template ref to the <div> with a class of qrcode like so:
<div
  v-if="userInput && userInput.length > 0"
  class="qrcode"
  ref="templateReference"
>
  <vue-qrcode
    :value="userInput"
    :options="{ width: 200 }"
  ></vue-qrcode>
</div>
Next, enter the <script> tag and import the toPng function from html-to-image like this:
import { toPng } from "html-to-image";Now you can write the function that will download the QR code:
const downloading = ref(false);

const templateReference = ref(null);

const downloadQRCode = () => {
  if (templateReference.value === null || !userInput.value) {
    return;
  }

  downloading.value = true;

  toPng(templateReference.value)
    .then((dataUrl) => {
      const link = document.createElement("a");
      link.download = "my-qrcode.png";
      link.href = dataUrl;
      link.click();
      downloading.value = false;
    })
    .catch((err) => {
      console.log(err, templateReference.value);
      downloading.value = false;
    });
};
This is how the downloadQRcode function works:
- It checks that the template reference is valid and that the user has provided input
- It then calls
toPngusing the reference.toPngreturns a promise that contains the dataUrl of the image if it resolves, and an error if it rejects. - If the promise resolves, it creates an
<a>tag whosehrefis set to the dataUrl and uses the download attribute of the<a>tag to download the image.
The last piece of the feature is a download button that calls downloadQRcode when clicked. Add this markup after the <div> with a class qrcode-box like this:
<template v-if="userInput && userInput.length > 0">
<div class="qrcode-box">
<!-- content unchanged -->
</div>
<button @click="downloadQRCode" class="download-button">
<span v-if="!downloading">download code as png</span>
<span v-else class="spinner"></span>
</button>
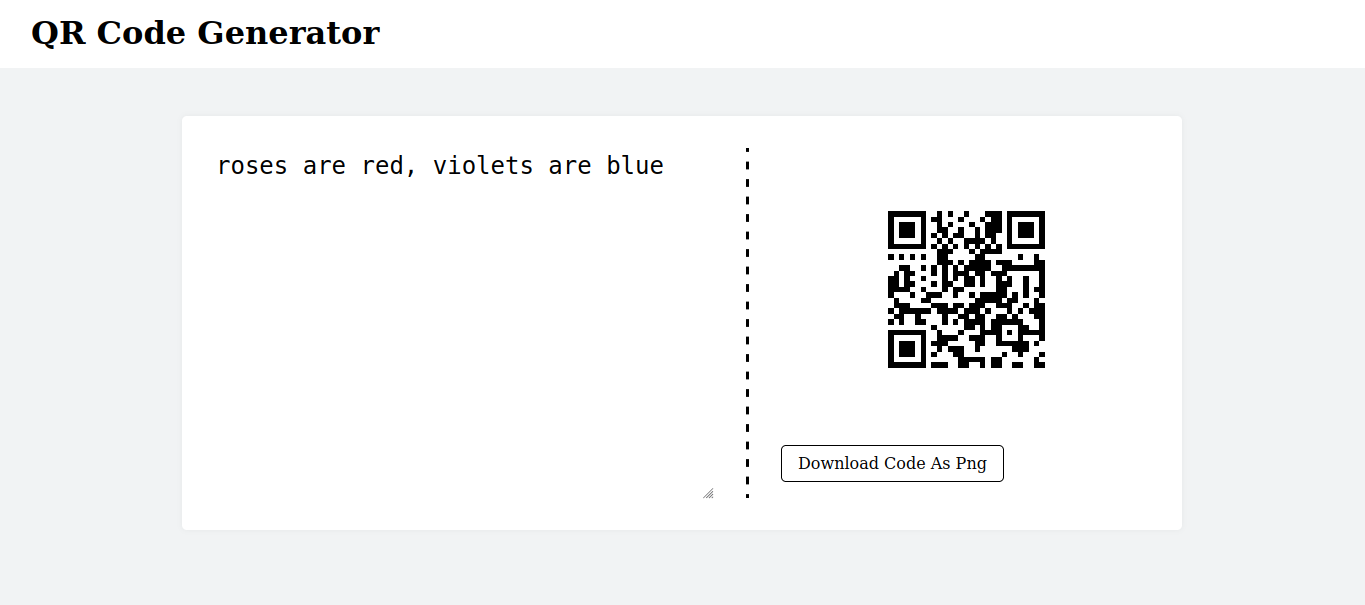
</template>And you’ve created a QR code generator! In the browser, your web application should now look like this:
Testing the QR code
There are several ways to test your QR codes. Many mobile phones come with inbuilt scanners, but if those aren’t an option for you, you can use a service like ZXing to parse the downloaded code and make sure it returns the correct content.
Customizing the QR code
The VueQrcode component is flexible and allows you to customize the generated code. Modifying the options object allows you to specify aspects of the code like the version, error correction level, and mask pattern. For example, here’s how you would set a version of 25 and an error correction of H for your code:
<vue-qrcode
:value="userInput"
:options="{ width: 200, version: 25, errorCorrectionLevel: 'H' }"
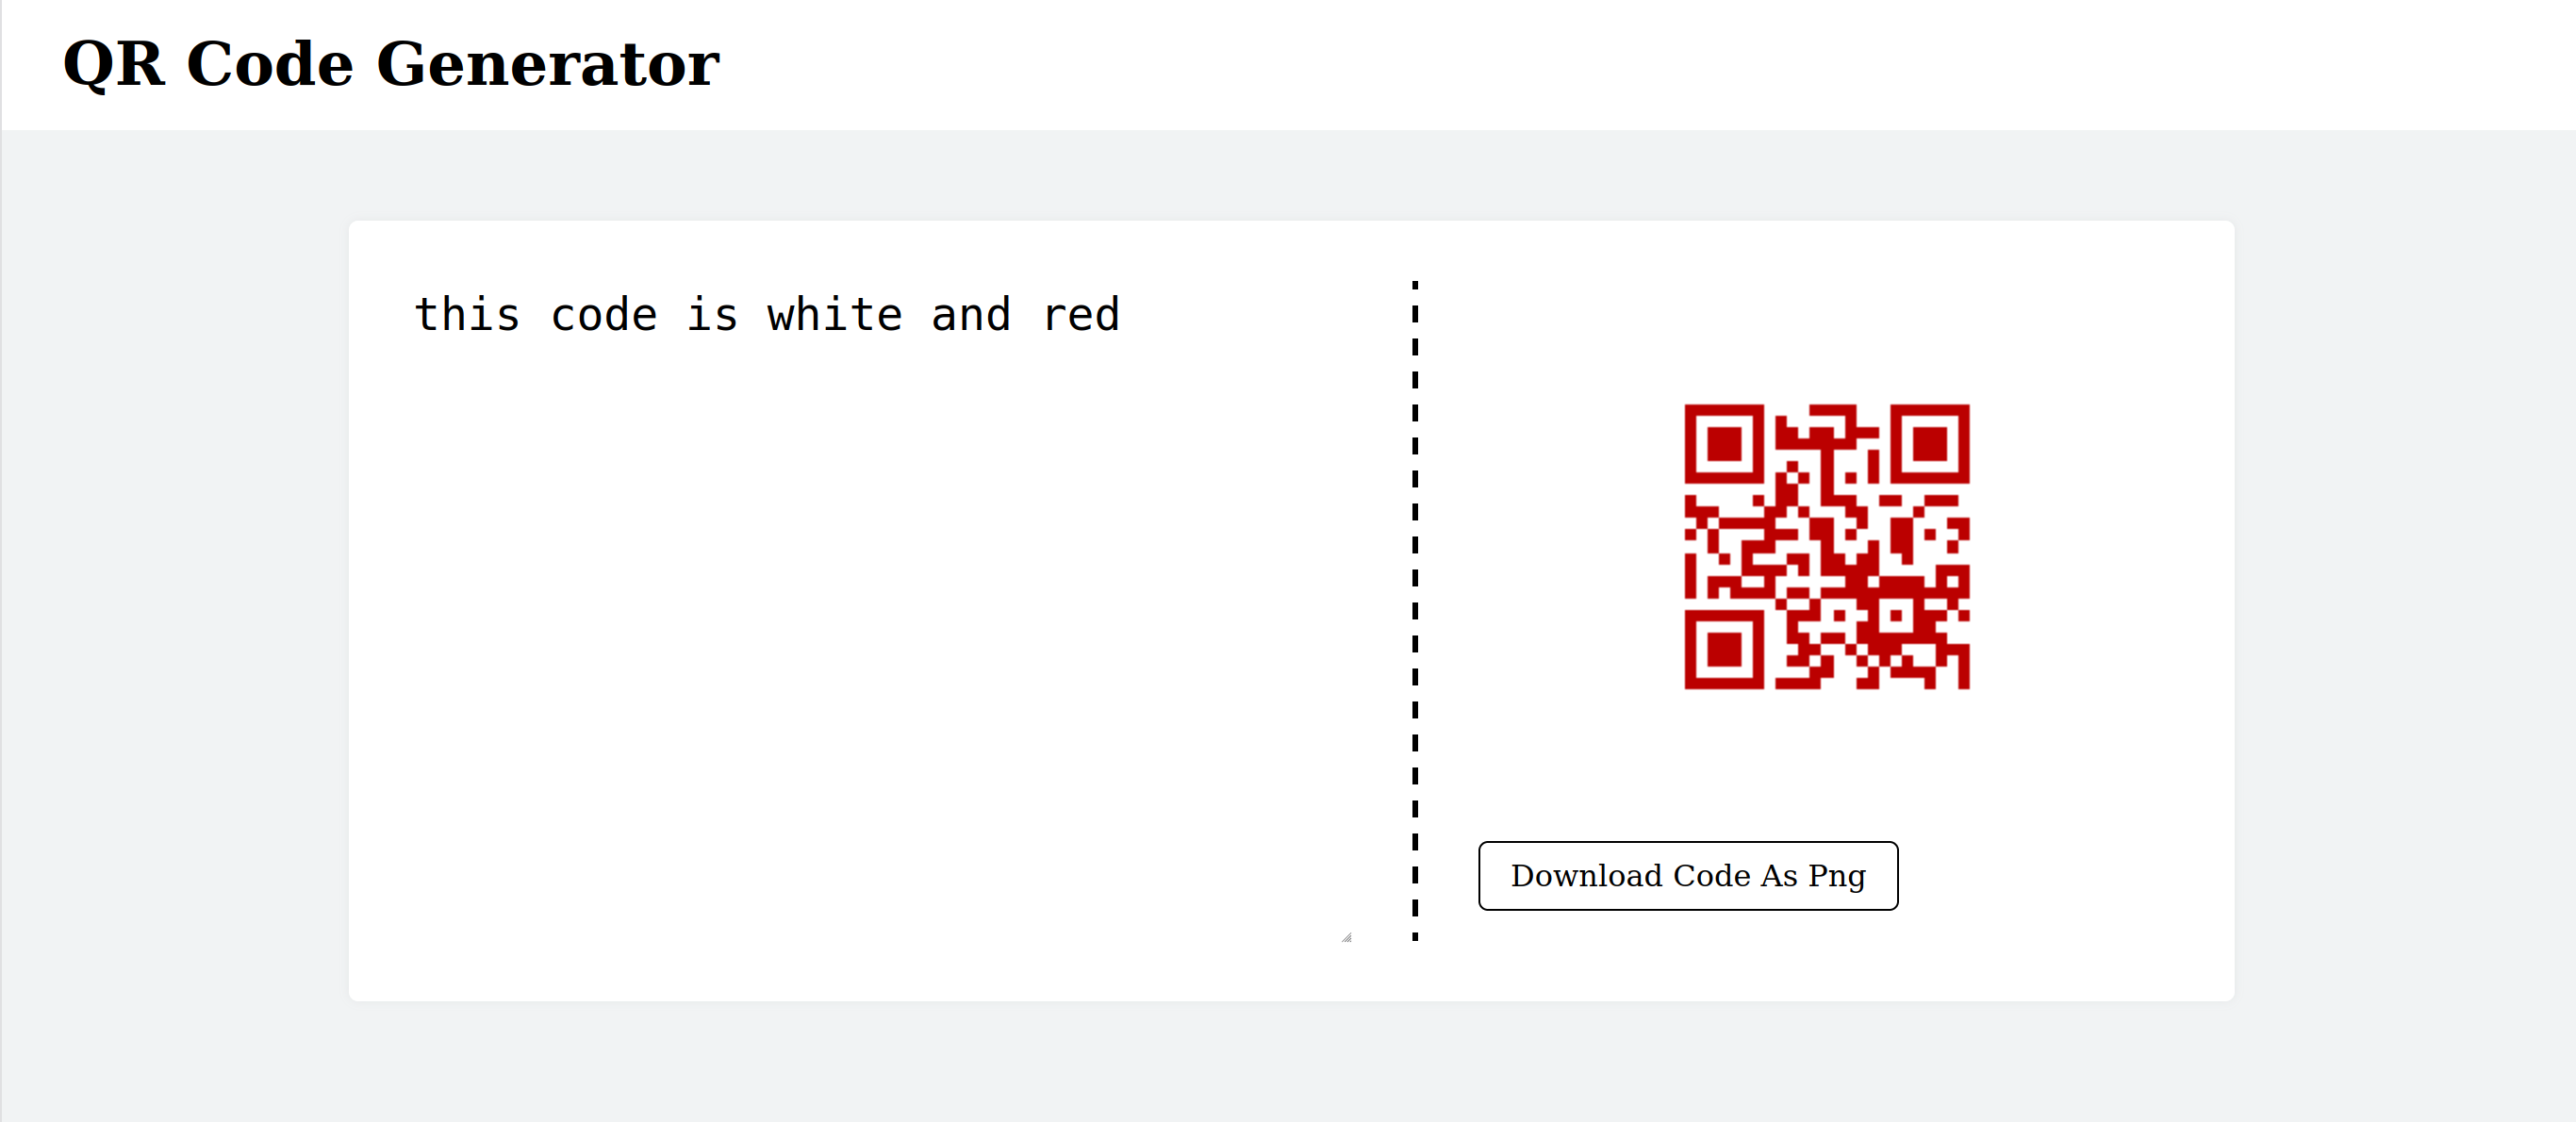
></vue-qrcode>It even allows you to specify custom colors for the code other than black and white, but you have to specify the colors as hex codes. For example, this QR code:
<vue-qrcode
  :value="userInput"
  :options="{
    width: 200,
    color: { dark: '#b00', light: '#ffffff' },
  }"
></vue-qrcode>
It will render like this:
You can see a full list of customization in the documentation.
Adding a logo to the QR code
While this isn’t a component feature, you can further customize the code by allowing users to add a logo on top of its center. You can do this any way you please, but in this tutorial, we’ll center the logo image on top of the code with position: absolute.
A note of warning: adding a logo to a QR code reduces the amount of data the error correction can recover because the logo covers up some of the QR code’s data. A scanner will still be able to read the code as long as the amount of data covered up is below the threshold of the error correction level, but it’s best to keep logos small relative to the size of the code.
Let’s modify our generator to allow a user to upload a logo. First, add a checkbox that lets the user decide if they want a logo and an input that lets them upload it. In your <template>, put this code right after the <div> with a class of qrcode-box:
<div>
  <input type="checkbox" id="toggle-logo" v-model="useLogo" />
  <label for="toggle-logo"> Add logo to QR code </label>
</div>

<input v-if="useLogo" type="file" @change="handleLogoUpload" accept="image/*" />
The <input> element calls a handleLogoUpload function that we haven’t defined yet to process the user’s selection of a new file, and the <input> only accepts image files.
Then add an image tag right after the vue-qrcode component like this:
<div
  v-if="userInput && userInput.length > 0"
  class="qrcode"
  ref="templateReference"
>
  <vue-qrcode
    :value="userInput"
    :options="{ width: 200 }"
  ></vue-qrcode>
  <img
    v-if="useLogo && uploadedImgUrl && uploadedImgUrl.length != 0"
    class="qrcode__image"
    :src="uploadedImgUrl"
    alt="business logo"
  />
</div>
The image will only render if useLogo is true and the dataUrl of the uploaded image isn’t valid.
Now, add the javascript that handles the upload in your <script> section:
const useLogo = ref(false);
const uploadedImgs = ref([]);
const uploadedImgUrl = ref("");
const handleLogoUpload = ($event) => {
const input = $event.target;
uploadedImgs.value = input.files;
if (uploadedImgs.value.length == 0) {
return;
}
const reader = new FileReader();
reader.addEventListener(
"load",
() => {
uploadedImgUrl.value = reader.result;
},
false
);
reader.readAsDataURL(uploadedImgs.value[0]);
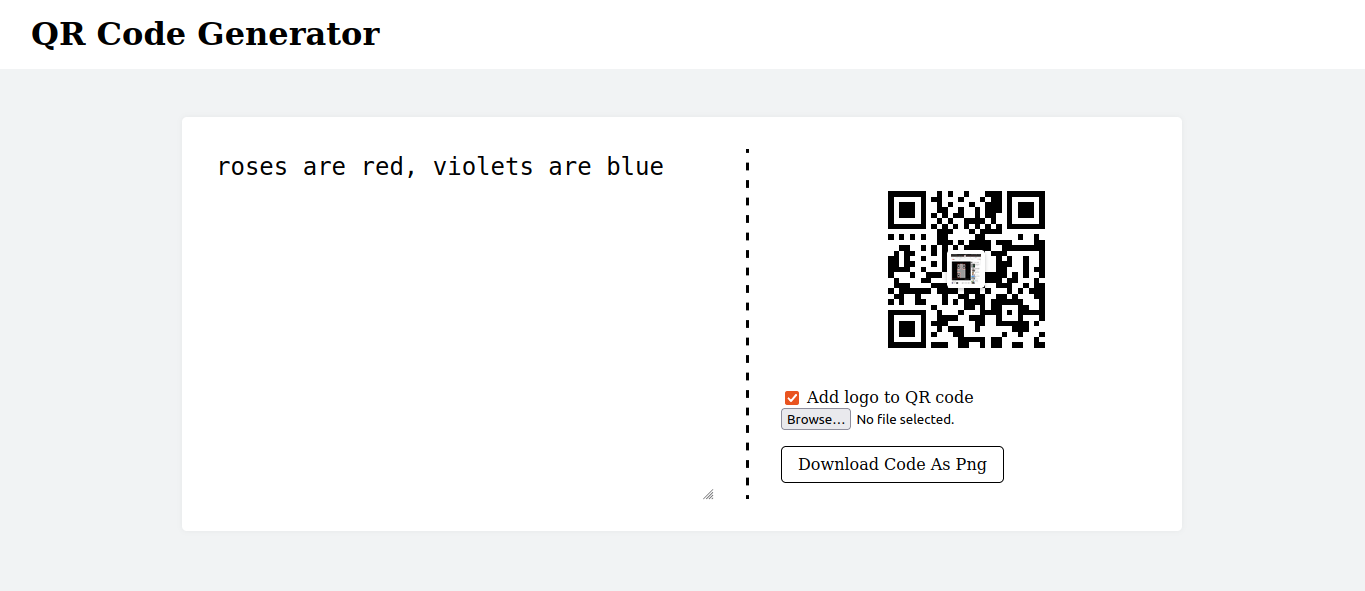
};The handleLogoUpload function takes the event that triggered it as an argument, checks that a file was actually uploaded, and then uses the FileReader API to convert the uploaded file to a base64 dataUrl that becomes the source of the img tag in the template. And that’s it. If you save and then try it out, you should see a small logo in the middle of your QR code like this:

You can find the complete code for the tutorial here.
Conclusion
This article explored creating a QR code generator in Vue.js using the vue-qrcode library. We discussed the utility and anatomy of QR codes and explored the capabilities of vue-qrcode. I hope you enjoyed the article, and happy coding!
Gain control over your UX
See how users are using your site as if you were sitting next to them, learn and iterate faster with OpenReplay — the open-source session replay tool for developers. Self-host it in minutes, and have complete control over your customer data.
Star on GitHub12k