Getting Started with React Cosmos
Learn about the power of React Cosmos in this getting started tutorial


As React developers, we break complex components into smaller bits to reduce complexity and also to make testing easier. React Cosmos further reduces that complexity by giving us a sandbox to easily test, see and iterate quickly while building these components.
React Cosmos is a library that provides a sandbox environment for developing and testing React components in Isolation.
Think of it like a library that provides a way to isolate components and be able to see what they look like (their UI), make changes, and iterate quickly. In the sandbox, we can change props and see our components reflex the changes instantly.
It only supports CRA and Nextjs officially, It also supports the use of Typescript.
The only requirements to use react cosmos are React 16.8 (or newer) Node 10 (or newer).
Why Use React Cosmos
There are many ways to test component UIs and some testing frameworks help us achieve that, to mention but a few react-testing-library, where we write tests to check what a component has, for example, if we are testing a form component, we will write tests to check it a button is rendered, if there are input and/or select tags, etc and we usually see the results in our terminals but with React cosmos, we have a visual way to test our components (Visual TDD) which makes testing easier.
React cosmos also comes with hot-reload so we can see changes made to our components in the sandbox instantly, and it provides a medium for quick testing with prop changes and state changes right there in the cosmos explorer.
Getting Started with React cosmos
Now that we have an overview of React cosmos, let’s see how to work with it by testing components of a food ordering app (no checkout & authentication) with it in isolation.
To get started, we will clone the food ordering app from here. You can do that by running the command below in your terminal (make sure you have git installed in your machine).
git clone https://github.com/Origho-precious/cosmos-food.git
After cloning the repository, navigate into the project folder and open it up in your favorite code editor.
In this project, we are using tailwind for styling, and react-router-dom for routing.
Install project dependencies by running yarn install or npm install in your terminal.
Let’s quickly go over the components we have in this project.
In the src/components folder, we have 4 components:
Button- a simple button componentCartCard- is used to show details of a cart item, and we can also update cart item quantity from this component.Checkout- shows a summary of the cart (sub-total price, delivery fee, and total price).FoodCard- shows food details and a button to add food to the cart.
And in the src/pages, we have 2 components, these are the 2 pages in the app.
cart- this component renders all cart items and the checkout componenthome- this is the app’s landing page, it primarily renders food items and a navbar.
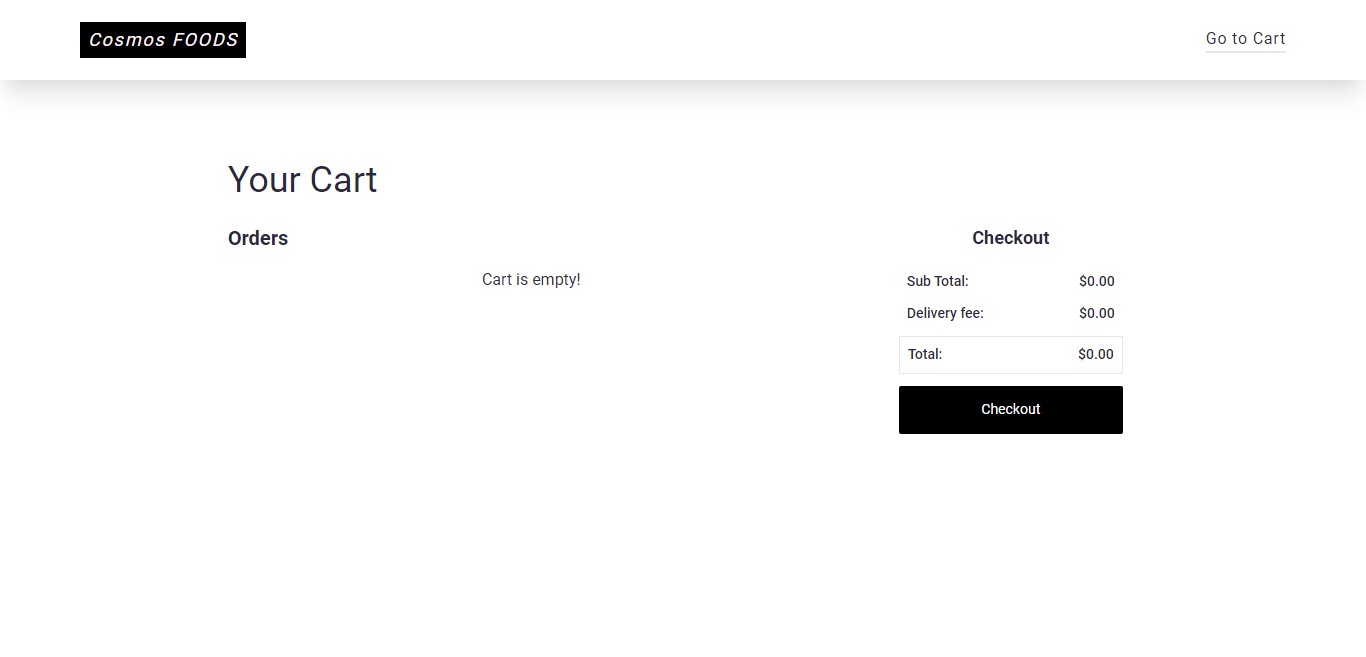
Now let’s start the app to see what it looks like. Start your dev server with
yarn startOR
npm startYou should see these on your browser.

In the next section, we will start testing components in this app with React cosmos.
Using React Cosmos
Let’s install the React cosmos package with the command below.
yarn add react-cosmos -DTo use react cosmos with create-react-app, we need to add and change a few things. Firstly, create a cosmos config file, In our project root folder, create a file called cosmos.config.json, inside it add the code block below
{
  "staticPath": "public",
  "watchDirs": ["src"],
  "webpack": {
    "configPath": "react-scripts/config/webpack.config"
  },
  "globalImports": ["src/styles/main.css"]
}
We are telling cosmos to watch the src folder and watch out for static assets in our public folder, we are also pointing cosmos to where to get our webpack config file from, and finally, we add our CSS import as seen in line 7.
The next step is to add a package that makes cosmos work well with create-react-app, without this we will run into an issue with cosmos and create-react-app hot-reload. learn more about it here. Run the command below in your terminal
yarn add cross-env -D Let’s update our package.json file, to include cosmos scripts
"scripts": {
    "start": "npm run watch:css && react-scripts start",
    "build": "npm run watch:css && react-scripts build",
    "test": "react-scripts test",
    "eject": "react-scripts eject",
    "watch:css": "postcss src/styles/tailwind.css -o src/styles/main.css",
    "cosmos": "cross-env FAST_REFRESH=false cosmos",
    "cosmos:export": "cross-env FAST_REFRESH=false cosmos-export"
  }
Start our cosmos server with
yarn cosmos
OR
npm run cosmos
After the server starts, go to http://localhost/5000 in your browser, you should see this.
If you see any error in your terminal, please go through the steps again.
Open Source Session Replay
OpenReplay is an open-source, session replay suite that lets you see what users do on your web app, helping you troubleshoot issues faster. OpenReplay is self-hosted for full control over your data.

Start enjoying your debugging experience - start using OpenReplay for free.
Writing Fixtures
I know you might be wondering what fixtures are, don’t sweat it. Fixtures are files containing default export of your React Components or React Node that will be shown in React cosmos explorer/sandbox.
There are two options to creating fixtures
- files are to end with
.fixture.{js,jsx,ts,tsx}e.g Button.fixture.js or - Create a folder inside
srccalled__fixtures__to house all your fixtures inside it like__fixtures/Button.jsx.
We will be using the second option to keep things a bit more organized. Let’s create our first fixture,
Button Fixture
Inside src create a folder called __fixture__ inside create a file called Button.jsx. We are going to create a Button fixture with the code below:
import Button  from "../components/Button/Button";

export default (
  <div className="w-60 mx-auto">
    <Button>Cosmos</Button>
  </div>
);- First we imported the component we want to test
- We exported it as default, notice the
divand classes, I did that to resize the width of the button and center it horizontally.
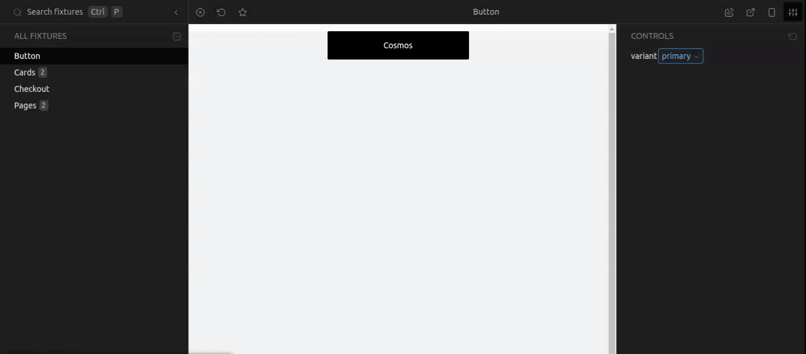
Go to your Cosmos explorer, you should see this
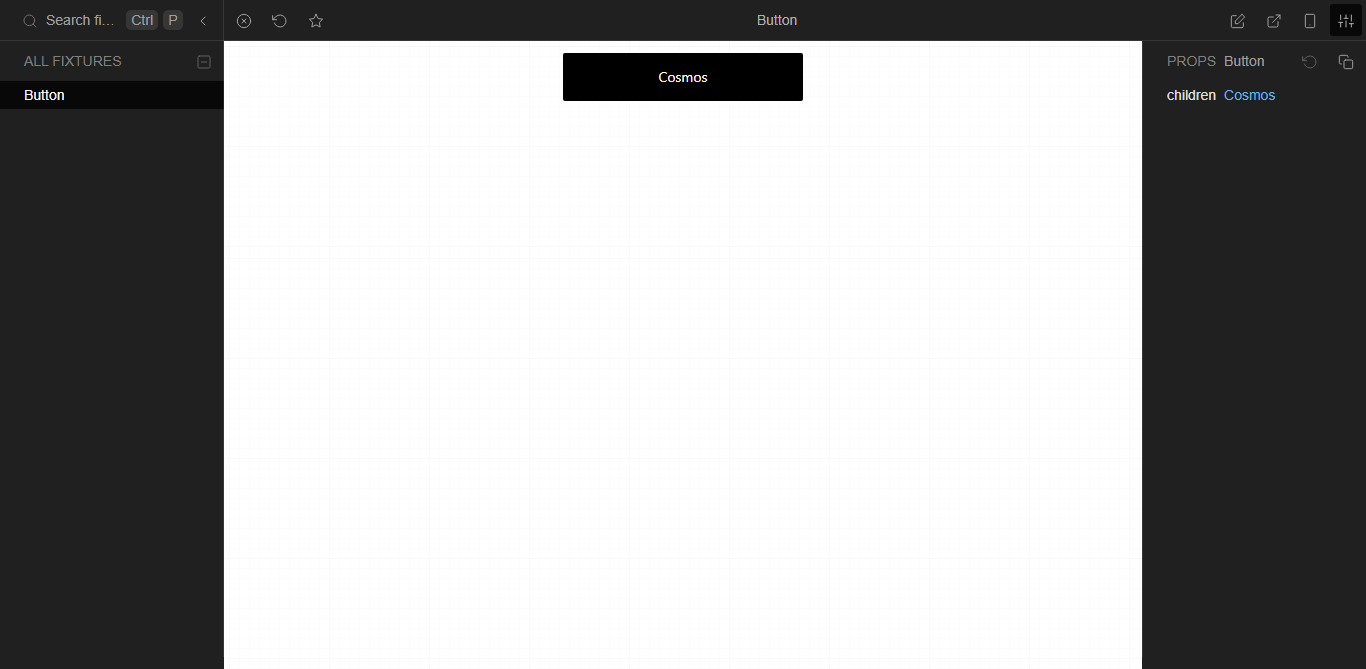
Notice the Button looking exactly like it is in our app, and the children prop we passed showing there.
On the right panel, we can directly update the prop passed to the button component, play around with it and see how it changes immediately,
To further test the Button’s UI, let’s add a variant prop so we will have a primary and secondary Button variant.
Go to src/components/Button/Button.jsx and update it to look like this
const Button = ({ children, variant = "primary" }) => {
  return (
    <button
      className={`block w-full h-12 ${
        variant === 'primary' ? "bg-black" : "bg-blue-600"
      } hover:opacity-70 mt-3 text-sm rounded-sm`}
      style={{ color: '#fff', border: "none", outline: "none" }}
      type="button"
    >
      {children}
    </button>
  );
};
export default Button;
We just updated our Button component to have a prop called variant which updates the background color of the Button.
Now to go src/__fixtures__/Button.jsx and update it to look like this
import { useSelect } from 'react-cosmos/fixture';
import Button  from "../components/Button/Button";

export default () => {
  const [variant] = useSelect('variant', {
    options: ['primary', 'secondary'],
  });

return (
  <div className="w-60 mx-auto">
    <Button variant={variant}>Cosmos</Button>
  </div>
)};
Above we updated our Button fixture to include a variant prop as we did the Button component and also we introduce a Control panel hook useSelect, with this hook we are able to set options of the variant prop, so in our sandbox, we can select from the options we have other than typing it manually. There’s also another control panel hook React cosmos offers useValues with it, we can update data like count, etc
Let’s see Button component in the explorer. On the right, you can select either of the two variant options to change the variant prop and see the background-color change accordingly.
We have now successfully created a Button fixture and tested it in our Cosmos sandbox (explorer).
Let’s continue by creating a Checkout fixture.
Checkout Fixture
Just like we created the Button fixture, in src/__fixtures__/ create a new file called Checkout.jsx and add the code below
import Checkout from "../components/Checkout/Checkout";

const data = {
  subTotal: 100,
  deliveryFee: 5,
  total: 105,
};

export default (
  <div className="w-60 mx-auto">
    <Checkout
      subTotal={data.subTotal}
      deliveryFee={data.deliveryFee}
      total={data.total}
    />
  </div>
);
Above we created a fixture for our Checkout component using mock data. Let’s check what it looks like in our Cosmos sandbox, Click on it on the left panel. It should look like
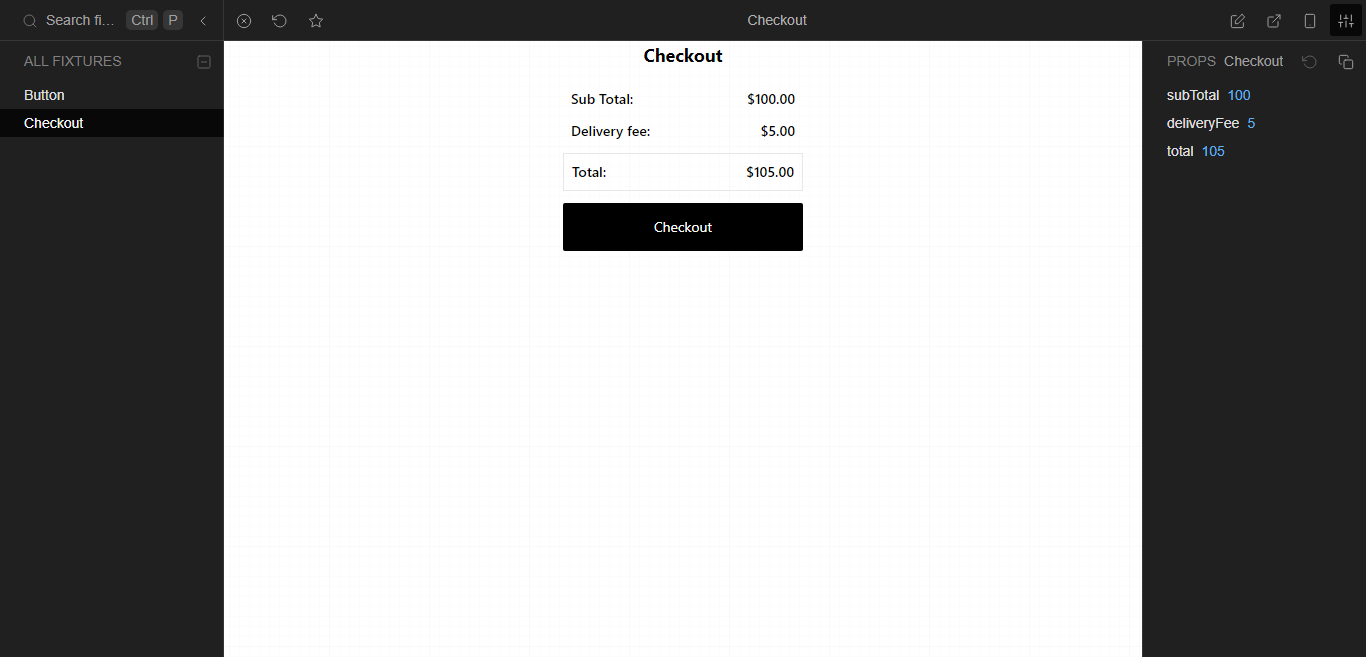
Simple right? Now you can test it by passing different prop values to it. or play with it in the explorer.
Cards Fixture
Here, we will create a different type of fixture called Multi fixture, It’s like the regular fixture but here, we can create more than one fixture from the same file. It’s easier than it sounds, let’s do it below to see how that works.
Create a file called Cards.js in the __fixtures__ folder and add the following code
import CartCard from "../components/CartCard/CartCard";
import FoodCard from "../components/FoodCard/FoodCard";

const food = {
  id: 1,
  name: "Peppered Chicken",
  imgURL: "https://sisijemimah.com/wp-content/uploads/2015/07/image70.jpg",
  price: "8.00",
};

const order = {
  id: 1,
  name: "Peppered Chicken",
  imgURL: "https://sisijemimah.com/wp-content/uploads/2015/07/image70.jpg",
  price: "8.00",
  qty: 1,
  updateList: () => {},
};

export default {
  FoodCard: (
    <FoodCard
      id={food.id}
      name={food.name}
      price={food.price}
      imgURL={food.imgURL}
    />
  ),
  CartCard: (
    <CartCard
      id={order.id}
      name={order.name}
      price={order.price}
      imgURL={order.imgURL}
      qty={order.qty}
      updateList={order.updateList}
    />
  ),
};
Above we imported, FoodCard and CartCard components and created two objects to contain mock data for the FoodCard and CartCard components and passed them to the respective components as props.
Let’s see what a multi fixture looks like in our cosmos sandbox,
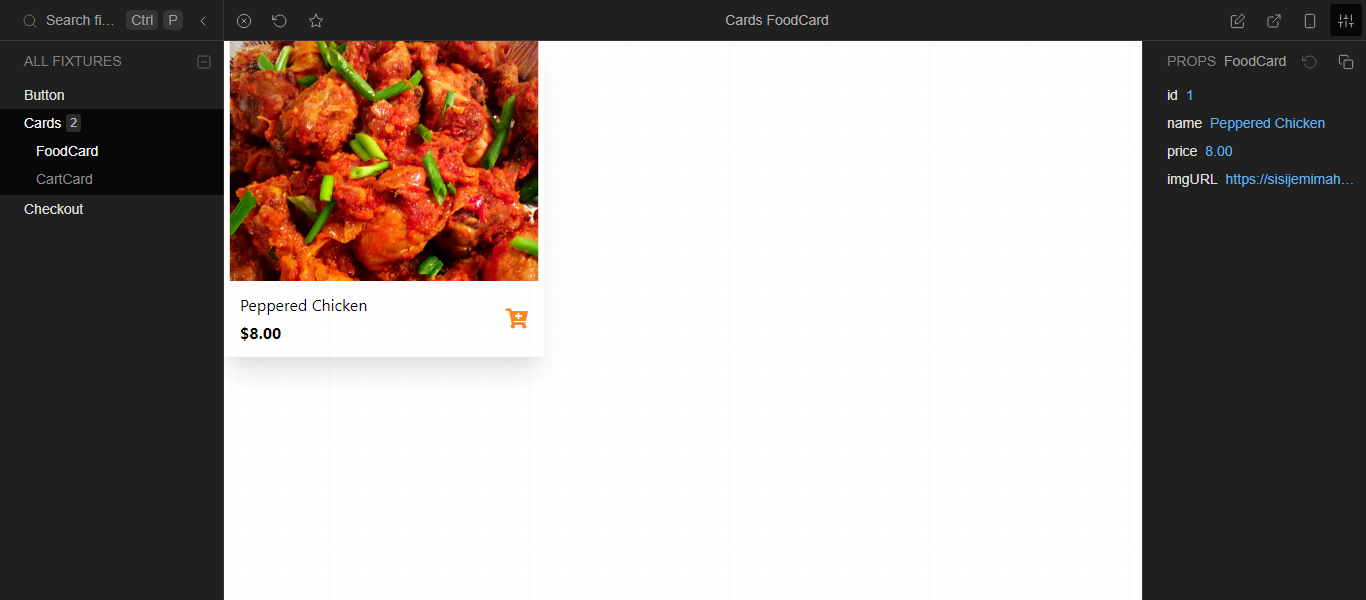
You see now we have a Cards fixture and in it we have FoodCard and CartCard components, and we can click on them to see them.
It’s more organized now right? Yeah, that’s how you can organize your sandbox as it gets larger.
Lastly, let us build a Page fixture - A multi fixture for pages (home and cart pages). we will do that below.
Pages Fixture
Create a new file in __fixtures__ called Pages.js add the code below
import Cart from "../pages/cart";
import Home from "../pages/home";

export default {
  cart: <Cart />,
  home: <Home />
};
A very simple fixture to show what a whole page looks, They should look like this in our sandbox;
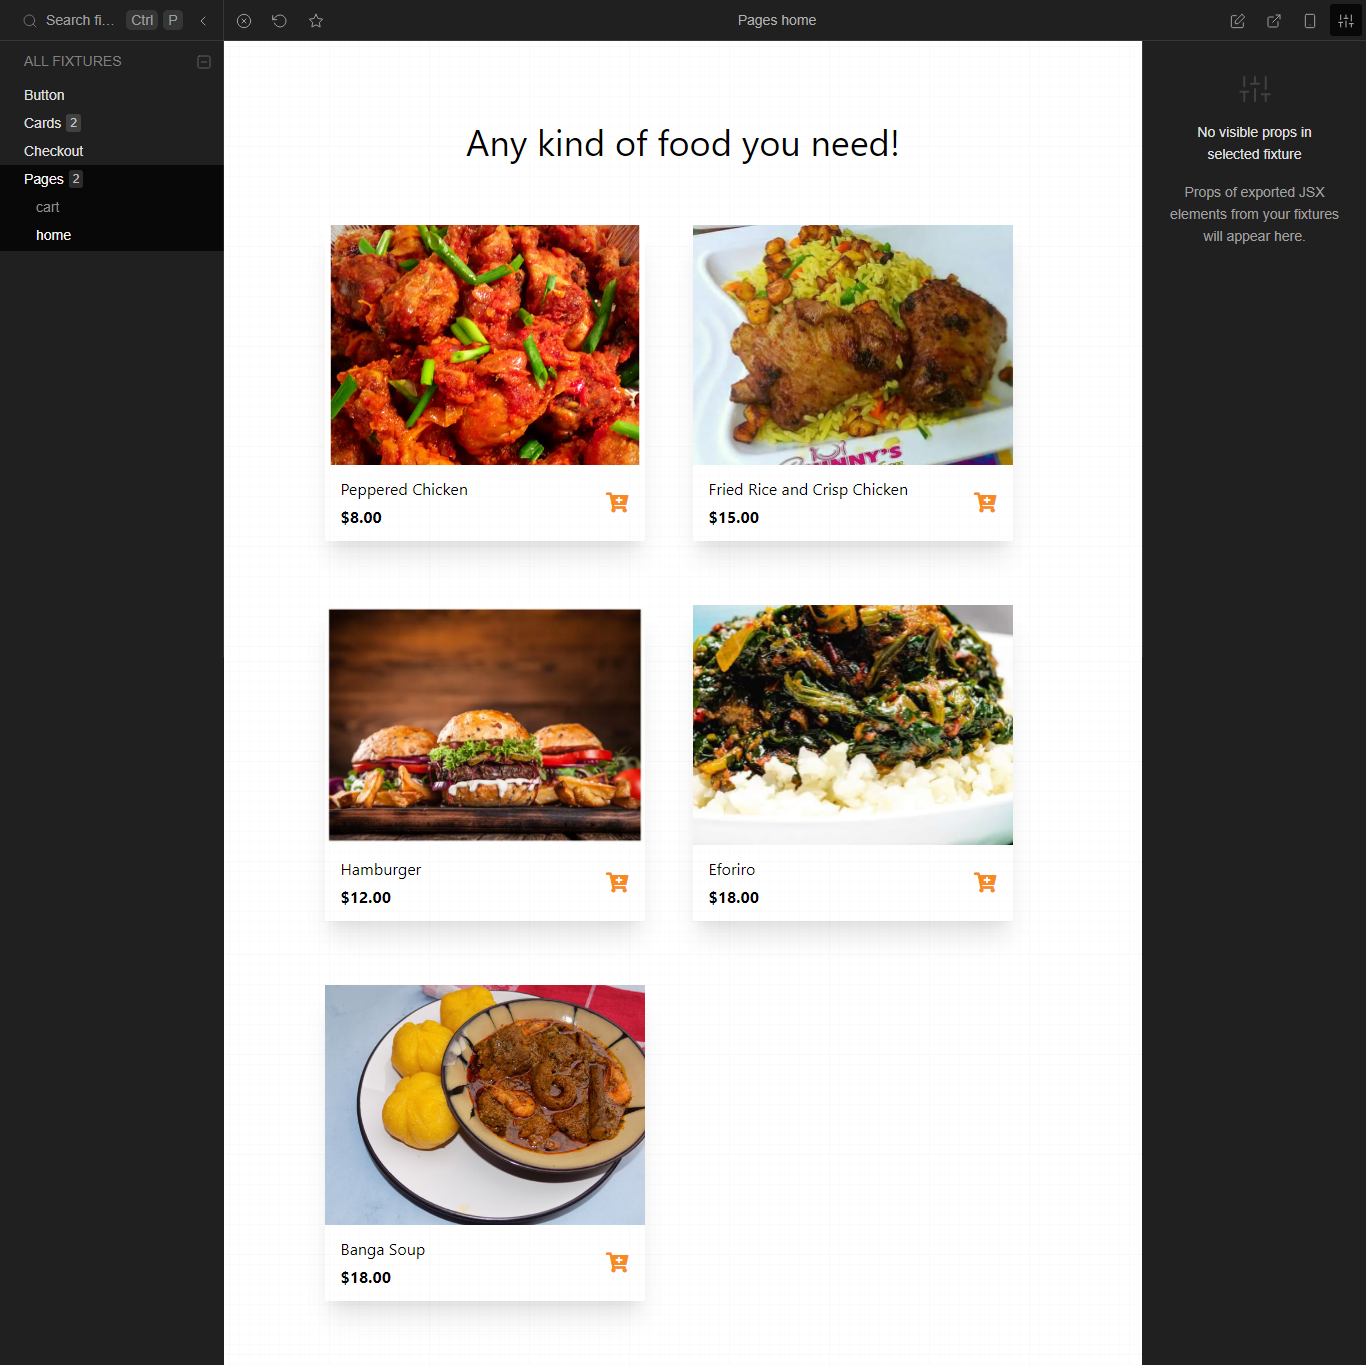

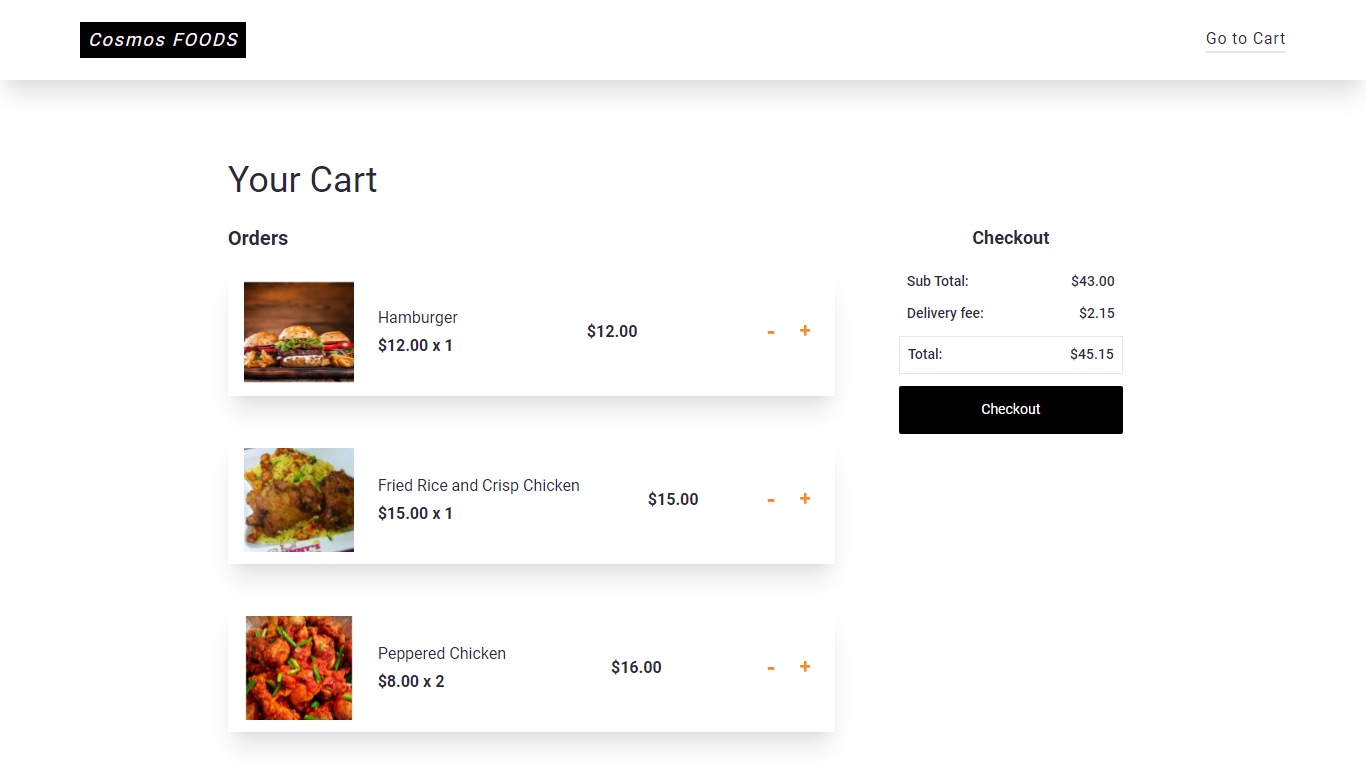
We now have home and cart page fixtures, click on any of the cart icons on the FoodCard to add to the cart and navigate to the cart page to see what you add. You can also update the quantity of the items ordered on the CartCard and see the values update accordingly as well as the checkout values.
We can visually test our app now, we see how it functions by testing the components in isolation and testing how they work together also in isolation without starting our app’s dev server. This is the visual TDD React cosmos offers. Other than writing tests for every component and checking the results in our terminal, with React cosmos, we can see the component working instead.
Decorators
Decorators help us wrap fixtures with some shared properties like CSS styles. To create a decorator we just need to create a cosmos.decorator.js file in the same folder as the fixtures we want to be wrapped with that decorator. Let’s create a decorator for all our pages, to just change the background color a bit.
In src/__fixtures__/ create a file called cosmos.decorator.js and add the code below.
export default ({ children }) => (
  <div className="bg-gray-100 h-screen">{children}</div>
);
We just wrapped our fixtures with a gray background color and made the page height 100vh. We have now successfully wrapped our fixtures with a decorator. Go over to the cosmos explorer to see the change.
Extending Responsiveness We can specify the viewports we want in our sandbox, specifying the devices as well as their height and width. Let do that below
Goto src/cosmos.config.json, update the file to look like this
{
  "staticPath": "public",
  "watchDirs": ["src"],
  "webpack": {
    "configPath": "react-scripts/config/webpack.config"
  },
  "globalImports": ["src/styles/main.css"],
  "ui": {
    "responsivePreview": {
      "devices": [
        { "label": "iPhone 5", "width": 320, "height": 568 },
        { "label": "iPhone 6", "width": 375, "height": 667 },
        { "label": "iPhone 6 Plus", "width": 414, "height": 736 },
        { "label": "Medium", "width": 1024, "height": 768 },
        { "label": "Large", "width": 1440, "height": 900 },
        { "label": "1080p", "width": 1920, "height": 1080 }
      ]
    }
  }
}
Now restart the cosmos server for it to reflect and go over the sandbox. On the top right, we have 4 icons. Click on the second from the left, you can now toggle the different viewports we just passed to it.

Static Export
We can export the fixtures we created if we want to host it as a component library with any static hosting service like netlify. Simply run the cosmos:export command
yarn cosmos:export OR
npm run cosmos:exportConclusion
We have now completely tested our components using react cosmos and we have a component library running alongside our app with which we can quickly test components and we can add more fixtures as we keep building the app.
In this tutorial, we built a food ordering service and testing all the components using React cosmos to learn how it works.
Resources
-
Tutorial Project Live Link - https://cosmos-foods.netlify.app/
-
Github link to the complete tutorial project - https://github.com/Origho-precious/cosmos-food master branch.
-
To learn more about React cosmos check out their official docs - https://github.com/react-cosmos/react-cosmos/tree/main/docs