

Solid.js is an open-source JavaScript library for building web applications focusing on performance and simplicity. It is designed to make it easy for developers to create fast, scalable, and maintainable web applications.
Solid.js is built on top of the React library, providing tools and utilities that make it easier to develop and manage complex React applications. In addition, it offers a lightweight, unopinionated approach to building web applications, allowing developers to choose the libraries and tools that best fit their needs.
Some of the key features of Solid.js include a lightweight component model, a simple and flexible API, server-side rendering, and code-splitting support. It is also designed to be easy to learn and use, making it a good choice for developers new to building web applications.
This tutorial will focus on how to build an application that shows characters from the Rick and Morty series. We will also implement infinite scrolling in this application.
Some prerequisites to follow along in this tutorial include:
- Node installed on your system
- Basic understanding of Javascript and React
Creating a new SolidJS project
The first step is to create a new SolidJS application by running the command below in the terminal:
npx degit solidjs/templates/js rick-and-mortyNavigate to the folder and install the application dependencies with the commands below.
cd rick-and-morty
yarn #or npm i or pnpm
The next step is to run yarn dev to start the development server, which opens at http://localhost:3000/ on your browser.
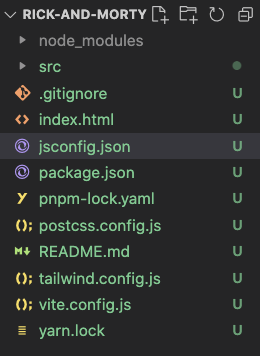
We will be using TailwindCSS for styling purposes, which can be installed by following the steps outlined in the Tailwind documentation. Below is an image of the file tree structure of a SolidJS application.
APIs in SolidJS
Built like React, SolidJS also provides developers with APIs that make building your application a breeze. We will look at some of them in this section.
createSignal: This is SolidJS’s default method for handling state and state changes. It comes with a getter and a setter element. The getter returns the current state value while the setter updates the state value.createSIgnalwork like theuseStatehook in React.
import { createSignal } from "solid-js";

function App() {
  const [count, setCount] = createSignal(0);

  return <div>{count()}</div>
}createEffect: These are used for handling side effects in your applications.createEffectwork like the useEffect hook in React.createResource: This reflects the results of an async function.
You can visit the docs here to find out more about the APIs available in Solid.js.
Building the application
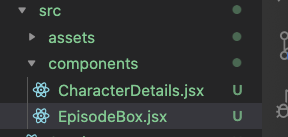
The application will be divided into two components: The component to show details about each episode and a component to show each character. First, create a component folder and the two files as shown below:
In the src/App.jsx file, clear the boilerplate code and paste the code below into it:
import { For, createSignal, onMount, createEffect } from 'solid-js';
import axios from 'axios';
import EpisodeBox from './components/EpisodeBox';
In the code block above, we imported various APIs and methods from SolidJS. We now know the uses of the createSignal and the createEffect APIs. The onMount method runs a code after the component has been rendered. The For method eliminates the need for using the Array.prototype.map() in looping through an array.
We also installed axios, which will be useful for making network requests. Next, add the code below to the App.jsx file.
// src/App.jsx

// imports remain the same
const fetchEpisodes = async () =>
  await axios.get("https://rickandmortyapi.com/api/episode"); // The API

function App() {
  const [episodes, setEpisodes] = createSignal(null);

  onMount(async () => {
    setEpisodes((await fetchEpisodes()).data);
    console.log(episodes());
  });

  return (
    <>
      <div class="flex justify-center items-center flex-col p-10">
        <h2 class=" font-medium text-4xl my-5">Rick and Morty</h2>
        <div style={{ width: "1000px" }}>
          <For each={episodes()?.results} fallback={<p>Loading...</p>}>
            {(episode) => (
              <div>
                <EpisodeBox episode={episode} />
              </div>
            )}
          </For>
        </div>
      </div>
    </>
  );
}
export default App;
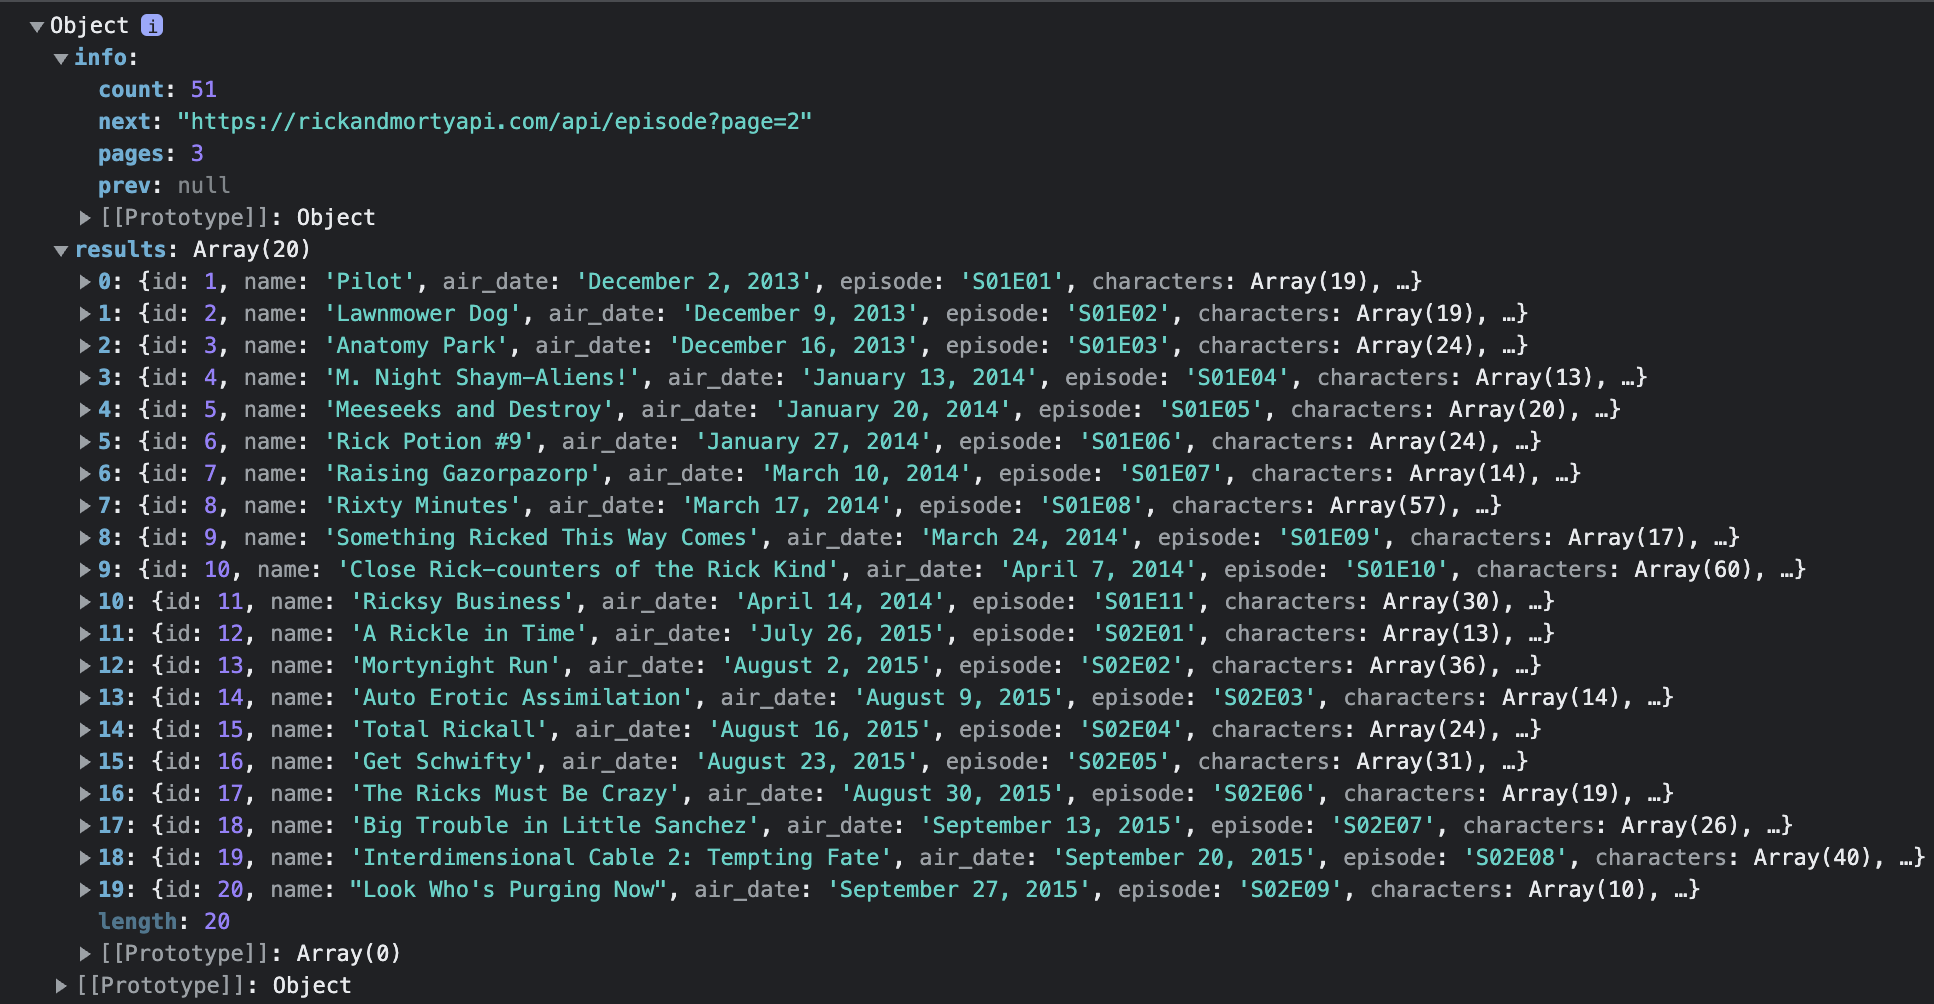
In the code block above, we created a function for fetching data from the Rick and Morty API. First, we created a getter and setter signal (for handling state ), naming them episode and setEpisode. Next, we called the onMount method and passed in the data from calling the API into the setter signal. After setting it, we log the getter signal to the console, map through the results using the For method from SolidJS, and then passed the mapped data as props to the EpisodeBox component.
Now when we check our console, we should see the results from the API shown below:
Next, navigate to the src/components/EpisodeBox.jsx and paste the code below into it.
// src/components/EpisodeBox.jsx

import { createSignal, For } from "solid-js";
import CharacterDetails from "./CharacterDetails";

const EpisodeBox = ({ episode }) => {
  // setting the state for the number of characters to be shown at a time
  const [loadCount, setLoadCount] = createSignal(6);
  // state that will be used check the total page for each episode
  const [counter, setCounter] = createSignal(1);

  // variable that checks the total page
  const totalPage = Math.ceil(episode.characters.length / 6);

  // functionality for checking if more pages are available and then rendering them
  const handleLoadMore = () => {
    if (counter() < totalPage) {
      setLoadCount((prevState) => prevState + 6);
      setCounter((prevState) => prevState + 1);
    }
  };

  // function that checks the episode number
  const episodeNumber = episode.episode.substring(
    episode.episode.length - 2,
    episode.episode.length
  );

  // function that checks the season number
  const seasonNumber = episode.episode.substring(1, 3);
  return (
    <div class="rounded-md border-solid border p-5 border-black mt-5">
      <p className="text-3xl">
        #{episode.id}-{episode.name}
      </p>
      <p className="text-xl my-2">
        {`This is
              episode ${episodeNumber} in season ${seasonNumber}. It was broadcast on ${episode.air_date}. There are a total of ${episode.characters.length} characters
              featured in this episode.`}
      </p>
      <div class="grid grid-cols-3 gap-4">
        <For
          each={episode.characters.slice(0, loadCount())}
          fallback={<p>Loading...</p>}
        >
          {(character) => <CharacterDetails characterUrl={character} />}
        </For>
        {counter() !== totalPage && (
          <>
            <button
              class="bg-blue-500 hover:bg-blue-700 text-white font-bold py-2 px-4 rounded"
              onClick={handleLoadMore}
            >
              Load More!
            </button>
          </>
        )}
      </div>
    </div>
  );
};
export default EpisodeBox;
In the code block above, we created two signals for handling the different states:
- The first signal is to set the state of the number of characters to show at a particular time which in our case is six (6).
- The other is for getting and setting the total page for each episode.
We also created a function that loads more characters for each episode if we have yet to exceed that page’s total number of characters. Next, we created two functions to check the episode and season number, which we then used in the return body.
In the return body, we mapped through the episode characters, got the URL for each character, and then passed it as props to the CharacterDetails component
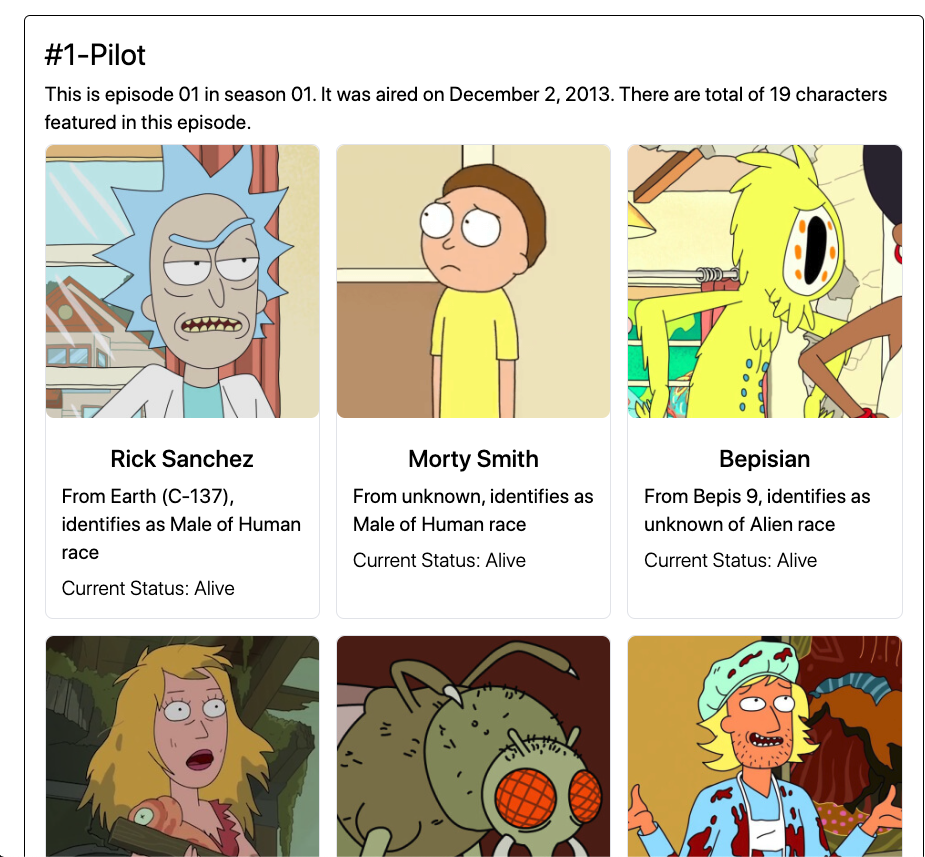
If we head over to the browser, we should see the changes reflect as shown below:

Session Replay for Developers
Uncover frustrations, understand bugs and fix slowdowns like never before with OpenReplay — an open-source session replay tool for developers. Self-host it in minutes, and have complete control over your customer data. Check our GitHub repo and join the thousands of developers in our community.
Showing the character details
Navigate to the src/components/CharacterDetails.jsx and paste the code below into it:
// src/components/CharacterDetails.jsx

import axios from "axios";
import { createSignal, onMount } from "solid-js";

const fetchCharacter = async (characterUrl) => axios.get(characterUrl);

const CharacterDetails = ({ characterUrl }) => {
  const [character, setCharacter] = createSignal();
  onMount(async () => {
    setCharacter((await fetchCharacter(characterUrl)).data);
  });
  return (
    <div class="flex rounded-lg flex-col border">
      <img
        class="rounded-lg"
        src={character()?.image}
        alt={character()?.name}
        loading="lazy"
      />
      <div class="p-4">
        <h2 class="text-center mt-2 text-2xl font-medium">
          {character()?.name}
        </h2>
        <p class=" mt-2 text-xl font-normal">{`From ${
          character()?.origin.name
        }, identifies as ${character()?.gender} of ${
          character()?.species
        } race`}</p>
        <p class=" mt-2 text-xl font-light">
          Current Status: {character()?.status}
        </p>
      </div>
    </div>
  );
};
export default CharacterDetails;
In the code block above, we destructured the character URL coming in and made a request to the API using the character URL. We passed the response to a created signal and then used the properties from the API’s response in the return body. The changes in the browser should be as shown below:
Adding infinite scrolling
The episodes from the Rick and Morty movie API are many, and a good idea is to have a way to fetch more episodes. Some methods include pagination or infinite scrolling, but we will implement infinite scrolling in this application.
In the App.jsx file, copy the code below and paste it there:
// imports and signal creation remain the same

const fetchNextData = async () => {
  if (episodes()?.info?.next) {
    const { data } = await fetchEpisodes(episodes()?.info.next);
    const modifiedEpisodes = [...episodes()?.results, ...data.results];
    setEpisodes((prevState) => ({
      ...prevState,
      results: modifiedEpisodes,
      info: data.info,
    }));
  }
};
const handleScroll = () => {
  if (window.innerHeight + window.scrollY >= document.body.offsetHeight) {
    fetchNextData();
  }
};

createEffect(() => {
  window.addEventListener("scroll", handleScroll);
});

// onMount method and the return body remain the same
We created a fetchNextData function that checks if there is a next option and fetches the following results. We destructured the data and passed it into the episodes signal. We also created a scrolling function that checks if we have scrolled toward the end of the document, and if yes, we call the fetchNextData function.
The next step is to add an event listener that listens to the scroll event and then calls the scrolling function. Our results should look like the GIF below:
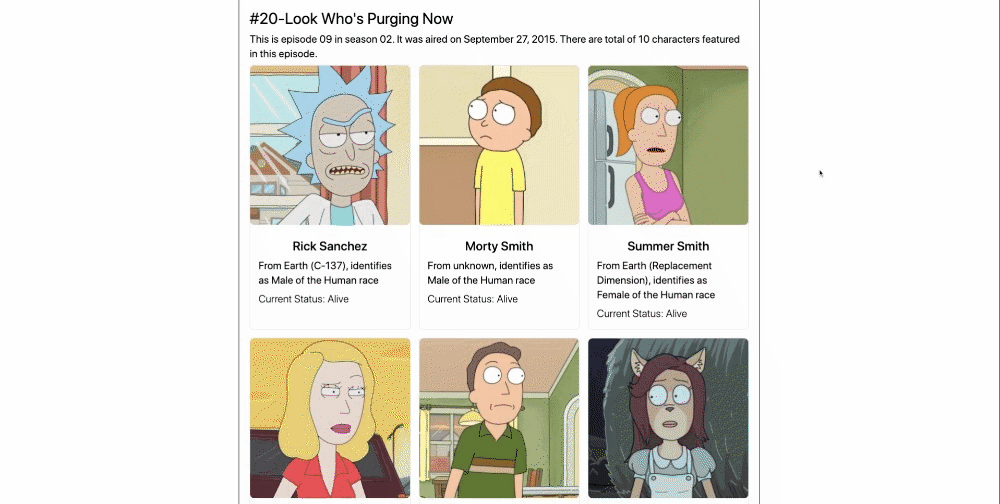
Here is a link to the GIF on Cloudinary.
From the GIF above, we can see that the scroll bar reaches the end, and more episodes are fetched from the API.
Conclusion
This article has looked at SolidJS and how to use SolidJS features to build applications with lots of reactivity. SolidJS also comes with a low learning curve, especially for developers coming from React. So have fun creating with Solid!!.
Readers can find the complete code for this tutorial here.
Gain Debugging Superpowers
Unleash the power of session replay to reproduce bugs and track user frustrations. Get complete visibility into your frontend with OpenReplay, the most advanced open-source session replay tool for developers.


