React: Performing Authentication with JWT
Use tokens for authentication for your React pages


JSON Web Tokens (JWT) have become a popular method for implementing authentication in web applications due to their simplicity and ease of use. This article will discuss how to perform JWT authentication in a React app. We will cover the steps involved in setting up a backend JWT authentication endpoint, signing up and signing in from your React app, and protecting routes with JWT validation, so you will have a solid understanding of how to implement JWT authentication in your code, ensuring your users’ data is secure.

Discover how at OpenReplay.com.
Authenticating users entails being able to identify and confirm that a user is exactly who they say they are. In web apps, you achieve this by providing user credentials, such as a username and password, on the client side that will be stored. When a user attempts to log in, you will check their credentials to verify the authenticity on the server side.
If the user credentials are correct, a JSON web token is generated for the user and saved to memory. The authentication flow is shown in the image below.
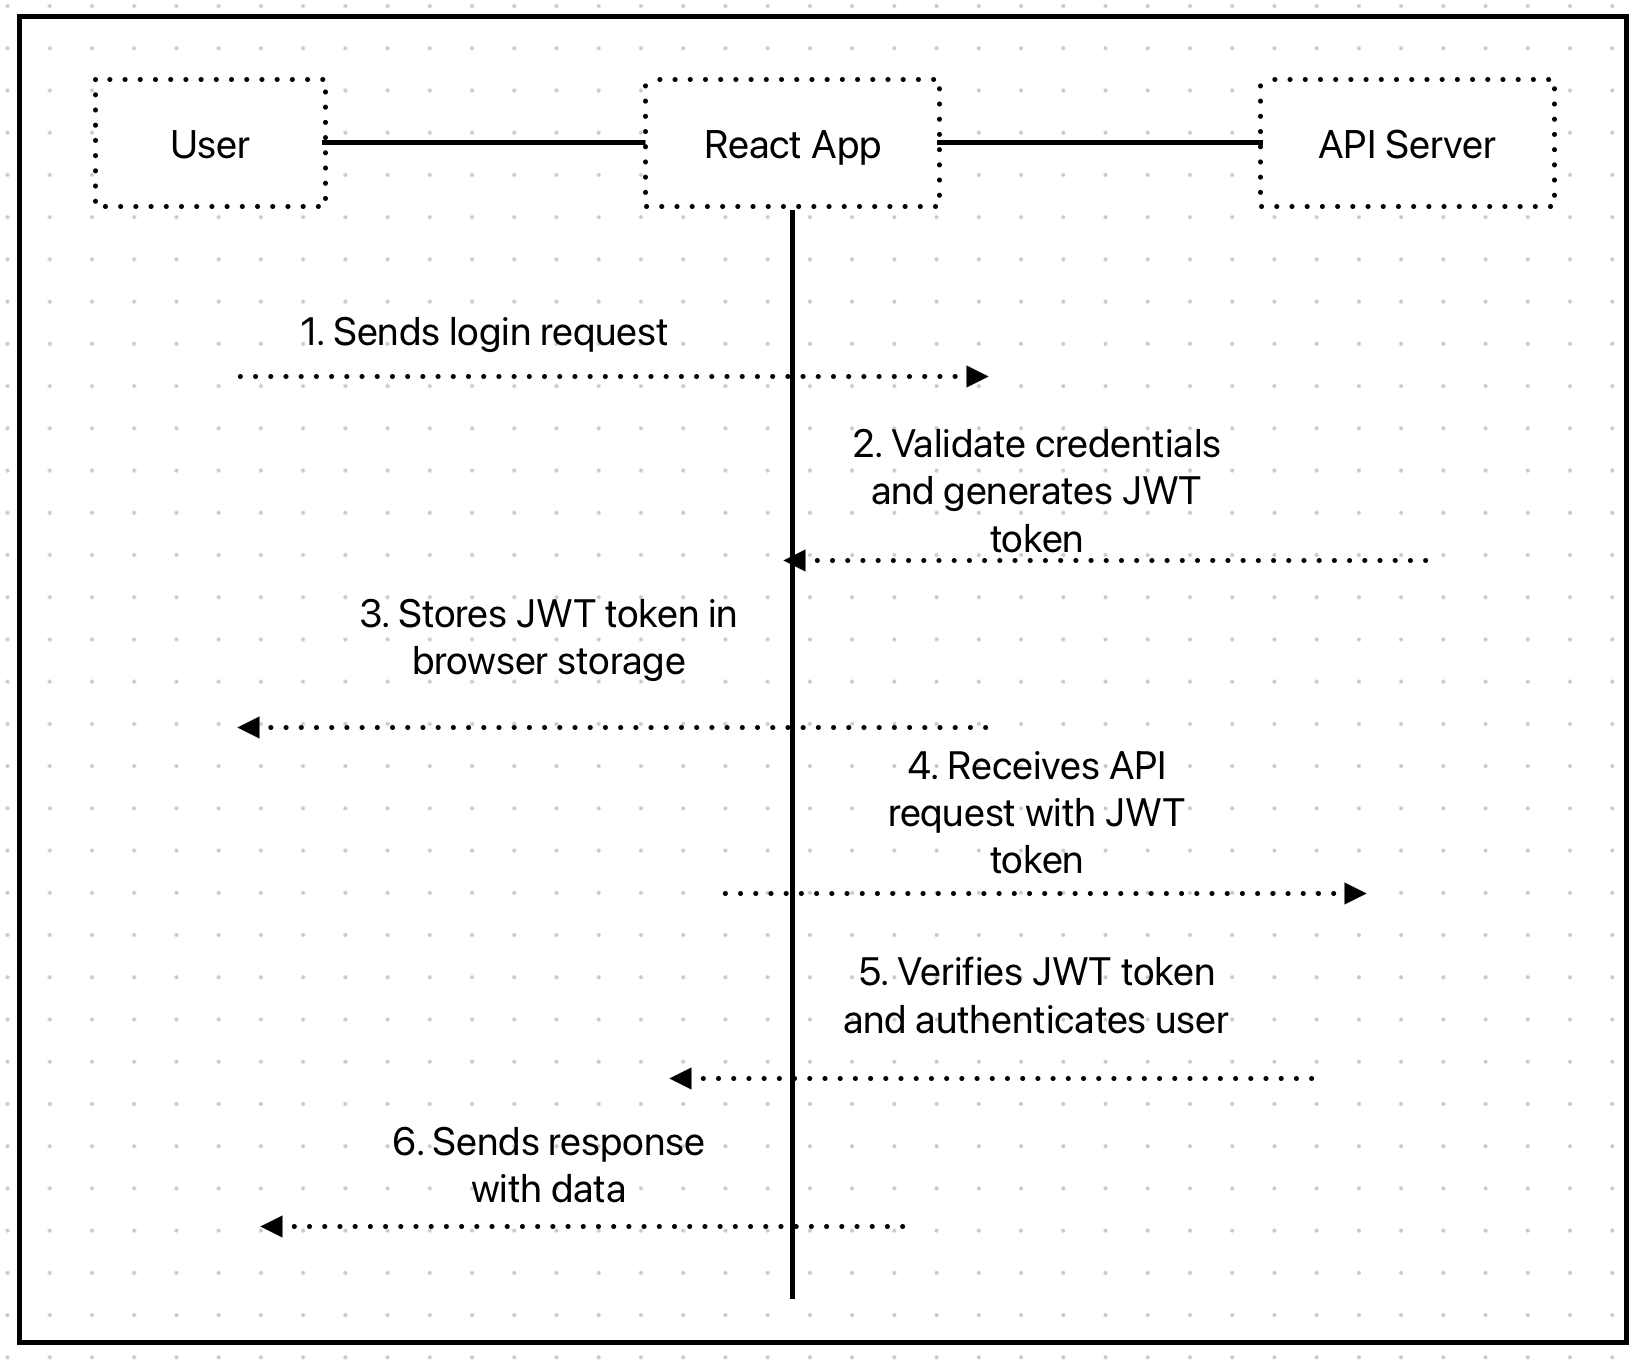
The JSON web token is an encoded string that serves to communicate user data and authentication. This string can be easily decoded to see its contents but can’t be changed, which makes it ideal for user authentication in web applications.
Setting Up the Backend
In this guide, you will use a custom-built Express server API to relay the JSON web token for a user. Clone the main branch of express-auth-api GitHub repository to kick off. There is also a jwt-complete branch that shows the final version of the code for the JWT authentication.
In the repo is a set-up express back-end application that you will connect to a MongoDB database to store user data. Follow this guide to learn how to connect your Node.js express app to MongoDB.
Developer Prerequisites
This post will focus on implementing JWT authentication and will not discuss any of these prerequisites. You should have the following installed in your cloned repo to follow this tutorial;
- Node.js and npm
- Express
- Bcrypt
- jsonwebtoken
- Nodemon
- Mongoose
You can run
npm installto install the dependencies into your project. Ensure all the required packages are listed in thepackage.jsonfile.
Defining Routes
The Express app currently has two routes, /sign-up and /sign-in, defined inside the userRoutes.js file. Your React application will be sending post requests to either of these routes.
/sign-up.
When a user makes a post request to the /sign-up endpoint, the call must have an email and password attached to the request body object. First, the route will extract the email and password from req.body and check if the provided email exists within the MongoDB user database. If the user exists, the promise will not resolve, and a 401 status error will be sent. However, if it can verify that this email and user do not exist, then go ahead to hash the provided password using the bcrypt library and a generated Salt. The route then saves the user’s email and hashed password to MongoDB.
/sign-in
The /sign-in route request is made with an email and password, which you will extract from req.body. The Express app will use the email credential to check and confirm that this user exists with the connected database. The app will return a 401 status error if the user does not exist. If the user exists, we compare the password provided by the user to the existing hashed password tied to the user’s email in the database. If the passwords match, we’ll have a successful authentication, and the user will be signed in.
Creating a JSON Web Token
In this section, you will implement logic to generate and send a JSON web token when a user signs in to your React app. You will require that token be presented on all follow-up requests from the user.
JSON web tokens include a header, payload, and signature. Within this payload is information about the user.
First, require jwt from the jsonwebtoken library at the top of the userRoutes.js file:
const jwt = require("jsonwebtoken");You will use jwt.sign() to create the JSON web token. The method takes two arguments. The first argument will be the payload provided by the user. The second argument will be a JWT secret key that the server app will use to verify the token and ensure its authenticity.
You should use a randomly-generated key to minimize the risk of a key-guessing attack. Node.js’s inbuilt crypto module can generate a random string of characters to serve as your secret key.
For this tutorial, open the .env file in your project’s root and assign the string “MY_SECRET_KEY” to the JWT_SECRET.
Now create a JSON web token by calling jwt.sign() inside the sign in route:
const JWT_SECRET = process.env.JWT_SECRET;
const token = jwt.sign({email}, JWT_SECRET);
return res
   .status(200)
   .json({ message: "User Logged in Successfully", token });
Validating a JSON Web Token With Protected Routes
The JSON token can now be created and sent back to the user on signing in. However, you need to be able to validate the token on future requests.
You can take an incoming request and validate a JSON web token with middleware. Every protected route is safeguarded from unauthorized access.
Create a new folder inside the routes directory called middlewares, create a new file inside it, and name it requireAuths.js.
Inside requireAuths.js add the following statements:
const jwt = require("jsonwebtoken");
const mongoose = require("mongoose");
const User = mongoose.model("User");
require("dotenv").config(); // Load the .env file
The first and second line requires the jsonwebtoken library as jwt and the mongoose library as mongoose. You will grab the User model created inside userModel.js from the mongoose library.
The last require statement adds the dotenv package to load environment variables from your .env file.
Now, define and export this module:
module.exports = (req, res, next) => {
// Extracting JWT secret from environment variable
 const JWT_SECRET = process.env.JWT_SECRET;
 //Extracting token from authorization header
 const { authorization } = req.headers;
// Checking if authorization header is present
 //authorization === 'Bearer "token"'
 if (!authorization) {
  return res.status(404).send({ error: "Must be logged in" });
 }

// Removing 'Bearer ' prefix to get the token
 const token = authorization.replace("Bearer ", "");
 //Verifying if the token is valid.
 jwt.verify(token, JWT_SECRET, async (err, payload) => {
  if (err) {
   return res.status(403).send("Could not verify token");
  }
 // Adding user information to the request object
  req.user = payload;
 });
 next();
};
The middleware function takes in the req, res, and next parameters. The next parameter is a callback function to pass control to the next middleware (if any) or route handler.
Inside the function, you extracted your JWT_SECRET token from .env. To access any protected routes, the React app will require a user to make the request with a JSON web token attached to the requests header.
The next operation is extracting an authorization token from the request header sent. If no token was provided, the middleware responds with an error message indicating that the user must be logged in.
<aside>
💡 You should send vague error messages when handling authentication. This will give malicious users less information on how to bypass the validation.
</aside><br>
The token is separated from the 'Bearer ' prefix with .replace and assigned to token.
You then verify the token by calling jwt.verify(), which takes the token, JWT_SECRET, and a callback function as parameters.
If the token is invalid or the verification fails, the middleware responds with an error message. If the token verification is successful, the payload of the token is extracted and assigned to req.user to make the user’s information accessible in subsequent route handlers.
Finally, call the next() function to pass control.
Setting Up the React Frontend
To make a request, sign up, and sign in your users from your React app, you need to install Axios into your React project. Open your terminal and run the following command to install Axios:
npm install axiosMaking Requests to the Authentication Endpoint.
Once Axios is installed, you can import it into your React component and use it to make requests to the Express API server.
Here’s an example of how you can make requests to the /sign-up, /sign-in, and /test routes:
import React, { useEffect } from "react";
import axios from "axios";
const MyComponent = () => {
 useEffect(() => {
  // Sign up request
  axios.post("/sign-up", { username: "exampleuser", password: "password123" })
   .then((response) => {
    console.log("Sign up successful", response.data);
   })
   .catch((error) => {
    console.error("Sign up error", error);
   });
  // Sign in request
  axios.post("/sign-in", { username: "exampleuser", password: "password123" })
   .then((response) => {
    console.log("Sign in successful", response.data);
    // Store the authentication token for subsequent requests
    const token = response.data.token;
    axios.defaults.headers.common["Authorization"] = `Bearer ${token}`;
   })
   .catch((error) => {
    console.error("Sign in error", error);
   });
  // Test request
  axios.get("/test")
   .then((response) => {
    console.log("Test request successful", response.data);
   })
   .catch((error) => {
    console.error("Test request error", error);
   });
 }, []);
 return <div>...</div>;
};
export default MyComponent;
In this example, the useEffect hook is used to make the requests when the component mounts.
The Axios post method sends data with the requests. For the sign-up and sign-in requests, an object containing the username and password is passed as the second argument to the post method.
The get method is used for the test request, which does not require any data.
In the sign-in request, the authentication token is extracted from the response and stored in the Axios default headers. This ensures subsequent requests include the authentication token in the Authorization header.
The response data is logged into the console for demonstration purposes.
You can now make requests to your Express API server from your React app using Axios and handle the responses accordingly.
Conclusion
In conclusion, integrating JWT authentication into a React Native app provides a secure way to authenticate users and protect sensitive data. By leveraging libraries like jsonwebtoken you can easily implement token-based authentication. With proper implementation and adherence to security best practices, JWT authentication enhances the overall user experience, safeguards user information, and ensures a robust authentication mechanism in React Native applications.