
Greater Interactivity through HTML Image Maps


In today’s web design and user engagement world, the ability to transform static images into interactive elements has become increasingly essential. HTML Image Maps provide a dynamic solution to this challenge, allowing web developers to craft interactive links connecting users with different sections of an image. This article will explore the world of HTML Image Maps, from the fundamentals to advanced techniques, providing a comprehensive guide for developers and designers seeking to enhance user experiences and engagement.

Discover how at OpenReplay.com.
Before we dive into the details, let’s start with the basics. HTML Image Maps are versatile features that transform static images into interactive elements. They enable you to create clickable areas within an image, known as “hotspots,” which can lead users to different image sections or external web pages. This can significantly improve the way users interact with images on your website.
Importance of Using HTML Image Maps
HTML image maps are more than just a design feature; they are crucial to modern web design and user interaction. By providing a means for users to interact with images, you can convey information, guide them through visual content, and create an immersive experience.
Let’s look at why HTML Image Maps are a crucial component of modern web design:
-
Elevated User Interaction: HTML Image Maps act as a catalyst, elevating user engagement on your website. The ability to provide a platform for users to interact with distinct sections of an image directly enables you to exceed the boundaries of passive observation, turning it into a captivating and immersive journey. This hands-on engagement extends users’ time on your site and cultivates a more profound and lasting connection with your content.
-
Narrative Enrichment through Visual Storytelling: HTML Image Maps serve as a dynamic tool to elevate the storytelling potential of images. Instead of a linear presentation of information, the strategic use of clickable hotspots within an image allows you to guide users through a narrative journey. This innovative approach effectively conveys information and injects an element of exploration into the storytelling process, inviting users to actively participate in unraveling the visual narrative.
-
Seamless Exploration: HTML Image Maps are a seamless solution for navigating intricate content, particularly in scenarios involving interactive maps or detailed diagrams. By incorporating clickable hotspots within the image, users can effortlessly navigate to specific information. This streamlined approach simplifies the navigation process and enriches the overall user experience, ensuring users can easily access relevant details.
-
Tactical Marketing Arsenal: HTML Image Maps emerge as a tactical tool for emphasizing key elements within business and marketing. Whether spotlighting product features, promoting exclusive offers, or deftly guiding users through a strategic marketing funnel, these maps become instrumental in directing user attention with precision and purpose.
-
Adaptable Across Industries: HTML Image Maps showcase a remarkable versatility that transcends industry boundaries. These maps seamlessly adapt to diverse contexts, whether on e-commerce platforms, where products come to life interactively, or on educational websites delivering dynamic learning materials. Their innate flexibility positions them as a valuable asset for any website aspiring to captivate and inform its audience, irrespective of the industry it serves.
-
Aesthetic Charm and Lasting Impression: HTML Image Maps transcend mere functionality to contribute to your website’s visual charm. Capturing and retaining user attention is an art, and visually engaging content is pivotal. The incorporation of interactive elements not only elevates the aesthetics of your site but also crafts a memorable browsing experience. It’s not just about functionality; it’s about creating a visually enchanting journey that users remember long after they’ve navigated away.
-
Empowering Engagement: The essence of interactivity lies in active participation. HTML Image Maps catalyzes, empowering users to delve into content actively. Clicking on designated areas invites engagement for educational exploration, product discovery, or navigating interactive timelines. This dynamic involvement fosters a more profound connection between users and your website’s offerings, transforming passive observers into active participants in the digital experience.
For example, you can use an image map to establish clickable areas that will lead you to a different section of your website, just as shown in the example below:
When you click on the box, you will be led to a section of the website. This is just a tip on what you can use Image Maps for; as you go further into the article, you will see how to do this and more yourself.
Use Cases of HTML Image Maps
Now that we’ve explored the significance of HTML Image Maps, let’s delve into their practical applications across various scenarios. These versatile tools find a home in many use cases, enhancing user experiences and interaction in unique ways. Some everyday use cases include:
-
Product Features and Demonstrations: Technology companies can leverage HTML Image Maps to showcase product features or step-by-step demonstrations. Each feature becomes a clickable hotspot, leading to detailed explanations or video demonstrations. With this, users gain a comprehensive understanding of product functionalities in an interactive and user-friendly manner.
-
Educational Websites: Educational platforms can utilize HTML Image Maps for interactive learning materials. Hotspots within diagrams or illustrations can link to supplementary information, quizzes, or additional resources. You can also create interactive maps for geography lessons or anatomy diagrams. Students actively engage with the learning material, making the educational journey more dynamic and impactful.
-
E-commerce Product Showcase: Online retailers can employ HTML Image Maps to create interactive product images. You can display interactive product images with hotspots linking to product details or purchase pages. Each hotspot on the image can lead to detailed product information pricing or even direct users to the purchase page. This practice can enable users to visually explore product features, fostering a more informed and engaging shopping experience.
-
Art and Photography Galleries: Art galleries or photography websites can implement HTML Image Maps to showcase their collections. Clickable areas on artwork can link to artist bios, related works, or the option to purchase prints. Users actively engage with the art, gaining insights into the artists and their creative processes.
-
Historical Websites: Websites dedicated to history can employ HTML Image Maps to create interactive timelines. Each era or event becomes a clickable hotspot, providing users with detailed information, images, and related content. Users can navigate through history seamlessly, understanding historical events more deeply.
The Building Blocks of Image Maps
Now that you know the importance and potential applications of HTML Image Maps, let’s move on to the nitty-gritty of creating them. As we implement HTML Image Maps, it’s crucial to understand the foundational elements that constitute these interactive wonders.
Let’s look at the essential building blocks for HTML Image Maps:
Preparing the Base Image for Mapping
Before creating an HTML Image Map, you need a base image. This is the visual foundation upon which your HTML Image Map will come to life. The base image will host interactive hotspots. This image should contain the elements you want to make interactive. Ensure the image is clear, high-quality, and contains distinct sections you want users to interact with.
Creating the <map> Element
With the canvas set, you must establish interactivity in your base image by creating the <map> element. This element is the container for defining clickable regions, or hotspots, within the image.
Let’s delve into the intricacies of crafting this fundamental element for your HTML Image Map:
- Start with the
<map>Opening Tag: Begin by opening the<map>element. This tag is the wrapper for all the interactive areas you’ll define within the image. Example:
<map name="The_Map_Name_you_Choose">Ensure you choose a meaningful and descriptive name for your map, as this name will link the <map> element to the <img> tag in your HTML document.
- Define hotspots with
<area>elements: Within the<map>element, you’ll use<area>elements to define individual hotspots. Each<area>element represents a clickable region on the image. You also need to specify the shape of the hotspot using theshapeattribute. It can be set as “rect” for rectangles, “circle” for circles, or “poly” for polygons. Example:
 <area
  shape="rect"
  coords="x1, y1, x2, y2"
  href="The_destination.html"
  alt="alt_text_description"
/>
Adjust the coords attribute to set the hotspot coordinates. The exact values depend on the shape selected.
The href attribute determines the destination URL users will be guided to when they click on the hotspot. This destination can be a web page, another part of the image, or any URL you choose. Each <area> element inside the <map> element should have an href attribute, which specifies the destination when users click on that hotspot.
Include the alt attribute to provide a textual description of the hotspot, enhancing accessibility for visually impaired users.
- Close the
<map>element: You need to close the<map>element after defining all the hotspots. Example:
</map>- Linking
<img>tag with<map>element: To establish the connection between the image and the map, use theusemapattribute within the<img>tag, referencing the<map>element’s ID. This association tells the browser that this image is meant to be interactive. Example:
<img
  src="your-base-image.jpg"
  alt="alt_text_description"
  usemap="#The_Map_Name_you_Choose"
/>
Ensure that the usemap attribute references the name you assigned to your <map> element.
Understanding the coords attribute
The coords attribute in the HTML <area> elements specifies the coordinates that define the shape and position of a clickable area within an image. Describing these coordinates is crucial for accurately creating hotspots in an HTML Image Map. The coords attribute values vary depending on the shape attribute’s defined shape. Different shapes require different sets of coordinates.
shape= "rect"(Rectangular Area): For rectangular hotspots,coordstake four values:x1, y1, x2, y2.x1, y1: This represents the coordinates of the upper-left corner of the rectangle.x2, y2: This represents the coordinates of the lower-right corner of the rectangle. Example:
<area
  shape="rect"
  coords="20,20,100,100"
  href="the_destination.html"
  alt="alt_text_description"
/>
The above example creates a rectangular hotspot with the upper-left corner at (20,20) and the lower-right corner at (100,100).
- shape= “circle” (Circular Area): For circular hotspots,
coordstakes three values:x,y, andradius.x, y: Defines the coordinates of the circle’s center. Radius: Defines the radius of the circle. Example:
<area
  shape="circle"
  coords="80,80,50"
  href="destination.html"
  alt="Description"
/>
The above example creates a circular hotspot with the center at (80,80) and a radius of 50 units.
- shape= “poly” (Polygonal Area): For polygonal hotspots,
coordsrequire multiple coordinate values in the format:x1,y1,x2,y2,...,xn,yn. Each pair of coordinatesxiandyirepresents a point in the polygon, defining its vertices in sequence. Example:
<area
  shape="poly"
  coords="100,20,50,60,150,60"
  href="destination.html"
  alt="Description"
/>
The above example creates a polygonal hotspot with vertices at (100,20), (50,60), and (150,60), forming a triangular shape.
Understanding and correctly implementing the coords attribute for different shapes is essential for creating functional and visually accurate HTML Image Maps that users can interact with seamlessly.
Implementing Image Maps in HTML
With the <map> element in place, you’ve laid the foundation for transforming your static image into an interactive landscape. Each <area> element defines a hotspot, beckoning users to explore and engage. As we progress, we’ll seamlessly integrate these building blocks into your HTML document, creating an HTML Image Map that invites users on an interactive journey. Here are ways we can implement Image Maps using HTML:
Structuring the HTML Document
Now that you’ve laid the groundwork by knowing how to prepare the base image and create the <map> element, it’s time to integrate these components into your HTML document seamlessly.
Here is how you can structure your HTML, associating the <img> tag with the <map> element and setting the stage for interactive exploration:
<!DOCTYPE html>
<html lang="en">
  <head>
    <meta charset="UTF-8">
    <title>HTML Image Map</title>
  </head>
  <body>

    <h1>HTML Structure of an Image Map</h1>

    <!-- Instructions for clicking -->
    <h2>Click on the laptop, phone and apple to see the magic!</h2>

    <!-- Base image of a workspace -->
    <img
      src="https://c.pxhere.com/photos/fb/de/apple_computer_desk_laptop_macbook_pro_mobile_phone_mockup_office-929161.jpg!d"
      alt="A laptop with apple and phone on a table"
      usemap="#WorkspaceMap"
      width="700"
      height="400"
    />

    <map name="WorkspaceMap">
      <!-- Hotspot for the entire image linked to an image of a laptop, phone and apple-->
      <area
        shape="rect"
        coords="550,350,190,15"
        href="https://www.kandwaudio.com/wp-content/uploads/2021/05/3-1500x802.jpg"
        alt="Workspace Inspiration"
      />
      <area
        shape="rect"
        coords="690,260,600,150"
        href="https://tse3.mm.bing.net/th?id=OIP.vQ6PNWOFyjFcLFO0mvkGdAHaE6&pid=Api&P=0&h=220"
        alt="Phones"
      />
      <area
        shape="rect"
        coords="70,290,450,360"
        href="https://wallpapercave.com/wp/fbVBs3M.jpg"
        alt="Apples"
      />

      <!-- You can add more areas based on your choice -->
    </map>
    <!-- Add your additional HTML content as needed -->

  </body>
</html>
The outcome:
The example creates an HTML document with an image showing clickable areas using the laptop, apple and phone. Clicking on any of them reveals a linked image.
CSS Styling
You can style your hotspots and the overall image map using CSS. This allows you to make the interactive elements visually appealing and consistent with your website’s design.
Styling an image map involves applying CSS styles to the various HTML elements, such as the image itself and the hotspots defined within the <map> element. You can style the image map as you desire using CSS styles. The specific styles you choose will depend on your design preferences and the overall theme of your website.
Here are some CSS properties you can use for styling image maps:
- Styling the base image: You style the base image by targeting the
<img>element. The styles can include adjustments for the size, border, border-radius (such as making the corners rounded), and box-shadow (subtle elevation) of the base image. Example:
img {
  width: 100%;
  height: auto;
  border: 2px solid #black;
  border-radius: 10px;
  box-shadow: box-shadow: 0 6px 12px rgba(33, 150, 243, 0.2);
}- Styling the Hotspots (area elements): The hotspots are the clickable regions defined by the
<area>elements, and styling these elements involves adjusting their appearance and behavior. You can style them by removing browsers’ default outline to clickable elements, creating a cleaner look. You can also change the cursor style to a pointer when hovering over the hotspots, indicating they are interactive. Transition effects control how properties change from one state to another. You can create a smooth transition effect in the<area>element.
You can customize the CSS styles further based on your design preferences. These styles provide a starting point; you can adjust properties such as colors, borders, and opacity to match your website’s look and feel.
Implementing JavaScript Actions on Hotspot Clicks
For advanced interactivity, consider using JavaScript. You can trigger actions like pop-ups when users click on specific hotspots. This elevates the user experience, providing a more engaging and dynamic interaction. Let us look at how you can use JavaScript to trigger when a hotspot is clicked:
- Alert display function: You will create a function that displays an alert. Feel free to use any descriptive and meaningful name for your function that helps convey its purpose. This function is automatically triggered when a user clicks on the hotspot (the image with the laptop, apple, and phone). It’s defined using the function keyword followed by the function name (showAppleDetails). Example:
<script>
  function showAppleDetails() {
  }
</script>- The
alert: Within the function, you will need a line of code that calls the alert function. Thealertfunction is a built-in JavaScript function that creates a pop-up dialog with the specified message. Thealertdialog pauses the script execution and waits for the user to click “OK” before proceeding. Example:
<script>
  function showAppleDetails() {
    alert('You clicked on the Apple! Enjoy!');
  }
</script>- The
onclick: Add anonclickattribute to the<area>tag to call theshowAppleDetailsfunction when the hotspot is clicked. Make sure to update theonclickattribute in the<area>tag to match the function name
<map name="WorkspaceMap">
  <area
    shape="rect"
    coords="100,150,490,330"
    href="https://s1.1zoom.me/big0/992/403672-svetik.jpg"
    alt="Apple"
    onclick="showAppleDetails()"
  >
</map>
Let us see a practical example of using JavaScript to trigger when a hotspot is clicked.
<!DOCTYPE html>
<html lang="en">
  <head>
    <meta charset="UTF-8">
    <title>HTML Image Map</title>
    <style>
      area:hover {
        opacity: 0.7;
        cursor: pointer;
      }

      area {
        border: 2px solid black;
      }
    </style>
  </head>
  <body>

    <h1>Using JavaScript for Image Map</h1>

    <h2>Click on the apple to see the magic!</h2>

    <img
      src="https://c.pxhere.com/photos/fb/de/apple_computer_desk_laptop_macbook_pro_mobile_phone_mockup_office-929161.jpg!d"
      alt="A laptop with apple and phone on a table"
      usemap="#WorkspaceMap"
      width="700"
      height="400"
    />

    <map name="WorkspaceMap">
      <area
        shape="rect"
        coords="690,260,600,150"
        href="https://wallpapercave.com/wp/fbVBs3M.jpg"
        alt="Apples"
        onclick="showAppleDetails()"
      ></area>
    </map>
    <!-- JavaScript function for hotspot action -->
    <script>
      function showAppleDetails() {
        alert('You clicked on the Apple! Enjoy!');
      }
    </script>
  </body>
</html>
The outcome:
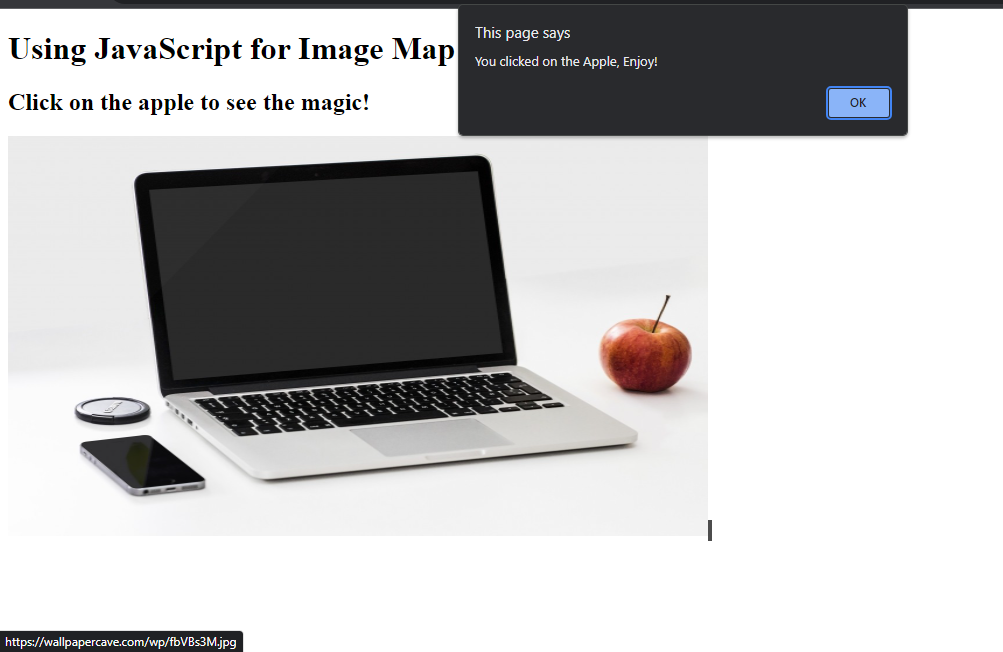
In the above example, when a user clicks on the apple, the showAppleDetails() function is triggered, displaying an alert with the message “You clicked on the Apple! Enjoy!”
Feel free to customize the JavaScript function based on your specific requirements. This example is a starting point for adding dynamic interactions to your HTML image map.
Best Practices for Interactive Image Maps
Creating interactive image maps can significantly enhance user engagement. However, it is essential to follow best practices to ensure a seamless and accessible experience. Here are some recommendations to consider:
Responsive Design
In today’s multi-device world, ensuring your HTML Image Maps are responsive and work well on various screen sizes is crucial. Here are some responsive design techniques to employ:
- Fluid Layouts: Design your image maps with fluid layouts that adapt to different screen sizes. Use relative units like percentages for widths and heights to create flexible designs. When applied to image maps, fluid layouts ensure that the hotspots and overall structure adjust dynamically, providing a consistent and visually appealing experience across devices. Example:
.container {
  width: 80%;
  margin: 0 auto;
}

img {
  max-width: 100%;
  height: auto;
}
In the above example, the container’s width is set to 80% of its parent element’s width, making it responsive. The container is also centered horizontally within its parent by setting margin: 0 auto;. The image’s maximum width is 100% of its container, ensuring it scales responsively. The height is set to auto to preserve the image’s aspect ratio, preventing distortion. These styles create a flexible and responsive layout for a container and ensure that images inside the container adapt to different screen sizes while maintaining their original proportions.
- Media Queries: Leverage CSS media queries to apply specific styles based on the device’s characteristics, such as screen width or orientation. This allows you to tailor the presentation of your image maps for various devices. Creating a responsive design is possible with media queries by adjusting the font size of hotspots based on the screen size, providing an optimal user experience for several devices. Example:
/* CSS for desktop screens */
@media screen and (min-width: 768px) {
  .hotspot {
    font-size: 16px;
  }
}

/* CSS for mobile screens */
@media screen and (max-width: 767px) {
  .hotspot {
    font-size: 12px;
  }
}
In the above example, for the desktop screen styles, the @media screen and (min-width: 768px) query targets screens with a minimum width of 768 pixels (typical of desktop screens). Inside this query, styles for the class .hotspot are defined. In the mobile screen styles, the @media screen and (max-width: 767px) query target screens with a maximum width of 767 pixels (typical of smaller screens like mobile devices). Inside this query, styles for the class .hotspot are defined. These approaches allow you to tailor the font size of hotspots based on the screen size, optimizing readability and aesthetics for different devices. You can adjust the pixel values according to your preferences and needs.
Accessibility Considerations
Ensuring your HTML Image Maps are accessible is crucial for providing an inclusive user experience. Here are vital considerations to enhance accessibility:
- Alternative text: Provide alternative text for your image map so disabled users can understand the content. This text also helps search engines index your content correctly. Therefore, ensure that the alt text for each
areaelement is descriptive to provide context and information about the linked content. It should also be concise and convey the clickable area’s purpose. Example:
<area
  shape="rect"
  coords="100,150,490,330"
  href="..."
  alt="A laptop with apple and phone on a table"
/>- Keyboard navigations: Ensure that users can navigate through the image map using keyboard controls. Use the tabindex attribute to specify the order in which hotspots receive focus. Example:
<area
  shape="rect"
  coords="100,150,490,330"
  href="..."
  alt="A laptop with apple and phone on a table"
  tabindex="0"
/>- Semantic HTML: Use semantic HTML elements to provide a clear structure for assistive technologies. Ensure that the image map is embedded in meaningful contextual elements.
<figure>
  <img src="..." alt="A laptop with apple and phone on a table" usemap="#WorkspaceMap" width="600" height="400">
  <map name="WorkspaceMap">
  </map>
</figure>- Focus styles: Apply visible focus styles to indicate which hotspot is currently active. Avoid relying solely on the default browser focus style. Example:
area:focus {
  outline: 2px solid blue;
}
Conclusion
HTML Image Maps are a powerful tool for enhancing user engagement and interactivity on your website. By understanding their fundamentals, creating them effectively, and following these best practices, you can transform static images into dynamic experiences that captivate your audience. Now, it’s your turn to experiment and bring your images to life with HTML Image Maps. Start creating, and watch your user engagement soar.
Truly understand users experience
See every user interaction, feel every frustration and track all hesitations with OpenReplay — the open-source digital experience platform. It can be self-hosted in minutes, giving you complete control over your customer data. . Check our GitHub repo and join the thousands of developers in our community..
