Mastering Multilingual Websites: Internationalization in Next.js 14
How to manage i18n in Next.js


In the rapidly evolving digital landscape, creating websites that cater to a global audience is not just an option but a necessity. Internationalization, or i18n, plays a pivotal role in web development, ensuring that your content reaches a global audience in different languages and regions seamlessly. This article will show you how to work with i18n in Next.js.

Discover how at OpenReplay.com.
With the release of Next.js 14, the popular React framework takes a giant leap forward in providing enhanced i18n capabilities out of the box. Next.js 14 App router provides a straightforward approach to handling internalization on the server side and building complete multilingual sites.
In this article, we will see the complete guide to using internalization in Next.js 14 from start to end that can be used for creating multi-language sites.
Setting Up Next.js 14 with Built-in i18n
Before we dive into next.js internalization, let’s set up a Next.js project.
Step 1. Create a new Next.js project Open your terminal and run the following commands to create a new next.js project and change its directory:
npx create-next-app myapp
cd myapp
Step 2. Install Next.js 14 and next-intl package
Next, install the latest version of Next.js (version 14) and the next-intl package by running the following command:
npm install next@latest next-intlThe above command will ensure that the Next.js is installed with its latest features including i18n along with next-intl. Why are we using next-intl? Because it integrates with the App Router by using a [locale] dynamic segment so that we can use this segment to provide content in different languages (like /en, /nl, etc.).
Step 3. Enable i18n Support in Next.js 14
Open your next.config.js file, and add the following configuration to enable i18n:
// next.config.js

const withNextIntl = require('next-intl/plugin')();

module.exports = withNextIntl({
  // Other Next.js configuration ...
});
In the above, we have now enabled i18n support in Next.js 14 by configuring the next.config.js file. The code utilizes the withNextIntl function from the 'next-intl' plugin to enhance Next.js with internationalization features.
Further, the withNextIntl function wraps the existing Next.js configuration, allowing for additional i18n-related settings while preserving other project configurations.
Step 4. Set Up the messages Folder
As next.js doesn’t support auto-translation, we must manually add the different locale files to a folder. To do this, create a messages folder in the root directory of your Next.js project.
Inside the messages folder, create separate JSON files for each locale (e.g., en.json, fr.json, nl.json). Add the content in each file as:
messages/fr.json
{
  "Index": {
    "title": "Internationalisation avec Next.js 14",
    "description": "Un tutoriel complet pour tous !"
  }
}
messages/en.json
{
  "Index": {
    "title": "Next.js 14 Internationalization",
    "description": "A complete tutorial for all!"
  }
}
messages/nl.json
{
  "Index": {
    "title": "Next.js 14 Internationalisatie",
    "description": "Een volledige handleiding voor iedereen!"
  }
}
And that’s all! We have successfully set up i18n in Next.js 14 to make our application support internalization.
Language Routing and Slugs with Built-in i18n
Now, our setup is complete, and it’s time to add language-specific routing and the configuration of language slugs without the need for additional libraries.
This step is crucial to dynamically generate routes for different locales as it enhances the user experience by providing content in their preferred language.
Before getting started, let’s see the project structure:
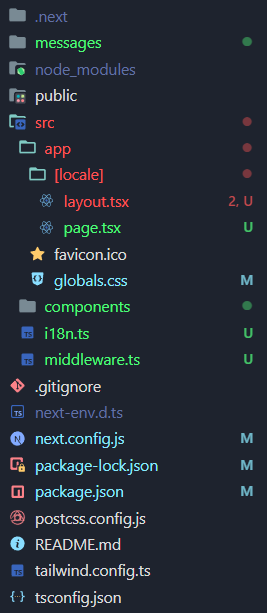
Let’s start with the language routing and slugs.
Step 1. i18n.ts for Dynamic Message Loading
Create a new file inside src/ and configure the i18n.ts file to dynamically load messages based on the locale:
// src/i18n.ts
import { notFound } from "next/navigation";
import { getRequestConfig } from 'next-intl/server';

const locales = ['en', 'fr', 'nl'];

export default getRequestConfig(async ({ locale }) => {
  if (!locales.includes(locale as any)) notFound();

  return {
    messages: (await import(`../messages/${locale}.json`)).default
  };
});
Above, we have used the getRequestConfig function, an asynchronous function that takes a locale parameter, checked against a predefined array of valid locales. In the function, if the locale is not found, it triggers a notFound function.
The function dynamically imports all our JSON files corresponding to the locale from the messages folder using await import. It returns an object with the messages property containing the default export of the imported module.
We have now set up a dynamic i18n configuration that dynamically loads messages based on the chosen locale as per user request, ensuring that the application adapts its content seamlessly for different language preferences.
Step 2. Creating a Middleware
We will create a middleware.ts file inside the src/ to match the locales. This will allow redirecting the user based on the locale inside middleware.
import createMiddleware from 'next-intl/middleware';

export default createMiddleware({
  //Add locales you want in the app
  locales: ['en', 'fr', 'nl'],

  // default locale if no match
  defaultLocale: 'fr'
});

export const config = {
  // Match only internationalized pathnames
  matcher: ['/', '/(fr|nl|en)/:path*']
};
In the above file, we added three different languages: English, French, and Dutch (Netherlands).
Step 3. Configure the app language
The locale matched by the middleware is available via the locale param and can be used to configure the document language.
Create a [locale] inside the app/ and add your layout.tsx and page.tsx files. Open layout.tsx and modify the default file code with the following code:
export default function LocaleLayout({children, params: {locale}}) {
  return (
    <html lang={locale}>
      <body>{children}</body>
    </html>
  );
}
Also, modify page.tsx with the following:
import { useTranslations } from "next-intl";

export default function Index() {
  const translated = useTranslations("Index");

  return (
    <div>
      <h1>{translated("title")}</h1>
      <h2>{translated("description")}</h2>
    </div>
  );
}
Above, we have used the useTranslations hook from next-intl to access translated messages. It provides a concise and organized way to handle multilingual content. Then the translated is obtained from the hook that takes a key, such as ‘title’ or ‘description,’ and retrieves the corresponding translation from the three .json message files.
And that’s all! You have now successfully implemented the language routes and slugs inside your Next.js 14 app.
Step 4. Run the app
To run the app, run the following command:
npm run dev
Visit the URL like localhost:port/en, localhost:port/fr, localhost:port/nl. You will see the below output:
Implementing Language Switching with Built-in i18n
To seamlessly move to different URLs, let’s create a Switcher component. Inside the src/components, create a file called Switcher.tsx and add the following code:
// src/components/Switcher.tsx
import "../app/globals.css";
import Link from "next/link";

const Switcher = () => {
  return (
    <div className="space-x-3">
      <Link
        href="/en"
        className="bg-blue-500 text-white font-semibold rounded-md p-3"
      >
        EN
      </Link>
      <Link
        href="/fr"
        className="bg-blue-500 text-white font-semibold rounded-md p-3"
      >
        FR
      </Link>
      <Link
        href="/nl"
        className="bg-blue-500 text-white font-semibold rounded-md p-3"
      >
        NL
      </Link>
    </div>
  );
};

export default Switcher;
In the Switcher component, we have used the next/link to dynamically switch to different locales. For styling, we are using the Tailwind CSS library.
Let’s add the Switcher component to the layout.tsx to render throughout our app.
import Switcher from "@/components/Switcher";
import "../globals.css";

const LocaleLayout = ({ children, params: { locale } }) => {
  return (
    <div className="flex gap-10 flex-col m-10 p-10">
      <Switcher /> // render switcher
      {children}
    </div>
  );
};

export default LocaleLayout;
After running the npm run dev command, you will see the following output:
Content Translation with and without Libraries
Internationalization (i18n) libraries are crucial in translating content for multilingual websites. While we can manually add translated content to our websites, it becomes a difficult task for a large application, and that’s where these libraries come into play.
Various i18n libraries are available, including react-intl, i18next, etc. These libraries are useful in providing features like translation, messaging, dynamic content translation, etc.
Manual translation without library
To add translated content to our application, we can manually handle content translation for static pages by creating separate folders for each locale (language), like pages/fr/index.js with the content as:
// pages/fr/index.js
const HomePage = () => {
  return (
    <div>
      <h1>Internationalisation avec Next.js 14</h1>
      <h3>Un tutoriel complet pour tous !</h3>
    </div>
  );
};

export default HomePage;
Adding translated content through this approach becomes challenging for dynamic content and might not be scalable for large applications. Therefore, it’s always recommended to use libraries.
Using react-intl for translation
The library react-intl (now Format.JS) is a very powerful i18n library that helps in setting up internationalization in any project, whether it’s React or an advanced one, i.e., Next.js.
Installation for react-intl is very simple. Just run the following command to install the library:
npm i react-intlAbove, we have used the inbuilt i18n of Next.js for our application. To use the react-intl, modify the [locale]/page.tsx as follows:
// src/[locale]/page.tsx
import '../styles/globals.css';
import { useIntl, FormattedMessage } from 'react-intl';

const LocalePage = () => {
  const intl = useIntl();

  return (
    <div>
      <h1>{intl.formatMessage({ id: 'Index.title' })}</h1>
      <h3>{intl.formatMessage({ id: 'Index.description' })}</h3>
    </div>
  );
};

export default LocalePage;
Conclusion
In this article, we’ve learned about internationalization in Next.js 14 and how it’s essential for reaching a global audience. From setting up with next-intl to language-specific routing and dynamic slugs, the framework simplifies multilingual web development. We also learned to create a dynamic language switcher that enhances the user experience.
We examined content translation options, emphasizing the efficiency of the react-intl library. Introducing next-i18n-router extended language routing, providing automatic language detection and streamlined route generation. As you apply these insights, Next.js 14 becomes a powerful ally in creating accessible and user-friendly multilingual websites.
Gain control over your UX
See how users are using your site as if you were sitting next to them, learn and iterate faster with OpenReplay — the open-source session replay tool for developers. Self-host it in minutes, and have complete control over your customer data.
Star on GitHub12k