Integrate Paystack and React Native

Paystack is a payment gateway that enables companies and individuals in Nigeria and other African nations to accept payments online, giving users a quick and safe way to take payments through various payment methods. Paystack is a preferred option for businesses of all sizes because of its well-known simplicity of integration with websites and mobile applications, and this article will show how to integrate it with React Native.
Paystack is a well-known payment gateway that enables companies to accept payments online from clients worldwide. Although many businesses in Nigeria and Africa prefer it, it is also used in other areas. Businesses may manage online payments on a safe and simple platform with the help of Paystack, which also offers several features and tools for quick and effective payment processing. The following factors may influence a company’s decision to use Paystack:
-
It’s a secure and user-friendly platform offering various features and tools to help businesses process online transactions efficiently.
-
With Paystack, businesses can process payments from customers across multiple countries and currencies, making it an ideal payment solution for businesses looking to expand their online presence, e.g., refunds, invoice generation, recurring payments, etc.
-
It supports multiple payment channels, making it a versatile solution for businesses of all sizes.
-
Paystack offers comprehensive documentation and integration with e-commerce platforms.
Scaffolding a new React Native project
Getting started with React Native is a straightforward process. The React Native project creation tool (expo) can be used to create a new React Native project with a sample file to help you get started. To create a new React Native project, execute the following command from your terminal:
npx create-expo-app react-native-paystackAfter running the above command, let’s install the Paystack package we’d be making use of
yarn add react-native-paystack-webviewWe’d also need to install a React Native package, which allows us to render web content in our application.
yarn add react-native-webviewN/B: for expo applications
expo install react-native-webviewWe’d also use the react-native-root-toast package to display notifications depending on whether our transaction is successful.
yarn add react-native-root-toastAfter installing the dependencies we’d use throughout this project, let’s build up our user interface.
Building our Interface
In our App.js file, let’s copy and paste the code snippet below.
import { useState } from "react";
import Toast from "react-native-root-toast";
import {
  StyleSheet,
  Text,
  View,
  ScrollView,
  TextInput,
  Button,
} from "react-native";
export default function App() {
  const [pay, setPay] = useState(false);
  const [billingDetail, setBillingDetail] = useState({
    billingName: "",
    billingEmail: "",
    billingMobile: "",
    amount: "",
  });
  const handleOnchange = (text, input) => {
    setBillingDetail((prevState) => ({ ...prevState, [input]: text }));
  };
  const handleSubmit = () => {
    //handle submit
  };
  return (
    <ScrollView>
      <View style={styles.appBar}>
        <Text style={styles.appBarTitle}>React Native and Paystack</Text>
      </View>
      <View style={styles.body}>
        <TextInput
          style={styles.input}
          placeholder="Billing Name"
          onChangeText={(text) => handleOnchange(text, "billingName")}
          value={billingDetail?.billingName}
        />
        <TextInput
          style={styles.input}
          placeholder="Billing Email"
          onChangeText={(text) => handleOnchange(text, "billingEmail")}
          value={billingDetail?.billingEmail}
        />
        <TextInput
          style={styles.input}
          placeholder="Billing Mobile"
          onChangeText={(text) => handleOnchange(text, "billingMobile")}
          value={billingDetail?.billingMobile}
        />
        <TextInput
          style={styles.input}
          placeholder="Amount"
          onChangeText={(text) => handleOnchange(text, "amount")}
          value={billingDetail?.amount}
        />
        <Button
          title="Pay Now"
          color="#841584"
          accessibilityLabel="pay now"
          onPress={handleSubmit}
        />
      </View>
    </ScrollView>
  );
}
const styles = StyleSheet.create({
  appBar: {
    backgroundColor: "#fff",
    height: 95,
    borderBottomColor: "#ccc",
    borderBottomWidth: 1,
    justifyContent: "center",
    alignItems: "center",
  },
  appBarTitle: {
    fontSize: 20,
    fontWeight: "600",
    color: "#841584",
  },
  body: {
    padding: 10,
  },
  input: {
    borderColor: "black",
    borderWidth: 2,
    padding: 10,
    marginTop: 15,
  },
});
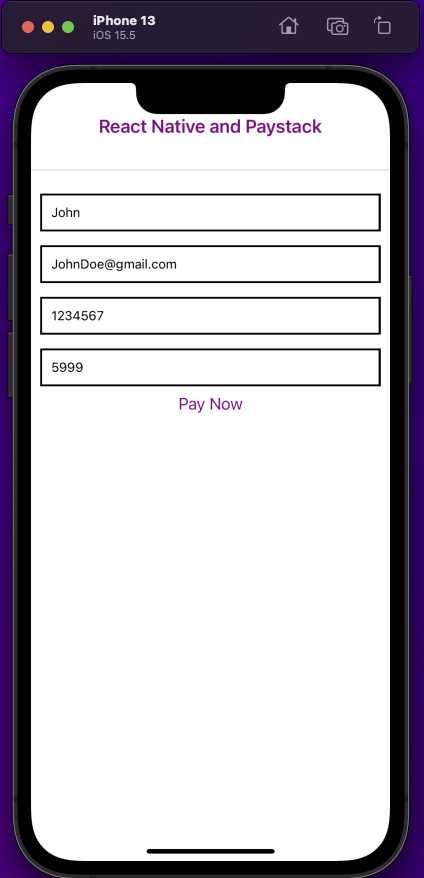
In the code above, we created a functional component that renders a billing form with four TextInputs for the user’s information and a Button with the title Pay Now that, when pressed, triggers the handleSubmit function. It also uses a useState hook to manage the state of the billing form. The initial state of the billing form contains the billingName, billingEmail, billingMobile, and amount properties, which are set to empty strings.
Here’s a Preview
Implementing the Paystack gateway
In this section, we will implement the Paystack gateway in your React Native application. Before we begin, head to Paystack’s official website and create an account or sign in if you already have one. Next, click on Setting, located in the sidebar.
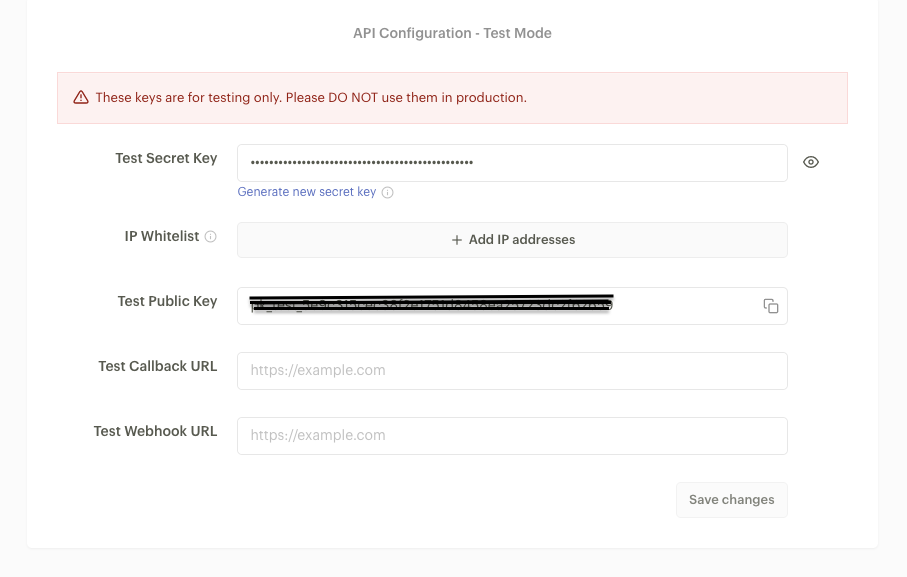
Note: For this tutorial, we’d be making use of the API Configuration - Test Mode
In the settings page, head to the API KEYS & Webhooks tab and copy the Test Public key
Next, we’d head over to our App.js file in our code editor and import the Paystack package we installed
import { Paystack } from "react-native-paystack-webview";Let’s copy and paste the code snippet below to use the library.
<Paystack
  paystackKey="API KEY"
  amount={billingDetail.amount}
  billingEmail={billingDetail.billingEmail}
  billingMobile={billingDetail.billingMobile}
  activityIndicatorColor="green"
  onCancel={(e) => {
    // handle response here
  }}
  onSuccess={(res) => {
    // handle response here
    console.log("request success", res);
  }}
  autoStart={false}
/>;-
paystackKey: This prop holds the Paystack API’s public key, which is required for transaction authorization and authentication. -
amount: The amount prop indicates the payment amount in the currency the business uses, which is, in this case, gotten from the TextInput. -
billingEmail&billingMobile: The billingEmail and billingMobile props supply the customer’s contact information, which is also gotten from the TextInput. -
activityIndicatorColor: This prop sets the indicator’s color that is rendered when a payment is currently processing. -
onCancel&onSuccess: These props are callback functions executed when the payment is canceled or successfully processed, respectively. -
autoStart: This prop indicates if a payment should automatically start immediately after the component is rendered.
Let’s look at what we’ve built so far.
Session Replay for Developers
Uncover frustrations, understand bugs and fix slowdowns like never before with OpenReplay — an open-source session replay tool for developers. Self-host it in minutes, and have complete control over your customer data. Check our GitHub repo and join the thousands of developers in our community.
Improving our code
Let’s start with adding a Toast notification to our application. We’d do that first by importing the React-native-root-toast package.
import Toast from "react-native-root-toast";Next, Let’s update the handleSubmit function that checks if all inputs are truth values and If any of the required fields are missing; then the function displays a toast notification using the Toast.show() method.
const handleSubmit = () => {
  if (
    billingDetail.billingName &&
    billingDetail.billingEmail &&
    billingDetail.billingMobile &&
    billingDetail.amount
  ) {
    setPay(true);
  } else {
    Toast.show("Fill in all fields", {
      duration: Toast.durations.LONG,
    });
  }
};
The Toast method displays a message “Fill in all fields.” and will have a duration of Toast.duration.LONG.
To use the Toast package, we’d need to wrap our App.js file with the RootSiblingParent component.
Let’s import the following package:
import { RootSiblingParent } from "react-native-root-siblings";And update our App.js file by wrapping the ScrollView with the RootSiblingParent component:
import { RootSiblingParent } from "react-native-root-siblings";

export default function App() {
  return (
    <RootSiblingParent>
      <ScrollView>// --> children --></ScrollView>
    </RootSiblingParent>
  );
}
Let’s preview our app and watch the toast notification pop up.
Here’s our updated App.js file
import { useState } from "react";
import { RootSiblingParent } from "react-native-root-siblings";
import Toast from "react-native-root-toast";
import {
  StyleSheet,
  Text,
  View,
  ScrollView,
  TextInput,
  Button,
} from "react-native";
import { Paystack } from "react-native-paystack-webview";

export default function App() {
  const [pay, setPay] = useState(false);
  const [billingDetail, setBillingDetail] = useState({
    billingName: "",
    billingEmail: "",
    billingMobile: "",
    amount: "",
  });

  const handleOnchange = (text, input) => {
    setBillingDetail((prevState) => ({ ...prevState, [input]: text }));
  };

  const handleSubmit = () => {
    if (
      billingDetail.billingName &&
      billingDetail.billingEmail &&
      billingDetail.billingMobile &&
      billingDetail.amount
    ) {
      setPay(true);
    } else {
      Toast.show("Fill in all fields", {
        duration: Toast.durations.LONG,
      });
    }
  };

  return (
    <RootSiblingParent>
      <ScrollView>
        <View style={styles.appBar}>
          <Text style={styles.appBarTitle}>React Native and Paystack</Text>
        </View>
        <View style={styles.body}>
          <TextInput
            style={styles.input}
            placeholder="Billing Name"
            onChangeText={(text) => handleOnchange(text, "billingName")}
            value={billingDetail?.billingName}
          />
          <TextInput
            style={styles.input}
            placeholder="Billing Email"
            onChangeText={(text) => handleOnchange(text, "billingEmail")}
            value={billingDetail?.billingEmail}
          />
          <TextInput
            style={styles.input}
            placeholder="Billing Mobile"
            onChangeText={(text) => handleOnchange(text, "billingMobile")}
            value={billingDetail?.billingMobile}
          />
          <TextInput
            style={styles.input}
            placeholder="Amount"
            onChangeText={(text) => handleOnchange(text, "amount")}
            value={billingDetail?.amount}
          />

          <Button
            title="Pay Now"
            color="#841584"
            accessibilityLabel="pay now"
            onPress={handleSubmit}
          />

          {pay && (
            <View style={{ flex: 1 }}>
              <Paystack
                paystackKey="YOUR API-KEY"
                amount={billingDetail.amount}
                billingEmail={billingDetail.billingEmail}
                billingMobile={billingDetail.billingMobile}
                activityIndicatorColor="green"
                onCancel={(e) => {
                  // handle response here
                  Toast.show("Transaction Cancelled!!", {
                    duration: Toast.durations.LONG,
                  });
                }}
                onSuccess={(response) => {
                  // handle response here

                  const responseObject = response["transactionRef"]["message"];
                  if (responseObject === "Approved") {
                    Toast.show("Transaction Approved!!", {
                      duration: Toast.durations.LONG,
                    });
                  }
                }}
                autoStart={pay}
              />
            </View>
          )}
        </View>
      </ScrollView>
    </RootSiblingParent>
  );
}

const styles = StyleSheet.create({
  appBar: {
    backgroundColor: "#fff",
    height: 95,
    borderBottomColor: "#ccc",
    borderBottomWidth: 1,
    justifyContent: "center",
    alignItems: "center",
  },
  appBarTitle: {
    fontSize: 20,
    fontWeight: "600",
    color: "#841584",
  },
  body: {
    padding: 10,
  },
  input: {
    borderColor: "black",
    borderWidth: 2,
    padding: 10,
    marginTop: 15,
  },
});
Closing thoughts
In today’s digital age, payment gateways like Paystack have become essential for online business selling products or services. With its simple and secure payment processing, Paystack makes it easy for businesses of all sizes to accept payments online. To start with Paystack, check out its official docs.
Here’s a link to the source code on Github
Gain Debugging Superpowers
Unleash the power of session replay to reproduce bugs and track user frustrations. Get complete visibility into your frontend with OpenReplay, the most advanced open-source session replay tool for developers.