Managing State with Finite State Machines: a Powerful Approach
Finite State Machines give frontend developers a structured way to handle state complexity, improve performance, and scale web applications effectively.


Managing application state—keeping track of every different state and interface can be complex. Finite State Machines (FSMs) provide a structured and efficient solution to this problem. At its core, an FSM is a mathematical model used to represent the behavior and transitions of a system. In front-end development, this system often refers to the user interface of a web application, and this article will show you how to use it.

Discover how at OpenReplay.com.
Managing State with Finite State Machines: A Powerful Approach to Frontend Development
Challenges of State Management in Frontend Development.
Frontend development is always changing and improving, but it’s not without its challenges. Managing the state, or the condition of a web application, is crucial for creating web apps that respond well and are interactive. In this article, we’ll look at the main problems of handling the state in front-end development.
- Complexity: Modern web applications are becoming increasingly complex. With more features, components, and interactivity, the state management for these applications grows in complexity. Keeping track of all the application’s states, transitions, and actions can be overwhelming. This complexity often leads to code that is hard to understand, maintain, and debug.
- Performance: Performance is always a concern in front-end development. Inefficient state management can lead to unnecessary re-renders and decreased application performance. It’s essential to optimize state updates to minimize these issues.
- Scaling: As your application grows, so does the complexity of state management. Adapting your state management solution to the ever-expanding needs of your project can be daunting. Choosing a state management approach that can scale with your application’s growth is essential.
- Team Collaboration: Frontend development often involves collaboration between designers, front-end engineers, and back-end developers. Communicating and collaborating on state management can be challenging, especially if each team member has a different understanding of how states should be managed.
The Importance of Managing State Effectively
- User Experience: State management directly impacts the user experience of your web application. When done effectively, it ensures that your app responds swiftly to user actions and provides a seamless, intuitive experience.
- Application Responsiveness: Modern web applications need to be highly responsive. Managing state efficiently enables your app to adapt to user input and display the right information promptly. Users expect a near-instant response, and state management is at the heart of delivering this responsiveness.
- Bug Reduction: Inefficient state management is a common source of bugs and unexpected behavior in web applications. By managing the state effectively, you can reduce the likelihood of these issues, making it easier to track down and fix problems when they arise.
- Consistency: State management ensures that the data presented to users is consistent and up-to-date. Without proper state management, different parts of your application may display conflicting or outdated information, leading to confusion and frustration for users.
Finite State Machines (FSMs) as a Solution to this Challenge.
Effective state management is critical in creating responsive and user-friendly web applications. Finite State Machines (FSMs) have emerged as a powerful solution to these challenges. Here, we’ll explore how FSMs can address the state management challenges discussed earlier.
- Simplified Complexity: FSMs provide a structured and simplified approach to managing the state. They break down an application’s behavior into distinct states, transitions, and actions. This clear organization reduces the complexity of the code, making it easier to understand and maintain. With FSMs, you know exactly what states your application can be in, how it transitions between them, and what actions are associated with each state.
- Performance: FSMs minimize unnecessary re-renders by focusing on well-defined state changes and actions, thus enhancing application performance.
- Scalability and Flexibility: One of the significant advantages of FSMs is their scalability. As your application grows, you can seamlessly add new states, transitions, and actions without introducing complexity or compromising existing functionality. This scalability ensures that your state management solution can evolve with your project’s needs.
- Team Collaboration: FSMs provide a shared language for team members, making collaborating easier on understanding and managing application behavior.
Understanding Finite State Machines
Finite State Machines (FSMs) are a powerful concept, providing a structured approach to managing states and transitions within applications. A Finite State Machine (FSM) is a simplified model used to describe systems where a single state can exist at any given time; it is a mathematical model that represents a system’s behavior by defining a finite number of states and the transitions between them. These states are often visualized as nodes and transitions as arrows connecting them. The key components of FSMs are states, transitions, events, and actions. Consider a multi-step form example to demonstrate the concept of a Finite State Machine (FSM) with finite input and output.
- Initially, the form is in the “Step 1” state, representing the “Personal Information” section. In this state, the user is prompted to enter their name.
- After clicking the “Next” button, it transitions to the “Step 2” state, which corresponds to the “Contact Information” section. In this state, the user is asked to provide their email.
- Following the “Next” click again, it moves to the “Step 3” state, representing the “Additional Information” section. Here, the user is prompted to input their phone number.
- After completing the final section and clicking “Submit,” it transitions to the “Completed” state, displaying the user’s submitted details.” Users have the flexibility to transition back and forth between states, as the Finite State Machine (FSM) allows for dynamic movement between different form sections, creating a more interactive and user-friendly experience.
This Multi-Step Form example demonstrates the essence of an FSM, where a finite number of states and events regulate the system’s operation.
Key Component of Finite State Machines
Finite State Machines (FSMs) are composed of several essential components that define their functionality:
- States: States are distinct conditions or modes within an FSM, each representing a unique phase or situation that the system can assume.
- Transitions: Transitions denote the pathways or connections between states, detailing how the system moves from one state to another in response to specific triggers or actions.
- Actions: Actions are associated with specific states and describe the behaviors or tasks the system performs while residing in that state.
- Events: Events act as the catalysts for state transitions, encompassing actions, inputs, or conditions that initiate changes in the system’s state.
Benefits of Using FSMs in Frontend Development
Incorporating Finite State Machines (FSMs) into frontend projects offers a range of valuable advantages:
- Clear State Management: FSMs provide a structured and intuitive approach to managing application state. This clarity ensures that developers and team members can easily comprehend and maintain every state transition and behavior of the application.
- Improved Code Organization: FSMs encourage a well-organized codebase by separating state-related logic into distinct states and transitions. This separation enhances code modularity and maintainability.
- Reduced Bugs: The structured nature of FSMs helps prevent bugs, or quickly identify and fix them. The well-defined states and transitions reduce the potential for unexpected behavior or errors in the application.
- Enhanced Collaboration: FSMs serve as a common language for front-end developers, designers, and other team members. They facilitate collaboration by providing a shared understanding of the application’s behavior, essential for effective teamwork. Incorporating FSMs into frontend projects empowers developers to create more manageable, reliable, and collaborative applications, ultimately leading to a smoother and more efficient development process.
FSM Libraries and Tools
In this section, popular libraries and tools that facilitate the implementation of FSMs in frontend projects will be highlighted, such as:
- XState: This is a powerful library for creating and managing Finite State Machines (FSMs) in JavaScript and React applications. It is widely used in frontend development and beyond, providing a robust framework for modeling complex state behavior in applications.
- React Automata: This is a library built on top of XState specifically designed for React applications. It simplifies the process of integrating finite-state machines with React components.
- StateMachine.js: A minimalistic state machine library that can be easily integrated into front-end applications. It’s particularly well-suited for simpler use cases. These libraries and tools provide different levels of features for managing states and state transitions in front-end applications. The choice of which one to use depends on your specific project requirements.
Implementing FSMs in Frontend Development
Here, we will use the @xstate/react library to demonstrate a simple example of how FSMs work. React and XState are powerful tools for building stateful applications. When used together, React and XState provide a structured way to handle the state of your application, making it more predictable and maintainable.
How to Install and Setup @xstate/react library in your React App
- Open your terminal or command prompt, and navigate to your application directory
- Install
xstateand@xstate/reactwith the command:
//Install with yarn
yarn add xstate @xstate/react

//Install with npm
npm install xstate @xstate/react- Import the
useMachinehook:
import { useMachine } from '@xstate/react';
import { createMachine } from 'xstate';
Now that the @xstate/react is integrated into our React application, we’ll simulate a multi-step form with various states. When you interact with the form by clicking the ‘Next’ or ‘Previous’ button, it triggers state transitions within the form, allowing you to progress through different form sections, and navigate through the form.
import React from "react";
import { useMachine } from "@xstate/react";
import { createMachine, assign } from "xstate";
const formMachine = createMachine({
 id: "form",
 initial: "step1",
 context: {
  data: {
   name: "",
   email: "",
   phone: "",
  },
 },
 states: {
  step1: {
   on: {
    NEXT: "step2",
    UPDATE: {
     actions: assign({
      data: (context, event) => ({
       ...context.data,
       [event.name]: event.value,
      }),
     }),
    },
   },
  },
  step2: {
   on: {
    PREV: "step1",
    NEXT: "step3",
    UPDATE: {
     actions: assign({
      data: (context, event) => ({
       ...context.data,
       [event.name]: event.value,
      }),
     }),
    },
   },
  },
  step3: {
   on: {
    PREV: "step2",
    SUBMIT: "completed",
    UPDATE: {
     actions: assign({
      data: (context, event) => ({
       ...context.data,
       [event.name]: event.value,
      }),
     }),
    },
   },
  },
  completed: {
   type: "final",
  },
 },
});
This code snippet is written in React.js and uses the XState library to create a finite state machine that simulates a multi-step form. Let’s break it down:
createMachineanduseMachineare functions from the XState library used to create and manage a state machine. In the multi-step form example,createMachineis employed to define the state machine, anduseMachineis used as a React hook to integrate this machine into the form component.- The
formMachinerepresents the state machine for the multi-step form. It consists of different states, each corresponding to a specific step or section of the form. These states are named “step1,” “step2,” “step3,” and “completed.” - Transitions between states in the
formMachineare triggered by events. For instance, the transition from “step1” to “step2” occurs when the user clicks the “Next” button, and this action is captured using the NEXT event. Similarly, specific events like PREV and SUBMIT control transitions between other steps. The multi-step form allows both forward and backward navigation. Users can move to the next step by clicking “Next” or return to the previous step using the “Previous” button. This user-driven flexibility is a core feature of multi-step forms and is enabled through event-driven transitions.
In summary, the formMachine in the multi-step form example enables a dynamic user-driven progression through different form steps, with the ability to move forward and backward. Events triggered by user interactions control the transitions between states, making it a versatile tool for creating multi-step forms in React applications.
This code sets up the basic structure of a multi-step form, but to use it in a React component, you’d need to utilize the useMachine hook provided by the @xstate/react library. This hook allows you to integrate the state machine into a React component and handle the state transitions and rendering based on the machine’s state as shown below:
import React from "react";
import { useMachine } from "@xstate/react";
import { createMachine, assign } from "xstate";
const formMachine = createMachine({
 id: "form",
 initial: "step1",
 context: {
  data: {
   name: "",
   email: "",
   phone: "",
  },
 },
 states: {
  step1: {
   on: {
    NEXT: "step2",
    UPDATE: {
     actions: assign({
      data: (context, event) => ({
       ...context.data,
       [event.name]: event.value,
      }),
     }),
    },
   },
  },
  step2: {
   on: {
    PREV: "step1",
    NEXT: "step3",
    UPDATE: {
     actions: assign({
      data: (context, event) => ({
       ...context.data,
       [event.name]: event.value,
      }),
     }),
    },
   },
  },
  step3: {
   on: {
    PREV: "step2",
    SUBMIT: "completed",
    UPDATE: {
     actions: assign({
      data: (context, event) => ({
       ...context.data,
       [event.name]: event.value,
      }),
     }),
    },
   },
  },
  completed: {
   type: "final",
  },
 },
});
const App = () => {
 const [state, send] = useMachine(formMachine);
 const { data } = state.context;
 const handleInputChange = (e) => {
  const { name, value } = e.target;
  send("UPDATE", { name, value });
 };
 const handleSubmit = () => {
  // Handle form submission logic (e.g., send data to a server)
  console.log("Form Data:", data);
  send("SUBMIT");
 };
 return (
  <div className="max-w-4xl mx-auto p-4 text-center">
   <h1 className="text-2xl font-bold mt-10 mb-4">Students form</h1>
   <form>
    {state.matches("step1") && (
     <div>
      <h2 className="text-lg font-semibold mb-4">
       Step 1: Personal Information
      </h2>
      <input
       type="text"
       name="name"
       value={data.name || ""}
       placeholder="Name"
       onChange={handleInputChange}
       className="w-full p-2 border rounded mb-4"
      />
      <button
       onClick={() => send("NEXT")}
       className="bg-blue-500 text-white p-2 rounded hover:bg-blue-700"
      >
       Next
      </button>
     </div>
    )}
    {state.matches("step2") && (
     <div>
      <h2 className="text-lg font-semibold mb-4">
       Step 2: Contact Information{" "}
      </h2>
      <input
       type="email"
       name="email"
       value={data.email || ""}
       placeholder="Email"
       onChange={handleInputChange}
       className="w-full p-2 border rounded mb-4"
      />
      <button
       onClick={() => send("PREV")}
       className="bg-gray-400 text-white p-2 rounded hover:bg-gray-600 mr-2"
      >
       Previous
      </button>
      <button
       onClick={() => send("NEXT")}
       className="bg-blue-500 text-white p-2 rounded hover:bg-blue-700"
      >
       Next
      </button>
     </div>
    )}
    {state.matches("step3") && (
     <div>
      <h2 className="text-lg font-semibold mb-4">
       Step 3: Additional Information
      </h2>
      <input
       type="text"
       name="phone"
       value={data.phone || ""}
       placeholder="Phone Number"
       onChange={handleInputChange}
       className="w-full p-2 border rounded mb-4"
      />
      <button
       onClick={() => send("PREV")}
       className="bg-gray-400 text-white p-2 rounded hover:bg-gray-600 mr-2"
      >
       Previous
      </button>
      <button
       onClick={handleSubmit}
       className="bg-green-500 text-white p-2 rounded hover:bg-green-700"
      >
       Submit
      </button>
     </div>
    )}
   </form>
   {state.matches("completed") && (
    <div className="mt-4">
     <h2 className="text-lg font-semibold">
      Your Details Have Been Recorded
     </h2>
     <h3 className="text-lg font-semibold">Submitted User Details:</h3>
     <ul className="text-left">
      <li>
       <strong>Name:</strong> {data.name}
      </li>
      <li>
       <strong>Email:</strong> {data.email}
      </li>
      <li>
       <strong>Phone Number:</strong> {data.phone}
      </li>
     </ul>
    </div>
   )}
  </div>
 );
};
export default App;
id: "form"specifies the unique identifier for this state machine. It’s just a label to identify the machine.initial: "step1"defines the machine’s initial state. The form starts in the “step1” state when it is first loaded. This represents the first step of the form.contextis an object that stores data shared among the different states of the machine. In this case, it holds an object data with fields for user input: name, email, and phone. These fields will be updated as the user progresses through the form.statesis an object that defines the various states of the form. Each state corresponds to a step in the form:- step1 is the initial step where the user is asked for their name.
- step2 is the second step where the user provides their email.
- step3 is the third step for the phone number.
completedis a finalstateindicating the user has completed the form.- Within each state, some objects define the events that can trigger state transitions.
UPDATEupdates the data context based on user input.- The completed state has no defined events and is marked as a “final” state. This means the form is considered complete once the user reaches this state.
- The
assignfunction within theUPDATEevents updates the data context. It merges the existing data with the new input, allowing the form to accumulate user input as it progresses. Overall, this state machine controls the flow of a multi-step form, handling step transitions and storing user input data in a structured manner. It’s a powerful way to manage complex forms with clear state management.
In the multi-state form simulation demonstrated above, we observe the XState library’s functions in action. The multi-step form begins in the initial state, labeled “step1.” In this state, the user is prompted to provide their personal information, such as their name. Upon clicking the “Next” button, a transition to “step2” is triggered, allowing the user to enter their contact information, such as their email. The “Previous” button can return to the previous step. From “step 2,” the user can progress to “step3” by clicking “Next” once more. In this state, the user is prompted to provide additional information, such as their phone number. Again, they can go back to the previous step by clicking “Previous.” Finally, when all the required information is filled out and the user clicks “Submit,” a transition to the “completed” state occurs. In the “completed” state, users see a summary of their submitted details, including name, email, and phone number. At this point, the form is considered finished.
XState Visualizer
The XState Visualizer is a tool for creating and inspecting state charts to visualize the state of your applications. As a visual tool, the Visualizer helps developers get an overview of their application logic and makes it easy to share with designers, project managers, and the rest of the team. The Visualizer supports a variety of features, including:
- Creating and editing statecharts: The Visualizer provides a graphical editor for creating and editing statecharts. You can drag and drop states, transitions, and events to define the behavior of your system.
- Visualizing statecharts: The Visualizer can render statecharts in various formats, including SVG, PNG, and GIF. This makes it easy to share and document your state charts.
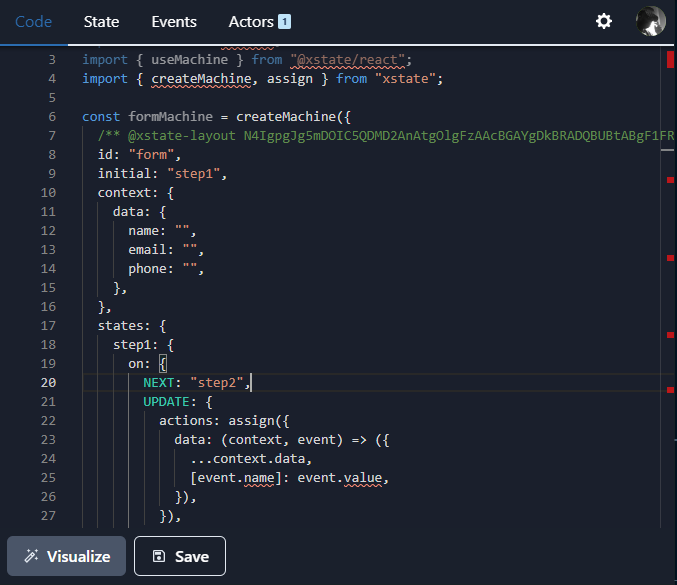
- Debugging statecharts: The Visualizer includes a debugger that can be used to step through the execution of a statechart and inspect its state. This can be useful for identifying and fixing bugs. To use the XState Visualizer, you first need to create a state chart. A state chart is a visual representation of the different states that a system can be in and the transitions between those states. You can create a state state using: Stately is a web app state machine library for React. It is built on top of XState, and it provides several features that make it easy to use state machines in React applications. To use Stately, you first need to create a state machine. You can do this using XState’s graphical editor or by writing code in JavaScript or TypeScript. You can utilize either the Stately web application here or the Visual Studio Code extension. For the web app, paste the code block below
import React from "react";
import { useMachine } from "@xstate/react";
import { createMachine, assign } from "xstate";
const formMachine = createMachine({
 id: "form",
 initial: "step1",
 context: {
  data: {
   name: "",
   email: "",
   phone: "",
  },
 },
 states: {
  step1: {
   on: {
    NEXT: "step2",
    UPDATE: {
     actions: assign({
      data: (context, event) => ({
       ...context.data,
       [event.name]: event.value,
      }),
     }),
    },
   },
  },
  step2: {
   on: {
    PREV: "step1",
    NEXT: "step3",
    UPDATE: {
     actions: assign({
      data: (context, event) => ({
       ...context.data,
       [event.name]: event.value,
      }),
     }),
    },
   },
  },
  step3: {
   on: {
    PREV: "step2",
    SUBMIT: "completed",
    UPDATE: {
     actions: assign({
      data: (context, event) => ({
       ...context.data,
       [event.name]: event.value,
      }),
     }),
    },
   },
  },
  completed: {
   type: "final",
  },
 },
});
Click on visualize.
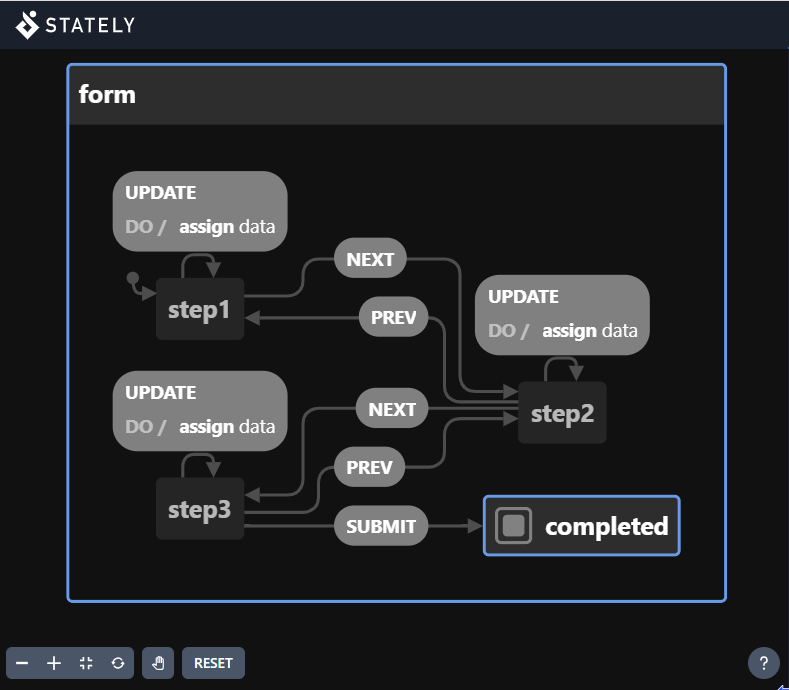
Now, on the left part of your screen is an intuitive visual interface for creating, editing, and understanding FSMs. This visual representation simplifies the complex state transitions, making it easier to conceptualize and communicate the behavior of your application.
The example showcased using Stately Visualizer demonstrates the transition from one state to another, using actions. This visual aid provides a comprehensive and improved understanding of this concept. You can also install and utilize the xstate Visual Studio Code extension.
Potential Challenges or Limitations When Using FSMs.
When using Finite State Machines (FSMs), there are several challenges and considerations to keep in mind. Here are some key points to be aware of:
- State Consistency: Maintaining state consistency can be challenging, especially in distributed systems. Ensuring that all parts of a system share the same understanding of the current state is crucial.
- Error Handling: Handling errors and unexpected transitions in FSMs can be challenging. You need to define how your FSM should react to unexpected events or invalid state transitions.
- Documentation and Communication: It’s important to document your FSMs well and communicate their design to your team. FSMs are a form of domain-specific language, and making sure everyone understands the states, transitions, and their meanings is crucial.
- Maintenance: As your system evolves, your FSMs may need to change as well. Updating and maintaining FSMs can be time-consuming, and it’s important to ensure that changes do not introduce unexpected behavior.
Strategies for Addressing Complex State Management Scenarios.
Complex state management scenarios often require thoughtful strategies to maintain clarity, scalability, and maintainability. Here are some strategies for addressing complex state management:
- State Charts: A state chart is a visual representation of a state machine. It can be used to document and design the state machine and to identify potential state management challenges.
- Use a state machine library: There are several state machine libraries available that can help you manage the state of your FSM. These libraries can provide features such as state serialization, event handling, and state transitions.
- Test your state machine thoroughly: Once you have implemented your FSM, test it thoroughly to ensure that it works as expected. This will help you to identify and fix any state management problems.
- Education and Training: Ensure that your team has a solid understanding of the chosen state management strategies. In complex state management scenarios, it’s important to choose the strategies and tools that align with your application’s specific requirements. By following these tips, you can develop FSMs that can effectively manage complex states.
Conclusion
Finite State Machines (FSMs) are a powerful and structured approach to managing state in frontend development. They offer predictability, readability, scalability, and enhanced testing. FSMs find applications in a wide range of scenarios, from user interfaces to complex workflows, making them a valuable tool for creating responsive and maintainable applications. By adopting FSMs, developers can streamline state management, enhance collaboration, and create more robust and responsive user experiences. Consider adopting FSMs in your next front-end project to harness the power of structured state management and create better user experiences. You may be surprised at how much easier and more enjoyable it can make your development process.