Multiple Electronic Wallets in React with Web3Modal
How to integrate more than one wallet in a React app


In the Web3 world, cryptocurrencies and NFTs are purchased using decentralized wallets. Due to this condition, all Web3 sites use such wallets for transactions. But there is a limitation to this since most web3 sites use a single wallet system for payment on the site, thus limiting users who have crypto funds to other wallet systems other than the site’s required wallet. Amongst these are the reasons for integrating multiple wallets.
- Giving users a preference on their choice of wallet.
- Eliminating time and charges taken for inter-wallet transfers to meet site requirements.
- Eliminating the stress of creating more wallets for users.
Web3Modal is a Multi-Wallet provider which allows users to enable more than one wallet in their application with a simple, customizable configuration. In this tutorial, we’ll learn how to integrate four different wallets (MetaMask, Wallet Connect, Binance Chain Wallet, and Coinbase Wallet) into our React application.
To follow along in this tutorial, you should know React and Web3.
Setting up the Project environment
Let’s start by creating a React App. Run the command below in your terminal.
yarn create react-app react-web3modalAfter running the command above, change the directory to the project folder and install web3modal and ethers package
cd react-web3modal && yarn add web3modal ethersBefore we integrate the various wallets, let’s rewire our app to enable some support from webpack.
To enable webpack configuration, we’ll use the react-app-rewired package. To install run
yarn add react-app-rewiredNext, replace the scripts object in the package.json file with the code below.
  ...

  "scripts": {
    "start": "react-app-rewired start",
    "build": "react-app-rewired build",
    "test": "react-app-rewired test",
    "eject": "react-scripts eject"
  },

  ...
Then install the following dependencies:
yarn add buffer
yarn add util
yarn add stream-browserify
yarn add assert
yarn add stream-http
yarn add url
yarn add https-browserify
yarn add os-browserify
Finally, create a config-overrides.js in the root directory and paste the code below into it.
const webpack = require("webpack")

module.exports = function override(config) {
  config.resolve.fallback = {
    fs: false,
    buffer: require.resolve("buffer/"),
    util: require.resolve("util/"),
    stream: require.resolve("stream-browserify"),
    assert: require.resolve("assert/"),
    http: require.resolve("stream-http/"),
    url: require.resolve("url/"),
    https: require.resolve("https-browserify/"),
    os: require.resolve("os-browserify/"),
    };

  config.plugins = [
    ...config.plugins,
    new webpack.ProvidePlugin({
      process: "process/browser",
      Buffer: ["buffer", "Buffer"],
    }),
  ];
  return config;
};
The code block above modifies the webpack by adding the packages we installed earlier.
Let’s run our code using the command below.
yarn startOpen Source Session Replay
OpenReplay is an open-source, session replay suite that lets you see what users do on your web app, helping you troubleshoot issues faster. OpenReplay is self-hosted for full control over your data.

Start enjoying your debugging experience - start using OpenReplay for free.
Setting up Infura
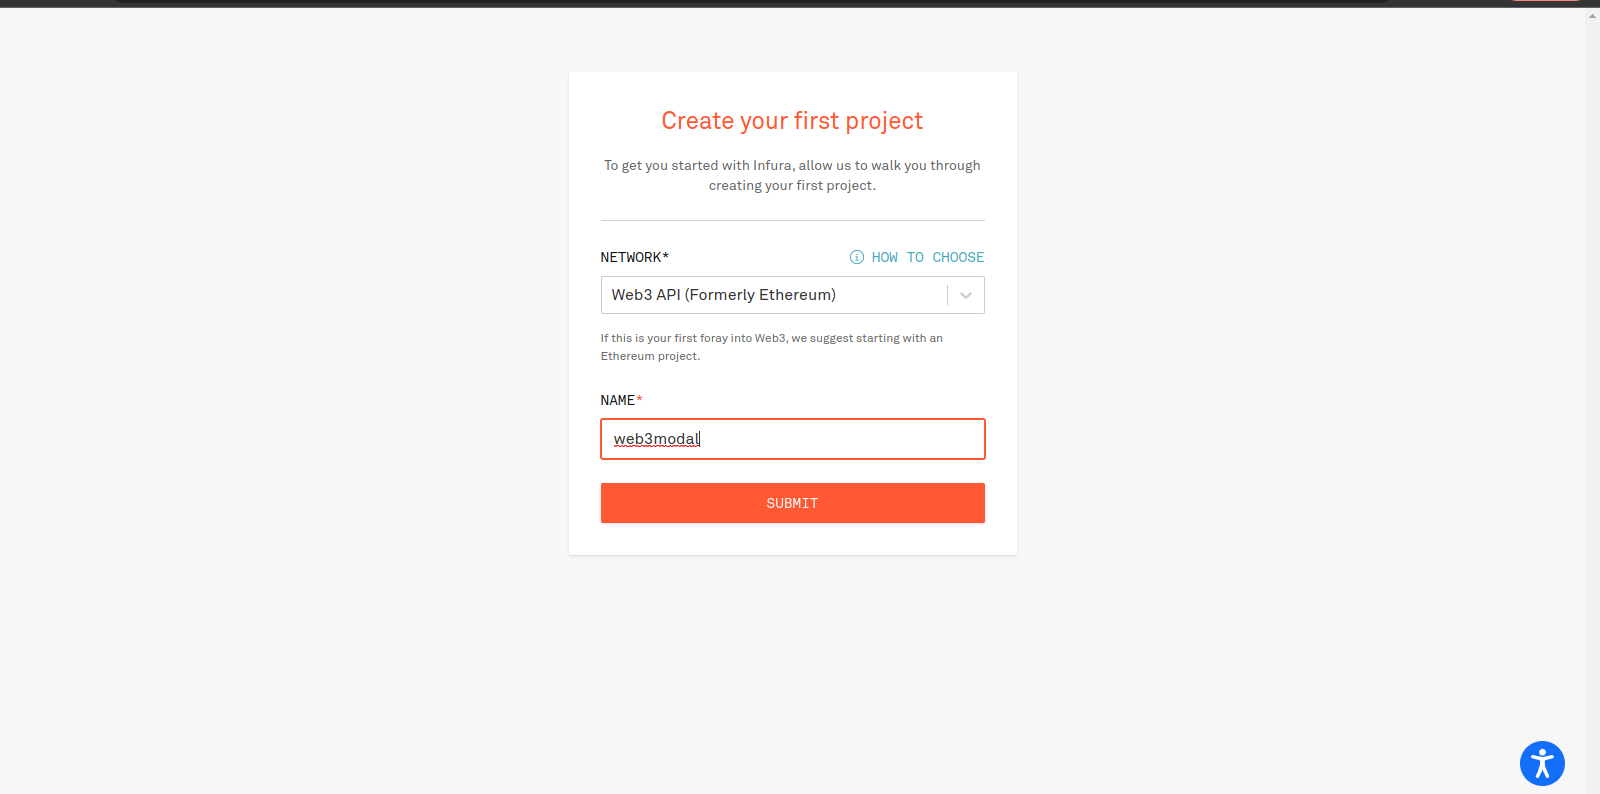
Head to https://infura.io, create an account and proceed with the setup.
Create your first project, as seen in the image below.
After creating the project, you’ll be redirected to the Dashboard. Change the testnet to Rineby, and finally, copy the API KEY.
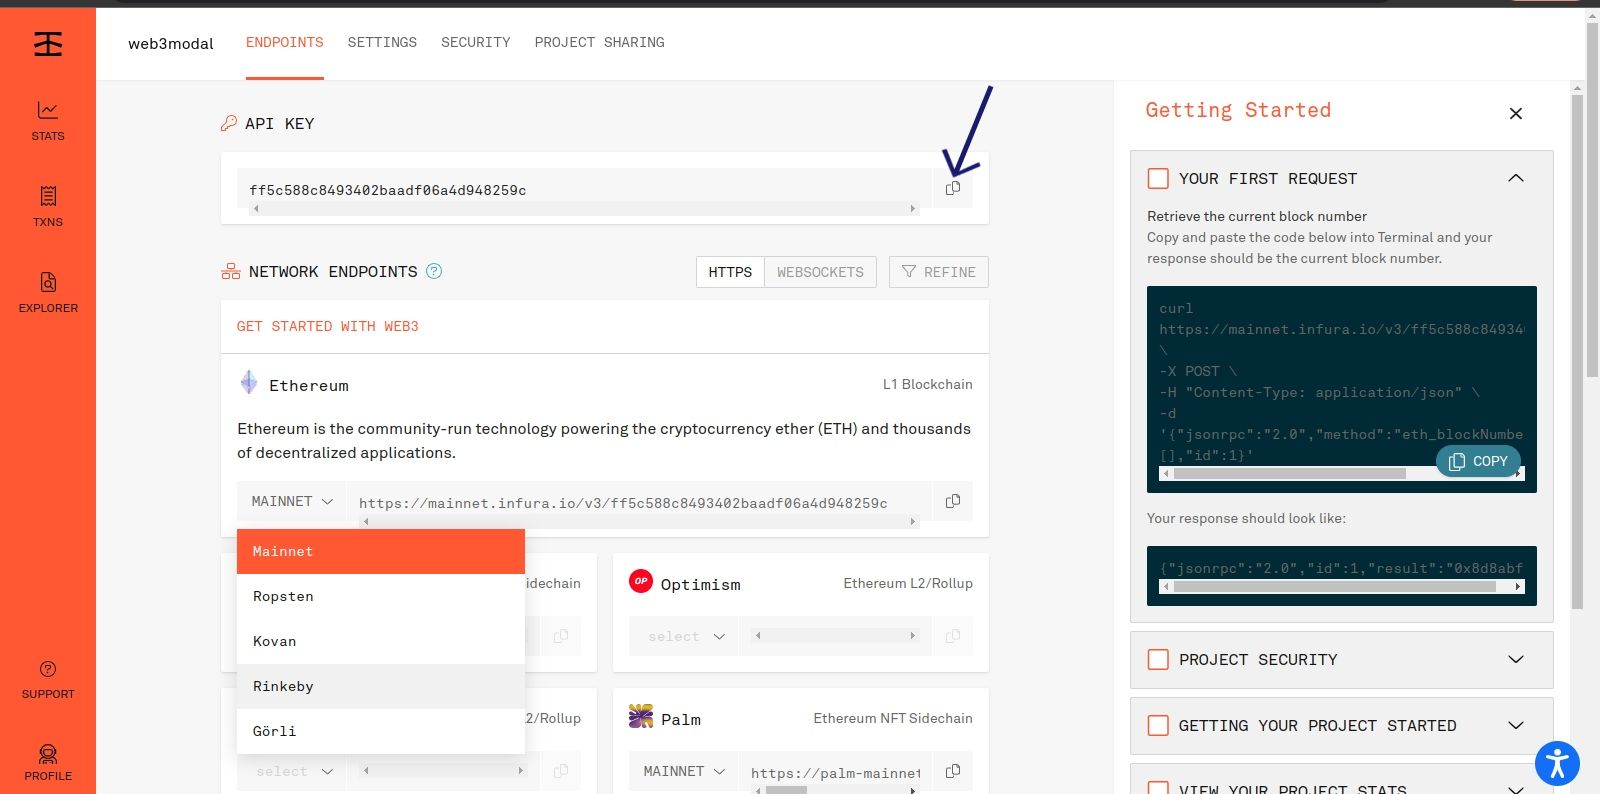
Let’s hide our Infura key by adding it to our environmental variables. Create a .env file in the root directory of the project and add the lines below to it
INFURA_ID = "YOUR_INFURA_KEY"After adding the infura key to the environmental variables, let’s hide it from version control. Locate the .gitignore file in the project’s root directory and add the code below at the bottom.
.envIntegrating MetaMask
With our packages installed, we can now proceed to integrate our wallets. Let’s start by updating the App.js file in our scr/ folder. Import the packages below.
import Web3Modal from "web3modal";Next, let’s instantiate our Web3modal.
const web3Modal = new Web3Modal({
  network: "rinkeby",
  theme: "light", // optional, 'dark' / 'light',
  cacheProvider: false, // optional
  providerOptions: {}, // required
});
In the code above, we instantiated the web3modal specifying the network, theme, cacheProvider, and providerOptions. If the cacheProvider is enabled, it stores the connected account’s status upon refresh.
Creating Wallet Connection
In this section, we’ll be creating a function to help us connect to our web3modal. Let’s start by importing the packages below into the App.js file.
import { ethers } from "ethers";
import { useState, } from "react";
Next, let’s create a function to enable our wallet connection.
const [connectedAccount, setConnectedAccount] = useState("");

const connectWeb3Wallet = async () => {
  try {
    const web3Provider = await web3Modal.connect();
    const library = new ethers.providers.Web3Provider(web3Provider);
    const web3Accounts = await library.listAccounts();
    const network = await library.getNetwork();
    setConnectedAccount(web3Accounts[0]);
  } catch (error) {
    console.log(error);
  }
};
In the code block above, we’re using the ether package to create a connection to the web3modal. Then, we’re grabbing the connected account and network from ether and storing the connected account in state.
Destroying Wallet Connection
After connecting, we might want to disconnect it from the account connected, and that’s what we’ll be looking into in this section.
const disconnectWeb3Modal = async () => {
  await web3Modal.clearCachedProvider();
  setConnectedAccount("");
};
In the code block above, we’re making an asynchronous call to the web3modal and clearing the cachedProvider and our state. This destroys the connection to any connected accounts.
Updating User Interface
Let’s update our User Interface to accommodate the functions created earlier.
return (
  <div className="App">
  <header className="App-header">
    <img src={logo} className="App-logo" alt="logo" />
    <br />
    {connectedAccount && <p>Connected to ${connectedAccount}</p>}
    {!connectedAccount ? (
      <button onClick={connectWeb3Wallet}>Connect Wallet</button>
    ) : (
      <button onClick={disconnectWeb3Modal}>Disconnect</button>
    )}
  </header>
</div>
);
In the code block above, we’re displaying the connected account when the account is connected to any wallet. We’re also displaying the Disconnect button if the account is connected to a network and Connect Wallet if it’s not.
With our progress so far, we should be able to achieve this.
Note: Web3modal comes with MetaMask as the default wallet
Integrating Binance Chain Wallet
Let’s add another wallet to our modal. In this section, we’ll add the Binance Chain Wallet to the web3modal.
const providerOptions = {
  binancechainwallet: {
    package: true,
  },
}
In the code block above, we’ve created a providerOptions object and specified the binancechainwallet package to true. The binancechainwallet package comes inbuilt within the web3modal package when installed.
Next, let’s update our instantiated web3modal by updating the providerOptions property.
const web3Modal = new Web3Modal({
  network: "rinkeby",
  theme: "light", // optional, 'dark' / 'light',
  cacheProvider: false, // optional
  providerOptions, // required
});
In the code above, we’re updating the providerOptions to the one we created a while ago.
Integrating WalletConnect
Let’s add WalletConnect to our web3modal. To achieve this, let’s start with installing its provider.
yarn add @walletconnect/web3-providerAfter installing the package above, let’s add the provider to the providerOptions.
const providerOptions = {
  binancechainwallet: {
    package: true,
  },
  walletconnect: {
    package: WalletConnect, // required
    options: {
      infuraId: process.env.INFURA_ID // required
  }
}
In the code block above, we’ve successfully added the package to our providerOptions and pointed the infuraId to our key in the .env file.
With our progress so far, we should be able to achieve this.
Integrating Coinbase Wallet
Finally, let’s add the Coinbase wallet to our web3modal. Run the command below to install the coinbase provider.
yarn add @coinbase/wallet-sdkImport the coinbase wallet provider into the App.js file
import CoinbaseWalletSDK from "@coinbase/wallet-sdk";Next, update the providerOptions to add the provider to web3modal.
const providerOptions = {
  binancechainwallet: {
    package: true,
  },
  walletconnect: {
    package: WalletConnect, // required
    options: {
      infuraId: process.env.INFURA_ID // required
  }
  coinbasewallet: {
    package: CoinbaseWalletSDK, // Required
    options: {
      appName: "Coinbase", // Required
      infuraId: process.env.INFURA_ID, // Required
      chainId: 4, //4 for Rinkeby, 1 for mainnet (default)
    },
  },
}
In the code block above, we added the coinbasewallet provider and specified the appName, infuraId, and chainId. We’re using the infura key from our environmental variable we specified earlier and setting the chainId to 4 since we’re using the rinkeby testnet.
So far, we’ve been able to achieve:

Resources
Here is the link to the full source code on Github.
Conclusion
In this tutorial, we’ve looked into the Web3modal package and successfully integrated four (4) different wallets. We’ve also looked at how to set up an infura account and get the infura id. The Web3modal has over 10+ wallets that can be integrated at once in web3modal; you can try the rest on your own by heading over to Web3modal repo on github.
A TIP FROM THE EDITOR: Don’t miss our Connect a React app to the NEAR Blockchain for more on connecting React to wallets.


