Optimizing Web Performance with Advanced Techniques


In today’s fast-paced digital world, website performance has become a critical factor in determining the success of a web application. Slow loading speeds can lead to high bounce rates, which can negatively impact the user experience and ultimately result in a loss of revenue for businesses. This article will explain four techniques you can use to enhance the speed of your websites.
According to a study by Section.io, it was found that the percentage bounce rate increases with increasing page load time.
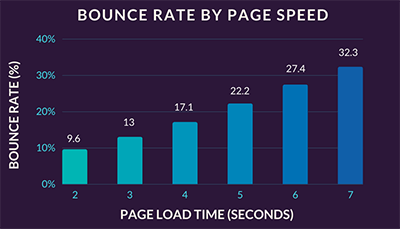
(Image source: Section.io)
The study found a relationship between the page load time of a website and the percentage of users who leave the site without interacting with it. As the page load time increases, so does the percentage of users who leave the site without engaging with it.
To mitigate these issues, you must turn to various techniques to optimize web performance. These techniques include:
- Lazy loading,
- Code splitting,
- Dynamic imports,
- Bundlers
In this article, you will be walked through each of these techniques and explore how they are used to improve the performance of your web application. You will learn the following:
- How lazy loading can defer the loading of non-critical resources until they are needed
- How code splitting can reduce bundle sizes and improve load times
- How dynamic imports can optimize resource loading.
By the end of this article, you’ll have a comprehensive understanding of these techniques and how they can be applied to enhance the performance of your web application.
What is Lazy Loading?
The concept of lazy loading or (on demand) involves retrieving or fetching code only when it is necessary, instead of preloading everything upfront. This is achieved by breaking down a large JavaScript bundle into smaller, separate pieces. Each piece can contain the code for a specific page, section, or component. When the code is needed, a request is sent to the server to fetch that specific piece of code, which is then downloaded and loaded into memory as if it had been there all along.
Lazy loading as a technique allows a web page to only load resources that are needed at a specific time. For example, when a user scrolls down a page, images not currently visible will not be loaded until the user scrolls to them. In an earlier article, Kristofer details how to use lazy loading to smartly optimize your ReactJS application.
Use Lazy Loading To Improve Web Performance
Lazy loading is an effective technique for optimizing the performance of your ReactJS application. It involves loading only the necessary components when they are required rather than everything at once. One way to implement lazy loading in ReactJS is by using the Suspense component.
The Suspense component is a built-in component in ReactJS that allows you to suspend the rendering of a component until its dependencies have loaded. It displays a fallback UI while the required components are loaded. This can be a simple loading spinner or a more complex component that indicates the progress of the loading process.
To use the Suspense component for lazy loading, you first need to import it from the React library:
import React, { Suspense } from 'react';Next, you can create a lazy-loaded component using the lazy function:
const MyLazyComponent = React.lazy(() => import('./MyLazyComponent'));Here, MyLazyComponent is the component you want to lazy load. The lazy function returns a new component that can be rendered using the Suspense component:
function MyApp() {
  return (
    <div>
      <Suspense fallback={<div>Loading...</div>}>
        <MyLazyComponent />
      </Suspense>
    </div>
  );
}
In this example, the fallback prop specifies the component displayed while the MyLazyComponent is being loaded. Once the component is loaded, it will be rendered in place of the fallback component.
Overall, the Suspense component provides a simple and effective way to implement lazy loading in your ReactJS application, resulting in faster load times and a better user experience.
What is Code Splitting?
Code splitting is a technique that allows you to break down your code into smaller files called chunks that can be loaded on demand by the browser. You can create web pages that load quickly and smoothly by breaking down the code into smaller chunks and only loading resources when needed.
A large JavaScript bundle.js file can pose a problem because the browser must download the entire file before executing the code within it. This means that if your bundle.js file is 5 megabytes, for example, the browser will need to download the entire 5 megabytes before the JavaScript code can be executed. To address this issue, you will need to make use of code splitting.
Typically, you will have one main entry point bundle and several supporting chunk files loaded only when the user performs an action requiring that particular section of the code, such as clicking a button.
Use Code Splitting To Improve Web Performance
Below is an example of using code splitting to optimize website performance in a ReactJS application:
import React, { lazy, Suspense } from 'react';

const HomePage = lazy(() => import('./pages/HomePage'));
const AboutPage = lazy(() => import('./pages/AboutPage'));
const ContactPage = lazy(() => import('./pages/ContactPage'));

function App() {
  return (
    <div>
      <Suspense fallback={<div>Loading...</div>}>
        <HomePage />
        <AboutPage />
        <ContactPage />
      </Suspense>
    </div>
  );
}

export default App;
In this example, the App component uses code splitting to lazy load the HomePage, AboutPage, and ContactPage components only when needed. The lazy function creates a new component that will be loaded on demand.
The Suspense component displays a fallback UI while the required components are being loaded. In this case, it’s a simple “Loading…” message, but you could use a more complex component that indicates the progress of the loading process.
By using code splitting in this way, the initial bundle size of the application can be significantly reduced, resulting in faster load times and a more responsive user experience.
Session Replay for Developers
Uncover frustrations, understand bugs and fix slowdowns like never before with OpenReplay — an open-source session replay tool for developers. Self-host it in minutes, and have complete control over your customer data. Check our GitHub repo and join the thousands of developers in our community.
What is Dynamic Import?
Dynamic import is a feature in JavaScript that allows you to load modules on-demand at runtime instead of at the beginning of the program’s execution. This means that you can selectively load parts of your application when they are needed rather than loading everything up-front, which can lead to slower page load times and wasted resources.
With dynamic import, you can load modules asynchronously using the import() function, which returns a promise that resolves to the module object. This function takes a string argument that specifies the path to the module you want to load. You can also use dynamic import to conditionally load modules based on user actions or other runtime conditions.
Use Dynamic Imports To Improve Web Performance
Here’s an example code for using dynamic imports to optimize your web application’s performance:
// main.js
async function loadComponent() {
  const { default: Component } = await import('./component.js');
  const component = new Component();
  component.render();
}

loadComponent();
In this example, main.js is the entry point for the application. It defines an asynchronous loadComponent function that uses dynamic imports to load the Component module when it is needed.
// component.js
export default class Component {
  render() {
    // render component
  }
}
The Component module defines a simple class with a render method for rendering the component.
By using dynamic imports, the browser can load only the necessary code for the Component module when needed rather than loading it all upfront. This can significantly reduce the initial bundle size of the application, resulting in faster load times and a better user experience.
Dynamic import is particularly useful for large applications with complex dependencies, where loading everything initially can be impractical or slow. It also allows for more modular code design and better separation of concerns, as you can load only the modules you need for a particular feature or functionality.
Bundlers
A bundler is a tool that takes multiple modules or files and combines them into a single file (known as a bundle) that a web browser can load. The goal of a bundler is to simplify the process of managing dependencies and reduce the number of requests needed to load a web page.
There are several popular bundlers available for JavaScript, including:
- Webpack: This is one of the most popular bundlers and is widely used in the industry. It supports multiple file types and can be configured to work with different front-end frameworks and libraries.
- Parcel: This is a zero-configuration bundler that aims to simplify the bundling process. It can handle most file types and automatically optimizes the output for production.
- Rollup: This is a specialized bundler that is designed to optimize the size of the output bundle. It is often used for libraries or components that are intended to be consumed by other applications.
What is Webpack?
Webpack is the most popular open-source module bundler. It is a powerful bundling tool that compiles all the modules of a web application, including other assets into static files that are easily interpreted by web browsers.
It can be used to implement code splitting and lazy loading in JavaScript. It allows you to bundle and optimize code, as well as create smaller chunks that can be loaded on demand. With the release of Webpack 5, you can now use ES modules to split code and improve the performance of web applications as part of its most compelling feature.
Though code bundling and compilation are the primary reasons you use Webpack, code splitting, and lazy loading are also compelling features of Webpack.
Use Webpack To Improve Web Performance
In this section, you will be guided through how to set up Webpack 5 for code splitting and lazy loading.
Setting up Webpack 5 to support code splitting and lazy loading is a relatively simple process. To start, you will need to have Node.js and npm (Node Package Manager) installed on your machine.
First, you will need to create a new directory for your project and initialize it with npm. You can do this by running the following command in your terminal:
npm init -yNext, you will need to install Webpack 5 and the necessary loaders and plugins to support code splitting and lazy loading. Here is an example of how to install Webpack 5 and the @babel/preset-env and babel-loader plugins:
npm install --save-dev webpack webpack-cli @babel/core @babel/preset-env babel-loaderWith these dependencies installed, you can now create a basic webpack.config.js file in your project’s root directory. Here is an example of a basic webpack config file that includes code splitting and lazy loading options:
// webpack.config.js
const path = require('path');
const MiniCssExtractPlugin = require('mini-css-extract-plugin');

module.exports = {
  entry: './src/index.js',
  output: {
    filename: 'bundle.js',
    path: path.resolve(__dirname, 'dist'),
  },
  module: {
    rules: [
      {
        test: /\.js$/,
        exclude: /node_modules/,
        use: {
          loader: 'babel-loader',
        },
      },
      {
        test: /\.css$/,
        use: [MiniCssExtractPlugin.loader, 'css-loader'],
      },
    ],
  },
  plugins: [new MiniCssExtractPlugin()],
};
In this example, webpack.config.js is the configuration file for Webpack. It defines how the application’s code should be bundled and optimized for production.
The entry property specifies the entry point for the application, which is index.js in this case. The output property specifies where the bundled code should be saved and how it should be named.
The module property defines the rules for how different types of files should be loaded and processed by Webpack. In this example, there are two rules: one for JavaScript files and one for CSS files.
The JavaScript rule uses the babel-loader to transpile the code to ensure it is compatible with all browsers. The CSS rule uses the css-loader to load and parse CSS files and the mini-css-extract-plugin to extract the CSS into a separate file.
The plugins property is used to specify any additional plugins that should be used by Webpack. In this case, we’re using the mini-css-extract-plugin to extract the CSS into a separate file.
By using Webpack in this way, the application’s code is optimized for production by reducing its size and ensuring compatibility with all browsers.
Conclusion
In today’s digital landscape, website load times have become more important than ever before. Slow load times can significantly impact the user experience, leading to higher bounce rates and lower conversion rates. Search engines also prioritize fast-loading websites, which means that optimizing load times is crucial for improving your website’s search engine visibility. By prioritizing load times, you can not only provide a better user experience but also stay ahead of your competitors.
One of the most effective techniques for optimizing load times is to use code splitting, dynamic imports, and lazy loading. By implementing these techniques, you can effectively reduce the initial bundle size of your application, which can result in significantly faster load times. When the browser can fetch and process the required resources faster, it leads to a more responsive user experience.
In conclusion, the use of these techniques described in this article can make a significant difference in the performance of your application, allowing it to load faster and more efficiently and ultimately enhancing the overall user experience.
Gain Debugging Superpowers
Unleash the power of session replay to reproduce bugs and track user frustrations. Get complete visibility into your frontend with OpenReplay, the most advanced open-source session replay tool for developers.