Over-The-Air updates: the revolutionary way to update React Native apps
Learn how to do OTA automatic updates

Updating mobile apps can be a chore, but if you use over-the-air updates, you can remotely and easily update all users, and this article will show you how to take advantage of this method.

Discover how at OpenReplay.com.
Do you know that an error as tiny as a typographical error can make you redeploy your application to the various app stores? Imagine having to rebuild your app, submit it to the app store, wait for the update to be approved, and then direct users to update their app because of a typographical error that wasn’t picked on review. I think this is the lowest scenario in which an app update is required, and conventionally, that is the case, except you’ve gone through this tutorial.
In this tutorial, I want to introduce you to a revolutionary way to update your React Native apps. This method saves you the strain of always having to redeploy on the app stores before the user base can get an update. This method is called Over-The-Air updates. After this tutorial, you will be able to push app updates directly to users, and they can instantly interact with your updated app once it is launched. I hope you find this interesting.
Prerequisite
This tutorial is in React Native; thus, to follow along, you should have some understanding of JavaScript. Also, you should have completed the React Native environmental setup and have emulators (Android and/or iOS ) for testing the application. You will find this page helpful if you haven’t completed your development environment setup. Lastly, you must have a Microsoft account or create one.
Overview of OTA and How it Works
As has been established, OTA (Over-The-Air) updates refer to the ability to update a mobile app remotely without requiring users to download a new version from the app store. This feature is particularly valuable for developers and businesses as it allows them to quickly deliver bug fixes, feature enhancements, and performance improvements to their app users, bypassing the lengthy app store review process.
It’s important to note that OTA updates in React Native can only update the JavaScript code and some assets; they cannot modify native code or change the app’s fundamental structure. If changes require native code modifications or significant architectural alterations, a new version of the app must still be submitted to the app store for review and distribution.
Here’s an overview of how Over-the-Air updates work:
- Code Push Service: For OTA updates to be created, the Code Push service must be used. The service facilitates the management and delivery of JavaScript code updates. In this tutorial, I will use Microsoft’s App Center CodePush for the code push Service.
- Creating an Update: An update package will be created once the project interacts with a code push service with the CLI (Command Line Interface).
- Update Distribution: The created update package consists of the modified JavaScript code and is uploaded to the Code Push service. The service generates a unique update identifier for the package.
- Checking for Updates: The app periodically checks the Code Push server for new updates on the user’s device. This check can be done automatically during the app’s launch or at specific intervals.
- Applying the Update: If the Code Push server has a new update available, the user’s device downloads the update package in the background while the app runs. Once the download is complete, the update is applied to the running app without requiring the user to manually update or restart the app.
- Update Rollout and Version Management: To ensure a smooth rollout and minimize the impact of potential issues, a developer can control the percentage of users who receive the update initially. If any critical issues are reported, they can quickly halt the update rollout and release a new fix.
CodePush Explanation and Features/Advantages
CodePush is a service provided by Microsoft App Center that enables developers to perform Over-The-Air (OTA) updates for their React Native and Cordova mobile applications. It allows a React Native developer to push updates to the JavaScript code and other assets of their apps directly to users’ devices without requiring them to download a new version from the app store. This results in a faster and more agile development process, providing several key features and advantages:
- Seamless Updates: CodePush allows developers to seamlessly deliver updates to users’ devices. Users don’t need to go through the app store update process, ensuring they always have access to the latest version of the app with bug fixes, new features, and performance improvements.
- Rapid Iteration: With CodePush, developers can iterate and deploy updates quickly. This enables them to respond promptly to user feedback, fix bugs, and continuously improve the app without waiting for the lengthy app store review and approval process.
- Targeted Rollouts: Developers can control the update rollout process with CodePush. They can target specific app versions or segments of users, gradually releasing updates to a small percentage of users first and then expanding the rollout as confidence in the update’s stability grows.
- A/B Testing: CodePush supports A/B testing, allowing developers to experiment with different versions of their apps. They can try out various features, UI designs, or configurations on subsets of users to gather valuable data and make data-driven decisions.
- Detailed Analytics: CodePush provides comprehensive analytics and reporting, giving developers insights into updated success rates, adoption rates, and potential issues. This data helps developers understand how users interact with updates and make informed decisions about future improvements.
- CI/CD Integration: CodePush integrates seamlessly with continuous integration and continuous delivery (CI/CD) pipelines. This allows developers to automate the process of building, testing, and deploying updates, streamlining the development workflow.
- Offline Support: CodePush is designed to handle updates even when the app is offline or has limited connectivity. It ensures that updates are applied when the app is back online and ready to receive them.
Implementing OTA updates in a React Native Project
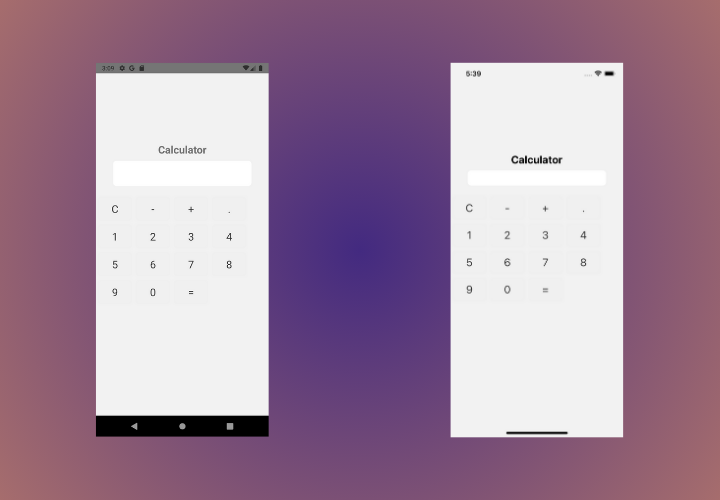
I will demonstrate this OTA update with a calculator app in this tutorial. The calculator app will be able to perform basic arithmetic operations like addition, subtraction, multiplication, and division. Still, the caveat is that the app’s initial version will only be able to calculate addition and subtraction. I will build the app, and with the help of OTA updates, I will add the multiplication and division possibilities and push the updates to our already released applications. Now the first thing to be done is to clone the initial version of the calculator app. To do that, use the command below:
git clone https://github.com/championuz/calculatorapp.gitOnce the clone is completed, follow the directions here to install the necessary modules and build your application on your emulators.
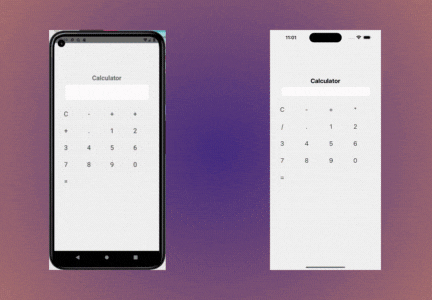
You should have your emulators show up like this:
Setting up CodePush for Android
Setting up CodePush follows a number of processes to be set up. First, you must create a Microsoft App Center account and get the keys for your Android application. After that, install appcenter and some other packages to track app crashes and get analytics, install appcenter cli globally, then install CodePush.
For this tutorial, I am deployed in production mode. Actually, for CodePush to work, you should have it in anything other than debug mode as the necessary files won’t be installed to have CodePush work in debug mode, so you can use Staging, but I am using Production mode. You can learn about how to deploy in dynamic modes here.
Click here to create a Microsoft app center account or to sign in. Once signed in, you should arrive on a dashboard like this.

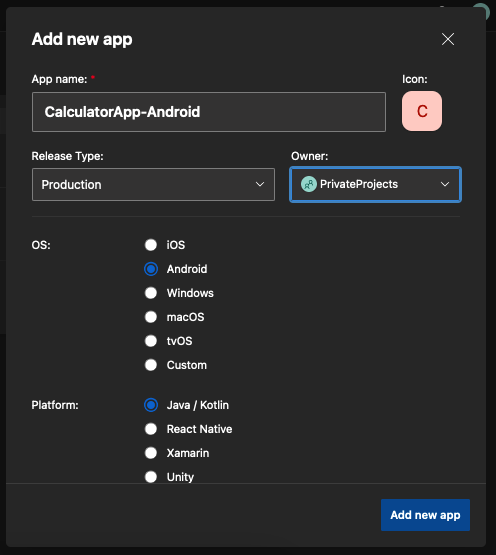
Now, you can create an organization or simply add a new app, but I am creating an organization called PrivateProjects then I will add an app called CalculatorApp-Android. -Choose a Release type; mine is production.
- Owner, I chose the organization I just created
- PrivateProjects. OS: Android (because this is an Android setup) and finally
- Platform: React Native, then click the “Add App” button.
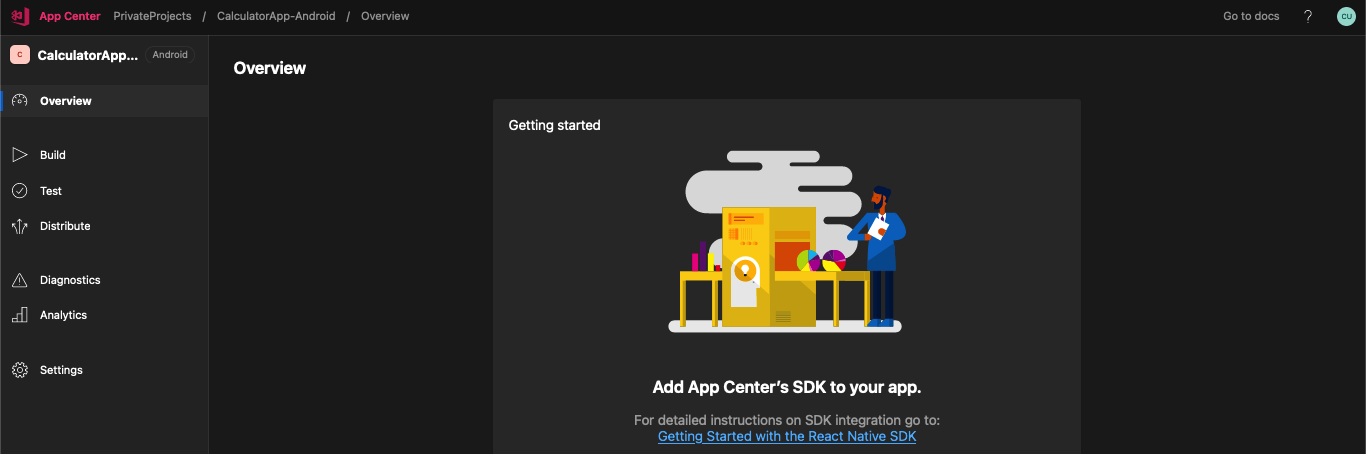
Once you have added the app, you should be navigated into a screen like this. Navigate to the bottom of the screen for your app secret and copy it.
Now run the command below in your terminal from your project’s root folder to install crash and analytics services in your app.
npm install react-native-code-push appcenter appcenter-analytics appcenter-crashes --save-exactStill integrating the app center SDK in your Android project, navigate to android/app/src/main/assets/ If there’s no assets folder among the items in the main folder, create the assets folder, and in it, create a file named appcenter-config.json. Then in the just-created file, add the JSON code below. You should paste in the copied app secret here.
{
 "app_secret": "{Your app secret here}"
}
Still, in the main folder, navigate into res/values/strings.xml and add the following strings.
<string name="appCenterCrashes_whenToSendCrashes" moduleConfig="true" translatable="false">DO_NOT_ASK_JAVASCRIPT</string>
<string name="appCenterAnalytics_whenToEnableAnalytics" moduleConfig="true" translatable="false">ALWAYS_SEND</string>
Now we have successfully integrated the app center SDK, moving on to configure and integrate CodePush.
Please note that the CodePush integration below is because I am using React Native version 0.60+; if you are setting this up in a lower version, please check here for the process.
Now, still in res/values/strings.xml, add the following to the strings.
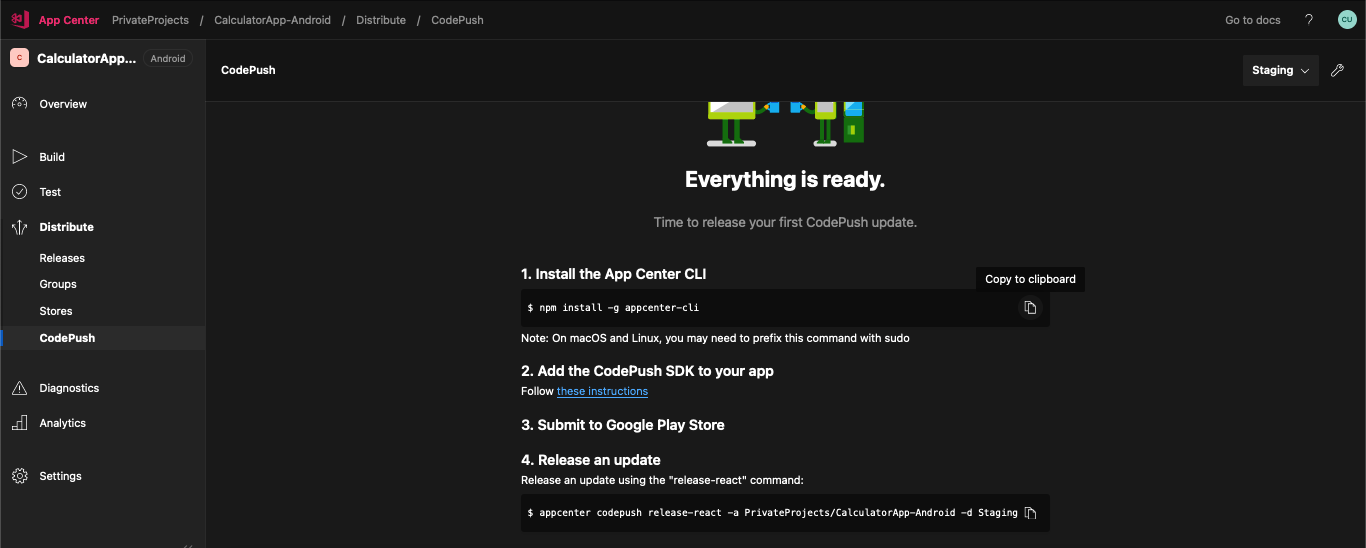
<string name="CodePushDeploymentKey" moduleConfig="true">{Your Deployment Key}</string>To get your deployment key, on the app center dashboard, click on distribute -> CodePush. This is where you should be navigated to.

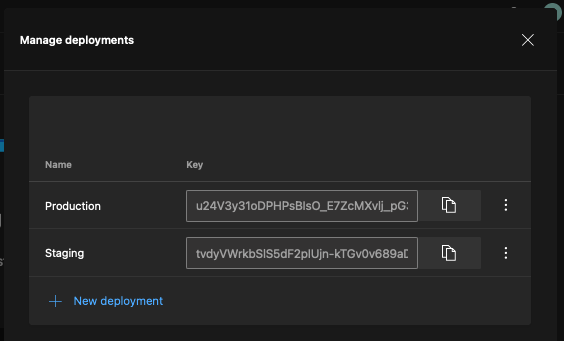
Now click on the Create Standard Deployments button.
Now, click on the dropdown showing Staging and select Production, then click on the key icon to choose a deployment key. Mine is production.
Back to the project, navigate to the android/settings.gradle file, and add the following code at the end of the file.
...
include ':app', ':react-native-code-push'
project(':react-native-code-push').projectDir = new File(rootProject.projectDir, '../node_modules/react-native-code-push/android/app')
Now, in the android/app/build.gradle file, add the code below at the end of the file. By adding the code line, you instruct the Android build system to include and execute the codepush.gradle file from the react-native-code-push library during the build process.
...
apply from: "../../node_modules/react-native-code-push/android/codepush.gradle"
...
Now, in your android/app/src/main/java/MainApplication.java file, add the code below:
//Add this Import Statement at the top
import com.microsoft.codepush.react.CodePush;

public class MainApplication extends Application implements ReactApplication {

   private final ReactNativeHost mReactNativeHost =
     new DefaultReactNativeHost(this) {
       ...

       // Add this
      @Override
      protected String getJSBundleFile() {
           return CodePush.getJSBundleFile();
      }
   };

}
Note that in React Native 0.71.3, as I am using in this tutorial, you will find the DefaultReactNativeHost class instead of ReactNativeHost in lower versions. You should still go ahead to add the code as shown.
Now, to ensure that CodePush is checking for updates and updating the app on app launch, I would wrap the root component (in this case, Calculator) with the CodePush higher-order component, as shown.
// Add this import statement at the top
import CodePush from 'react-native-code-push';

const Calculator = () => {
...
}

export default CodePush(Calculator);
After completing this, go ahead and rebuild your Android app to ensure everything is well set up.
Setting up CodePush for iOS
For iOS, run the pod install command in the ios directory to install the required modules.
Next, on the app center dashboard, add a new app. The process is the same as stated above in the Android configuration but remember to select iOS under OS. After this, copy your app secret.
Back to your project, navigate to ios/projectName/info.plist file and add the following.
<key>AppSecret</key>
<string>{Your App Secret}</string>

<key>CodePushDeploymentKey</key>
<string>{Your Deployment Key}</string>
Paste in your app secret and to get your deployment key, follow the steps demonstrated in the Android configuration.
Now, in your AppDelegate.mm file, add the import statements below at the top.
#import <CodePush/CodePush.h>
#import <AppCenterReactNative.h>
#import <AppCenterReactNativeAnalytics.h>
#import <AppCenterReactNativeCrashes.h>
Next, in thedidFinishLaunchingWithOptions method, add the lines below:
   - (BOOL)application:(UIApplication *)application didFinishLaunchingWithOptions:(NSDictionary *)launchOptions
   {
     ...
     [AppCenterReactNative register];
     [AppCenterReactNativeAnalytics registerWithInitiallyEnabled:true];
     [AppCenterReactNativeCrashes registerWithAutomaticProcessing];
   ...
   }
Now, locate the code below and replace it accordingly.
// Find this
return [[NSBundle mainBundle] URLForResource:@"main" withExtension:@"jsbundle"];

// Replace with
return [CodePush bundleURL];
Now rebuild your iOS app.
Updating Calculator App to include Multiplication and Subtraction
Before applying the update, the Android and iOS apps should be built in release mode. Remember CodePush doesn’t work in debug mode. To get this done, you need to get a release key for Android, and to do that, follow this guide. If you have gotten your release key for Android, run the command below to build the release version of your app in your simulator.
npm run android -- --mode="Release"To build your iOS app in release mode, run the command below.
npx react-native run-ios --configuration Release --simulator="Name of your Simulator"Once it’s been built in release mode, you will notice that the hot reload doesn’t apply and doesn’t need the metro server to run. Now we can update the app. In the app.js file, add the following code in the calculator component.
...
<View>
 <Text style={styles.headerText}>Calculator App</Text>
</View>
...
<View style={styles.buttonsContainer}>
 <Button onPress={() => handleButtonPress("*")} label="*" />
 <Button onPress={() => handleButtonPress("/")} label="/" />
</View>
...
Creating and deploying a CodePush update
After an update is made on an app, it could be as tiny as the update we have just made on the calculator app project, you can create a CodePush update by running a simple command, but you should be sure to have the appcenter cli installed globally on your computer. The commands are as follows:
# Install Appcenter Cli Globally
npm install -g appcenter-cli
appcenter codepush release-react -a PrivateProjects/CalculatorApp-Android -d Production
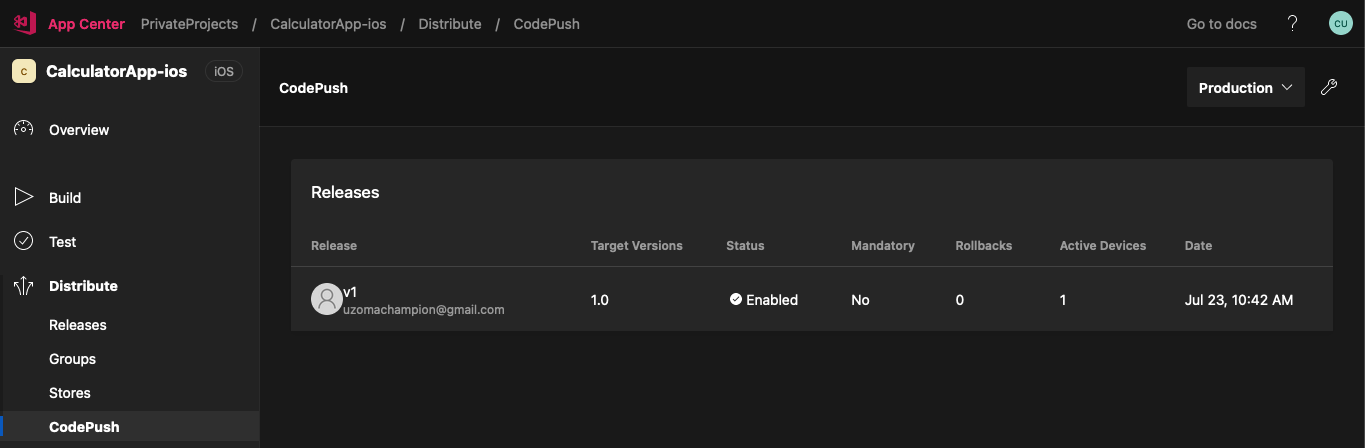
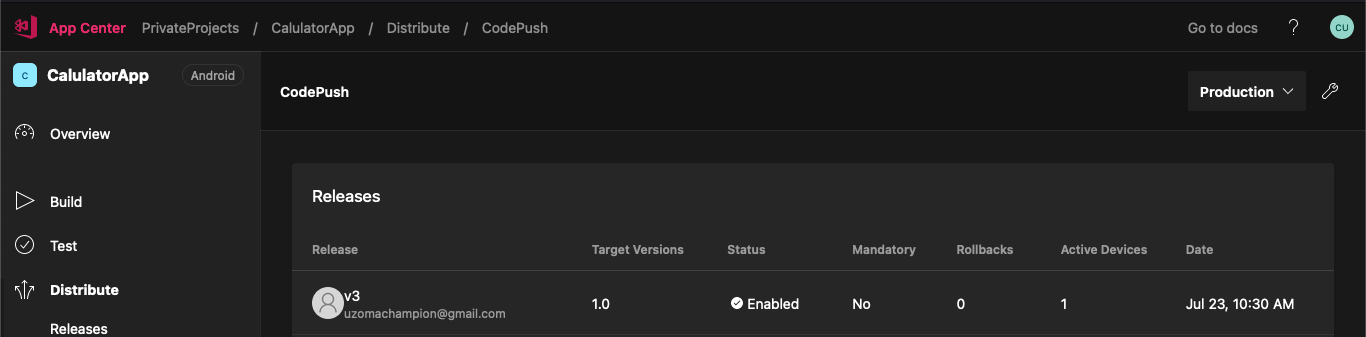
appcenter codepush release-react -a PrivateProjects/CalculatorApp-ios -d ProductionAs shown, the above are the commands I used to create OTA updates using CodePush for the CalculatorApp. Since they are targeted individually, you need to deploy them individually. You should endeavor to replace PrivateProjects with the Owner’s name of your Application and CalculatorApp-ios with the configured app name.
Testing the CodePush update
To test for CodePush updates, you must close your app and relaunch it after a few seconds. As you can see, my Android and iOS simulators with the app built-in release mode have been updated!
Also, if you look at your Appcenter dashboard, you will see the number of devices in which your update is live, as well as some other details.
Conclusion
In development, there are tools, and there are indispensable tools. CodePush is one of the indispensable tools because of how it significantly simplifies the process of updating applications and users’ getting updates. Let us leave submissions to app stores for the initial deployment and whenever a prominent update needs to be made. I hope this tutorial gets you from point A to Z in implementing OTA updates in your React Native project. If you face any challenges, please share; I will like to assist in any way I can. For the complete source code of this tutorial, you can find it here. Happy coding!
Gain control over your UX
See how users are using your site as if you were sitting next to them, learn and iterate faster with OpenReplay — the open-source session replay tool for developers. Self-host it in minutes, and have complete control over your customer data.
Star on GitHub12k