Creating Stunning Particle Animations with React and TsParticles
Do animations with the React library

React TsParticles is a popular open-source library that enables you to integrate particle animations into your React applications easily. It is built on top of the TsParticles library, which provides a flexible and customizable way to create various particle effects and animations. React TsParticles simplifies the integration of these particle animations into React projects, making it a powerful tool for adding dynamic and visually appealing elements to your websites or web applications, and this article will show you several examples of its usage.

Discover how at OpenReplay.com.
Adding particle animation to web projects can enhance the overall user experience and make your website or web application more engaging and visually appealing. Here are some of the key benefits of incorporating particle animation into your web projects:
-
Visual Appeal: Particle animations can make your website more visually appealing by adding dynamic and eye-catching elements. They can create a sense of depth and interactivity, making your site stand out from the competition.
-
User Engagement: Animations are attention-grabbing, and they can help keep users engaged with your content. Interactive particles can encourage users to interact with your site and explore its features.
-
User Interaction: Interactive particle animations can respond to user actions, such as mouse movements or touches, making the website more responsive and interactive. This can improve the overall user experience.
-
Background Effects: Particle animations are often used for background effects, providing an attractive backdrop for your content. This can be effective for landing pages, portfolios, and other visually oriented websites.
Installation and setup of React TsParticles
In your React application project directory, you can install the TsParticles dependency with your preferred package installer using the following bash scripts:
For npm:
npm install react-tsparticles tsparticlesFor yarn:
yarn add react-tsparticles tsparticlesCreating animations with TsParticles
In this section, we will discuss the different animations TsParticles provides and how they can be integrated into web applications.
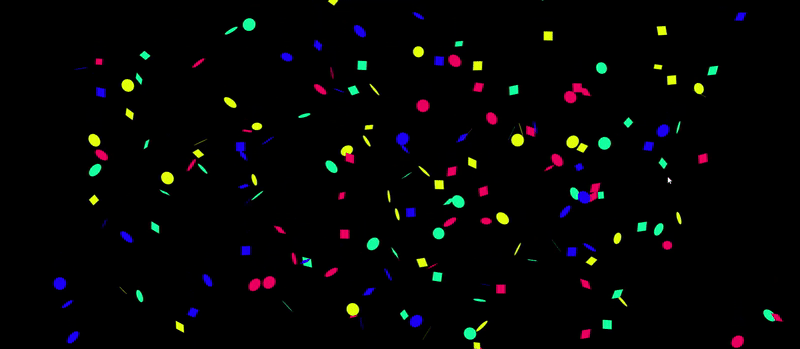
Confetti Effects
For our first animation, we will use TsParticles to generate confetti on a web application. Confetti are small multi-colored pieces of material usually thrown on special celebration occasions. In a web application, it can be used to depict a form of celebration in instances where users complete an object, e.g., completing a course on an e-learning website.
To create this animation, follow the steps outlined below:
- First, in the
src/App.jsdirectory, we will clear the boiler template code and import the necessaryTsParticledependencies:
import Particles from "react-tsparticles";
import { loadFull } from "tsparticles";
import { useCallback } from "react";- Next, we will define the animation configuration and a function to initialize the TsParticles animation:
//...
function App() {
const config = {
  //Here we define the animation type, properties and behavior
};

const particlesInit = useCallback(async (engine) => {
  // here we initialize the particles animation
  await loadFull(engine);
}, []);
We will use useCallback to memorize the particleInit function, hence as the dependency array is empty [], React will not create a new function on each render, but will only create such on the first render when the component mounts.
In the return block of the App.js component, we can access the animation with the config and initialization function:
//...
return (
  <div className="App">
    <Particles options={config} init={particlesInit} />
  </div>
);
export default App;
For the confetti animation, we will define the following properties in the config:
const config = {
  fullScreen: {
    zIndex: 1,
  },
  background: {
    color: "#000",
  },
  emitters: {
    position: {
      x: 50,
      y: 100,
    },
    rate: {
      quantity: 5,
      delay: 0.15,
    },
  },
  particles: {
    color: {
      value: ["#1E00FF", "#FF0061", "#E1FF00", "#00FF9E"],
    },
    move: {
      decay: 0.05,
      direction: "top",
      enable: true,
      gravity: {
        enable: true,
      },
      outModes: {
        top: "none",
        default: "destroy",
      },
      speed: {
        min: 50,
        max: 100,
      },
    },
    number: {
      value: 0,
    },
    opacity: {
      value: 1,
    },
    rotate: {
      value: {
        min: 0,
        max: 360,
      },
      direction: "random",
      animation: {
        enable: true,
        speed: 30,
      },
    },
    tilt: {
      direction: "random",
      enable: true,
      value: {
        min: 0,
        max: 360,
      },
      animation: {
        enable: true,
        speed: 30,
      },
    },
    size: {
      value: 10,
      animation: {
        enable: true,
        startValue: "min",
        count: 1,
        speed: 16,
        sync: true,
      },
    },

    shape: {
      type: ["circle", "square"],
      options: {},
    },
  },
};
We can define the function of each attribute specified above:
- Fullscreen: In this property, we set the stacking order of the intended animation to “1” using the
z-indexattribute. - Emitters: Here, we specified the initial X and Y origin points of the particle animation using the
positionattribute. Usingrate, we also specified the quantity emitted at a time and the delay between each creation of particles. - Particles: Using this property, we defined the emitted particles’ qualities and behavior.
- Color: This can be a single color or a collection of different colors, as shown above. This sets the color for each particle created in the animation.
- Move: This property defines:
- The
directionof the particle animation. - At what point the particles begin to lose speed is specified using the
decayattribute. - We also enabled the effect of gravity on the particles by setting the
gravityattribute to true.
- The
- Number: This is the initial number of particles for the animation.
opacity, rotate, tilt, size, and shape all perform the functions implied by their names. To run the application, use the npm start command in the terminal environment of the working directory and open the result in the browser. You will get a page similar to the GIF below:
By modifying the config properties, we can create unique forms of animation in TsParticles. For example, we can get a confetti pop animation with the following code:
const config = {
  fullScreen: {
    zIndex: 1,
  },
  background: {
    color: "#000",
  },
  emitters: {
    life: {
      count: 0,
      duration: 0.1,
      delay: 0.4,
    },
    rate: {
      delay: 0.1,
      quantity: 150,
    },
    size: {
      width: 0,
      height: 0,
    },
  },
  particles: {
    color: {
      value: ["#1E00FF", "#FF0061", "#E1FF00", "#00FF9E"],
    },
    move: {
      enable: true,
      gravity: {
        enable: true,
        acceleration: 10,
      },
      speed: {
        min: 10,
        max: 20,
      },
      decay: 0.1,
      direction: "none",
      straight: false,
      outModes: {
        default: "destroy",
        top: "none",
      },
    },
    number: {
      value: 0,
    },
    opacity: {
      value: 1,
      animation: {
        enable: true,
        minimumValue: 0,
        speed: 2,
        startValue: "max",
        destroy: "min",
      },
    },
    rotate: {
      value: {
        min: 0,
        max: 360,
      },
      direction: "random",
      animation: {
        enable: true,
        speed: 30,
      },
    },
    tilt: {
      direction: "random",
      enable: true,
      value: {
        min: 0,
        max: 360,
      },
      animation: {
        enable: true,
        speed: 30,
      },
    },
    size: {
      value: 10,
      random: {
        enable: true,
        minimumValue: 2,
      },
    },
    shape: {
      type: ["circle", "square"],
      options: {},
    },
  },
};
Running the application will produce the following results:
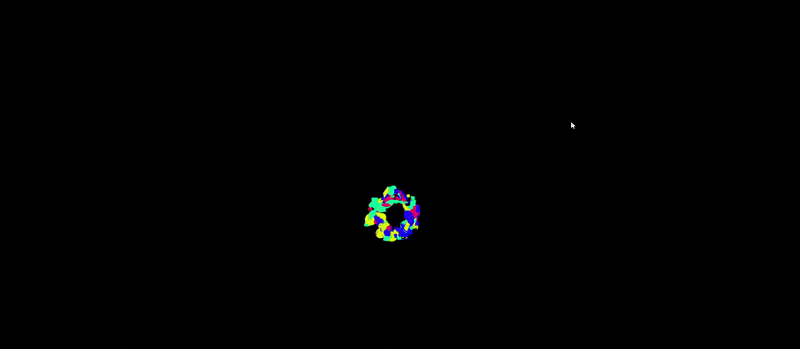
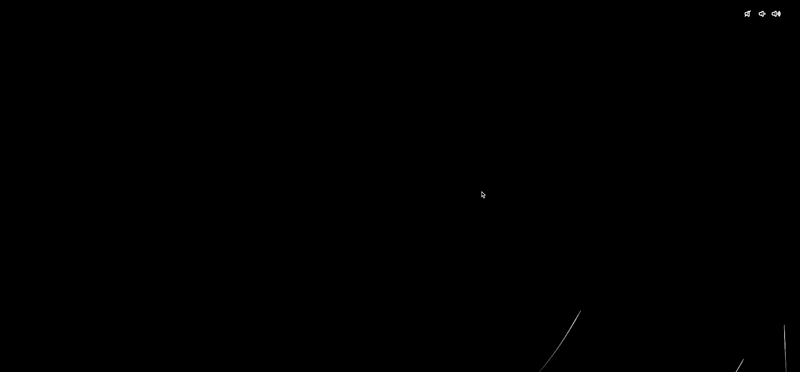
Fireworks Effects
In this section, we will create a fireworks effect with TsParticles using the following steps:
- First, we will set a black background and a Fullscreen property for the fireworks to be well visible. We will also define a
fpsLimitfor a better none choppy animation and adetectRetinavalue of “true” to improve the particle appearance:
const config = {
  fullScreen: {
    enable: true,
  },
  detectRetina: true,
  background: {
    color: "#000",
  },
  fpsLimit: 60,
};- Next, we will define the emitter property of our particles. To imitate actual fireworks, we will need the particles to be animated upwards, to different x and y coordinates before we can create the explosion effect:
//...
emitters: {
  direction: "top",
  position: {
    y: 100,
    x: 50,
  },
  rate: {
    delay: 0.03,
    quantity: 1,
  },
  life: {
    count: 0,
    duration: 0.1,
    delay: 0.1,
  },
  size: {
    width: 80,
    height: 0,
  },
//...
We also defined the particles’ rate, life, and size properties. Next, we will create and animate the particles to be animated:
// still within the emitters property
particles: {
  number: {
    value: 0,
  },
  destroy: {
    mode: "split", // using splits we will achieve a firework effect
    split: {
      rate: {
        value: 100, //number of splits to be created
      },
      particles: {
        // Splitted practicle properties
        color: {
          //color of particles after explosion
          value: [
            "#FF0000" /*Red */,
            "#0000FF" /*blue */,
            "#FFFF00" /*yellow*/,
          ],
        },
        opacity: {
          value: 1,
          animation: {
            enable: true,
            speed: 0.2,
            minimumValue: 0.1,
            sync: false,
            startValue: "max", // create multiple fireworks
            destroy: "min",
          },
        },
        shape: {
          // pattern of the explosion
          type: "star",
        },
        size: {
          value: 3,
          animation: {
            enable: false,
          },
        },
        life: {
          count: 1, //amount of time
          duration: {
            value: {
              min: 1,
              max: 2,
            },
          },
        },
        move: {
          enable: true,
          gravity: {
            enable: false,
          },
          speed: 3,
          direction: "none",
          outMode: "destroy",
        },
      },
    },
  },
  life: {
    count: 1,
  },
  shape: {
    type: "line",
  },
  size: {
    value: { min: 1, max: 100 },
    animation: {
      enable: true,
      sync: true,
      speed: 150,
      startValue: "random",
      destroy: "min",
    },
  },
  stroke: {
    color: {
      // color of the fireworks stroke
      value: ["#00FFFF", "#FF8000", "#0080FF"],
    },
    width: 1,
  },
  rotate: {
    path: true,
  },
  move: {
    enable: true,
    gravity: {
      acceleration: 15,
      enable: true,
      inverse: true,
      maxSpeed: 100,
    },
    speed: { min: 10, max: 20 },
    outModes: {
      default: "destroy",
    },
    trail: {
      // trail for split particles
      enable: true,
      length: 10,
    },
  },
},
Running the application will produce the following results:

Using Presets
While creating the particle configuration offers more flexibility in controlling the animation properties, it can take some time to get things right. To quickly provide particle animations, TsParticles introduced the use of preset particles. The preset allows users to import and use pre-configured particle animation. For example, we can use the fireworks preset provided by TsParticles, as shown below.
First, we install the preset using the following command in the CLI:
npm install tsparticles-preset-fireworksWe can then import and use it as shown below:
import Particles from "react-tsparticles";
import { loadFull } from "tsparticles";
import { useCallback } from "react";
import { loadFireworksPreset } from "tsparticles-preset-fireworks";
const fireworkInit = useCallback(async (engine) => {
  await loadFireworksPreset(engine);
}, []);
const options = {
  preset: "fireworks",
};
  return (
    <div className="App">
      <Particles options={options} init={fireworkInit} />
    </div>
  );
}
Final results:
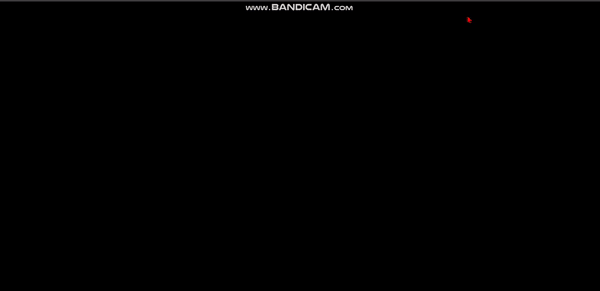
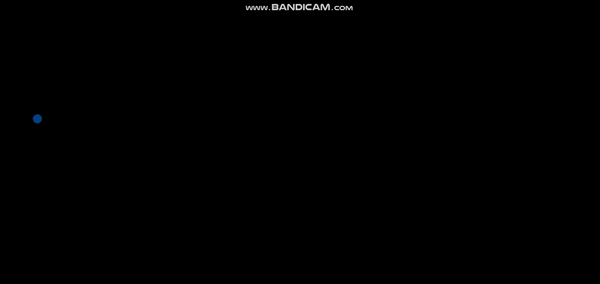
Implementing interactivity with particles
In this section, we will learn how to generate TsParticle animations based on user interactions, such as click and hover events. A mouse click event can trigger the particle emitter action, as shown in the code below:
background: {
  color: "#000",
},
interactivity: {
  events: {
    onClick: {
      enable: true,
      mode: "emitter",
    },
  },
  // emitter and mode here
},
Next, we define a mode that houses the emitter property, and then we add the rest of the animation properties:
//....
modes: {
  emitters: {
    direction: "top",
    spawnColor: {
      value: "#FF8000",
      animation: {
        h: {
          enable: true,
          offset: {
            min: -1.4,
            max: 1.4,
          },
          speed: 0.1,
          sync: false,
        },
        l: {
          enable: true,
          offset: {
            min: 20,
            max: 80,
          },
          speed: 0,
          sync: false,
        },
      },
    },
    life: {
      count: 1,
      duration: 0.1,
      delay: 0.6,
    },
    rate: {
      delay: 0.1,
      quantity: 100,
    },
    size: {
      width: 0,
      height: 0,
    },
  },
},
Finally, we define the particles’ properties:
particles: {
  number: {
    value: 0,
  },
  color: {
    value: "#0080FF",
  },
  shape: {
    type: ["circle", "square", "triangle"],
  },
  opacity: {
    value: { min: 0, max: 1 },
    animation: {
      enable: true,
      speed: 1,
      startValue: "max",
      destroy: "min",
    },
  },
  size: {
    value: { min: 6, max: 12 },
  },
  life: {
    duration: {
      sync: true,
      value: 7,
    },
    count: 1,
  },
  move: {
    enable: true,
    gravity: {
      enable: true,
    },
    drift: {
      min: -2,
      max: 2,
    },
    speed: { min: 10, max: 30 },
    decay: 0.1,
    direction: "none",
    random: false,
    straight: false,
    outModes: {
      default: "destroy",
      top: "none",
    },
  },
  rotate: {
    value: {
      min: 0,
      max: 360,
    },
    direction: "random",
    move: true,
    animation: {
      enable: true,
      speed: 60,
    },
  },
  tilt: {
    direction: "random",
    enable: true,
    move: true,
    value: {
      min: 0,
      max: 360,
    },
    animation: {
      enable: true,
      speed: 60,
    },
  },
  roll: {
    darken: {
      enable: true,
      value: 25,
    },
    enable: true,
    speed: {
      min: 15,
      max: 25,
    },
  },
  wobble: {
    distance: 30,
    enable: true,
    move: true,
    speed: {
      min: -15,
      max: 15,
    },
  },
},
In the code above, we are creating a confetti pop effect animated upwards, with its point of origin at the location where a mouse click takes place:
 In a similar pattern, we can also define hover animations, which emit particles as the mouse hovers on the screen. For this, we will also use the
 interactivity property:
const config = {
  background: {
    color: "#000",
  },
  interactivity: {
    detectsOn: "window",
    events: {
      onhover: {
        enable: true,
        mode: "trail"
      },
    //...
Here, we define the area (i.e., window) to detect mouse events and the type of events to be detected. We will create a mouse trail using an onhover effect:
//...
resize: true,
},
modes: {
  grab: {
    distance: 400,
    line_linked: {
      opacity: 1,
    },
  },
  bubble: {
    distance: 400,
    size: 40,
    duration: 2,
    opacity: 0.8,
    speed: 3,
  },
  repulse: {
    distance: 200,
  },
  push: {
    particles_nb: 4,
  },
  remove: {
    particles_nb: 2,
  },
  trail: {
    delay: 0.005,
    quantity: 5,
    pauseOnStop: true,
  },
},
},
retina_detect: true,
fullScreen: {
  enable: true,
  zIndex: 100,
},
fpsLimit: 60,
particles: {
  number: {
    value: 0,
    density: {
      enable: true,
      value_area: 800,
    },
  },
  color: {
    value: "#0080FF",
  },
  shape: {
    type: ["circle", "square", "triangle"],
  },
  opacity: {
    value: { min: 0, max: 1 },
    animation: {
      enable: true,
      speed: 1,
      startValue: "max",
      destroy: "min",
    },
  },
  size: {
    value: { min: 6, max: 12 },
  },
  links: {
    enable: false,
  },
  move: {
    enable: true,
    speed: 3.5,
    direction: "none",
    random: false,
    straight: false,
    outMode: "destroy",
    attract: {
      enable: false,
      rotateX: 600,
      rotateY: 1200,
    },
  },
},
//...
Running the application will produce the following results:
Handling responsiveness
With TsParticles, we can also define the behavior of particles under different screen sizes, as shown below:
responsive: [
  {
    maxWidth: 1024,
    options: {
      particles: {
        move: {
          speed: {
            min: 33,
            max: 66,
          },
        },
      },
    },
  },
],
In the code block above, we defined a move speed of 33 and 66 for minimum and maximum values at a screen with maxWidth 1024px. Therefore, all screens less than 1024px in size will have properties within the defined breakpoint applied to their particles.
Integration with other React components
In this section, we will learn how to toggle particle animations from actions performed by other components. Actions, such as buttons or completing a progress bar, can trigger these animations.
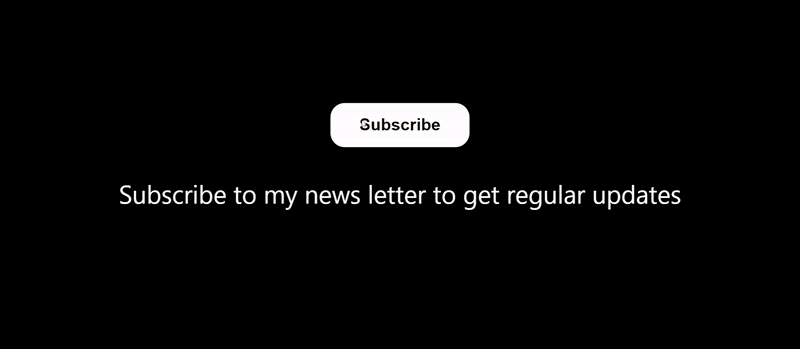
Button
Using animations, we can bring life to simple user interactions, such as clicking on a subscriber button or finishing a form sign up. To trigger particle animations from a button, follow the steps outlined below:
- First, we will create a new file,
Button.jsxto contain a component for the button, add our necessary imports, and create a button:
import React, { useState } from "react";
import Particles from "react-tsparticles";
import { loadFull } from "tsparticles";
import { useCallback } from "react";
const Button = () => {
  const [subscribed, setSubscribed] = useState(false);
  // confetti particles animation here
  return (
    <div
      style={{
        display: "flex",
        height: "100vh",
        width: "100vw",
        flexDirection: "column",
        justifyContent: "center",
        alignItems: "center",
        gap: "23px",
        background: "black"
      }}
    >
      <button
        id="#myButton"
        style={{
          padding: "10px 23px",
          fontWeight: 700,
          width: "max-content",
          border: "1px solid black",
          borderRadius: "12px",
          background: subscribed ? "red" : "white",
          color: subscribed ? "white" : "black",
          transform: "scale(2)",
        }}
        onClick={() => setSubscribed(!subscribed)}
      >
        {subscribed ? "Unsubscribe" : "Subscribe"}
      </button>
      <p style={{ fontSize: "40px", color: "white" }}>
        {/* subscription caption */}
        {!subscribed
          ? "Subscribe to my news letter to get regular updates"
          : "Thank you for subscribing. Cheers!!!"}
      </p>
      // return particles component when subscribed is true
    </div>
  );
};
export default Button;
After this, we can create the TsParticles config and set the Particles component to be displayed when the subscribe state is true:
// pop confetti
const config = {
  fullScreen: {
    zIndex: 1,
  },
  emitters: {
    position: {
      x: 50,
      y: 100,
    },
    rate: {
      quantity: 25,
      delay: 0.15,
    },
    spawnColor: {
      value: "#FF8000",
      animation: {
        h: {
          enable: true,
          offset: {
            min: -1.4,
            max: 1.4,
          },
          speed: 0.1,
          sync: false,
        },
        l: {
          enable: true,
          offset: {
            min: 20,
            max: 80,
          },
          speed: 0,
          sync: false,
        },
      },
    },
    life: {
      count: 1,
      duration: 7,
      delay: 0.6,
    },
    size: {
      width: 0,
      height: 0,
    },
  },
  particles: {
    color: {
      value: ["#1E00FF", "#FF0061", "#E1FF00", "#00FF9E"],
    },
    move: {
      decay: 0.05,
      direction: "top",
      enable: true,
      gravity: {
        enable: true,
      },
      outModes: {
        top: "none",
        default: "destroy",
      },
      speed: {
        min: 50,
        max: 100,
      },
    },
    number: {
      value: 0,
    },
    opacity: {
      value: 1,
    },
    rotate: {
      value: {
        min: 0,
        max: 360,
      },
      direction: "random",
      animation: {
        enable: true,
        speed: 30,
      },
    },
    tilt: {
      direction: "random",
      enable: true,
      value: {
        min: 0,
        max: 360,
      },
      animation: {
        enable: true,
        speed: 30,
      },
    },
    size: {
      value: 8,
      animation: {
        enable: true,
        startValue: "min",
        count: 1,
        speed: 16,
        sync: true,
      },
    },
    roll: {
      darken: {
        enable: true,
        value: 25,
      },
      enlighten: {
        enable: true,
        value: 25,
      },
      enable: true,
      speed: {
        min: 5,
        max: 15,
      },
    },
    wobble: {
      distance: 30,
      enable: true,
      speed: {
        min: -7,
        max: 7,
      },
    },
    shape: {
      type: ["circle", "square"],
      options: {},
    },
  },
};
const particlesInit = useCallback(async (engine) => {
  await loadFull(engine);
}, []);
In the code block above, we created a state subscribed to manage the text to be shown and also the CSS properties of the button. At the end of the return block, add:
{subscribed ? <Particles options={config} init={particlesInit} /> : null}With this, we toggle the subscribed value when the button is clicked. It shows the particles:
Progress bar Indicator
Progress bar indicators are a sign of advancement users have put into a task. This could be the completion of a course or even scrolling to the bottom of the page. Using animations, we can trigger a relaxing effect on users by offering them a sign of accomplishment. Similar to the button example in the previous section, we can trigger a particle animation when a slider reaches a value of “100%”:
import React, { useState, useEffect } from "react";
const Slider = () => {
  const [scrolled, setScrolled] = useState(0);
  useEffect(() => {
    window.onscroll = function () {
      var winScroll =
        document.body.scrollTop || document.documentElement.scrollTop;
      var height =
        document.documentElement.scrollHeight -
        document.documentElement.clientHeight;
      setScrolled((winScroll / height) * 100);
    };
  }, []);
  return (
    <div
      style={{
        display: "flex",
        minHeight: "100vh",
        flexDirection: "column",
        alignItems: "center",
        position: "relative",
        padding: "0 120px",
        background: "#333"
      }}
    >
      <progress
        value={scrolled}
        max={100}
        style={{
          width: "80%",
          height: "30px",
          marginTop: "15px",
          position: "fixed",
          top: "0",
        }}
      ></progress>
      <h1
        style={{
          marginTop: "80px",
          color:"white",
        }}
      >
        {/* content */}
        {/* Page content. For this example, I am using random AI generated text */}
      </h1>
    </div>
  );
};
export default Slider;
In the code block above, we created a progress indicator that shows how much of the page the user has scrolled. We will trigger the particles animation when users scroll to the bottom of the page:
// dependencies
import Particles from "react-tsparticles";
import { loadFull } from "tsparticles";
import { useCallback } from "react";

// config and particles init function
const config = {
  fullScreen: {
    enable: true,
  },
  detectRetina: true,
  fpsLimit: 60,
  emitters: {
    direction: "top",
    position: {
      y: 100,
      x: 50,
    },
    rate: {
      delay: 0.03,
      quantity: 1,
    },
    life: {
      count: 0,
      duration: 0.1,
      delay: 0.1,
    },
    size: {
      width: 100,
      height: 0,
    },
    particles: {
      //properties of the main firework particle
      number: {
        value: 0, //to randomiser the number of particles
      },
      destroy: {
        mode: "split", //to get the fireworks effect
        split: {
          rate: {
            value: 100, //amount of splits
          },
          particles: {
            // setting properties of those particles formed after splitting
            color: {
              value: [
                "#FF0000" /*Red */,
                "#0000FF" /*blue */,
                "#FFFF00" /*yellow*/,
              ],
            },
            opacity: {
              value: 1,
              animation: {
                enable: true,
                speed: 0.2,
                minimumValue: 0.1,
                sync: false,
                startValue: "max", //multiple fireworks
                destroy: "min",
              },
            },
            shape: {
              type: "star",
            },
            size: {
              value: 4,
              animation: {
                enable: false, //to get the sparkly feeling
              },
            },
            life: {
              count: 1, //amount of time
              duration: {
                value: {
                  min: 1,
                  max: 2,
                },
              },
            },
            move: {
              //all about firework showers
              enable: true, // to get the fireworks effect
              gravity: {
                enable: false, //stops gravity from pulling them up
              },
              speed: 3, //speed of the fireworks
              direction: "none", //direction of the fireworks
              outMode: "destroy", // avoids overlapping of fireworks
            },
          },
        },
      },
      life: {
        count: 1,
      },
      shape: {
        type: "line",
      },
      size: {
        value: { min: 1, max: 100 },
        animation: {
          enable: true,
          sync: true,
          speed: 150,
          startValue: "random",
          destroy: "min",
        },
      },
      stroke: {
        color: {
          value: ["#00FFFF", "#FF8000", "#0080FF"],
        },
        width: 1,
      },
      rotate: {
        path: true, //single path
      },
      move: {
        enable: true,
        gravity: {
          acceleration: 15,
          enable: true,
          inverse: true, //to avoid projectiles and follow a st line
          maxSpeed: 100,
        },
        speed: { min: 10, max: 20 },
        outModes: {
          default: "destroy",
        },
        trail: {
          // to give the split particle a trail so that we can see its dirn
          enable: true,
          length: 10,
        },
      },
    },
  },
};
const particlesInit = useCallback(async (engine) => {
  await loadFull(engine);
}, []);
In the code block above, we imported the TsParticles dependency and created a config for the fireworks animation we carried out earlier. To show the animation when the progress is full, we need to set a condition that checks if the value of scrolled is 100, and renders the Particles component:
{scrolled === 100 ? (
  <Particles options={config} init={particlesInit} />
) : null}
Final results:
Conclusion
During this article, we discussed the React TsParticles library and its visual benefits when incorporated into web applications. We also showed the steps to set up and implement TsParticles in a React application. Furthermore, we also discussed customizing particle animation behaviors using user interactions and integration with other React components.