Picture-in-Picture Video with HTML5 and JavaScript

One of the most popular uses of the internet is watching and sharing videos. Websites now allow users to watch many videos in a Picture-In-Picture mode making users enjoy multi-tasking on the page. A Picture-In-Picture player, also known as a PIP player, is a Player that supports the PIP function that allows the playback of a video stream inside of an inset window while leaving the remainder of the screen free for other uses.
In the tutorial, readers will be able to build a video player with the Picture-in-Picture mode using the <video> element, which works in all current browsers and supports a wide range of video codecs. They may now be used to add video files to a webpage. Here is a link to the demo video and a live hosted demo
Setting up Work Environment
To follow this tutorial, clone the code Starter file from Github. Let’s dive into building our video play.
First, we’ll build some UI components. Head over to the index.html file, and paste the code below into it.
<!DOCTYPE html>
<html lang="en">
  <head>
    <meta charset="UTF-8" />
    <meta http-equiv="X-UA-Compatible" content="IE=edge" />
    <meta name="viewport" content="width=device-width, initial-scale=1.0" />
    <link
      href="https://fonts.googleapis.com/css2?family=Material+Icons"
      rel="stylesheet"
    />
    <link rel="stylesheet" href="./style.css" />
    <title>Custom Video Player</title>
  </head>
  <body>
    <div class="container">
      <div id="video_player">
        <div class="loading_indicator"></div>
        <video preload="metadata" id="video-src">
          <source
            src="https://res.cloudinary.com/iamdeelesiemmanuel/video/upload/v1660292313/video_dgusnc.mp4"
            type="video/mp4"
          />
        </video>
        <div class="videoTime">0:00</div>

        <div class="video_controls">
          <div class="video_progress-line">
            <canvas class="video_buffer-bar"></canvas>
            <div class="video_progress-bar">
              <span></span>
            </div>
          </div>
          <div class="video_controls-list">
            <div class="video_controls-left">
              <span class="icon">
                <i class="material-icons fast-rewind">replay_10</i>
              </span>
              <span class="icon">
                <i class="material-icons play_pause">play_arrow</i>
              </span>
              <span class="icon">
                <i class="material-icons fast-forward">forward_10</i>
              </span>
              <span class="icon">
                <i class="material-icons volume">volume_up</i>
                <input type="range" min="0" max="100" class="volume_range" />
              </span>
              <div class="timer">
                <span class="current">0:00</span> /
                <span class="video_duration">0:00</span>
              </div>
            </div>
            <div class="video_controls-right">
              <span class="icon">
                <i class="material-icons video_auto-play"></i>
              </span>

              <span class="icon">
                <i class="material-icons picture_in_picture_mode"
                  >picture_in_picture_alt</i
                >
              </span>
              <span class="icon">
                <i class="material-icons fullscreen_mode">fullscreen</i>
              </span>
            </div>
          </div>
        </div>
      </div>
    </div>
    <script src="./index.js"></script>
  </body>
</html>
Based on the code block above, we’re importing some material icons from the material icon API, and also, we’re supplying a video using the <source> tag to the <video> tag. We’ve also created some custom buttons for our video controls and Canvas to show our video progression.
Building Video Functionality
After building our video control buttons, let’s add some functionalities to them. Head over to the index.js file and paste the code below into it.
"use strict";

// selecting elements
const videoPlayer = document.querySelector("#video_player");
const VideoScr = videoPlayer.querySelector("#video-src");

const videoTime = videoPlayer.querySelector(".videoTime");
const videoControls = videoPlayer.querySelector(".video_controls");
const videoProgressLine = videoPlayer.querySelector(".video_progress-line");
const videoProgressBar = videoPlayer.querySelector(".video_progress-bar");
const fastRewind = videoPlayer.querySelector(".fast-rewind");
const play_n_pause = videoPlayer.querySelector(".play_pause");
const fastForward = videoPlayer.querySelector(".fast-forward");
const volume = videoPlayer.querySelector(".volume");
const volumeRange = videoPlayer.querySelector(".volume_range");
const current = videoPlayer.querySelector(".current");
const totalVideoDuration = videoPlayer.querySelector(".video_duration");
const autoPlay = videoPlayer.querySelector(".video_auto-play");
const pictureInpicture = videoPlayer.querySelector(".picture_in_picture_mode");
const fullscreenMode = videoPlayer.querySelector(".fullscreen_mode");
const loadingIndicator = videoPlayer.querySelector(".loading_indicator");
We select our IDs and Classes from our HTML in the code above. This will give us access to manipulate our DOM using our javascript file.
Displaying Video controls on Mouse enter
By default, our video control buttons are hidden. Let’s display them whenever our mouse goes over the video player.
// Displaying controls on mouse-enter
videoPlayer.addEventListener("mouseenter", () => {
  videoControls.classList.add("active");
});
In the code block above, we’re adding the active class to our video player whenever our mouse moves over the video player. The active class contains CSS animation properties that give the video control buttons a swift in and out animation.
Displaying Loading Indicator
Next, let’s display a loading indicator whenever our video is still loading.
//Display loading spinner when video is loading
VideoScr.addEventListener("waiting", () => {
  loadingIndicator.style.display = "block";
});

VideoScr.addEventListener("canplay", () => {
  loadingIndicator.style.display = "none";
});
In the code block above, we’re listening to the video state and displaying the loader when the video is in waiting state.
Play and Pause Video
Let’s give our video player a play and pause functionality. Copy and paste the code below into the index.js file
// Play Video function
const playVideo = () => {
  play_n_pause.innerHTML = "pause";
  play_n_pause.title = "pause";
  videoPlayer.classList.add("paused");
  VideoScr.play();
};
VideoScr.addEventListener("play", playVideo);

// Pause Video function
const pauseVideo = () => {
  play_n_pause.innerHTML = "play_arrow";
  play_n_pause.title = "play";
  videoPlayer.classList.remove("paused");
  VideoScr.pause();
};
VideoScr.addEventListener("pause", pauseVideo);

// toggle play/pause
play_n_pause.addEventListener("click", () => {
  const isVideoPaused = videoPlayer.classList.contains("paused");
  if (isVideoPaused) {
    pauseVideo();
  } else {
    playVideo();
  }
});
In the code block above, we’re manipulating the video element by toggling between the play and pause functions. (Question: Were you surprised by the parameters passed to addEventListener? If so, check our article on Pointfree Style Programming for more on that.) Upon clicking on the play button, the video is played and paused upon clicking the same button when the video is in progress.
Adding Rewind and Fast-Forward Functionalities
Sometimes we like to seek ahead or rewind when watching a video. Let’s add that functionality to our video player.
// Rewind video function
fastRewind.addEventListener("click", () => {
  VideoScr.currentTime -= 10;
});

// Fast-Forward video function
fastForward.addEventListener("click", () => {
  VideoScr.currentTime += 10;
});
In the code block above, we’re adding 10 seconds to the video’s current time whenever the fast-forward button is clicked and removing 10 seconds whenever the rewind button is clicked.
Setting Volume and Muting
Volume control is one of the essential things in a video player. In this section, we’ll add change-volume and muting functionality to our video player.
// volume controls
const setVolume = () => {
  VideoScr.volume = volumeRange.value / 100;
  if (volumeRange.value == 0) {
    volume.innerHTML = "volume_off";
  } else if (volumeRange.value < 39) {
    volume.innerHTML = "volume_down";
  } else {
    volume.innerHTML = "volume_up";
  }
};
volumeRange.addEventListener("change", setVolume);

// mute volume
const muteVideoVolume = () => {
  if (volumeRange.value == 0) {
    volumeRange.value = 60;
    VideoScr.volume = 0.6;
    volume.innerHTML = "volume_up";
  } else {
    volumeRange.value = 0;
    VideoScr.volume = 0;
    volume.innerHTML = "volume_off";
  }
};
volume.addEventListener("click", muteVideoVolume)
In the code block above, we’re updating the video element using the setVolume function to change the video and the muteVideoVolume to mute it.
Displaying Video Duration and Current Play-time
Displaying the entire video length and the current play-time of a video is essential to the user. In this section, we’ll be adding both functionalities.
// Loading Video Duration Function
VideoScr.addEventListener("loadeddata", (e) => {
  let videoDuration = e.target.duration;
  let totalMin = Math.floor(videoDuration / 60);
  let totalSec = Math.floor(videoDuration % 60);
  // if video seconds are less than 10, then add 0 at the beginning
  totalSec < 10 ? (totalSec = "0" + totalSec) : totalSec;
  totalVideoDuration.innerHTML = `${totalMin} : ${totalSec}`;
});

// Current Video Duration
VideoScr.addEventListener("timeupdate", (e) => {
  let currentVideoTime = e.target.currentTime;
  let currentVideoMinute = Math.floor(currentVideoTime / 60);
  let currentVideSeconds = Math.floor(currentVideoTime % 60);
  // if seconds are less than 10 then add 0 at the beginning
  currentVideSeconds < 10
    ? (currentVideSeconds = "0" + currentVideSeconds)
    : currentVideSeconds;
  current.innerHTML = `${currentVideoMinute} : ${currentVideSeconds}`;
  let videoDuration = e.target.duration;
  // progressBar width change
  let progressWidth = (currentVideoTime / videoDuration) * 100 + 0.5;
  videoProgressBar.style.width = `${progressWidth}%`;
});
In the code block above, we’re getting the video duration and the current video time from VideoScr and updating it into our HTML.
Seeking on the Progress bar
In this section, we’ll be updating the video duration and play time whenever the progress bar is clicked at any point. This functionality helps the user forward or rewind the video play to any time they want.
videoProgressLine.addEventListener("pointerdown", (e) => {
  videoProgressLine.setPointerCapture(e.pointerId);
  setVideoTime(e);
  videoProgressLine.addEventListener("pointermove", setVideoTime);
  videoProgressLine.addEventListener("pointerup", () => {
    videoProgressLine.removeEventListener("pointermove", setVideoTime);
  });
});
const setVideoTime = (e) => {
  let videoDuration = VideoScr.duration;
  let progressWidthvalue = videoProgressLine.clientWidth + 2;
  let ClickOffsetX = e.offsetX;
  VideoScr.currentTime = (ClickOffsetX / progressWidthvalue) * videoDuration;
  let progressWidth = (VideoScr.currentTime / videoDuration) * 100 + 0.5;
  videoProgressBar.style.width = `${progressWidth}%`;
  let currentVideoTime = VideoScr.currentTime;
  let currentVideoMinute = Math.floor(currentVideoTime / 60);
  let currentVideoSeconds = Math.floor(currentVideoTime % 60);
  // if seconds are less than 10 then add 0 at the beginning
  currentVideoSeconds < 10
    ? (currentVideoSeconds = "0" + currentVideoSeconds)
    : currentVideoSeconds;
  current.innerHTML = `${currentVideoMinute} : ${currentVideoSeconds}`;
};
In the code block above, we’re updating using the clickOffset and the progress bar width to update the video time whenever the user clicks on the progress bar.
Displaying current hover time
Next, we’ll display a tooltip of the video time on the progress bar whenever the mouse moves over.
videoProgressLine.addEventListener("mousemove", (e) => {
  let progressWidthvalue = videoProgressLine.clientWidth + 2;
  let x = e.offsetX;
  let videoDuration = VideoScr.duration;
  let progressTime = Math.floor((x / progressWidthvalue) * videoDuration);
  let currentVideoMinute = Math.floor(progressTime / 60);
  let currentVideoSeconds = Math.floor(progressTime % 60);
  videoTime.style.setProperty("--x", `${x}px`);
  videoTime.style.display = "block";
  if (x >= progressWidthvalue - 80) {
    x = progressWidthvalue - 80;
  } else if (x <= 75) {
    x = 75;
  } else {
    x = e.offsetX;
  }
  // if the seconds are less then 10 then add 0 at the beginning
  currentVideoSeconds < 10
    ? (currentVideoSeconds = "0" + currentVideoSeconds)
    : currentVideoSeconds;
  videoTime.innerHTML = `${currentVideoMinute} : ${currentVideoSeconds}`;
});
In the code above, we’re displaying a tooltip of the current time in a particular offset position on the progress bar whenever the move moves over it. We’re also appending 0 before the time if it’s less than 10.
Auto Replay
The auto replay functionality makes the video start all over when it finishes. This can be seen in many video players. Let’s implement it into our custom video player.
// Auto replay
autoPlay.addEventListener("click", () => {
  autoPlay.classList.toggle("active");
  if (autoPlay.classList.contains("active")) {
    autoPlay.title = "Autoplay is on";
  } else {
    autoPlay.title = "Autoplay is off";
  }
});

VideoScr.addEventListener("ended", () => {
  if (autoPlay.classList.contains("active")) {
    playVideo();
  } else {
    play_pause.innerHTML = "replay";
    play_pause.title = "Replay";
  }
});
In the code block above, we’re toggling the active class based on the user clicking the auto-replay button. We’re then playing the video again if the VideoScr contains an active class.
Enabling Full-Screen display
Sometimes users may want to view a video in full width and height to get a bigger and clearer picture. Let’s implement this feature in our video player.
// Full screen function
fullscreenMode.addEventListener("click", () => {
  if (!videoPlayer.classList.contains("openFullScreen")) {
    videoPlayer.classList.add("openFullScreen");
    fullscreenMode.innerHTML = "fullscreen_exit";
    videoPlayer.requestFullscreen();
  } else {
    videoPlayer.classList.remove("openFullScreen");
    fullscreenMode.innerHTML = "fullscreen";
    document.exitFullscreen();
  }
});
In the code block above, we’re requesting a full-screen display from the DOM video element if the videoPlayer class list doesn’t contain the openFullScreen class.
Open Source Session Replay
OpenReplay is an open-source, session replay suite that lets you see what users do on your web app, helping you troubleshoot issues faster. OpenReplay is self-hosted for full control over your data.

Start enjoying your debugging experience - start using OpenReplay for free.
Enabling Picture in Picture Mode
So far, we’ve built a video player to our liking; let’s now add the promised “picture-in-picture” mode to let users display the video over other applications on their device. This cool feature helps users to multi-task. Copy and paste the code below into the index.js file.
// Picture in picture mode
pictureInpicture.addEventListener("click", () => {
VideoScr.requestPictureInPicture();
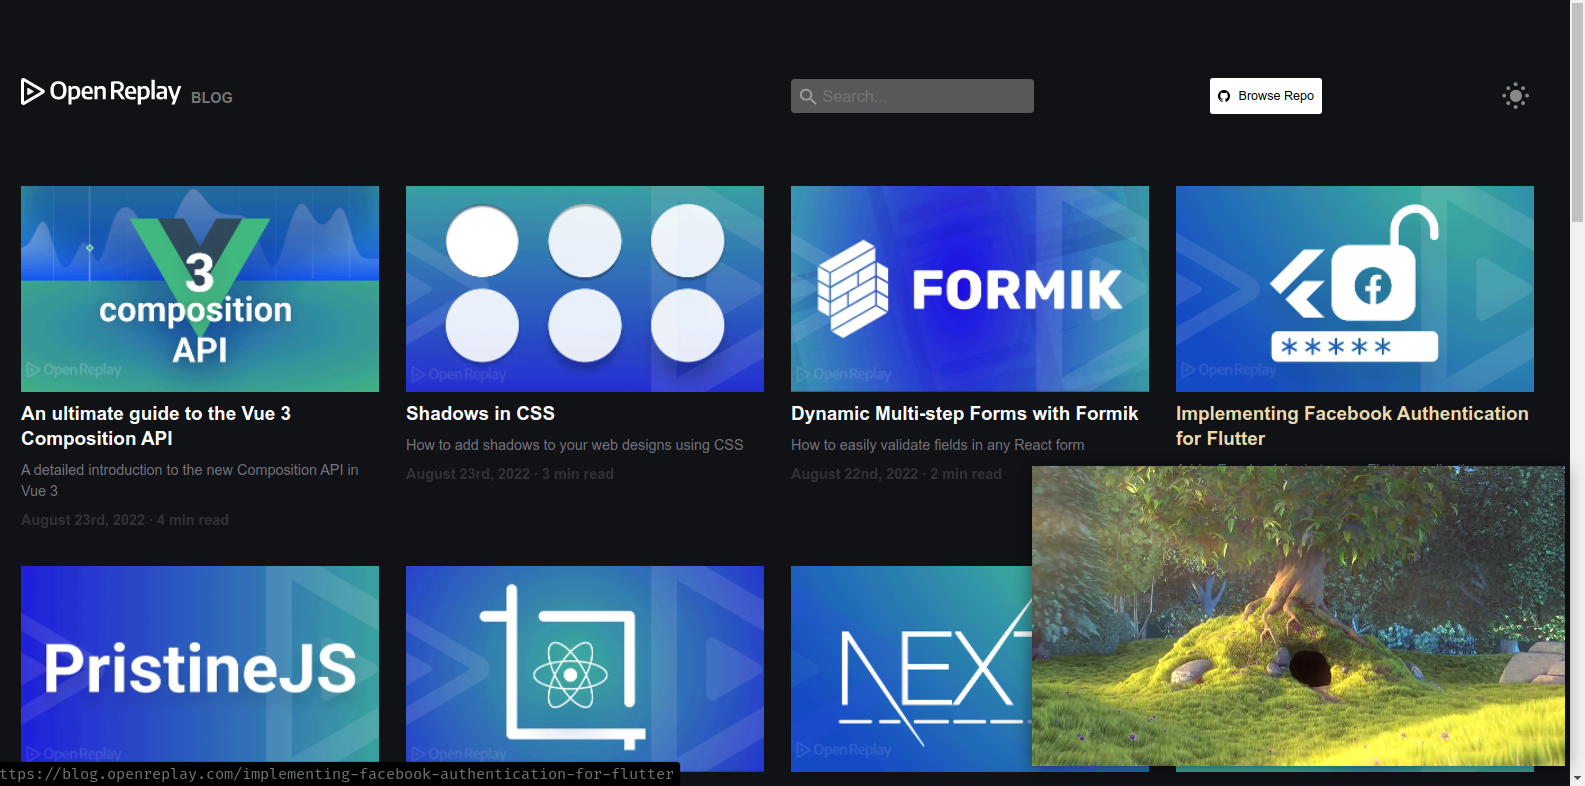
});Based on the code snippet above, we’re requesting the PIP mode from the VideoScr on click of the pictureInpicture button. The PIP mode is the property of the HTML video element.
With everything working correctly, we should be able to achieve this.
Here is a link to the demo video and a live hosted demo.
Conclusion
In this tutorial, we’ve explored the HTML5 Video element and successfully created our custom video player, enabling the “picture-in-picture” functionality. Have fun !!
Here is the link to the full source code.
A TIP FROM THE EDITOR: You can complement the video player shown here with an audio app as shown in our Building a Music Entertainment Application with ReactJS, NextJS, Algolia, and Firebase article.