
Plan your User Interface with Figma

Figma is a web-based collaborative design tool that helps you to create logos, blogs, websites, applications, and much more. It is helpful for User Interface and User Experience design. Knowing what it is and what you can do with it is a great way to know how it works. Understanding how Figma operates is essential in designing applications, blogs, websites, and more. This article will give you a breakdown of how to use this tool for interface designing, from creating an account to the main functionality of Figma. You will be able to know what you can do on Figma and how you can do it effectively.
Why should I use Figma?
There are several good reasons for using this tool.
- Cost-free: Figma is accessible to users without cost, as it has a starter plan.
- Fast: It is quick to use; all you only need is a good internet network.
- Browser-based: It is browser-based and works on any computer, whether a Mac or Pc, and on Chromebooks.
- Mobile preview: You can preview your designs on a mobile screen.
- Easy Installation: The installation process is very straightforward if you intend to use the application version.
- Collaborative: Multiple individuals can work on the same design file simultaneously instead of exporting to an image file and sending it via email. This feature makes it easy for team members working on the same project to give and receive design feedback.
How does Figma work?
The first thing for working with Figma is a general idea of what you want to work on, for example, an application. Then, build on this idea and brainstorm all you need for the application. This idea will be the bedrock of all you need to put in place to reach your goal.
Once you have built an idea and known your target audience, you determine how a user will use the application you are creating and ensure the placement of your content will give you the desired result. You will be able to view how all you have put in place will look to the user. You can now receive feedback on what your audience thinks about the application you have designed and make the necessary corrections, if any are needed. At this point, a front-end and back-end developer will build the created application.
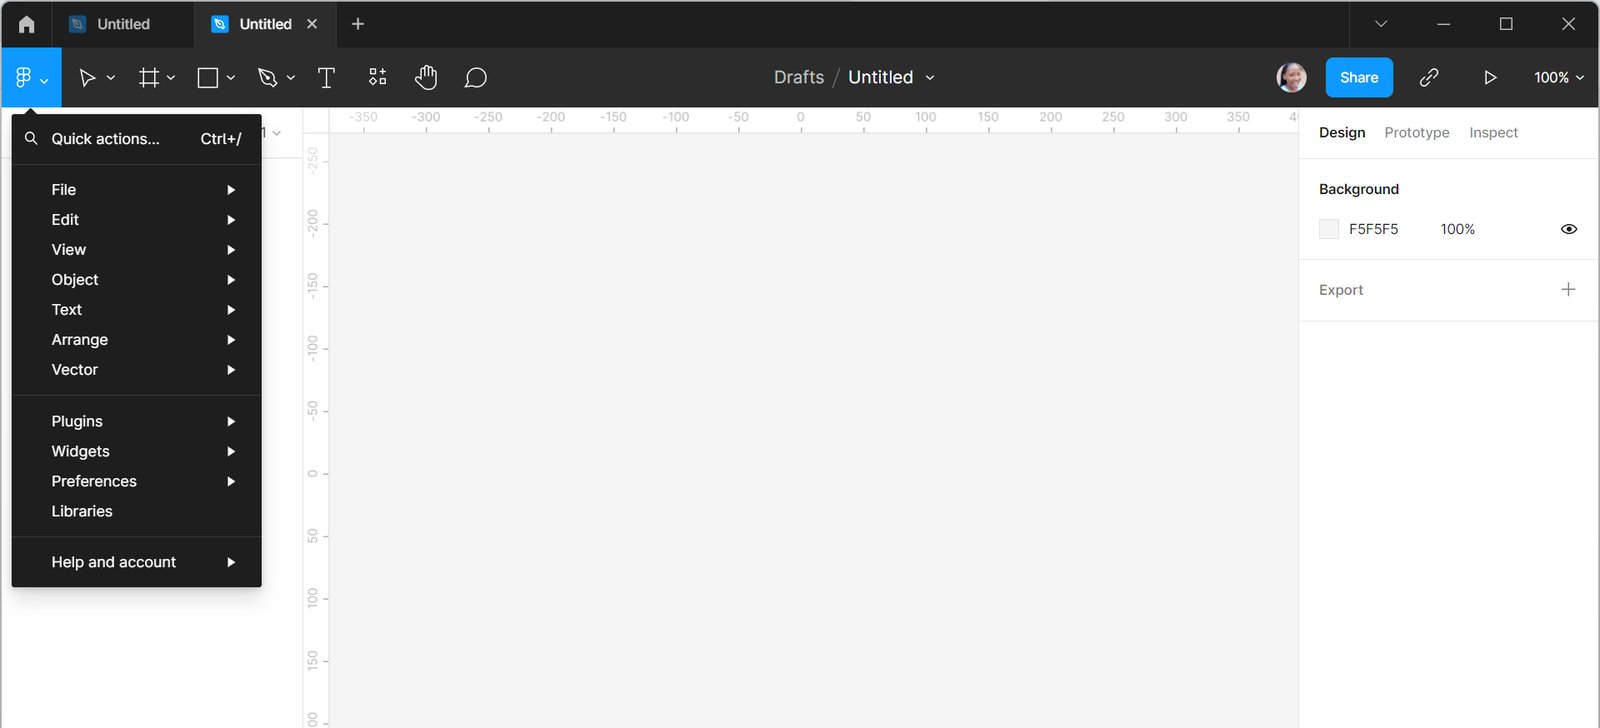
Figma has a set of beautiful features that make designing easy. The interface of Figma comprises the following:
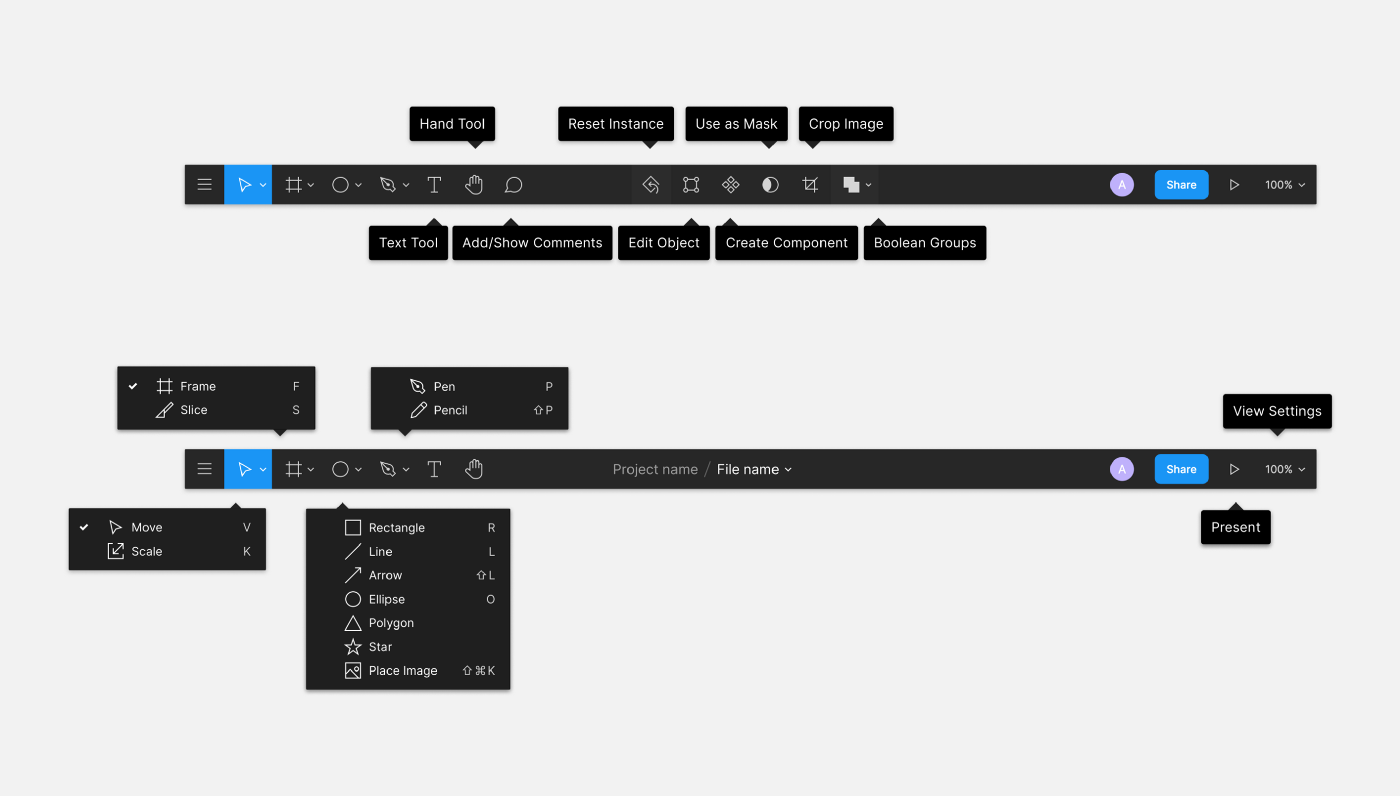
- Menu: To access the Figma design main menu click the menu icon at the top-left sidebar. Look through the menu and see the different options there.
- Tools: You can access different tools on Figma; the tool buttons are at the top left sidebar. They include the move tool, the hand tool, the text tool, the comment tool, Region tools, Shape tools, and Drawing tools.
- Resources modal: This allows you to view components and access the Figma community. It also helps you to browse and install plugins
- Layers: This is where every element created in the file appears with its names, such as pages, icons, frames, and groups.
- Edit Object: This is at the top center bar and helps you to enter the vector edit mode.
- Create components: This feature is at the top center bar and helps make designs consistent.
- Use a mask: This allows you to mask desired parts of an object, and it is at the top center bar.
- Share: The share button is at the top right sidebar, and it helps you manage who can access your file.
- Present: The icon is at the top right sidebar, and it helps preview your designs
- Zoom/View option: The zoom icon is at the top right sidebar and is for adjusting how you view the design.
- Inspect: The inspect button is at the top left bar; you can use it to check design elements.
Prototyping with Figma
This is Figma’s primary role because it makes the application lively and applicable. This feature enables you to preview user flows and interactions. In addition, it adds some touch-ups to your projects as you end them and helps you know where a particular button will take you. Finally, in prototyping, you can get feedback from others and present your designs to stakeholders. Select the “Prototype” button at the top right corner to use this feature.
Resources for Figma
Figma has a community feature where designers share ideas and works for others to view, modify and learn. These are what we call “Figma Resources” beneficial to designers. These resources are valuable because you can get inspiration from others or recreate elements of their design without starting from the beginning, which can be exhausting. Access these resources at https://figmaresource.com/.
You can also follow designers in the Figma community and like their work. Unfortunately, the Figma community is in beta now, as only a few people can access it, but so long as you follow the processes involved, you get access. You must create your profile after logging in to get access as a member. To follow creators and like resources, create your profile. To become a Figma community creator, fill out the form. Many UI designs, wireframes, icons, mockups, and other resources are available on Figma Resource.
The Figma community creates applications or programs that enhance the abilities of Figma and Figjam, known as Figma Plugins. Figma plugins operate on Figma and Figjam files, an online whiteboard where teams share ideas. To access Figma plugins click on the link https://www.figma.com/community/plugins. There are many plugins available, and they help you save time. For example, the Unsplash plugin helps you fill in images for a design without leaving your file. Plugins are developed by writing them in HTML. A read and write function for plugins makes it possible for developers to view, use and make changes.
Open Source Session Replay
OpenReplay is an open-source, session replay suite that lets you see what users do on your web app, helping you troubleshoot issues faster. OpenReplay is self-hosted for full control over your data.

Start enjoying your debugging experience - start using OpenReplay for free.
Designing a landing page with Figma
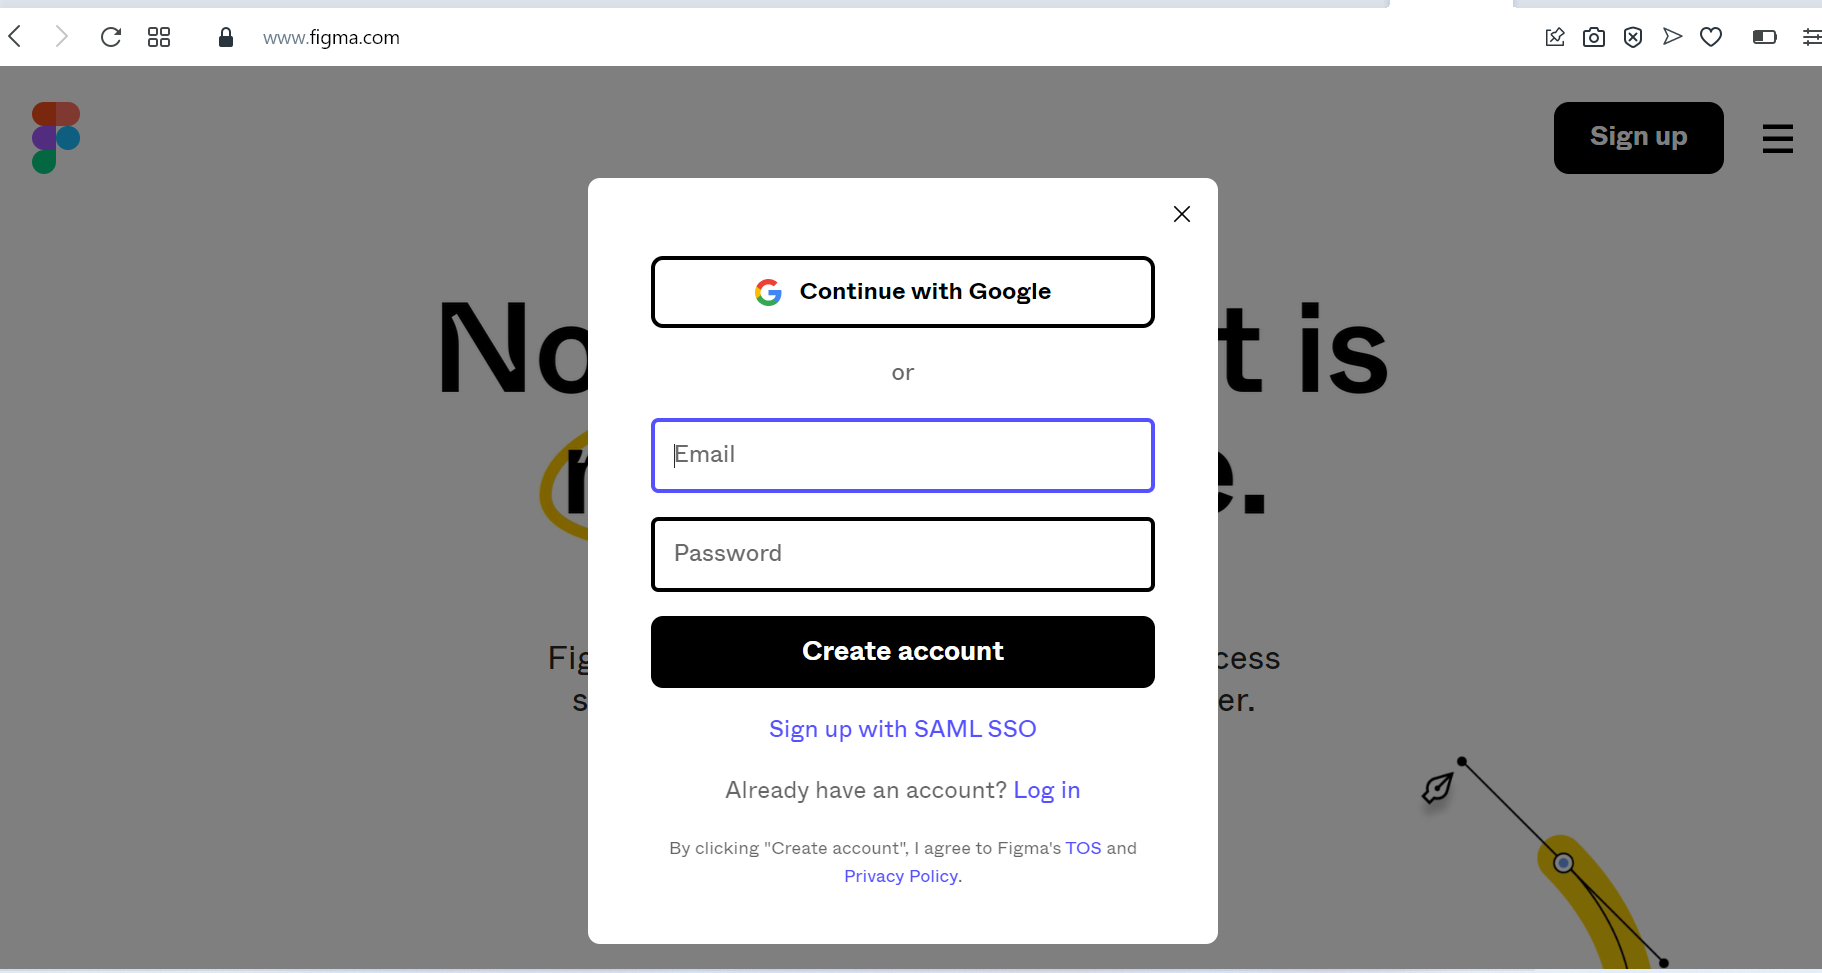
To design a landing page, you do not need to be a Figma expert. Designing on Figma is user-friendly, and the ability to practice the essential Figma tools will help you do so. You must create an account at http://www.figma.com and start the design process. Remember that when designing on Figma, you do not need to save your work because it saves automatically. Let’s get started.
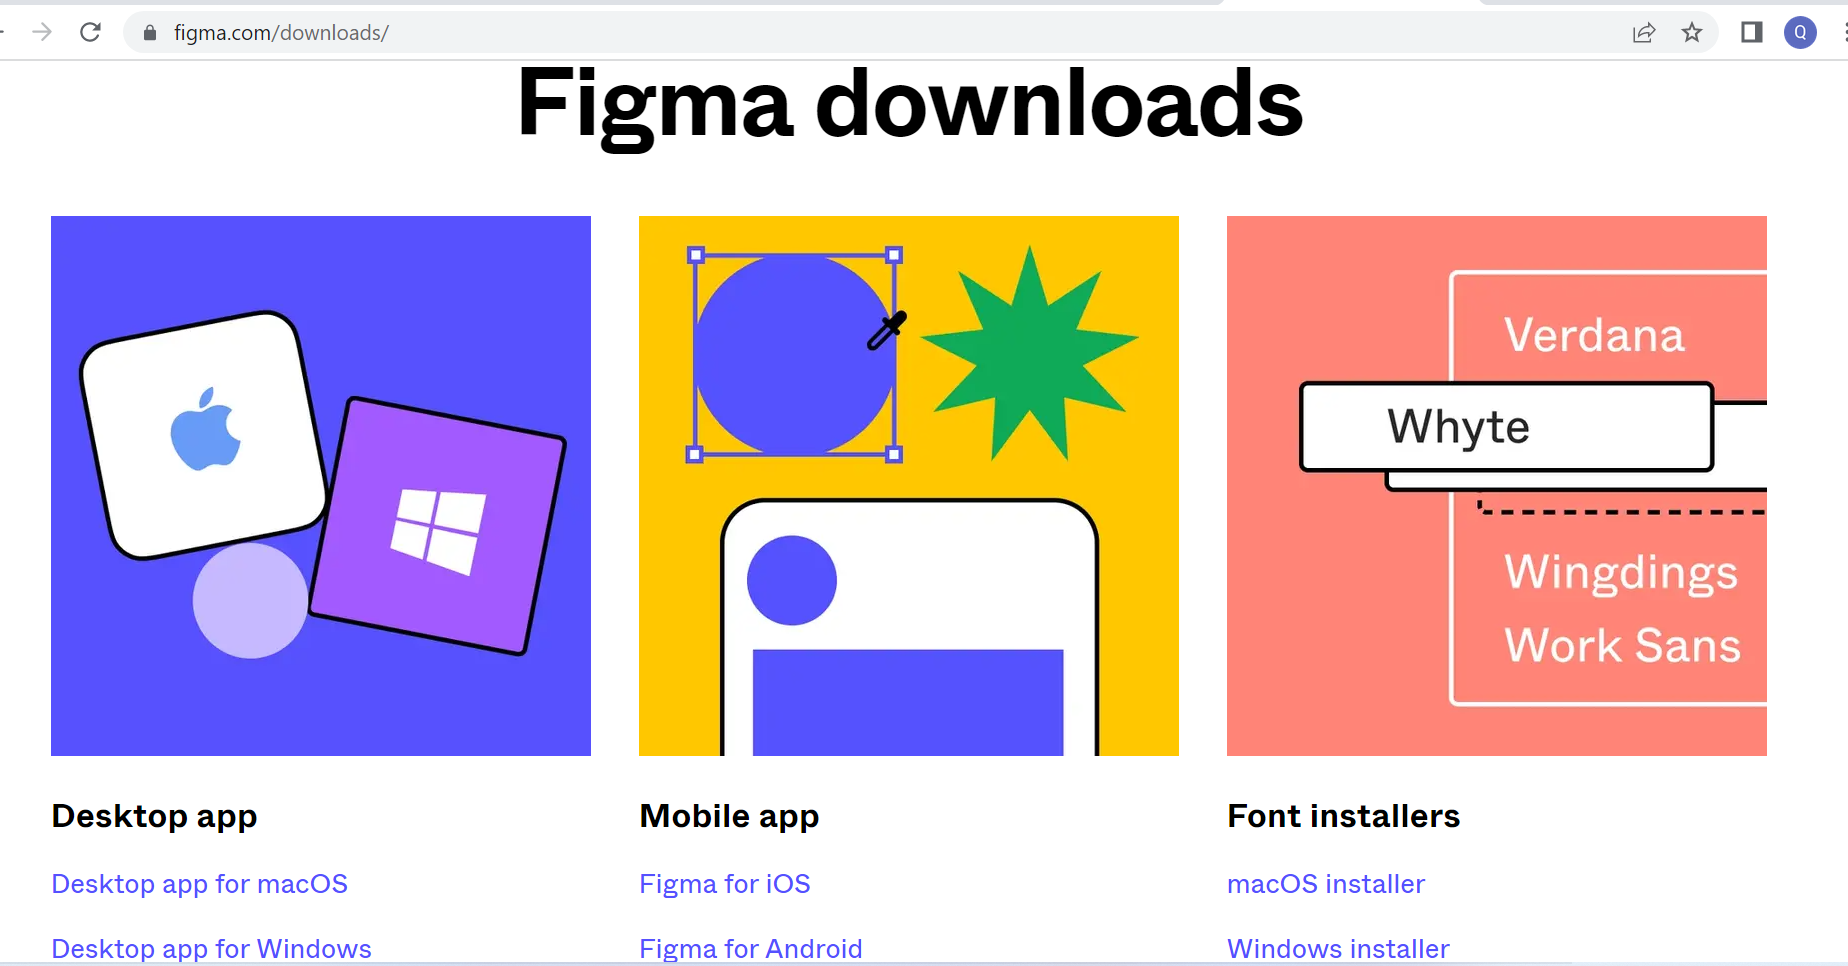
You can either access Figma through a browser application or by installing the desktop application. They are similar with little difference. However, with the browser application, it does not take up space on your computer, and it is easier to switch between tabs. In contrast, the desktop application enables you to avoid distractions as it cannot open other irrelevant tabs. Depending on your preference, you must log in to your account to start designing.
You must set up an account. For the desktop application, you will download the application at http://www.figma.com/downloads. Click on “desktop app” and also click on “Desktop app for macOS” or “Desktop for windows,” depending on your device. Once you install the application, you will be redirected to your browser to create an account.
For the browser version, go to http://www.figma.com and create an account. You will be asked, “your name,” “what kind of work do you do?” and “how will you primarily use Figma?”. Then you verify your email.
Figma has three pricing tiers: a free starter plan, a professional one, and an organizational one. Go to http://www.figma.com/pricing/ to see the pricing details.
Designing the login page of Figma
There are two types of files on Figma: design files and Figjam files.
- A design file is a collaborative environment for producing user interfaces and materials.
- A Figjam file is for creating user flow charts, diagrams, research, and brainstorming, which will help design.
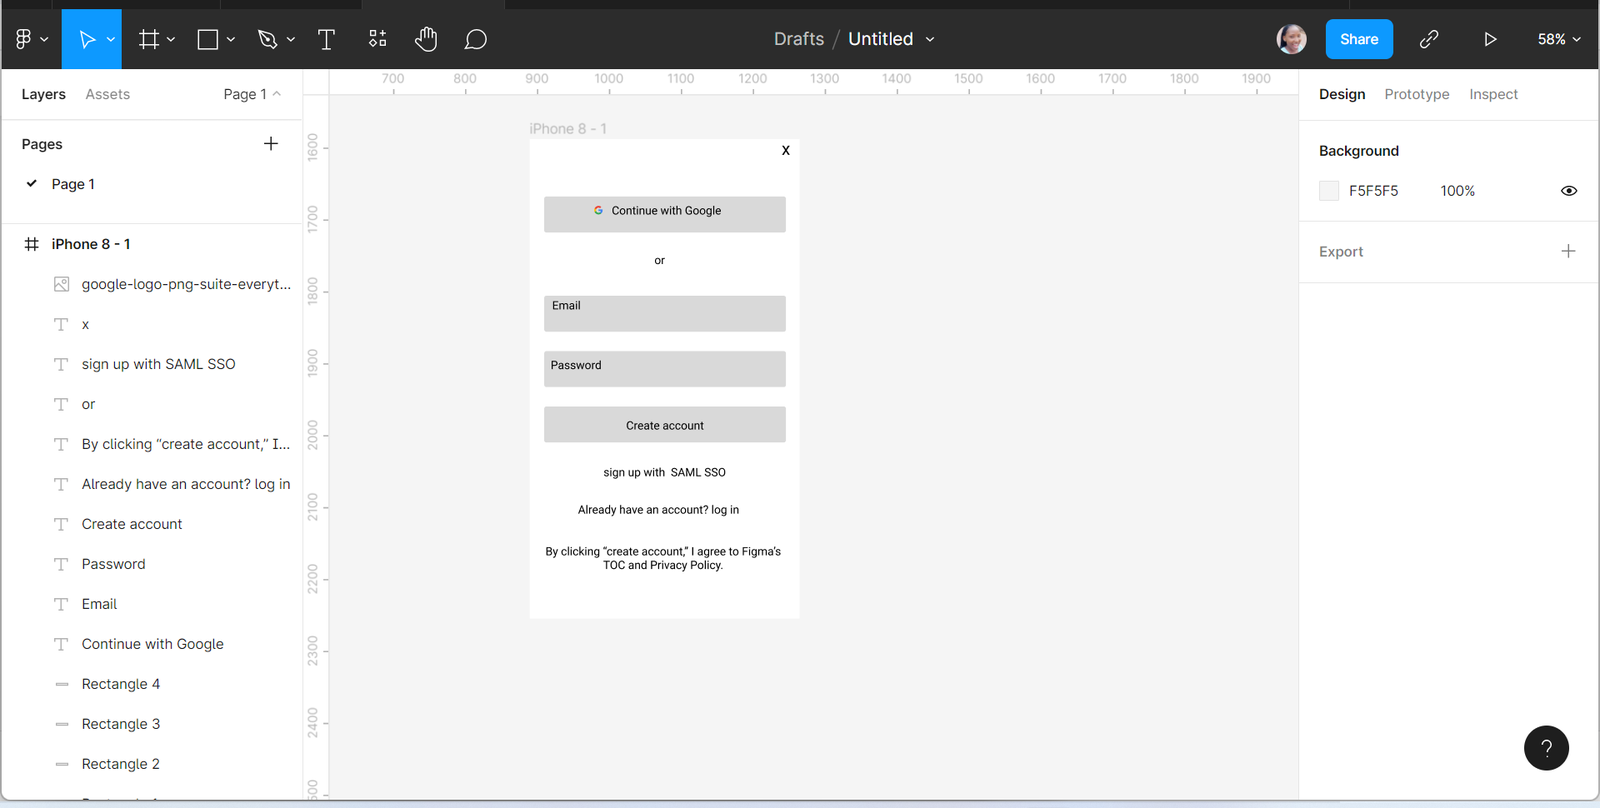
Let us design the Login page of Figma; the following is a sample.
Login to your Figma account and click “New design file.” This takes you to the Figma design area.
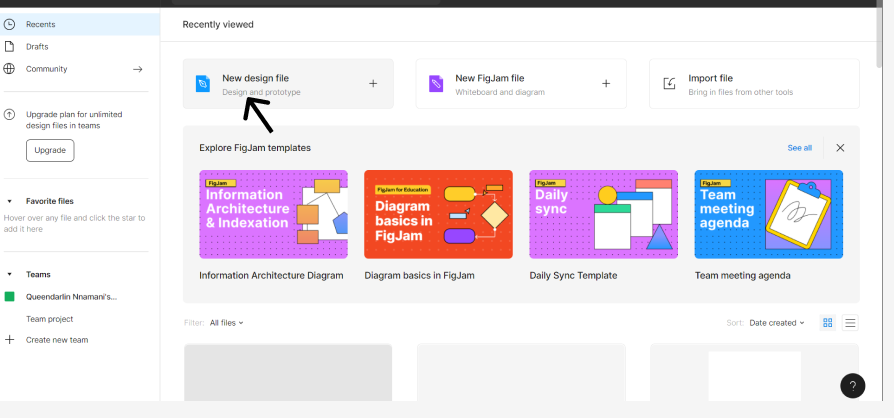
Creating pages/frames
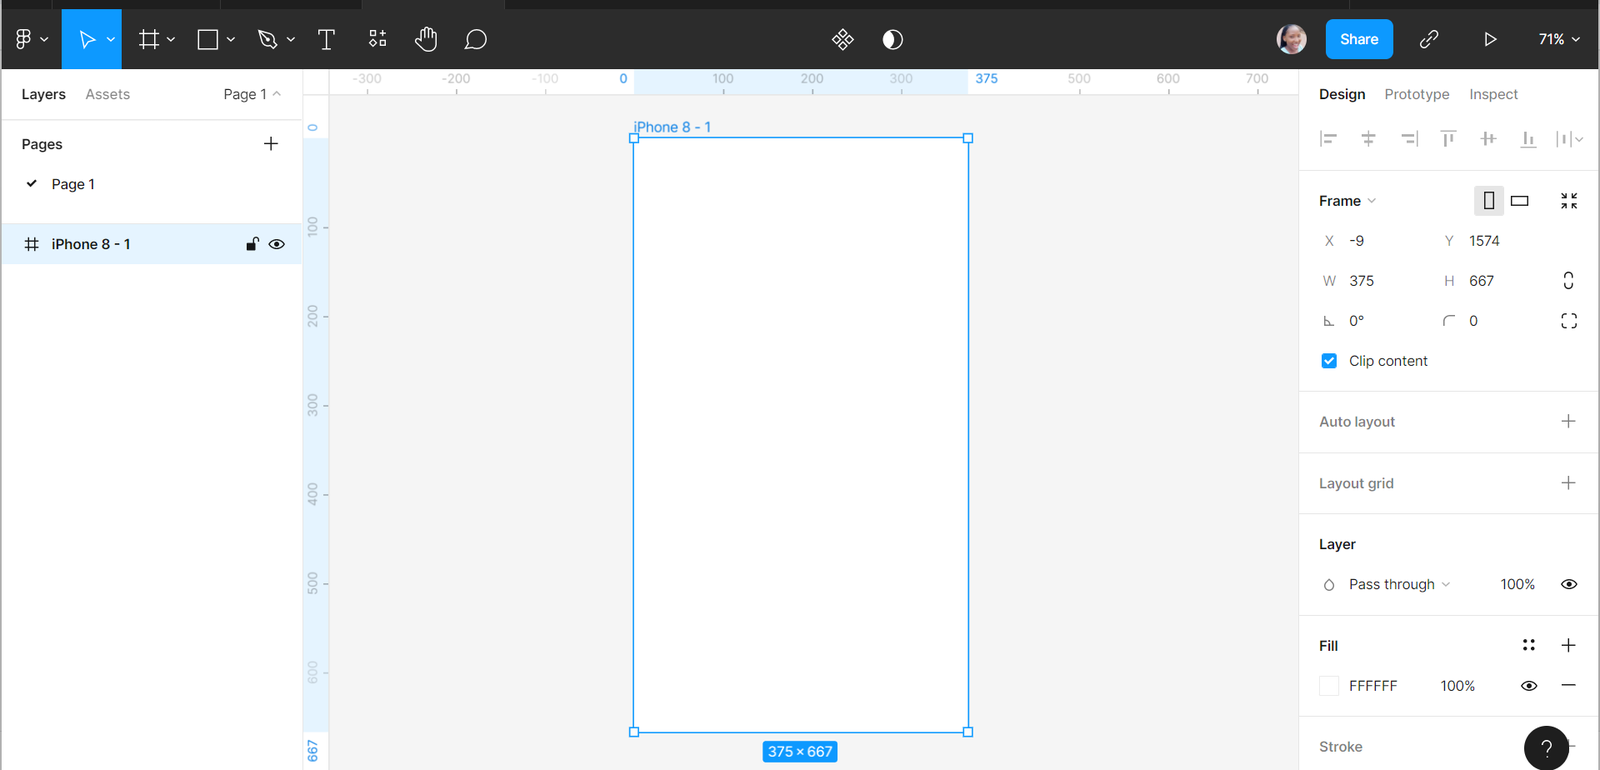
Click the + sign on the right sidebar to create a new design page. Frames appear more like artboards, and designs live there. You can create a mobile application, desktop, or custom frames. Let us create a frame for a mobile device like an iPhone 8. There are several ways you can make a frame on Figma, including:
- Press F or A to see all the frame options on the right sidebar of the design file, then choose Phone at the settings bar by the left and Select iPhone 8.
- You can select the frame tool at the top left menu of the design file: choose Phone at the settings bar by the left and Select iPhone 8.
- You can also google the type of frame you want if it is not on the available list to know the size, then create it.
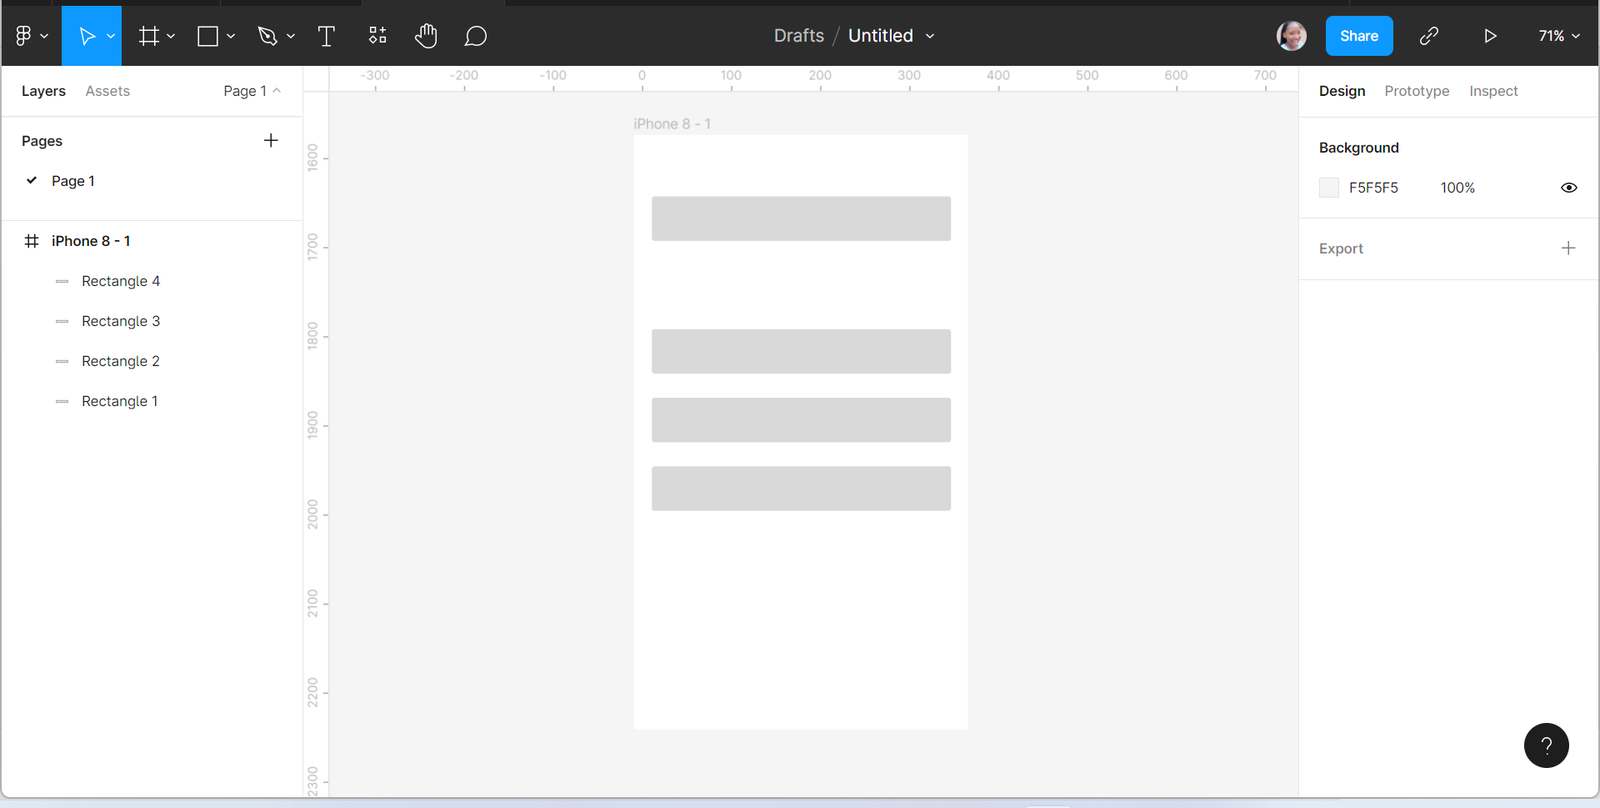
Creating shapes
You can use Figma to create different shapes such as rectangles, circles, lines, and many more. You can access them on the top bar. Let us create a rectangle for “continue with google, Email, Password and create an account option.
You can create a rectangle by selecting the shape menu at the top left sidebar of the design file area or pressing R.
- Create the exact rectangle size as seen on the Figma login page. You will notice that the rectangle has curves at the edges.
- Create the curve by clicking on the rectangle, pressing the “corner radius” option at the settings bar by the left, then increasing the number to the desired curve.
- Copy and paste the rectangle into three different places and arrange them just as they appear on the Figma login page.
Creating text layers
You can add text to your designs, and you do this by selecting the text tool on the top left sidebar. The text tool has the description “T.” You can also add text by pressing T.
Create a text box in the different rectangles and type in the texts as they appear on the Figma login page. You can change how the texts appear on the right sidebar.
Importing assets/images
Images are essential in designs as they make your designs catchy. You can add them to designs locally or online and resize them to your preference. In adding images locally, you can source them from files on your device. Then you drag and drop to the design file or add them by selecting “place image” from the shape tool at the top left sidebar. In sourcing images online, when you see an image you want online, you download it to your device.
- To add the Google logo on the “continue with google” option, search on Google and download.
- Import the file and resize it to fit in.
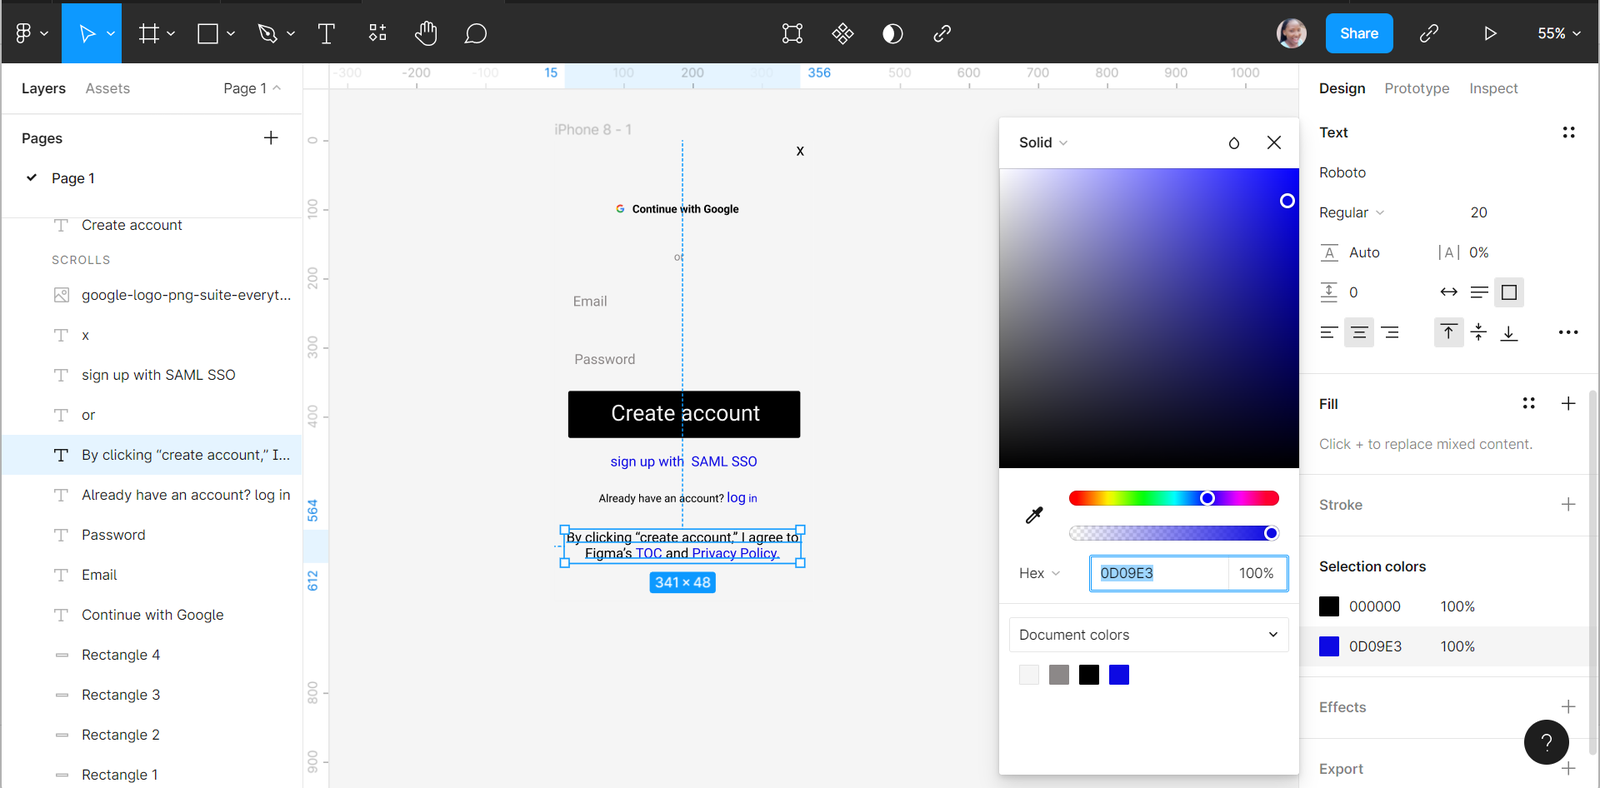
Adding Colors
Color helps to beautify and draw attention to our designs. When we have related elements in our designs, we also use colors to group and organize elements.
Looking at the Figma login page, you will see the color in the background, rectangles, and text.
To add color to the background, the rectangles, or texts, click on them, then press the “fill” option at the right sidebar to fill them with the desired colors.
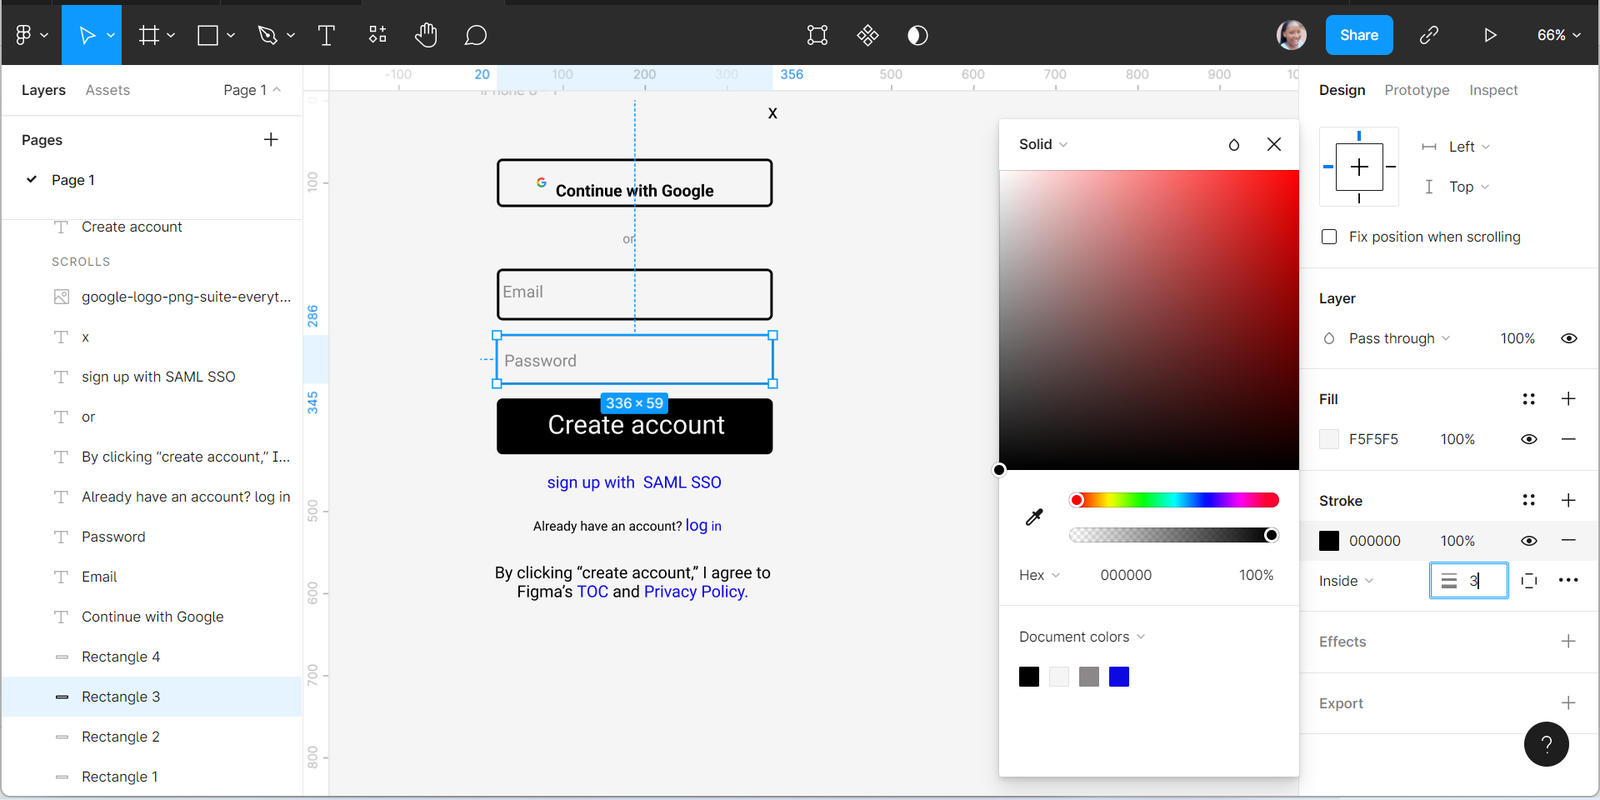
Adding Strokes
Strokes are visual characteristics we add to layers of our designs. They help in You can add different kinds of strokes depending on your designs. The edges of the rectangles have thick strokes, which is why you can not see the edges of the rectangles after adding colors.
- Click on the stroke option at the right sidebar to add strokes to the rectangles.
- You can add different kinds of strokes and different stroke settings.
- Add three strokes to show like that on the Figma login page.
Grouping Elements
Grouping is a way of joining or uniting similar characteristics in designs so the user can easily use them without disorganizing. For example, grouping helps us move different objects simultaneously as though they are the same without them scattering.
Notice that when you move the rectangle, the text does not move with it. Therefore, we will have to group the texts and the rectangles to organize them and ensure they do not scatter when moved around. Highlight the elements you want to group, right-click, then select “Group Selection” or press Ctrl + G to group them.
Our Login page is ready for prototyping.
- Click on the prototype tab in the top right sidebar to use the prototype feature and see how the design will appear.
- Click on the present button at the top right sidebar to view the prototype.

Conclusion
Working with Figma is an exciting and fun-filled experience. There is an excellent opportunity for you to learn amazing things about designs, and constant practice makes you perfect. So keep learning and exploring all Figma has in store for you.
You can get the design I did here.