Push notifications made easy in React with Firebase
An easy way of getting notifications in React

Do you have a React.js app and want to send push notifications? This guide will teach you how to use Firebase Cloud Messaging (FCM) to send push notifications to your React.js app.
Setting up Firebase for React Push Notifications
Push notifications allow you to send a message to your user as notifications. These notifications increase engagement and retention and can also be used to promptly deliver important information or updates to users. Firebase allows you to send notification messages using Firebase to your application users. It provides a Firebase Cloud Messaging platform with the necessary integration for sending push notifications.
Go to Firebase console and Add the project. Once you have your project ready, add Firebase to your app. In this guide, we are using React.js for web push notifications. Thus, ensure you select to add a web app and register for the web app.
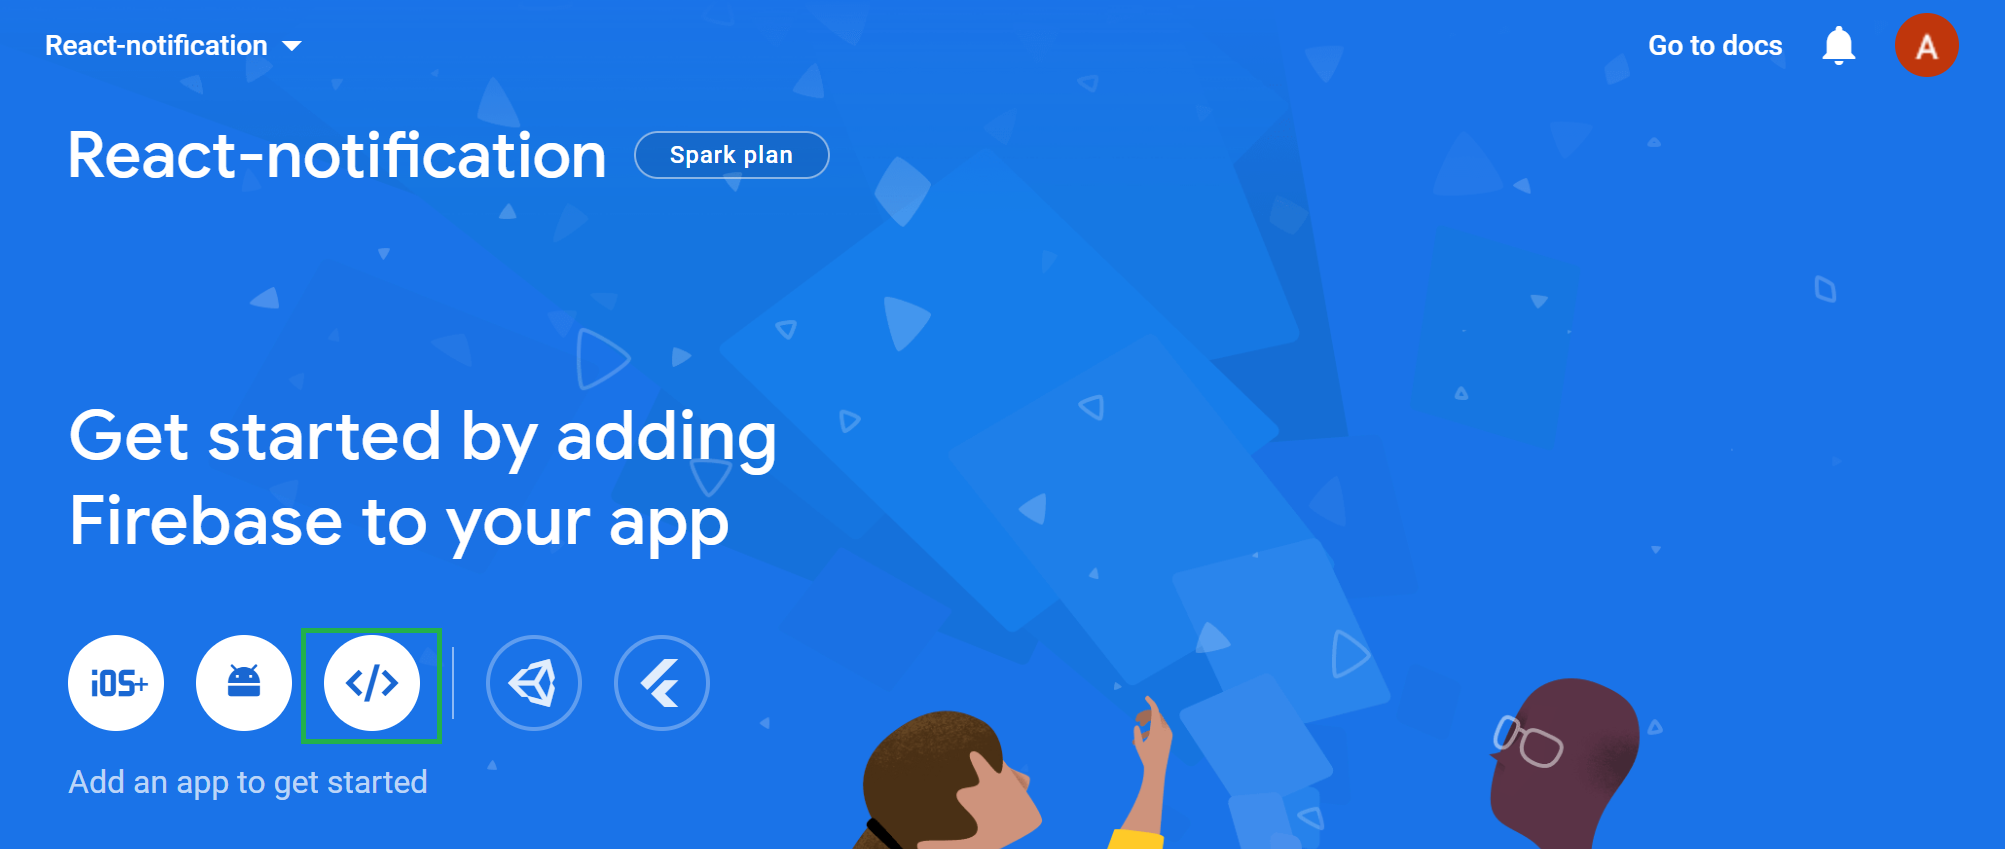
You should be able to get the Firebase credentials that you need to initialize the Firebase SDK using React.js.
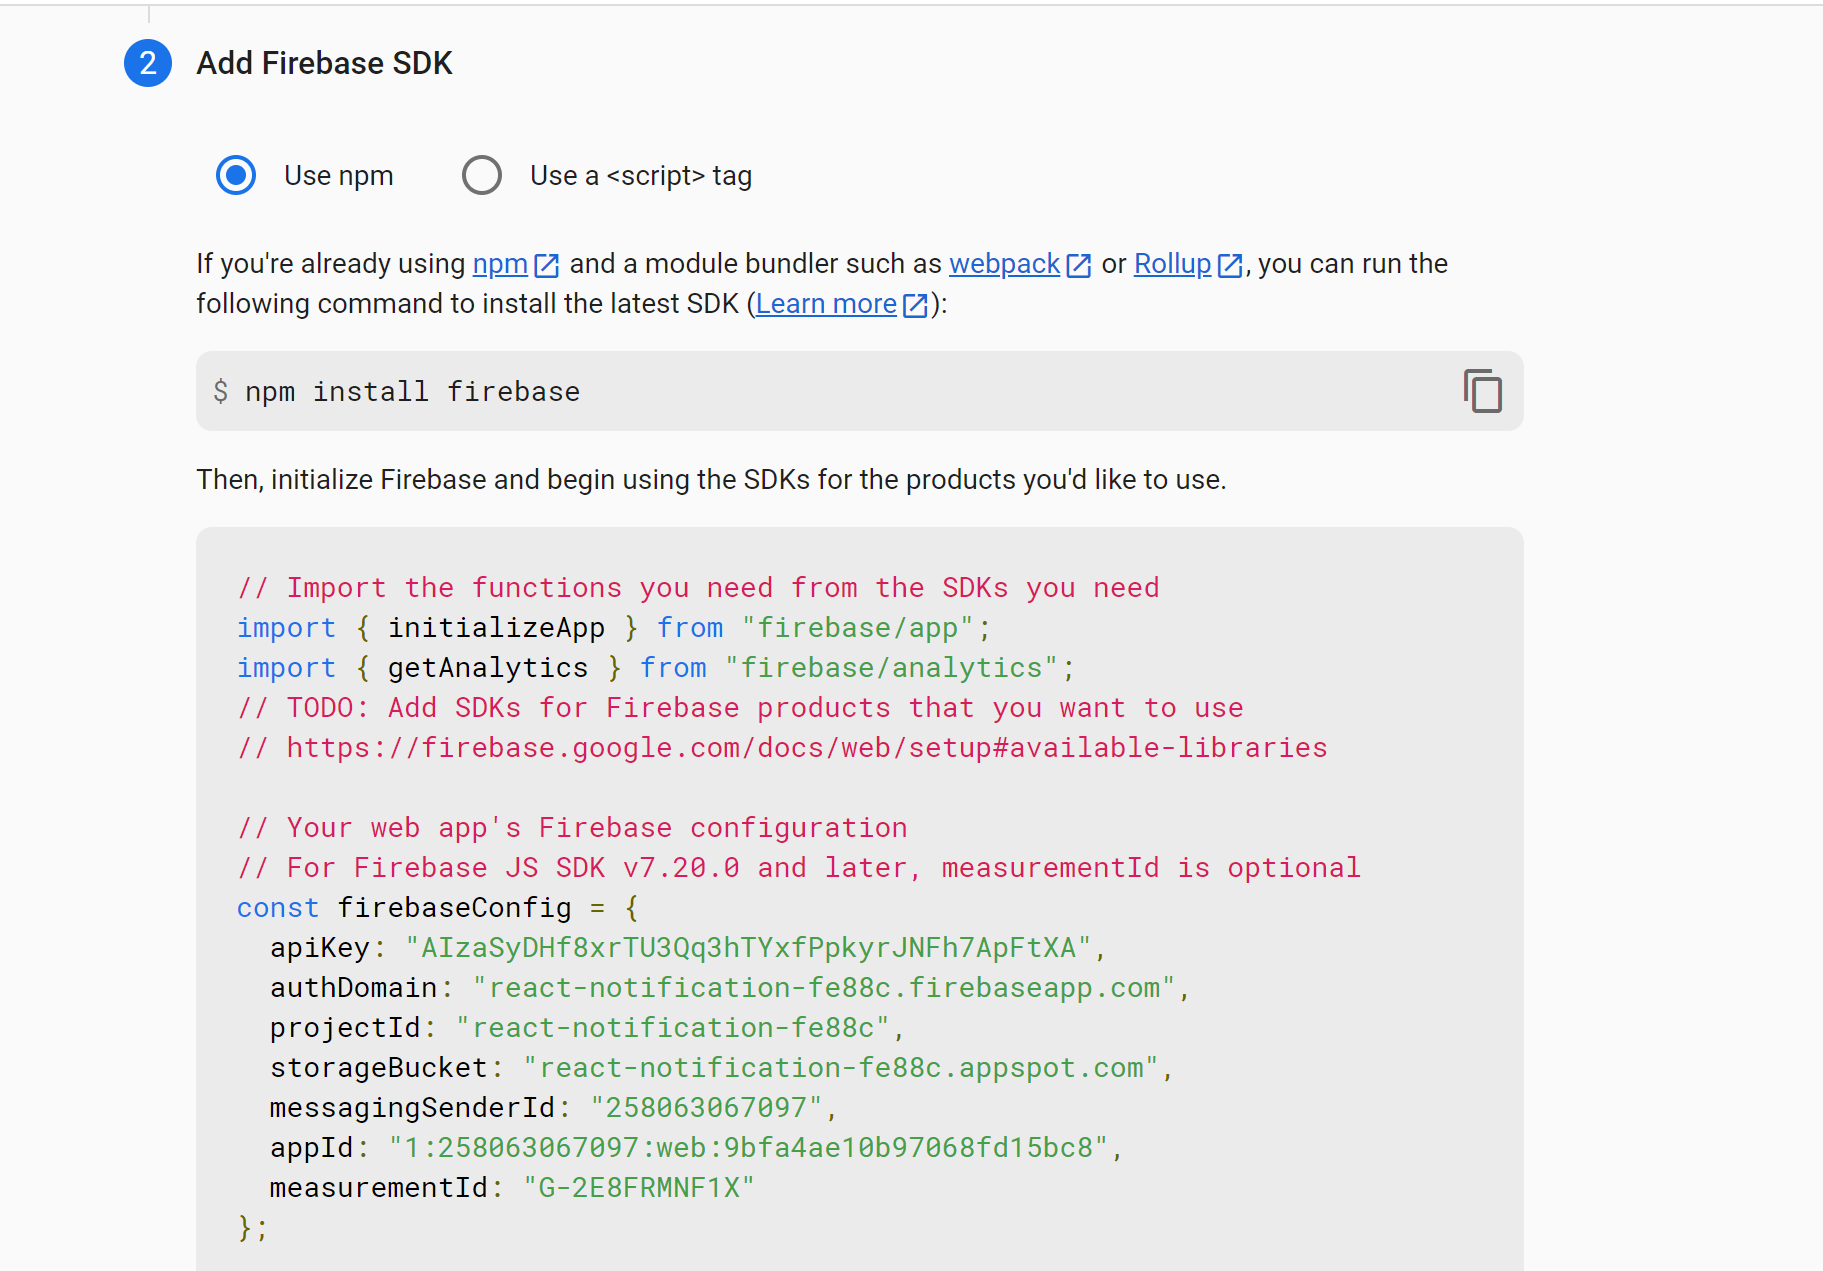
Copy your web app’s Firebase configuration, as we will require them to initialize Firebase SDK in React.js. Continue to the console to access your application. Now we need to obtain the necessary credentials for your application Firebase messaging. Navigate to Project settings to set up Firebase Messaging Onboarding. Select Cloud Messaging
FCM uses application identity key pairs to connect with external push services. To generate this key, under Web Push certificates, Generate key pair.
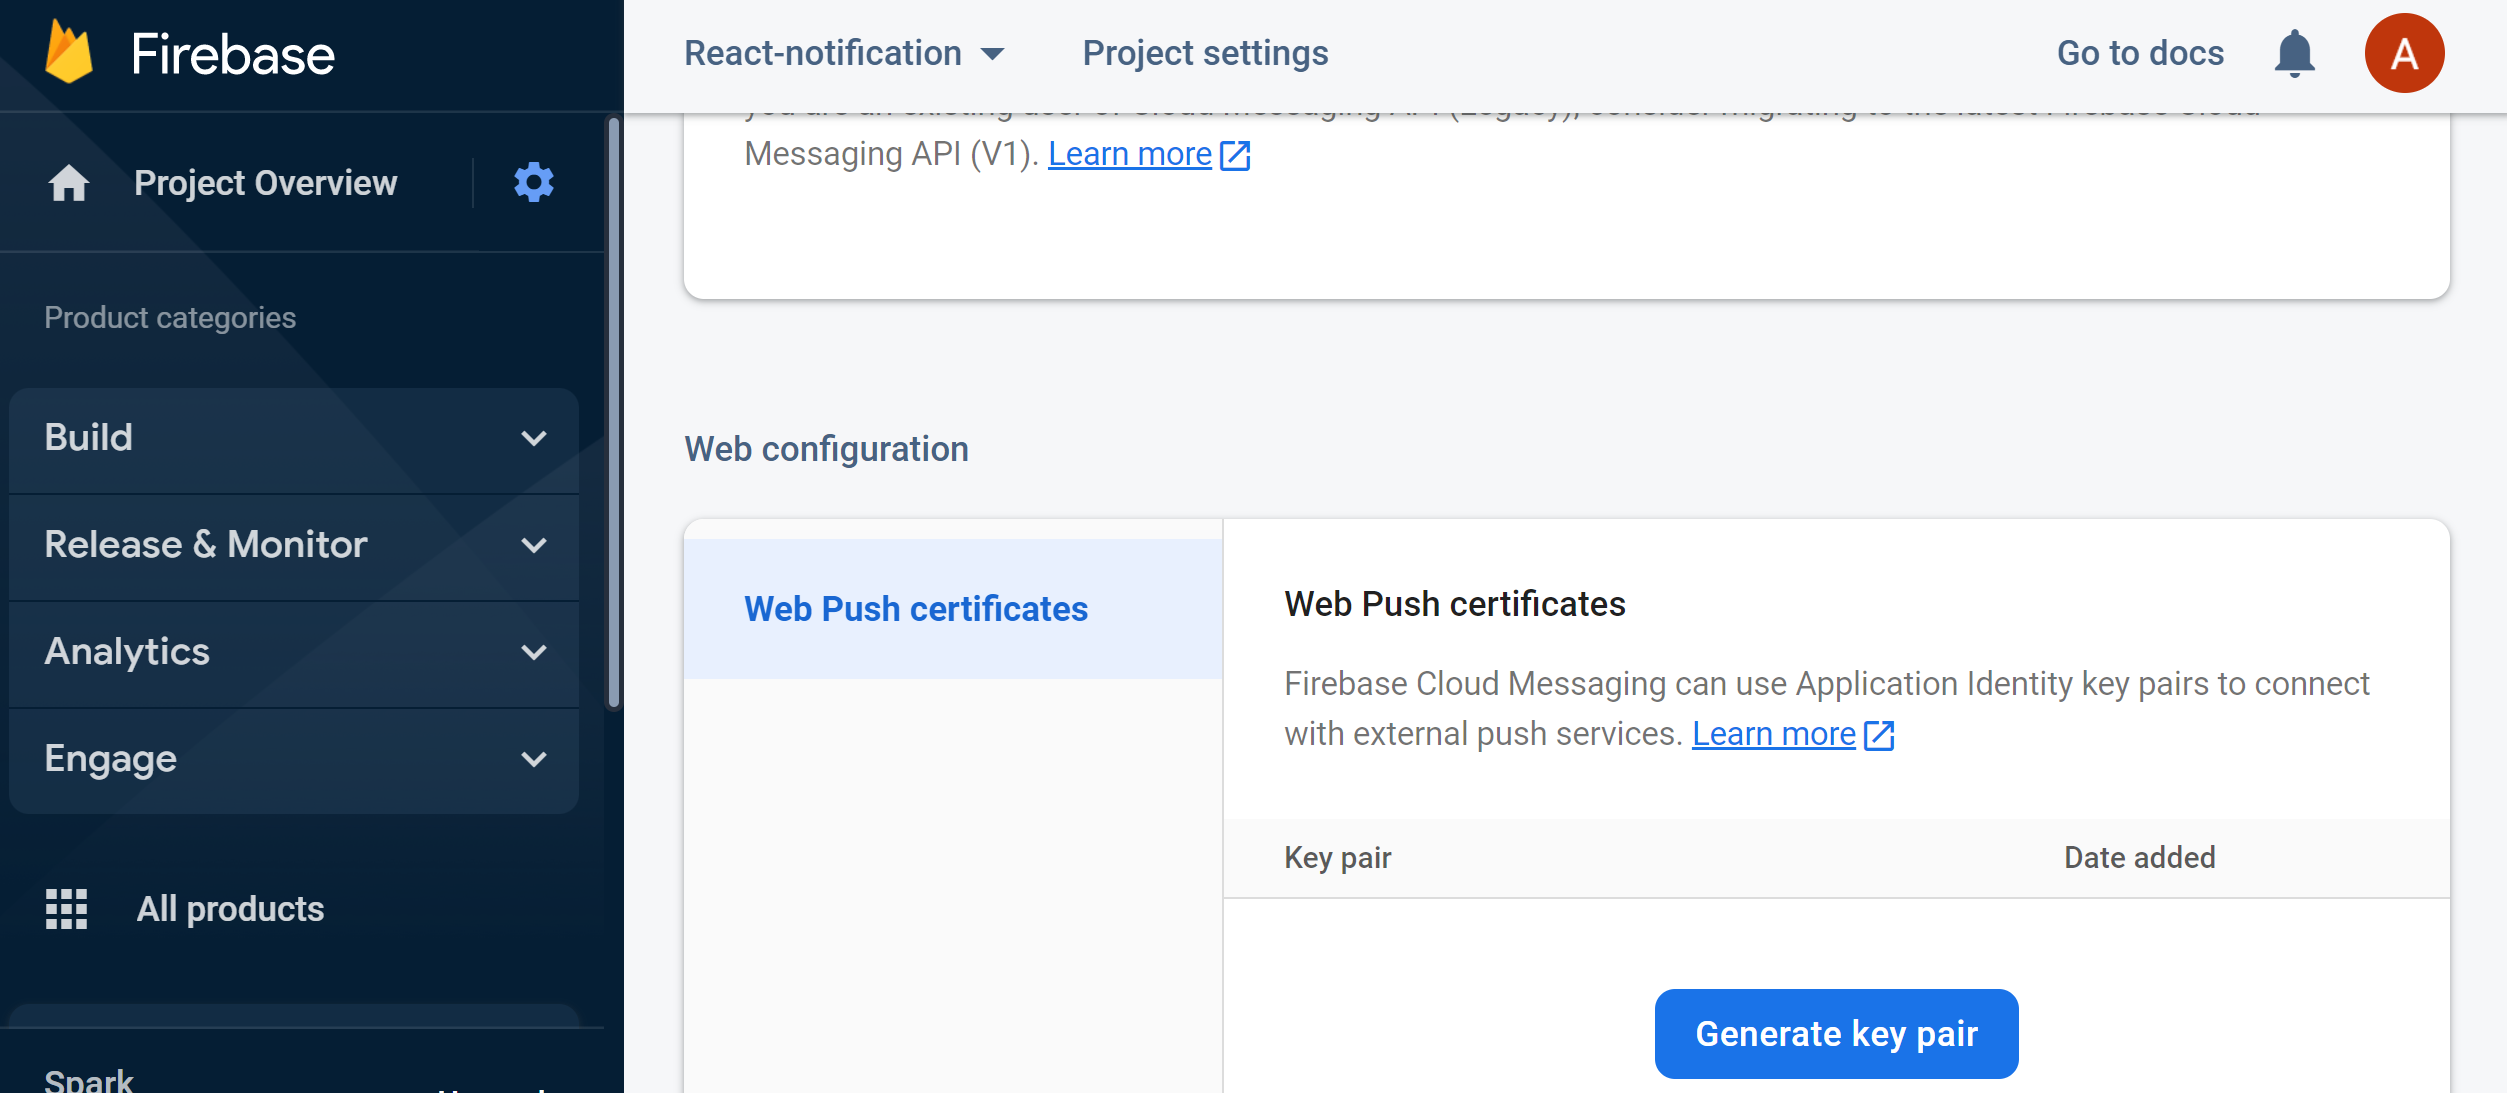
Ensure you copy this key, as we will use it in React.js to connect to the created Firebase app to set up web app push services.
To configure Push Notifications, we require installing libraries that provide the necessary Firebase methods. First, ensure you have created a basic React.js application using the following command:
npx create-react-app demo-appThis will scaffold a basic React.js application. Change the directory to the created project directory:
cd demo-appWithin this project, we will need the following libraries:
- Firebase: Provides Firebase tools and infrastructure such as Firebase Cloud Messaging.
- React-hot-toast: A lightweight package for customizing Notifications in React.js.
To install the above libraries to your React.js app, use the following command:
npm install firebase react-hot-toastHandling Notification User Permissions
We must set up user permissions to allow the app to receive push notifications. This involves calling the requestPermission method provided by the messaging object and handling the user’s response.
The React.js web app will ensure the permission request is made at an appropriate time. To do so, create a firebase.js file inside the src directory.
export const Sendrequest = () => {
  console.log("Requesting User Permission......");
  Notification.requestPermission().then((permission) => {
    if (permission === "granted") {
      console.log("Notification User Permission Granted.");
    } else {
      console.log("User Permission Denied.");
    }
  });
}

Sendrequest();
The above code uses the Notification API to request permission from the user to send push notifications. The requestPermission method is called. If the user grants permission, the permission will be granted. If the user denies permission, it will be set to denied. If the user has already granted or denied permission in the past, it will be set to default. This means the user has not been prompted to grant or deny permission.
Adding Firebase to React.js
Now initialize the Firebase SDK and connect FCM to the React.js app. Navigate to your firebase.js file and import the firebase package to access the Messaging objects:
import { initializeApp } from 'firebase/app';
import { getMessaging, getToken, onMessage } from 'firebase/messaging';
Add your web app’s Firebase configuration you copied earlier as follows:
const firebaseConfig = {
  apiKey: "AIzaSyDHf8xrTU3Qq3hTYxfPpkyrJNFh7ApFtXA",
  authDomain: "react-notification-fe88c.firebaseapp.com",
  projectId: "react-notification-fe88c",
  storageBucket: "react-notification-fe88c.appspot.com",
  messagingSenderId: "258063067097",
  appId: "1:258063067097:web:9bfa4ae10b97068fd15bc8",
  measurementId: "G-2E8FRMNF1X"
};
Finally, initialize firebase SDK as follows:
initializeApp(firebaseConfig);Writing the React.js Push Notification Listeners
We need to set up message listeners to handle incoming messages, and this involves subscribing to the messages and providing callbacks to handle these messaging events. Create the following onMessageListener() in your firebase.js file:
export const onMessageListener = () =>
  new Promise((resolve) => {
    onMessage(messaging, (payload) => {
      resolve(payload);
    });
});
Handling incoming messages is called when a message is received. At the same time, the app has focus. onMessageListener sets a message listener for push notifications. onMessage sets up a message listener that is triggered whenever the app receives a push notification.
When a notification is received, the message payload will contain the data associated with the sent notification. This includes the message title and body.
Handling the Incoming Messages
For a user to subscribe to the incoming messages, the client must create a token that the application will use to receive the sent messages. Thus, we need to check whether the client has generated this token. We will generate the token once the user permission has been granted. Edit Sendrequest() as follows:
export const Sendrequest = () => {
  console.log("Requesting User Permission......");
  Notification.requestPermission().then((permission) => {
    if (permission === "granted") {
      console.log("Notification User Permission Granted.");

      return getToken(messaging, { vapidKey: `Notification_key_pair` })
        .then((currentToken) => {
          if (currentToken) {
            console.log('Client Token: ', currentToken);

          } else {

            console.log('Failed to generate the registration token.');
          }
        })
        .catch((err) => {
          console.log('An error occurred when requesting to receive the token.', err);
        });
    } else {
      console.log("User Permission Denied.");
    }
  });
}
The client token will only be generated if the user has been granted permission to receive notifications.
Note: Remember to replace Notification_key_pair with the key pair generated earlier in the Web Push certificates section.
Session Replay for Developers
Uncover frustrations, understand bugs and fix slowdowns like never before with OpenReplay — an open-source session replay tool for developers. Self-host it in minutes, and have complete control over your customer data. Check our GitHub repo and join the thousands of developers in our community.
Creating a React.js Notification Client
We need to create a notification client to handle incoming messages. We will create a Notification component to load the message payload from onMessageListener(). We will then use react-hot-toast to display the notification payload to the user.
Create a Notification.js file inside the src directory. In this file, we will display push notifications:
Import the packages and modules that we require:
import React, {useState, useEffect} from 'react'
import toast, { Toaster } from 'react-hot-toast';
import { Sendrequest, onMessageListener } from './firebase';
Create a Notification component as follows:
const Notification = () => {
}

export default Notification
Inside Notification(), create the application states as follows:
const [notification, setNotification] = useState({title: '', body: ''});Customize the message payload as follows:
const notify = () =>  toast(<ToastDisplay/>);

function ToastDisplay() {
  return (
    <div>
      <p><b>{notification?.title}</b></p>
      <p>{notification?.body}</p>
    </div>
  );
};
Call notify() to display the notification:
useEffect(() => {
    if (notification?.title) {
        notify()
    }
}, [notification])
Here the useEffect checks the value of the notification state variable. If the notification has a title property, a new notification has been received, and the notify() function will be called to display the notification.
Call the Sendrequest() function to request permission from the user to send notifications:
Sendrequest();Set up a message listener using the onMessageListener(), and updates the notification state when a new notification is received:
onMessageListener()
.then((payload) => {
  setNotification({title: payload?.notification?.title, body: payload?.notification?.body});
})
.catch((err) => console.log('failed: ', err));
Render the Toaster to display the notifications as they are displayed.
return (
    <Toaster/>
)
We need to execute this component. Go ahead and edit the App.js file as follows:
import logo from './logo.svg';
import './App.css';
import Notification from './Notification'

function App() {
  return (
    <div className="App">
      <header className="App-header">
        <img src={logo} className="App-logo" alt="logo" />
        <p>
          Edit <code>src/App.js</code> and save to reload.
        </p>
        <a
          className="App-link"
          href="https://reactjs.org"
          target="_blank"
          rel="noopener noreferrer"
        >
          Learn React
        </a>
      </header>
      <Notification />
    </div>
  );
}

export default App;
Testing React.js FCM
First, execute the npm start command to start the local server. Open http://localhost:3000/ on your browser to access the application. You should get the following pop-up to allow the application to receive notifications.
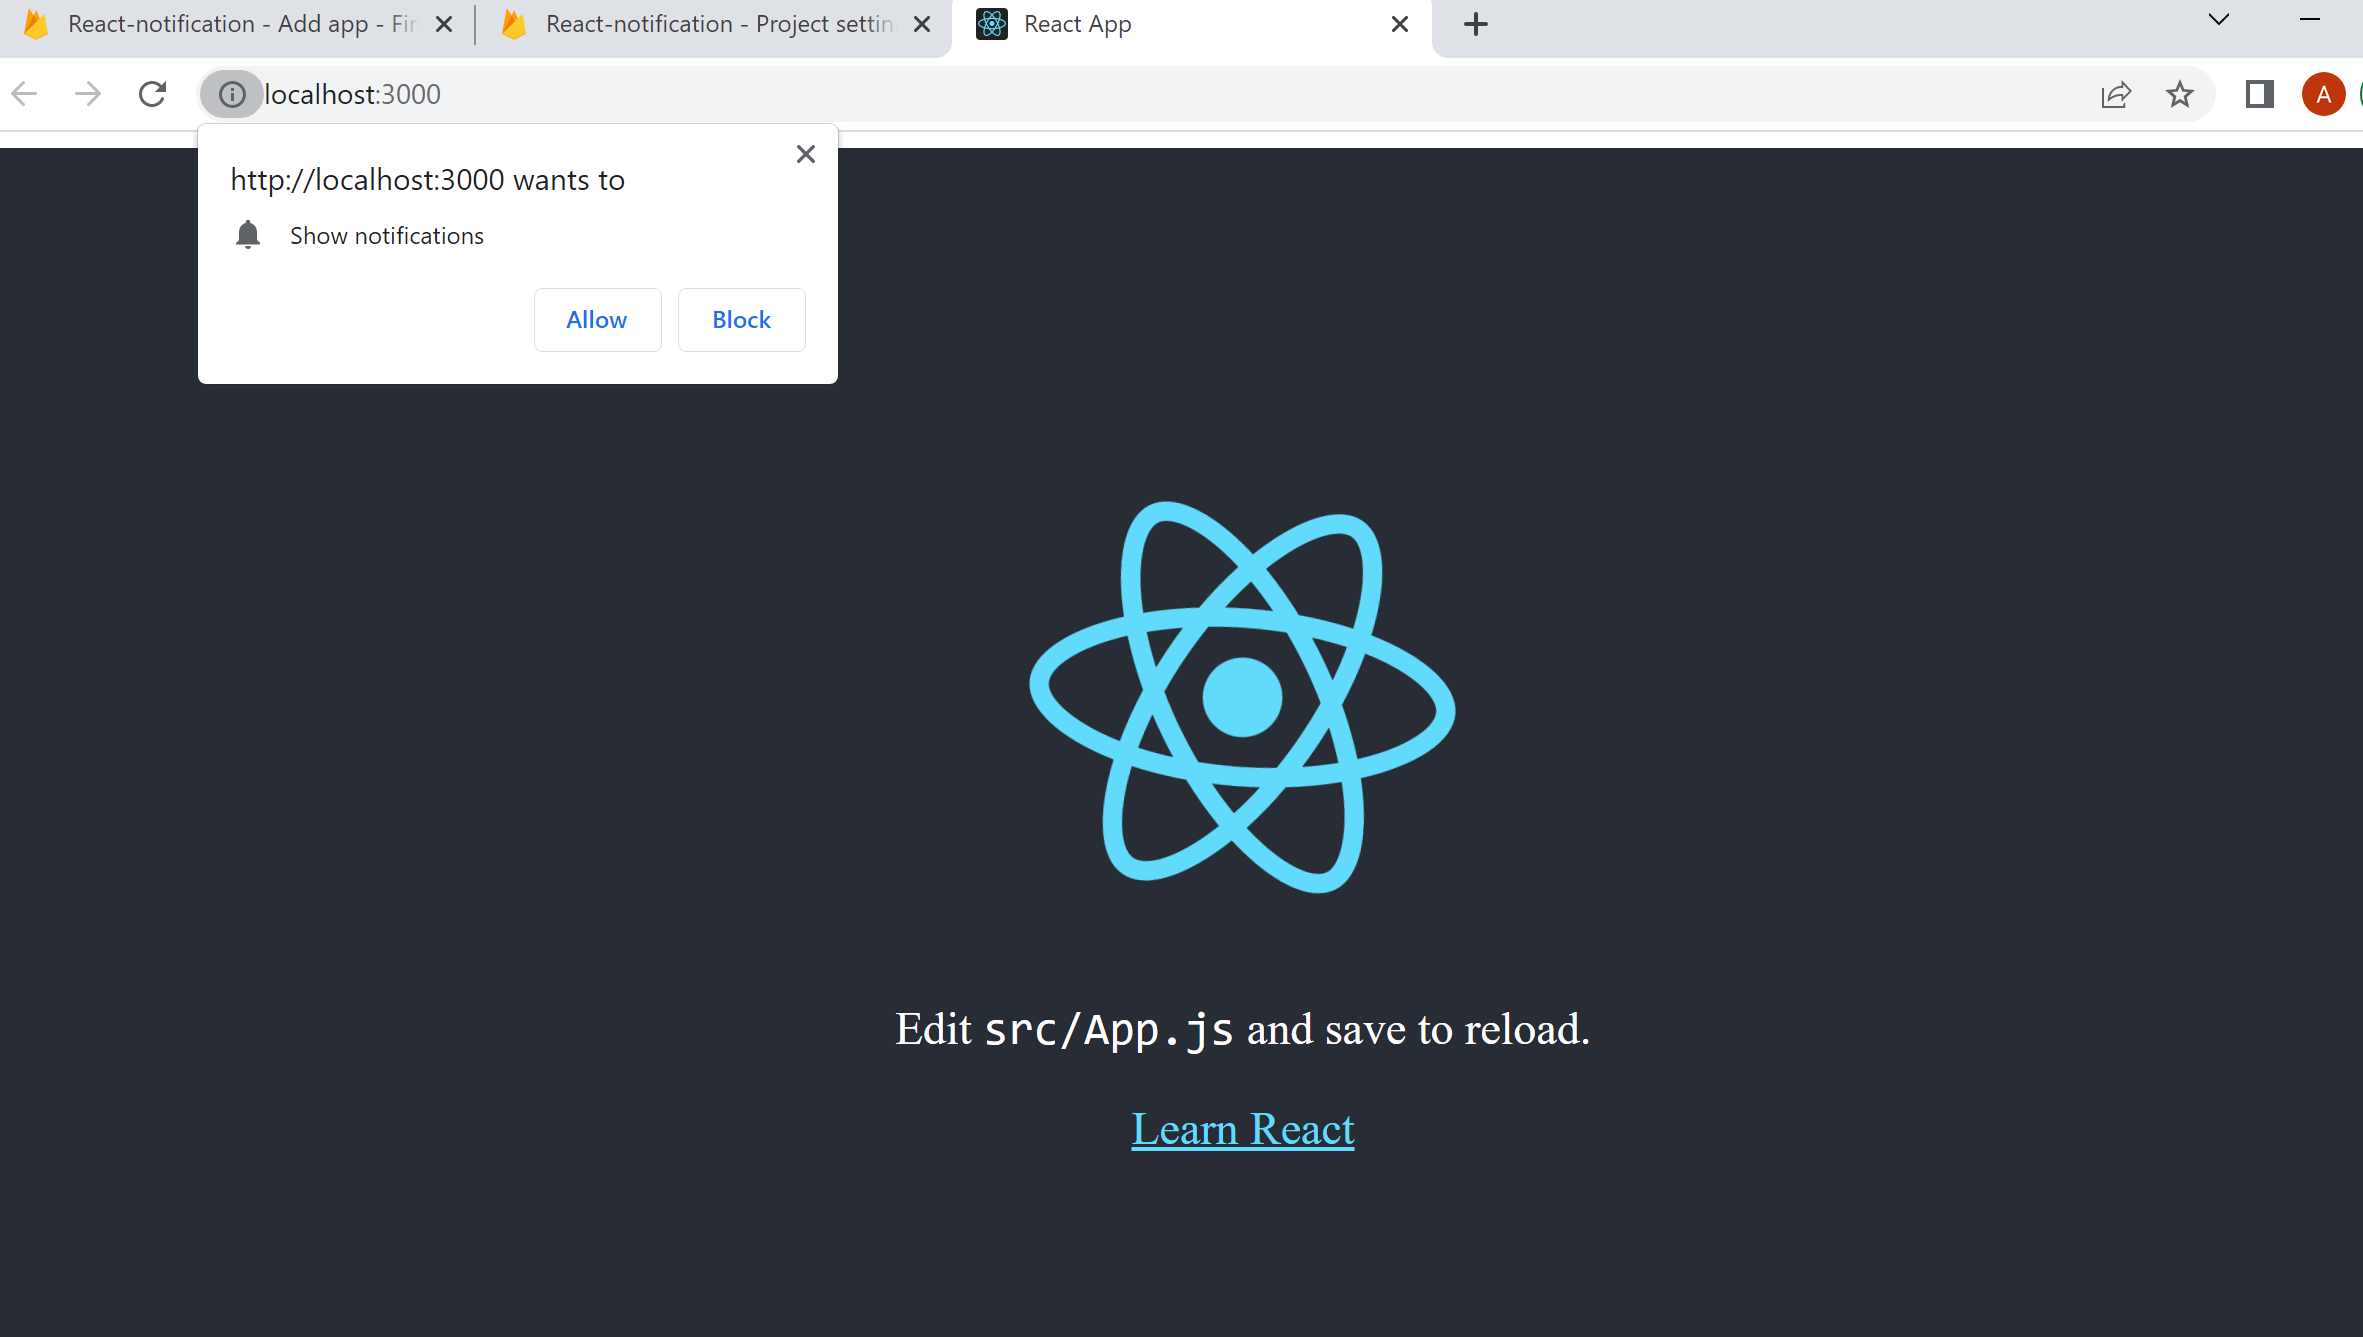
Click Allow. At this time, the client token should be generated. To check this, navigate to your browser console:
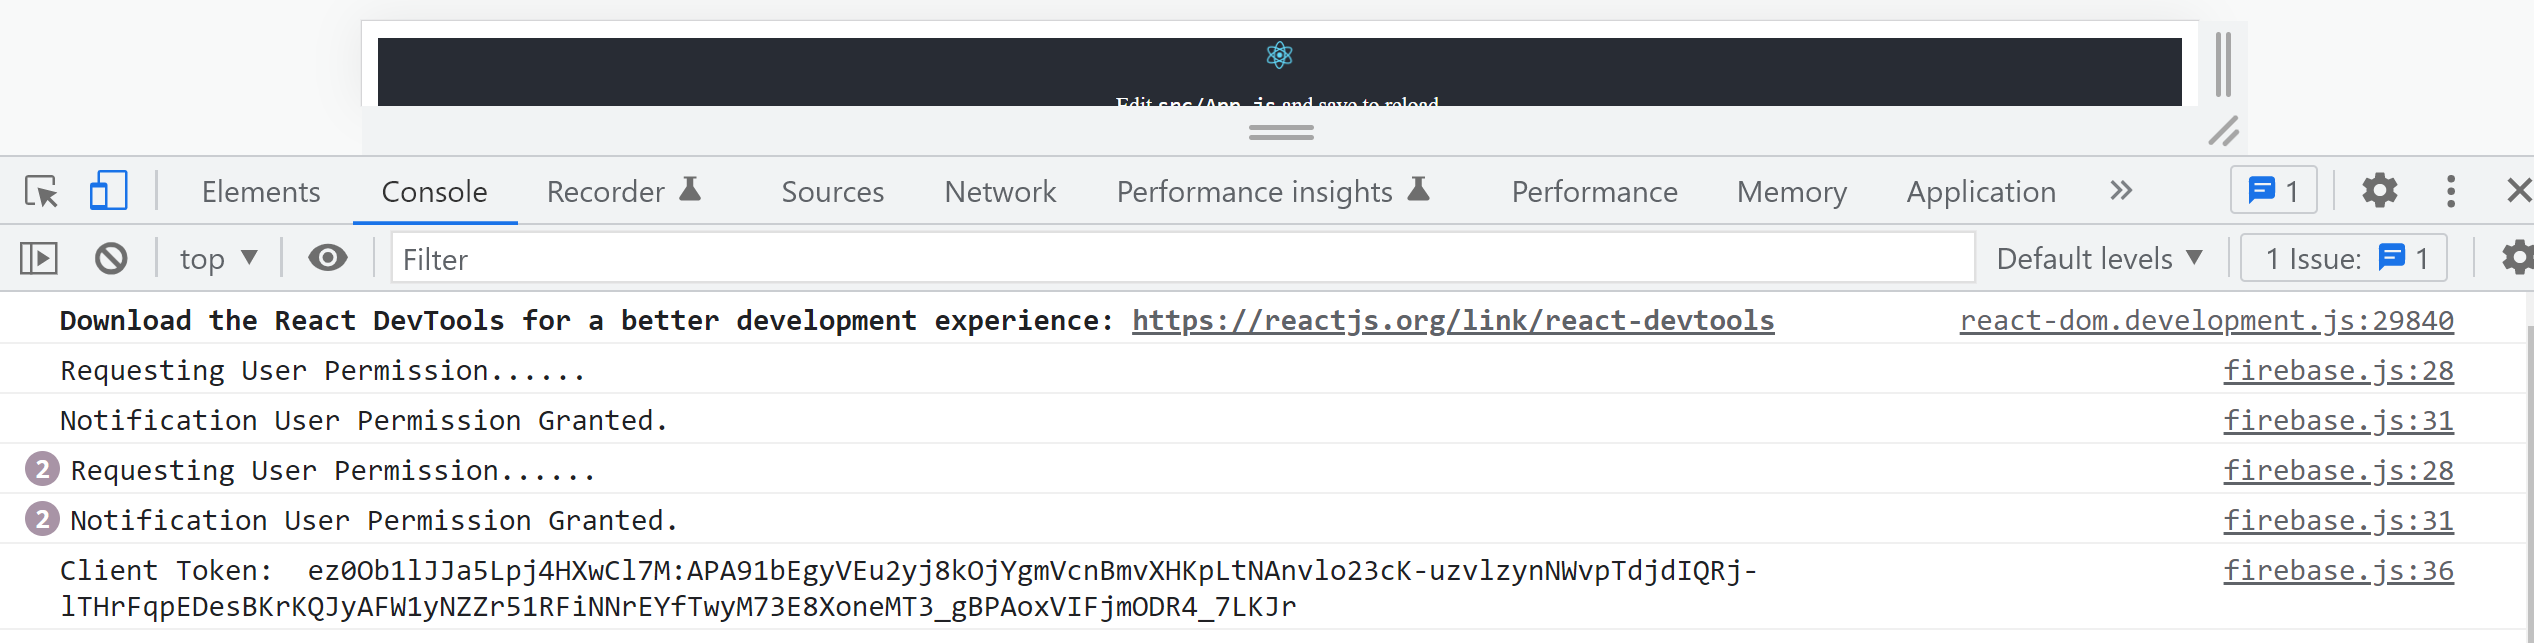
We will use a token to send Notifications. Ensure you copy the generated Client Token. To test Cloud Messaging in your Firebase project, navigate to your application dashboard and click the Cloud Messaging tab under the Grow & engage your audience section.
Click Create your first campaign, select Firebase Notification messages, and compose a notification as follows:
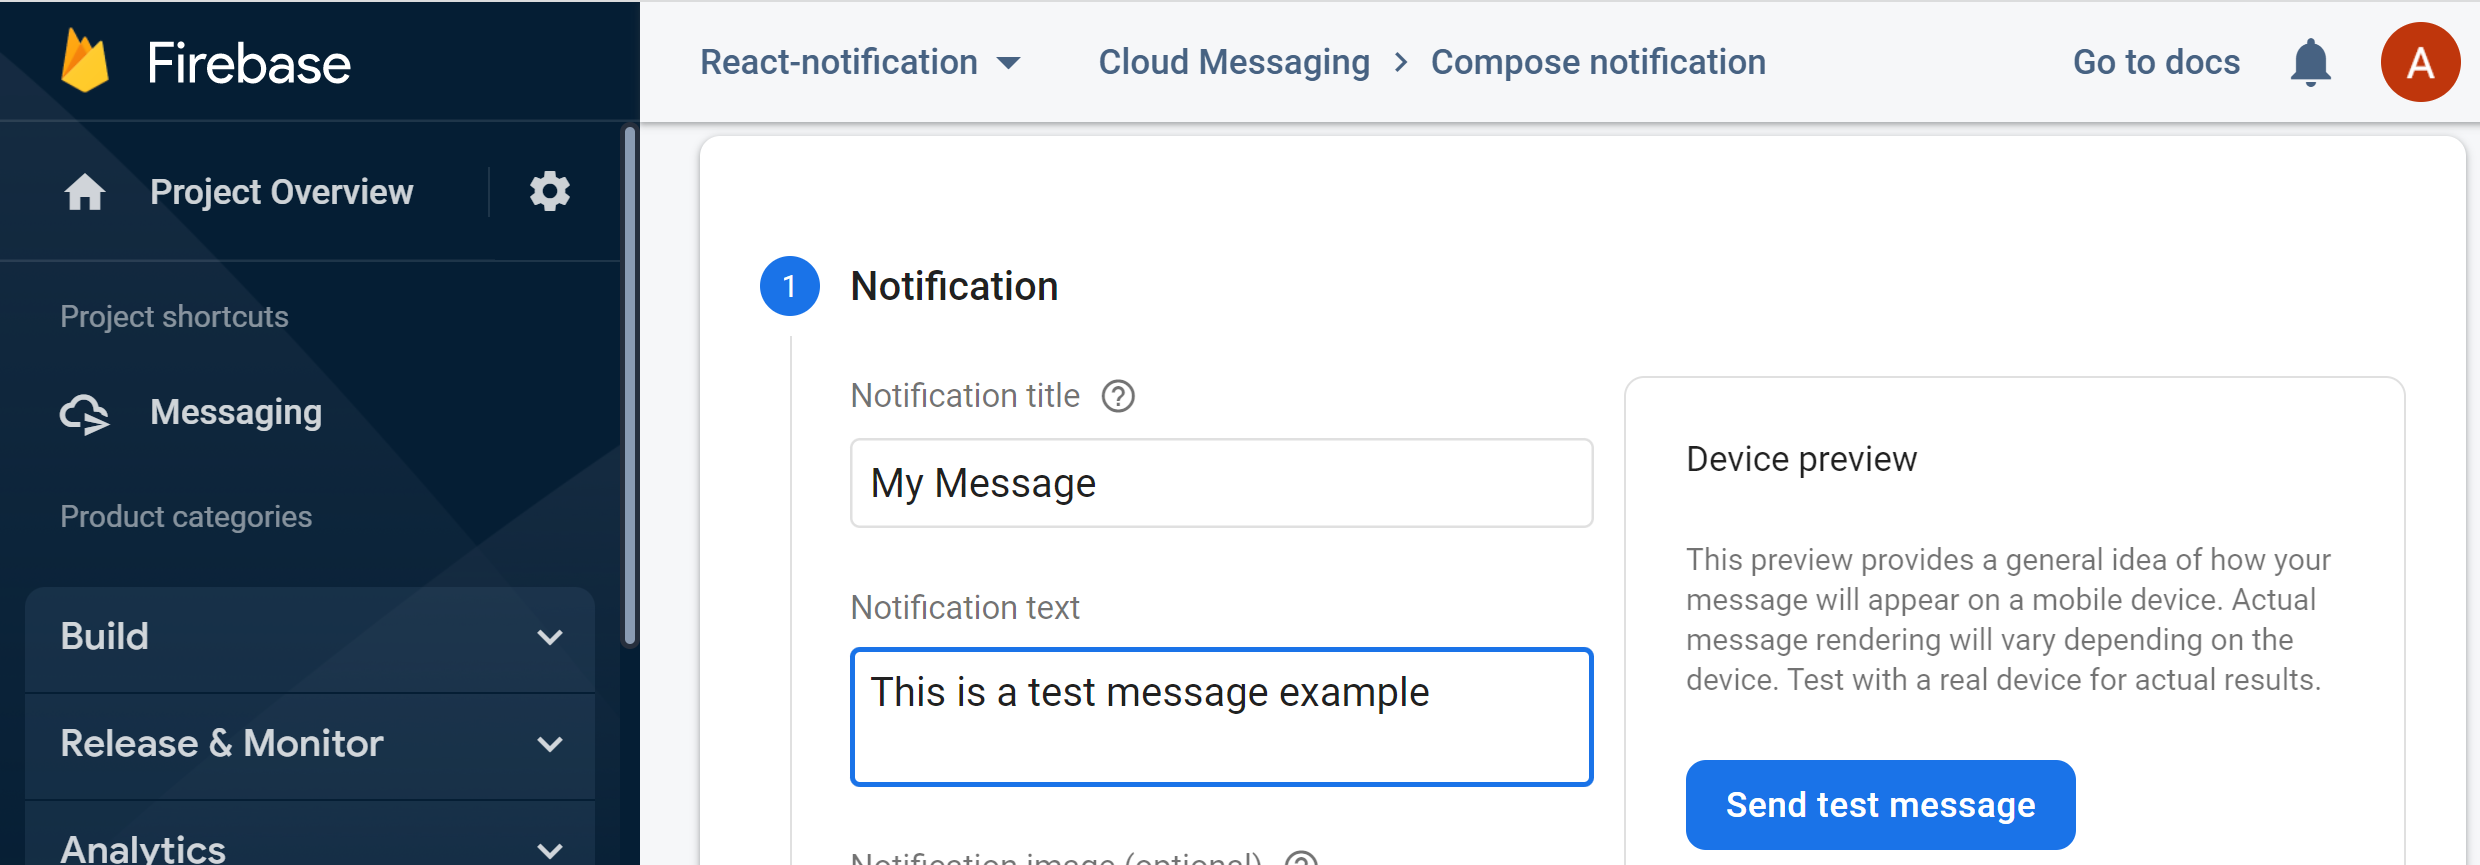
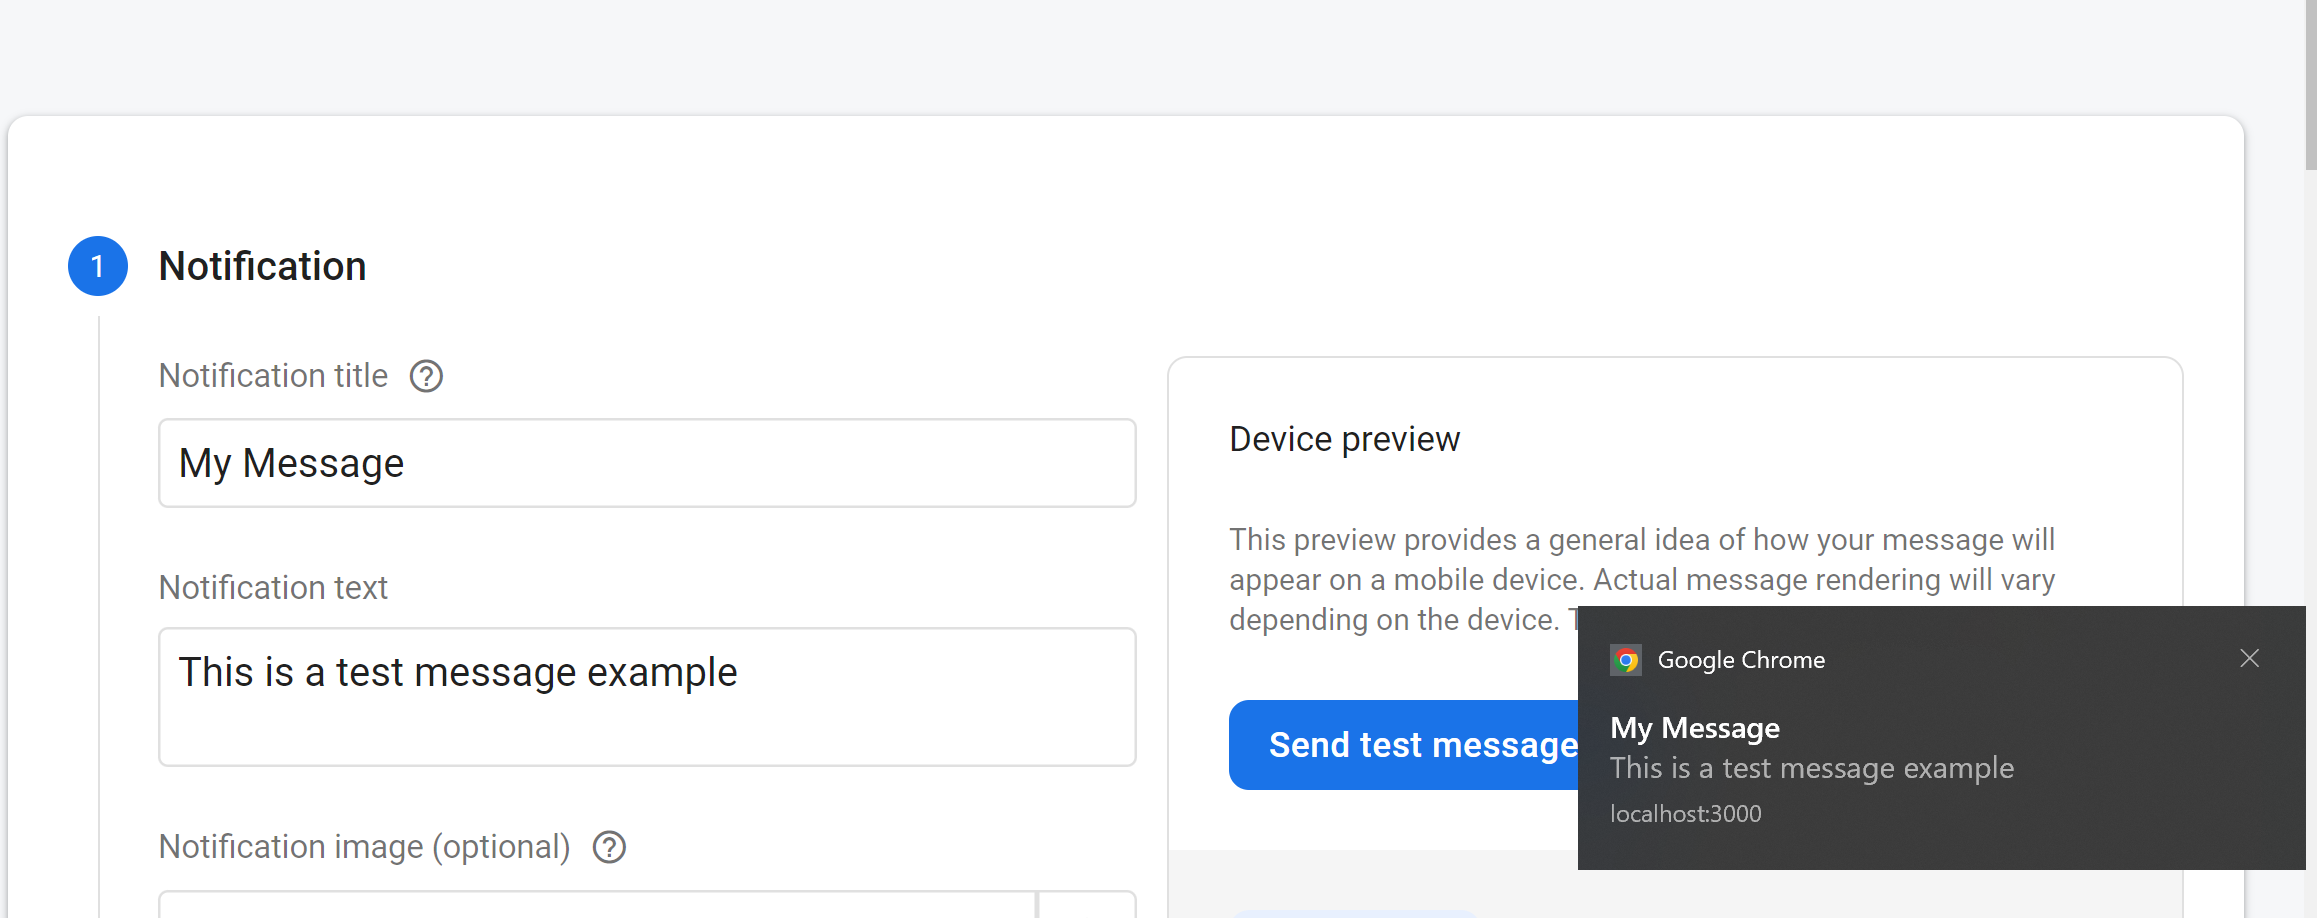
Click Send Message. Go ahead and provide the client token and click Test.

If you are on the application, you will receive the above notification. However, if you are not currently on the application, you will receive a background notification as follows:
Wrapping Up
Push notifications can be a useful way to keep users informed and engaged with your app. They can help to increase engagement and retention. They can also be used to deliver important information or updates to users on time. With Firebase, sending push notifications is a breeze. In this article, you learned how to send push notifications in React.js using Firebase.
Gain Debugging Superpowers
Unleash the power of session replay to reproduce bugs and track user frustrations. Get complete visibility into your frontend with OpenReplay, the most advanced open-source session replay tool for developers.