React Router for Beginners - A Complete 2023 Guide
Learn React Router: a React Router Tutorial for your web application


React Router, in simple terms, is a library that helps in handling navigation and routing in a React application. It is the most popular routing tool used to manage routing in React. If you’re unfamiliar with the concept of routing, think of it as the process of navigating through different sections of a website. For instance, when you go to the “contact” section on a website, you have successfully undergone a routing process. This article will give you all the details about React Router so you can use it fully.

Discover how at OpenReplay.com.
If you’re new to React Router, you’re probably used to using regular links (a tags) to move around your app. However, issues arise when you want to preserve the current state of your app while navigating. Unfortunately, regular links often trigger a page refresh to show components, disrupting the user experience. This is where React Router comes in.
React Router allows you to define different routes in your app and link them to their respective components without reloading the page. This approach makes React Router easily update the content on the page and makes the website feel like a native app.
There are also other benefits to using React Router, such as the creation of complex navigation, seamless page navigation structure, and support for dynamic URLs.
Setting up the environment
To understand how React Router works, one of the best approaches is building a simple website. Thus, let’s build a little History website, nothing complex.
So, let’s set up everything needed to start using React Router.
- Installing React: There are several ways to do this, but let’s opt for the easiest one: create-react-app (CRA). Install React through your code editor terminal by running:
npx create-react-app history-appAfter, navigate to the created React app by running cd history-app.
- Installing React Router: To install the react-router package in a React website, run this command in the terminal:
npm install react-router-domThis command lets you install React Router, a necessary package.
Once completed, you can start the React app by running npm start. And that’s it! React and React Router are ready to be used.
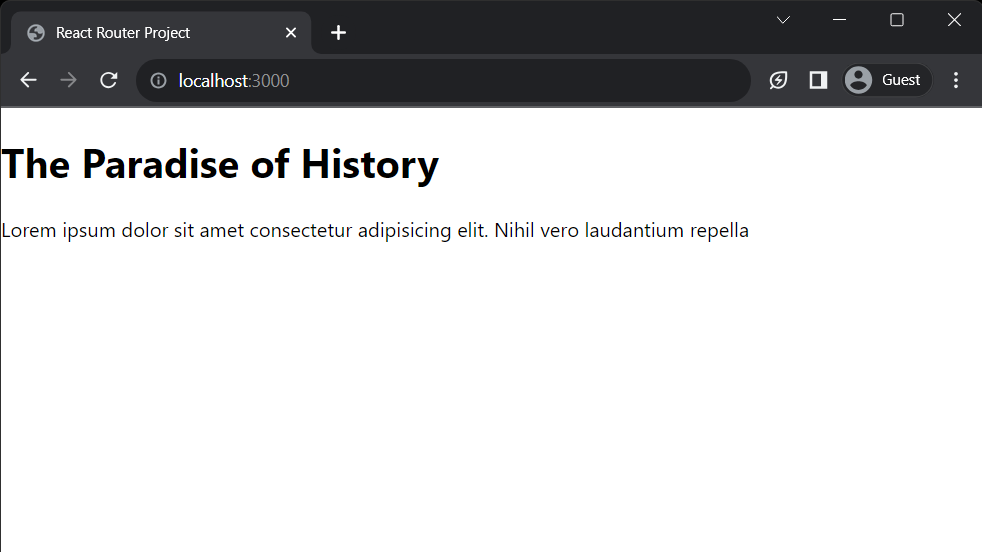
Let’s add some React components to get some dummy content we can work with on the history app. You can just copy and paste this into App.js, the default app component:
export default function App() {
return (
<>
<Home />
</>
);
}
function Home() {
return (
<div>
<h1>The Paradise of History</h1>
<p>
Lorem ipsum dolor sit amet consectetur adipisicing elit. Nihil vero
laudantium repella
</p>
</div>
);
}
function Eras() {
return (
<div>
<h1>The Eras of Time</h1>
<ul>
<li>
<a href="/">Medieval</a>
</li>
<li>
<a href="/">Digital</a>
</li>
</ul>
</div>
);
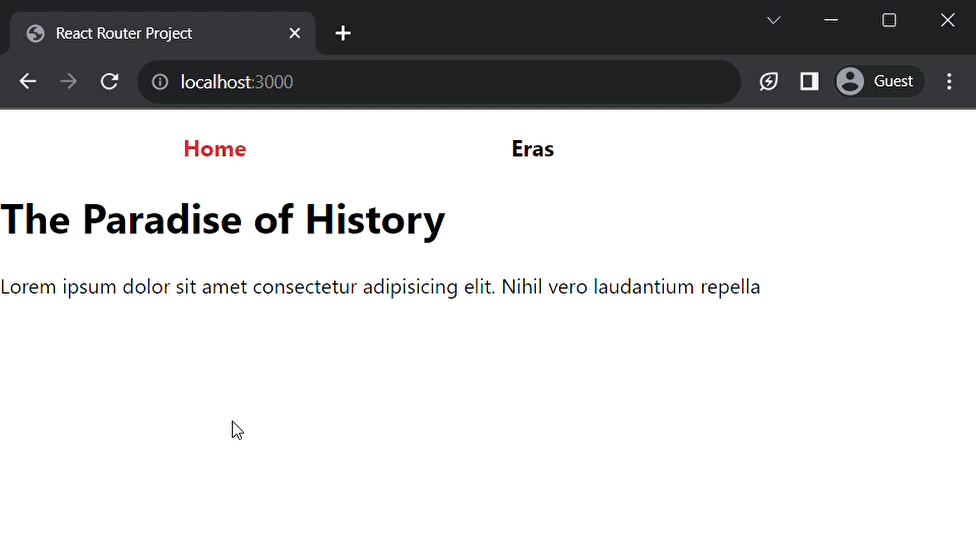
}You should have this on your browser:
Understanding Routing Concepts
Before we continue, let’s have a quick understanding of some key concepts in React Router:
-
History Stack: React router intelligently uses the HTML5 History API to keep track of the user’s navigation history. When a user visits a new URL, React Router pushes that URL to the history stack. As the user navigates to other URLs, they are also pushed to the stack. This is how React Router can navigate back and forth between routes without refreshing the page.
-
Location: This refers to the URL that you’re currently on when navigating through a website. It is the topmost URL in the history stack and how React Router dynamically changes the content displayed to match the correct URL.
Quick Tip
In some browsers, like Chrome, you can click and hold the “back” button to see a list of all the URLs in the history stack.
Browser Router and Its Usage
As we all know, React uses components and hooks, as does React Router. And one key component provided by React Router is the <BrowserRouter />.
Just as the body element is the backbone of a website, that’s the same way the BrowserRouter is to React Router. It lays the groundwork for all possible routing within the website.
Note: The BrowserRouter uses the HTML5 History API to manipulate the browser’s URL and keep it in sync with the current displayed page.
The BrowserRouter can be placed anywhere around the app’s components, but typically, you’ll want to place the BrowserRouter at the top of the component tree to wrap the entire app’s components.
Now, back to building our simple history website. To implement the BrowserRouter, wrap the entire App component within it. To do this, go to the index.js files:
import { BrowserRouter } from "react-router-dom";

const root = ReactDOM.createRoot(document.getElementById("root"));
root.render(
 <React.StrictMode>
   <BrowserRouter>
     <App />
   </BrowserRouter>
 </React.StrictMode>
);
With <BrowserRouter /> engulfing the App component, routing functionality is available throughout all of the components in the App component.
That’s all on BrowserRouter; let’s move on.
Psst… It’s also worth noting that alongside the
<BrowserRouter />, there are other similar components available, such as theMemoryRouter,StaticRouterand more.
Using Routes and Route
To fully grasp what the Routes component does in React Router, let’s first understand what Route does.
Route
In simple terms, Route defines a specific URL path and points to the component that should be rendered when that URL path is visited.
The route component has two main properties:
-
Path: This property accepts a string that specifies the path for that
Route. For instance, if there’s aRoutewith itspathset to"/eras", whenever the URL becomeshttps://historyApp.com/eras, thisRoutewould be triggered. -
Element: This property is assigned the React component to be rendered whenever the path in the
pathprop is visited. Therefore, if the/eraspath is visited, the<Eras />component would be rendered on the page.
Here is a code example:
<Route path='/eras' element={<Eras />} />Routes
Routes is a container component for the Route component. It is responsible for inspecting the current URL location and comparing it against the paths specified in the child Route components to find a match.
Inside Routes, you can nest all the Route components, then when navigating through the website, Routes would get the current URL and match it with each child route component to find the perfect one that corresponds.
Thus, setting up the Routes and Route in the history app goes like this:
import { Routes, Route } from 'react-router-dom';

export default function App() {
 return (
   <Routes>
     <Route path="/" element={<Home />} />
     <Route path="/eras" element={<Eras />} />
   </Routes>
 );
}
In this code,
- The
RoutesandRoutecomponents are first imported from thereact-router-dompackage. - Then, within the
Appcomponent, theRoutescomponent confines the differentRoutecomponents. - The first route’s
pathis set to (”/”), which would render theHomecomponent when accessed. This default route will always be rendered when the root URL is accessed. - The
/erasroute is associated with theErascomponent. This means that whenever the URL path matches/eras, the<Eras />content will be displayed.
When you add /eras to the root URL in the address bar, React Router uses the Routes component to match the exact Route with its path set to /eras. Once found, the component defined within the element prop of the matched Route is rendered; in this case, the <Eras /> component.
404 Not found Routes
A 404 error is an HTTP status code that shows up when a requested resource or page cannot be found. This can happen when a user enters a URL that does not exist.
React Router includes a way to handle 404 errors by rendering a custom component when an undefined URL is visited on a website.
To handle 404 errors in React Router, create a route with its path property set to * and its element prop set to the error component that should be rendered.
This can be implemented like this:
- First, let’s create an error 404 component
function Error404() {
 return (
   <div>
     <h1>404 — Page Not Found</h1>
     <a href="/">Take me back!</a>
   </div>
 );
}- Then create a
routethat renders<Error404 />.
export default function App() {
 return (
   <Routes>
     <Route path="/" element={<Home />} />
     <Route path="/eras" element={<Eras />} />
     {/* 404 page */}
     <Route path="*" element={<Error404 />} />
   </Routes>
 );
}
With this set in place, anytime a non-existent URL is visited, the React Router automatically uses the route component with path set to * and renders its element, the Error404 component.
Now, we can be gracefully assured that the website can handle any unexpected URLs.
Linking Between Routes
So far, we have only mentioned how to access routes by manually inputting URLs into the address bar. However, this is unpleasant, as users have to remember the exact URL of each page they want to visit.
The a tag would typically be used to fix this, but it has limitations. And to bypass these limitations, React Router uses the Link component.
In React Router, Link is the major means for route navigation. The link component uses the a tag under the hood, but it enhances it by preventing default page reloads. Instead, Link pushes the URL from its to property to the history stack, and then the routes component finds the matching route with the same URL and displays the associated component.
React Router uses the
Linkcomponent overatags becauseLinkhas been designed to prevent page reloads, retain application state, & offer seamless navigation between routes.
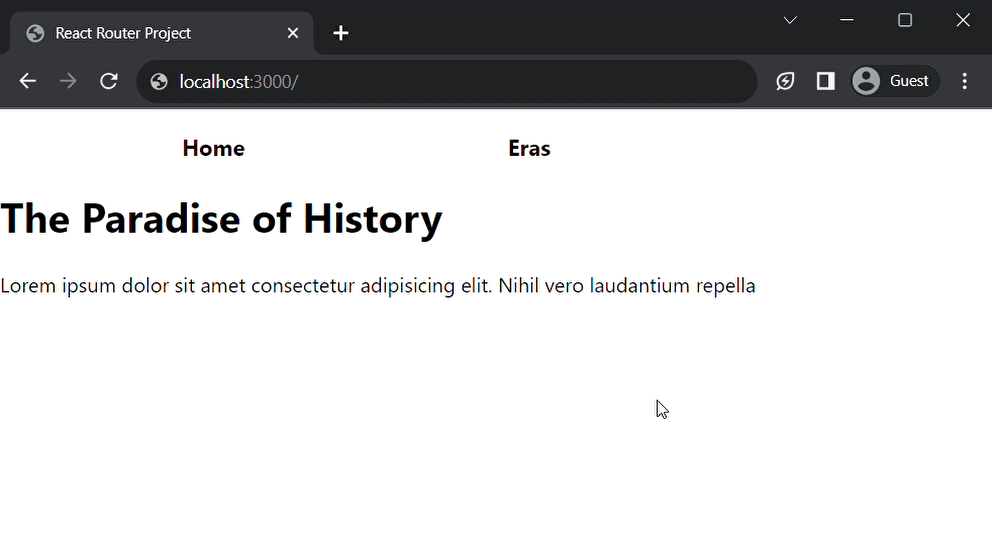
Here is how Link would be used in the history website. Head over to App.js and create a navigation component:
import { Link } from "react-router-dom";

function Nav() {
 return (
   <ul className='nav'>
     <li>
       <Link to='/'>Home</NavLink>
     </li>
     <li>
       <Link to='/eras'>Eras</NavLink>
     </li>
   </ul>
 );
}
The Link component is first imported from react-router-dom. After, a functional component, Nav, is created to act as the navigation for the history website.
This Nav component follows the structure of a typical navigation menu; just that Link components are used instead of a tags.
Each <Link /> has a specific path assigned to the to property; this sets the destination route for the Link. Thus, when any of these links are clicked, React Router gets the URL from the to property, matches the correct route path, and renders the specified component.
Since the Nav component should be visible on all pages, let’s place it at the top within the App component:
export default function App() {
 return (
   <>
     <Nav />
     <Routes>
       <Route path='/' element={<Home />} />
       <Route path='/eras' element={<Eras />} />
       <Route path='*' element={<Error404 />} />
     </Routes>
   </>
 );
}
Let’s also add some rough styling to juice it up; head to App.css:
a {
 text-decoration: none;
 color: inherit;
}
a:hover {
 color: #e32a30;
}

.nav {
 list-style: none;
 display: flex;
 width: 500px;
 justify-content: space-around;
 align-items: center;
 font-size: 1.1rem;
 font-weight: bold;
}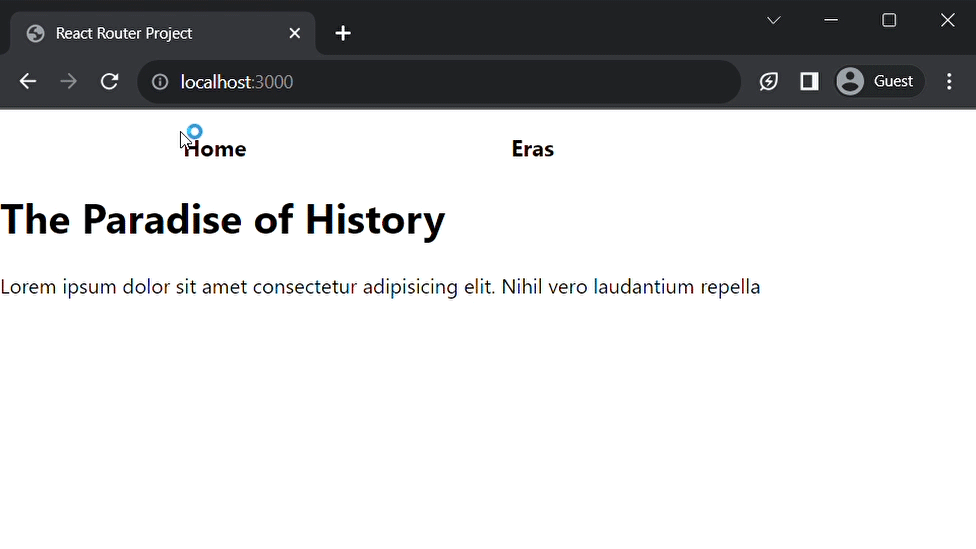
NavLink vs Link
React Router has a component called NavLink. It is similar to Link but is mainly used when dealing with menu navigation links, unlike the Link component, which can be used for any type of link.
The major difference between NavLink and Link is that NavLink can detect when it is in an active state. When NavLink detects that it is active, it adds an active class to its component by default.
Since navigation menus are present in the history website, let’s update the Link component to NavLink :
import { Link, NavLink } from "react-router-dom";

function Nav() {
 return (
   <ul className='nav'>
     <li>
       <NavLink to='/'>Home</NavLink>
     </li>
     <li>
       <NavLink to='/eras'>Eras</NavLink>
     </li>
   </ul>
 );
}
The active class of NavLink can then be customized using CSS. Head to App.css:
.active {
 color: #e32a30;
}
Overall, NavLink is a more robust option than the Link component when creating links for navigation menus.
Nested Routes
In React Router, nesting can be thought of as establishing parent-child connections between routes. This can be done to organize routes that share common URL paths.
Nested routes use a Route component as the parent route and another Route component to define child routes within the parent route. Thus, the child routes can only be rendered when on the parent route.
In the history website, under the eras section, “Medieval” and “Digital” are the available era categories. So, to access these eras details, we can nest them within the /eras route.
Let’s add this functionality to the history website:
- Create “Medieval” and “Digital” components:
function MedievalEra() {
 return (
   <div>
     <hr />
     <h3>The Medieval Era</h3>
     <p>Lorem ipsum dolor sit amet.</p>
   </div>
 );
}

function DigitalEra() {
 return (
   <div>
     <hr />
     <h3>The Digital Era</h3>
     <p>Lorem ipsum dolor sit amet.</p>
   </div>
 );
}- Head over to the
Appcomponent and create the nested routes within the/erasroute:
export default function App() {
 return (
   <>
     <Nav />
     <Routes>
       <Route path="/" element={<Home />} />
       <Route path="/eras" element={<Eras />}>
         <Route path="medieval" element={<MedievalEra />} />
         <Route path="digital" element={<DigitalEra />} />
       </Route>
       <Route path="*" element={<Error404 />} />
     </Routes>
   </>
 );
}
At this point, navigating to either /eras/medieval or /eras/digital should render the <MedievalEra /> and <DigitalEra /> components, respectively. However, it won’t render as expected.
This happens because React Router doesn’t know where to place these nested components. To fix this, React Router has a component called Outlet that can explicitly point out where nested route components should be placed.
- Import the
Outletcomponent:
import { Outlet } from "react-router-dom";- Place the
Outletcomponent within theErascomponent:
function Eras() {
 return (
   <div>
     <h1>The Eras of Time</h1>
     <ul>
       <li>
         <Link to="medieval">Medieval</Link>
       </li>
       <li>
         <Link to="digital">Digital</Link>
       </li>
     </ul>

     <Outlet />
   </div>
 );
}
In this code, the previous a tags used have been replaced with Link components, with the appropriate paths placed in the to properties.
After, the <Outlet /> component is placed below, as this is where the nested route components will be rendered.

Nested routes have various use cases like hierarchical organizing of routes, code efficiency, improving performance, etc.
Dynamic Routing with useParams
Dynamic routing is a concept that allows you to create routes that are not hard-coded but generated based on user actions or data.
React Router handles dynamic routing using the Route component and the useParams hook.
When setting up a dynamic route, a placeholder (denoted by a colon :) is used in the path prop of the route component.
Like this:
<Route path="/eras/:type" element={<EraType />} />Here, the placeholder for this Route is : type, which indicates that the value of the type parameter would be dynamically generated.
React Router provides a hook called useParams to handle dynamic routing effectively.
Essentially, the useParams hook returns an object that contains the dynamic value from the Route component, which can be used in the component responsible for rendering dynamic content.
Let’s see how it works:
import { useParams } from "react-router-dom";

function EraType() {
 const { type } = useParams();

 return (
   <div>
     <hr />
     <h3>The {type} Era</h3>
   </div>
 );
}
Now update the /eras Route found in App.js to include the dynamic route:
export default function App() {
 return (
   <>
     <Nav />
     <Routes>
       <Route path='/' element={<Home />} />
       <Route path='/eras' element={<Eras />}>
         <Route path='medieval' element={<MedievalEra />} />
         <Route path='digital' element={<DigitalEra />} />
         {/* Dynamic route */}
         <Route path=':type' element={<EraType />} />
       </Route>
       <Route path='*' element={<Error404 />} />
     </Routes>
   </>
 );
}
With this dynamic Route in place, when you navigate within the /eras route, like /eras/ancient. The value “ancient” is the dynamic path and can be accessible through the type variable extracted from useParams.
The <EraType /> then gets rendered within the <Eras /> component due to the nested route structure.
This was just a basic use case of useParams; this hook can be used in other ways, like to fetch similar dynamic data from an API.
Using the useRoutes hook
Another hook provided by React Router is the useRoutes hook.
This hook is just an alternative way to structure Routes and Route in React Router. It works like this: instead of using Routes and Route in the form of React components (JSX), it uses Javascript objects.
In App.js, this is how we structured the Routes and Route components:
export default function App() {
 return (
   <>
     <Nav />
     <Routes>
       <Route path='/' element={<Home />} />
       <Route path='/eras' element={<Eras />}>
         <Route path='medieval' element={<MedievalEra />} />
         <Route path='digital' element={<DigitalEra />} />
         <Route path=':type' element={<EraType />} />
       </Route>
       <Route path='*' element={<Error404 />} />
     </Routes>
   </>
 );
}
Now, by using the useRoutes hook, the code can be restructured like this:
import { useRoutes } from 'react-router-dom';

export default function App() {
 const routes = useRoutes([
   {
     path: "/",
     element: <Home />,
   },
   {
     path: "/eras",
     element: <Eras />,
     children: [
       {
         path: "medieval",
         element: <MedievalEra />,
       },
       {
         path: "digital",
         element: <DigitalEra />,
       },
       {
         path: ":type",
         element: <EraType />,
       },
     ],
   },
   {
     path: "*",
     element: <Error404 />,
   },
 ]);

 return (
   <>
     <Nav />
     {routes}
   </>
 );
}
The useRoutes hook is imported from react-router-dom. Then, an array of route objects is passed to useRoutes. Each route object has a path and element property, which specifies the path and the component that should be rendered when the route matches.
So, choosing between the useRoutes hook or Routes and Route components boils down to personal preference. Opt for the one that suits your style the most.
Conclusion
In conclusion, learning React Router is an important step that React developers should take. By using this tool, managing route navigation and creating well-structured routing systems in an app becomes effortless.
If you’re in pursuit of more knowledge on React Router, we recommend these resources:
Gain Debugging Superpowers
Unleash the power of session replay to reproduce bugs, track slowdowns and uncover frustrations in your app. Get complete visibility into your frontend with OpenReplay — the most advanced open-source session replay tool for developers.
Star on GitHub12k