
RedwoodJS, a new framework


According to its documentation,
“RedwoodJS is a full-stack web development framework designed to help you grow from side project to startup.”
RedwoodJS features an end-to-end development workflow that weaves together the best part of React for developing pages and components, GraphQL as the query language for data, Prisma as ORM for accessing data, TypeScript for better programming, Jest for testing, and Storybook to aid with component development. It provides a full-stack development process in JAMStack.
RedwoodJS is obsessed with developer experience and eliminating as much boilerplate as possible where existing libraries elegantly solve these problems, and where we don’t write our solution. The result has a Javascript development experience one can fall in love with!
Features
Let’s look at RedwoodJS’s main basic features that make it look attractive as a full-fledged framework.
-
Project Structure: Two folders are generated as API and Web when creating a RedwoodJS project. API folder contains the GraphQL back end of your project, which runs on any server. The Web folder contains React front-end code; RedwoodJS uses React for the front end, and several features are built around Routing, Components, Forms, and Cells, including unique formatting structures.
-
Distinctive Command-Line: RedwoodJS CLI allows you to generate any file you need in the directory you specify. It includes two entry points,
rwandrwt, which stand for developing an application and contributing to the frameworks, respectively. Also, you can use the CLI for migration and scaffolding purposes. -
Routing: RedwoodJS Router is a customized version of React Router. It allows developers to track Routes with their corresponding pages by listing all the Routes in a single Routing file. The Named Routes feature allows you to add a reference name to each Route as you prefer. There are three main prop types in React Router name (used to call the route component from the link component), path (used to match the URL path to the route), and page (a prop that indicates the relevant component that needs to be rendered when the path is matched).
// web/src/Routes.js
import { Router, Route } from ‘@redwoodjs/router’
const Routes = () => {
    return (
    <Router>
        <Route path=”/” page={HomePage} name=”home” />
        <Route path=”/users/{type}” page={UsersPage} name=”users” />     </Router>
    )
}
// web/src/components/Admin/Admin.js
import { Link, routes } from ‘@redwoodjs/router’
const Admin = () => {
    return (
      <h1><Link to={routes.home()}>My CRM</Link></h1>
      <Link to={routes.users({type: “admin”})}>View Admins</Link>
    )
}- Data Fetch with Cells: RedwoodJS cells are considered higher-level components that can handle data for you. If you are using RedwoodJS cells, you probably need to write the query then RedwoodJS will do the rest for you. The data fetching mechanism is quite different from the typical traditional system. RedwoodJS provides an asynchronous tool to fetch data where the front end and back end process their task separately, which makes the front end load without waiting for the data to be fetched. Let’s look at RedwoodJS cells; they contain four states named
Loading,Empty,Error, andSuccess, which are automatically rendered depending on the state of your cell.
// web/src/components/UsersCell/UsersCell.js
export const QUERY = gql`
  query USERS {
    users {
      id
      name
    }
  }

export const Loading = () => <div>Loading users...</div>
export const Empty = () => <div>No users yet!</div>
export const Failure = ({ message }) => <div>Error: {message}</div>
export const Success = ({ users }) => {
  return (
    <ul>
      { users.map(user => (
        <li>{user.id} | {user.name}</li>
      ))}
    </ul>
  )
}- Integration with regular HTML: RedwoodJS has identified the issue of React Forms and its complexities compared to a typical HTML Form, and has provided a solution which is a helper method as a wrapper to React Forms, around
react-hook-form. With this method, it’s easier to validate client & server-side where you need to put the required styles to the imported input fields as follows:
import { Form, Label, TextAreaField, FieldError, Submit } from “@redwoodjs/web”
export const Comment = () => {
  const onSubmit = (data) => {
    console.info(`Submitted: ${data}`)
  }
  return (
    <Form onSubmit={onSubmit}> <Label name=”comment” errorStyle={{ color: “red” }} />
      <TextAreaField
        name=”comment”
        errorStyle={{ borderColor: “red” }}
        validation={{ required: true }}
      />
      <FieldError name=”comment” errorStyle={{ color: “red” }} />
      <Submit>Send</Submit>
    </Form>
  )
}
Open Source Session Replay
OpenReplay is an open-source, session replay suite that lets you see what users do on your web app, helping you troubleshoot issues faster. OpenReplay is self-hosted for full control over your data.

Start enjoying your debugging experience - start using OpenReplay for free.
How RedwoodJS works
In a typical setting, RedwoodJS applications are split into two parts: a front end and a back end. This is represented as two JS/TS projects within a single monorepo. The front-end project is called the web side, and the back-end project is called the API side. The web side will end up running in the user’s browser, while code on the API side will run on the server.
Note: RedwoodJS refers to ‘front end’ as ‘web’. This is because RedwoodJS conceives of a world where you may have other sides like ‘mobiles’, ‘desktop’, ‘cli’, etc. But for the sake of this article, we’ll be referring to it as the front end.
The front end is built with React. RedwoodJS’s router makes it simple to map URL paths to React ‘Page’ components. Pages may contain a ‘Layout’ component to wrap content and ‘Cells’ and regular React components. The Cells allow you to declaratively manage the lifecycle of a component that fetches and displays data. Other RedwoodJS utility components make it insignificant to integrate forms and various basic needs.
The back end is an implementation of GraphQL API. Your business logic is organized into ‘services’ that represent their internal API and can be called both from external GraphQL requests and other internal services. RedwoodJS can automatically connect your internal services with Apollo, reducing the amount of boilerplate you have to write.
Before we move on to building our RedwoodJS project, let’s take a look at some of the basic commands of RedwoodJS CLI:
yarn rw g page: generates a page componentyarn rw prisma migrate dev: Runs migrations on our applicationyarn rw g sdl: generates a GraphQL schema definition fileyarn rw g service: generates the service filesyarn rw g cell: generates cell componentyarn rw dev: runs RedwoodJS dev server on http://localhost:8910/.
Building an app
We need to illustrate how to use RedwoodJS to build an app. The Todo app will be able to take notes and save those notes on the JSON server. Note: Credit to RedwoodJS for the example.
First steps
To create the project, all we have to do is run the following commands:
yarn create redwood-app todo-app
cd todo-app
yarn rw dev
Let’s take a glance at our folder structure:
    todo-app
    │
    ├── api
    │   ├── db
    │   │   ├── schema.prisma
    │   │   └── seed.js
    │   └── src
    │       ├── functions
    │       │   └── graphql.js
    │       ├── graphql
    │       ├── lib
    │       │   └── db.js
    │       └── services
    └── web
        ├── public
        │   ├── README.md
        │   ├── favicon.png
        │   └── robots.txt
        └── src
            ├── Routes.js
            ├── components
            ├── index.css
            ├── index.html
            ├── App.js
            ├── layouts
            └── pages
                ├── FatalErrorPage
                │   └── FatalErrorPage.js
                └── NotFoundPage
                    └── NotFoundPage.js
Defining data models
Now we have to add our Todo model to the schema.prisma file.
model Todo {
  id     Int    @id @default(autoincrement())
  body   String
  status String @default("off")
}
Note: Run yarn rw prisma migrate, which will prompt for the name of the migrations; just type added_todo and hit the enter button. RedwoodJS will create and run the migrations.
We’ll create services that will be used to carry out CRUD operations on our todo table in the db:
yarn rw g service todo
yarn rw g sdl
This command will create the files:
- api/src/graphql/todos.sdl.js: contains the GraphQL schema definitions of our GraphQL endpoints.
- api/src/services/todos/todos.js: our service file contains all query and mutation resolver functions.
Creating the page and components
Our app will have just a page, i.e., the HomePage. The homepage will show the to-dos in the database and the input field.
yarn rw g page home/ todosThis command creates the to-do page. The main file is located at web/src/pages/HomePage/HomePage.js. The page will map to the URL path ”/” home. We’ll also create a TodoListCell: yarn rw g cell list todo. It will generate files in the components folder. The main file is located at web/src/components/TodoListCell/TodoListcell.js.
We modify the code to this:
import styled from 'styled-components'
import TodoItem from 'src/components/TodoItem'
import { useMutation } from '@redwoodjs/web'
export const QUERY = gql`
  query TODOS {
    todos {
      id
      body
      status
    }
  }
`
const UPDATE_TODO_STATUS = gql`
  mutation TodoListCell_CheckTodo($id: Int!, $status: String!) {
    updateTodoStatus(id: $id, status: $status) {
      id
      __typename
      status
    }
  }
`
export const Loading = () => <div>Loading...</div>
export const Empty = () => <div></div>
export const Failure = () => <div>Oh no</div>
export const Success = ({ todos }) => {
  const [updateTodoStatus] = useMutation(UPDATE_TODO_STATUS)
  const handleCheckClick = (id, status) => {
    updateTodoStatus({
      variables: { id, status },
      optimisticResponse: {
        __typename: 'Mutation',
        updateTodoStatus: { __typename: 'Todo', id, status: 'loading' },
      },
    })
  }
  const list = todos.map((todo) => (
    <TodoItem key={todo.id} {...todo} onClickCheck={handleCheckClick} />
  ))
  return <SC.List>{list}</SC.List>
}
export const beforeQuery = (props) => ({
  variables: props,
})
const SC = {}
SC.List = styled.ul`
  padding: 0;
  `
We’ll generate AddTodoControl component, which will have an input form with a placeholder and a submit button to submit our todos. Now, let’s scaffold the AddTodoControl component:
yarn rw g component AddTodoControlIt creates a AddTodocontrol component located at web/src/components/AddTodoControl/AddTodoControl.js and our code should look like this:
import styled from 'styled-components'
import { useState } from 'react'
import Check from 'src/components/Check'
const AddTodoControl = ({ submitTodo }) => {
  const [todoText, setTodoText] = useState('')
  const handleSubmit = (event) => {
    submitTodo(todoText)
    setTodoText('')
    event.preventDefault()
  }
  const handleChange = (event) => {
    setTodoText(event.target.value)
  }
  return (
    <SC.Form onSubmit={handleSubmit}>
      <Check type="plus" />
      <SC.Body>
        <SC.Input
          type="text"
          value={todoText}
          placeholder="Memorize the dictionary"
          onChange={handleChange}
        />
        <SC.Button type="submit" value="Add Item" />
      </SC.Body>
    </SC.Form>
  )
}
const SC = {}
SC.Form = styled.form`
  display: flex;
  align-items: center;
`
SC.Body = styled.div`
  border-top: 1px solid #efefef;
  border-bottom: 1px solid #efefef;
  width: 100%;
`
SC.Input = styled.input`
  border: none;
  font-size: 18px;
  font-family: 'Inconsolata', monospace;
  padding: 10px 0;
  width: 75%;

  ::placeholder {
    color: #9e9595;
  }
`
SC.Button = styled.input`
  float: right;
  margin-top: 5px;
  border-radius: 6px;
  background-color: #f75d52;
  padding: 5px 15px;
  color: white;
  border: 0;
  font-size: 18px;
  font-family: 'Inconsolata', monospace;
  :hover {
    background-color: black;
    cursor: pointer;
  }
`
export default AddTodoControl
We’ll create our TodoItem with the command yarn rw g component TodoItem and this component consists of our style attributes for each todo body, so we’re going to implement things like padding, borders, and lines with the code below:
import styled from 'styled-components'
import Check from 'src/components/Check'
const TodoItem = ({ id, body, status, onClickCheck }) => {
  const handleCheck = () => {
    const newStatus = status === 'off' ? 'on' : 'off'
    onClickCheck(id, newStatus)
  }
  return (
    <SC.Item>
      <SC.Target onClick={handleCheck}>
        <Check type={status} />
      </SC.Target>
      <SC.Body>{status === 'on' ? <s>{body}</s> : body}</SC.Body>
    </SC.Item>
  )
}
const SC = {}
SC.Item = styled.li`
  display: flex;
  align-items: center;
  list-style: none;
`
SC.Target = styled.div`
  cursor: pointer;
`
SC.Body = styled.div`
  list-style: none;
  font-size: 18px;
  border-top: 1px solid #efefef;
  padding: 10px 0;
  width: 100%;
`
export default TodoItem
The Check component consists of our icons like on, off, plus icons. To create the check component, run yarn rw g component. Input the following code in our Check component:
import styled from 'styled-components'
import IconOn from './on.svg'
import IconOff from './off.svg'
import IconPlus from './plus.svg'
import IconLoading from './loading.svg'
const map = {
  on: <IconOn />,
  off: <IconOff />,
  plus: <IconPlus />,
  loading: <IconLoading />,
}
const Check = ({ type }) => {
  return <SC.Icon>{map[type]}</SC.Icon>
}
const SC = {}
SC.Icon = styled.div`
  margin-right: 15px;
`
export default Check
We need an AddTodo component to add new todos.
import { useMutation } from '@redwoodjs/web'
import AddTodoControl from 'src/components/AddTodoControl'
import { QUERY as TODOS } from 'src/components/TodoListCell'
const CREATE_TODO = gql`
mutation AddTodo_CreateTodo($body: String!) {
createTodo(body: $body) {
id
__typename
body
status
}
}
`
const AddTodo = () => {
const [createTodo] = useMutation(CREATE_TODO, {
update: (cache, { data: { createTodo } }) => {
const { todos } = cache.readQuery({ query: TODOS })
cache.writeQuery({
query: TODOS,
data: { todos: todos.concat([createTodo]) },
})
},
})
const submitTodo = (body) => {
createTodo({
variables: { body },
optimisticResponse: {
__typename: 'Mutation',
createTodo: { __typename: 'Todo', id: 0, body, status: 'loading' },
},
})
}
return <AddTodoControl submitTodo={submitTodo} />
}
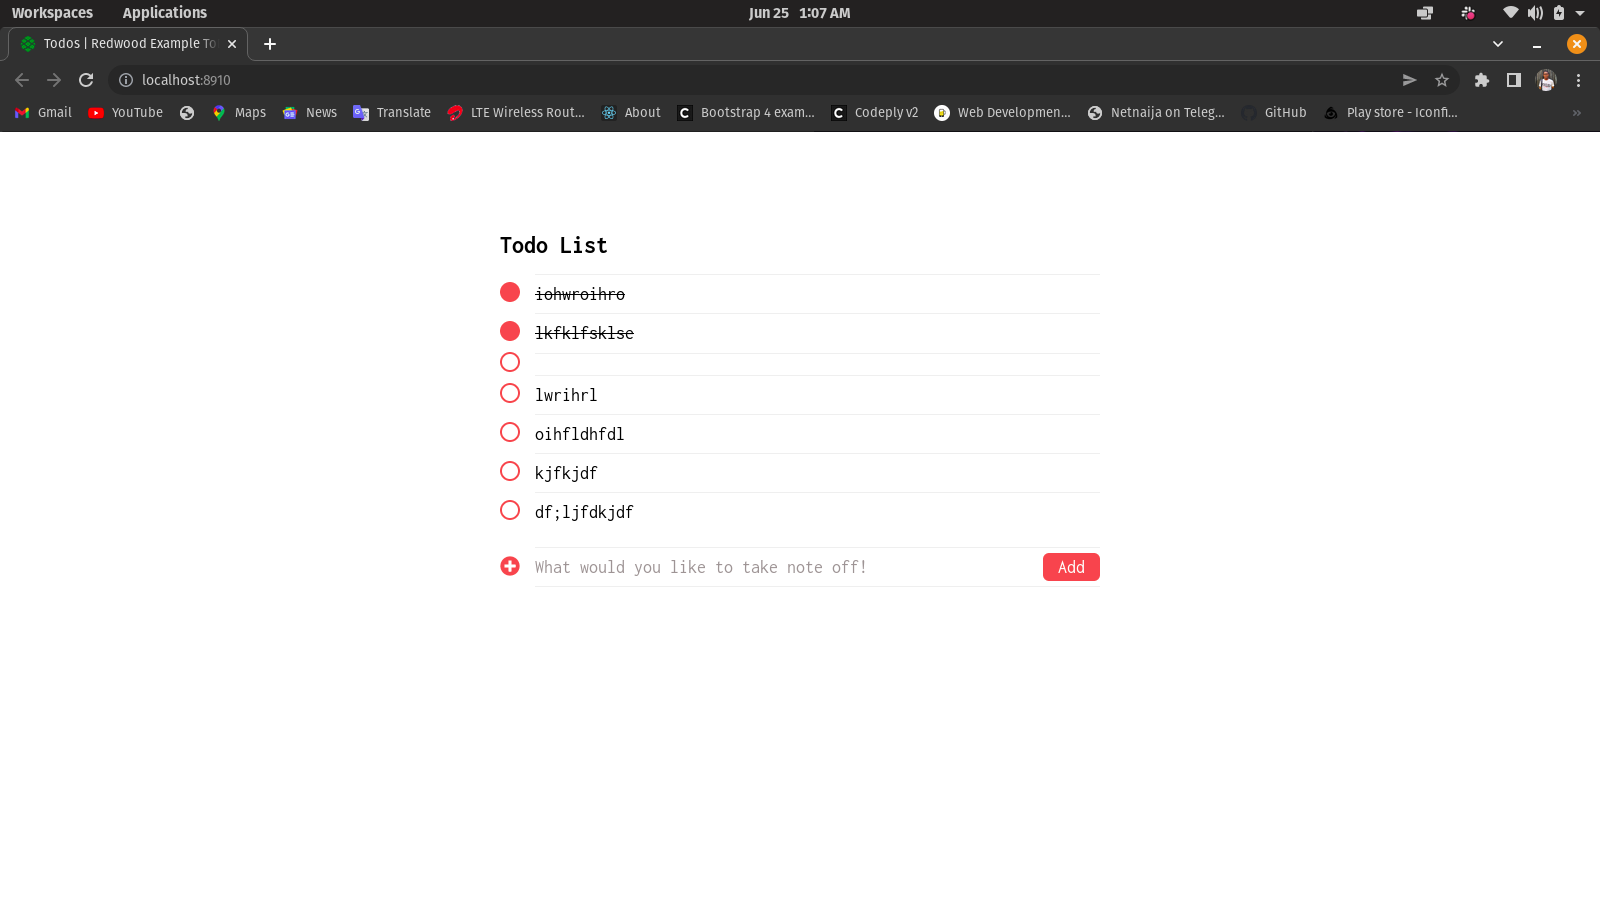
export default AddTodoThis is our final project.
Conclusion
There are many other reasons to get attracted to RedwoodJS.
- Opinionated defaults for formatting, file organization, Webpack, Babel, and more
- Generators for pages, layouts, cells, SDL, services, etc.
- Forms with easy client-and/or server-side validation and error handling
- Database and Data migrations
All these and many more make RedwoodJS unique to the core.