Restful API End-to-End (E2E) Testing


End-to-end testing focuses on testing the entire application flow to ensure it works as designed. Testing an express route helps catch any errors that might occur during the development stage, boosting productivity. This tutorial will help you develop your first RESTful API E2E test.

Discover how at OpenReplay.com.
End-to-end testing, often called E2E or system testing, is a software testing technique that ensures the application works as designed. It runs the application from start to finish, checking for any flaws in the development stage before moving to deployment. E2E testing ensures that the application meets business requirements and users’ expectations.
Unit testing is also a testing technique done in the development stage, but it involves the testing of individual components of an application. These various methodologies have their benefits and drawbacks. E2E testing differs from Unit testing, which focuses on the smallest units of code, mostly functions or methods. A unit test is better at catching errors because it isolates each component compared to E2E, which tests the application as a whole. E2E, on the other hand, ensures that the application is built as intended, meeting users’ expectations.
You can decide whether to pick any of the testing techniques or explore more options like Integration testing.
Importance of testing in software development
The importance of software testing cannot be overemphasized, as it offers vast benefits. The list below contains just a few:
- Quality Assurance: Testing an app thoroughly confirms that the app follows the outlined requirements and satisfies customers. It verifies if the application is of a high standard and ensures that it rivals other existing competitors.
- Detecting and Fixing Bugs: Examining the entire application using any technique can reveal and rectify errors in the staging phase. This makes testing very cost-effective and prevents users from using defective products.
- Security: Top-notch security is desired in any application. Testing helps identify various vulnerabilities and lapses that might be found in the software. This assures users that their credentials are safe and well-protected.
The list can go on and on. This shows how testing is a very crucial part of developing software. With this knowledge, we can build an Express application and test it to see if it works as proposed.
Enough with the theory part. Let’s get our hands on some code. We will develop a payment API using Express and MongoDB as the database.
Getting Started
In this tutorial, we will create an API that will allow users to:
- Create an account.
- Deposit money into their account and
- Send money from their account to another user.
To demonstrate how API testing works, the money that will be used will be virtual, as we will not use any payment platform.
Installing dependencies
To get started, we need to install the needed dependencies. Create an empty folder called apitest; you can name the folder as you please. Next, open this folder in your terminal and run the following:
yarn init --yes
yarn add express mongodb bcryptjs mongoose dotenv
yarn add nodemon jest @types/express @types/node @types/mongoose @types/supertest @types/jest supertest ts-jest ts-node typescript -D
Based on the above code, we created a package.json file with default content using yarn init --yes, then we installed the various dependencies and devDependencies.
Next, we will initialize the default config for typescript using the code below:
npx tsc --initThis will create a new configuration file with:
target: es2016
module: commonjs
strict: true
esModuleInterop: true
skipLibCheck: true
forceConsistentCasingInFileNames: true
Modify the package.json file by replacing the script section with the one below.
    "scripts": {
       "start": "ts-node src/server.ts",
       "dev": "nodemon --exec ts-node src/server.ts",
       "test": "npx jest --detectOpenHandles --forceExit"
   },
Setting up the Database
Once we have installed the required dependencies, we will set up MongoDB Atlas next. Navigate to Atlas’ webpage and register if you don’t have an account or login if you are an existing user.
On your dashboard, create a new database:
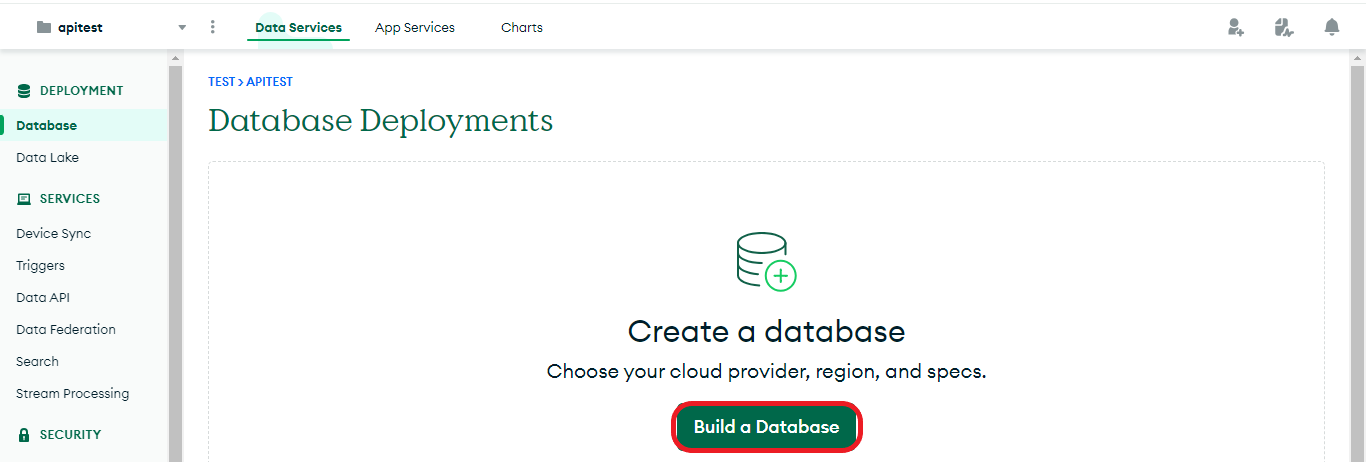
On the next screen, you will be asked to choose a plan. Select MO Free and click on the Create button. You can choose to select any other plan of your choice.

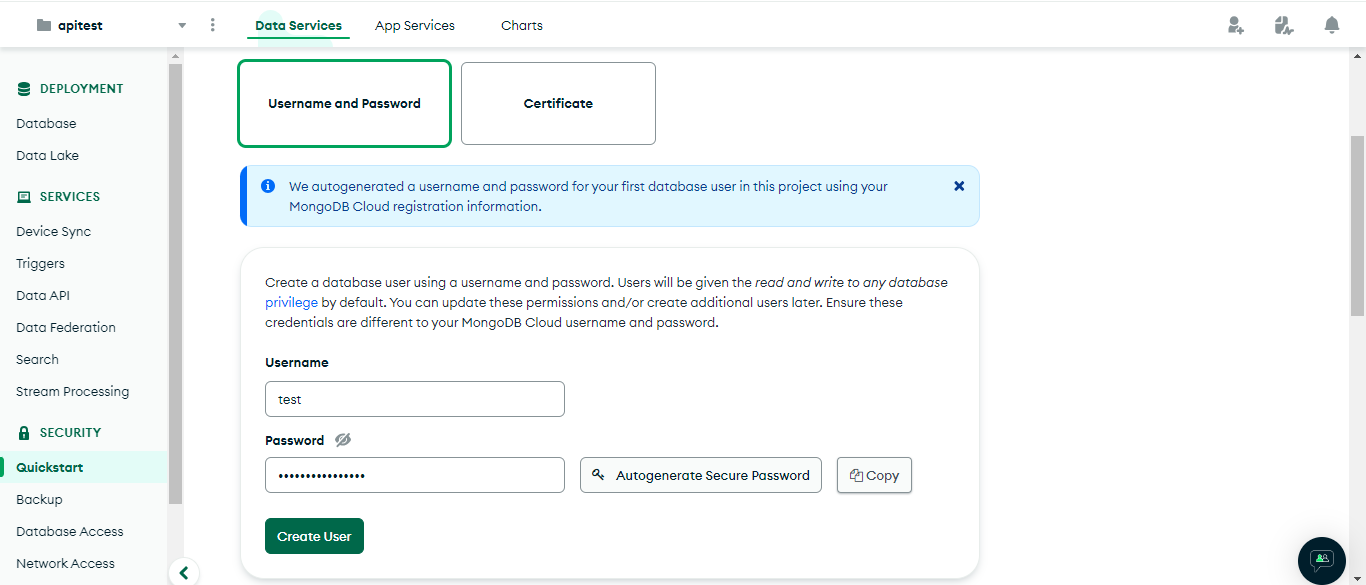
Enter the user username and password of your choice and click on Create User.
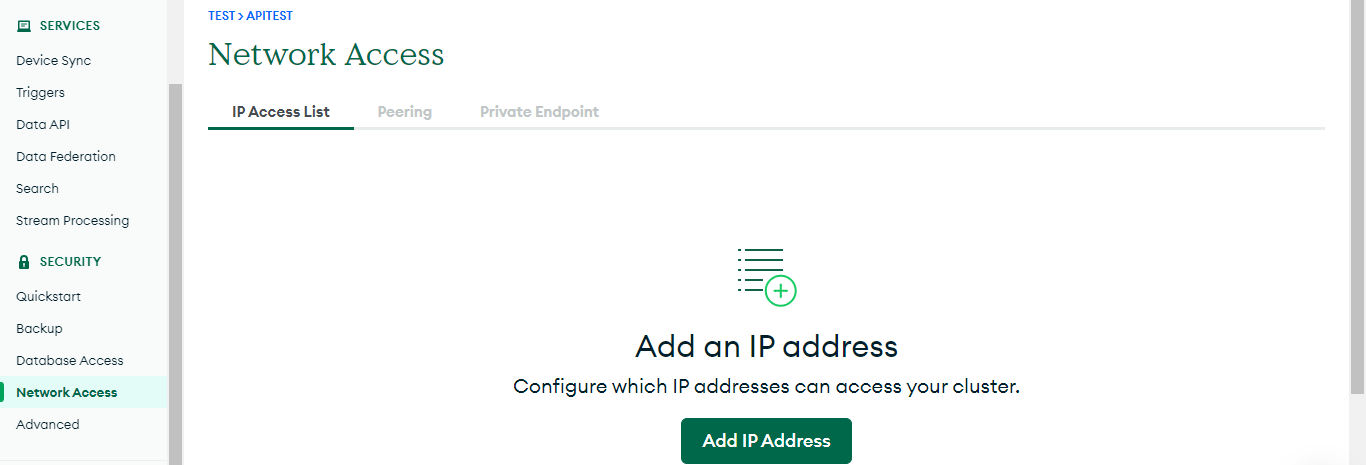
On the left nav bar, select Network Access and click on ADD IP ADDRESS
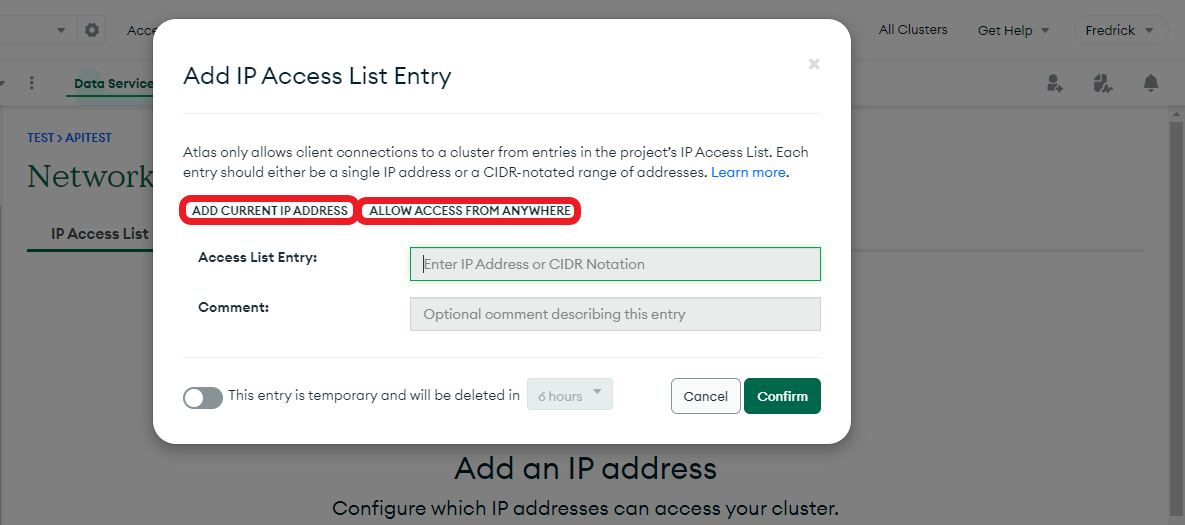
You can either choose to access the Atlas database from any device, or you can specify the IP Address of your desired device. Once you’ve added an IP ADDRESS, click on the Confirm button.
Connecting the application to the database
After we’ve set up the database, the next step is to connect the application to MongoDB. There are various methods to do this, but we will make use of Mongoose.
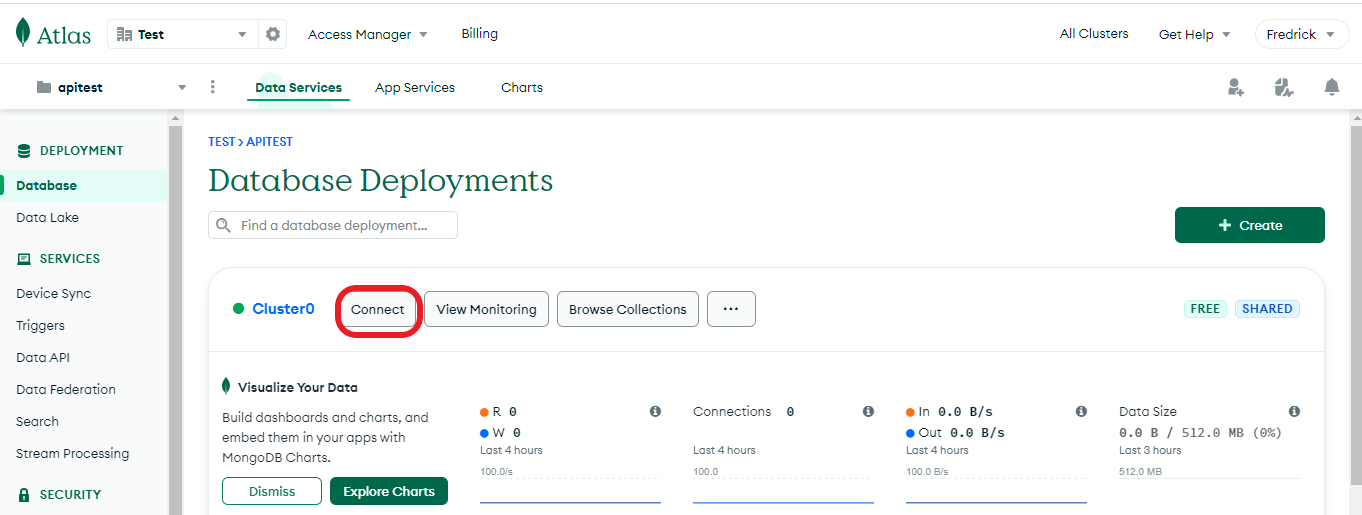
Select Database by the side nav bar on your Atlas dashboard. Click on the Connect button.
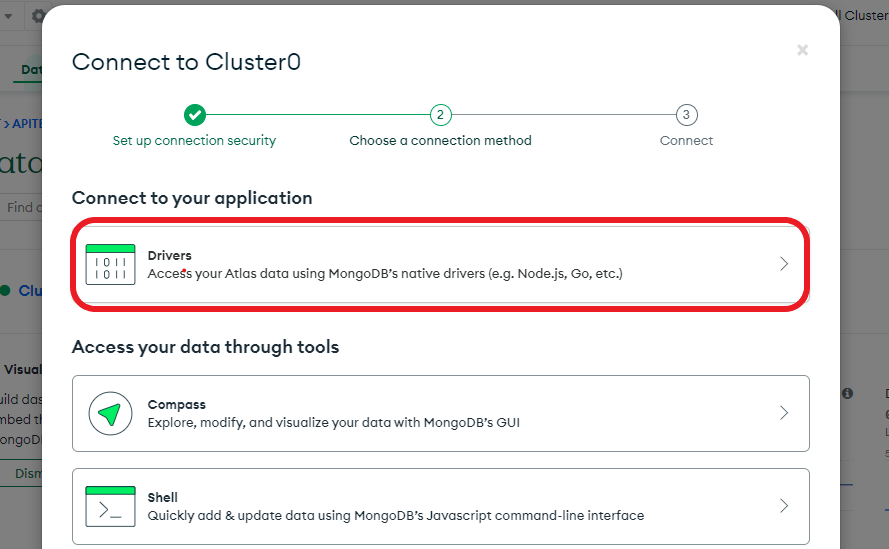
Click on Drivers.
Scroll to step 3 and copy the connection string
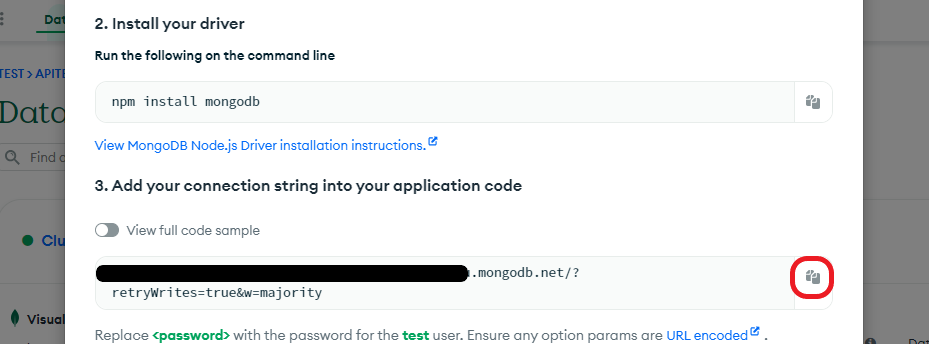
Next, open the apitest folder in Visual Studio Code, create a file called .env in the root folder and add the connection string as shown below:
#./.env
MONGO_URI=mongodb+srv://yourUserame:yourPassword@clusterName.setOfStrings.mongodb.net/?retryWrites=true&w=majority
#PORT: 5000
PORT=5000
Replace yourUsername and yourPassword with your specified username and password, respectively.
Following the addition of the connection string to the .env file,
- Create a folder called src in the root folder.
- Create a file called server.ts and app.ts in it**.**
- Add the following code to the app.ts file.
// src/app.ts
import express from 'express';

const app = express();
app.use(express.json());

//Routes
app.use('/api/signup', reqire('./routes/signup'));
app.use('/api/login', require('./routes/login'));
app.use('/api/transfer', require('./routes/transfer'));
app.use('/api/deposit', require('./routes/deposit'));
app.use('/api/find', require('./routes/find'));

export default app;- Add the code below to the server.ts file.
// src/server.ts
import app from './app';
import dotenv from 'dotenv';
dotenv.config();

import { connectDB, testDB } from './config/db'; //Importing the connectDB function
connectDB().catch(err => {
 console.log(err.message);
}); //Calling the connectDB function
const PORT = (process.env.PORT || 5000) as number;

app.listen(PORT, () => {
 console.log('Server is listening on port ' + PORT);
});
Above, we created an express server that runs on the port received from the .env file or on port 5000.
Once we’re done setting up the server, the next step is to connect to MongoDB.
To do this, create a folder in the src folder called config and a file in the config called db.ts.
Add the code below to the db.ts file once you have created it.
// src/config/db.ts
import { connect } from 'mongoose';

const MONGO_URI = process.env.MONGO_URI as string; //Getting the URI from .env file

export async function connectDB() {
 await connect(MONGO_URI); //Connecting to the database
 console.log('Database is connected successfully');
}
Next, import the connectDB function from the db.ts file into the server.ts file.
// src/server.ts
import express from 'express';

import dotenv from 'dotenv';
dotenv.config();

import { connectDB } from './config/db'; //Importing the connectDB function
connectDB().catch(err => {
 console.log(err.message);
}); //Calling the connectDB function

const app = express();
const PORT = (process.env.PORT || 5000) as number;

app.listen(PORT, () => {
 console.log('Server is listening on port ' + PORT);
});
After connecting to the database, we will create the account schema. In this schema, we will create a blueprint for the Mongo database containing:
- Username,
- Password, and
- Account balance.
Create a model in the src folder called model and create a file in it, Account.ts. Add the following to the Account.ts file:
import { Schema, model } from 'mongoose';

interface IAccount {
 //Interface for the account schema
 username: string;
 password: string;
 balance: number;
}

const accountSchema = new Schema<IAccount>({
 //Creating the account schema
 username: {
   type: String,
   required: true,
   unique: true,
 },
 password: {
   type: String,
   required: true,
 },
 balance: {
   type: Number,
   minLength: 8;
   required: true,
 },
});

const Account = model<IAccount>('Account', accountSchema); //Creating the account model

export default Account; //Exporting the account model
Creating various express routes.
In this section, we will set up different routes for the express application. These routes include:
- POST
/api/signup - POST
/api/login - PUT
/api/deposit - PUT
/api/transfer - GET
api/find/:username
We will create a boiler template that will handle the routes’ functions. Create a folder called Controller, create a file called index.ts in it, and add the code below to the file.
import { Request, Response } from 'express';

export const deposit = async (req: Request, res: Response) => {};
export const find = async (req: Request, res: Response) => {};
export const transfer = async (req: Request, res: Response) => {};
export const login = async (req: Request, res: Response) => {};
export const signup = async (req: Request, res: Response) => {};
Next, create a folder, routes, and add the following files and their respective codes to it.
- signup.ts:
// src/routes/signup.ts
import express, { Request, Response } from 'express';
import { signup } from '../Controller';
const router = express.Router();

router.route('/').post(signup);

router.route('*').all((req, res) => {
 res.status(404).json({ message: 'Invalid route' });
});

module.exports = router;- login.ts:
// src/routes/login.ts
import express, { Request, Response } from 'express';
import { login } from '../Controller';
const router = express.Router();

router.route('/').post(login);

router.route('*').all((req, res) => {
 res.status(404).json({ message: 'Invalid route' });
});

module.exports = router;- deposit.ts:
// src/routes\deposit.ts
import express, { Request, Response } from 'express';
import { deposit } from '../Controller';
const router = express.Router();

router.route('/').put(deposit);

router.route('*').all((req, res) => {
 res.status(404).json({ message: 'Invalid route' });
});

module.exports = router;- transfer.ts:
// src/routes/transfer.ts
import express, { Request, Response } from 'express';
import { transfer } from '../Controller';
const router = express.Router();

router.route('/').put(transfer);

router.route('*').all((req, res) => {
 res.status(404).json({ message: 'Invalid route' });
});

module.exports = router;- find.ts:
//src/routes/find.ts
import express, { Request, Response } from 'express';
import { find } from '../Controller';
const router = express.Router();

router.route('/:username').get(find);

router.route('*').all((req, res) => {
 res.status(404).json({ message: 'Invalid route' });
});

module.exports = router;
Lastly, import these various routes into the server.ts file and use them.
// src/server.ts

// The rest of the code
const app = express();
app.use(express.json());

//Routes
app.use('/api/signup', require('./routes/signup'));
app.use('/api/login', require('./routes/login'));
app.use('/api/transfer', require('./routes/transfer'));
app.use('/api/deposit', require('./routes/deposit'));
app.use('/api/find', require('./routes/find'));

const PORT = (process.env.PORT || 5000) as number;

app.listen(PORT, () => {
 console.log('Server is listening on port ' + PORT);
});Adding controllers
In this section, we will add the functionalities for the various routes. Open the index.ts file in /src/Controller and let’s handle the signup function.
//src/Controller/index.ts

export const signup = async (req: Request, res: Response) => {
 const { username, password }: { username: string; password: string } =
   req.body; //Getting the username and password from the request body

 if (!username || !password) {
   //Checking if the username or password is missing in the request body
   return res
     .status(400)
     .json({ message: 'Username or password not provided' });
 }

 try {
   const lowerUsername = username.toLowerCase(); //Converting the username to lowercase
   const checkUsername: any = await Account.findOne({
     username: lowerUsername
   });
   if (password.length < 8) {
     //Checking if the password is at least eight characters long
     return res
       .status(400)
       .json({ message: 'Password must be at least 8 characters long' });
   }
   if (checkUsername) {
     //Checking if the username already exists
     return res.status(400).json({ message: 'Username already taken' });
   }
   const account = new Account({
     //Creating a new account
     username: lowerUsername,
     password,
     balance: 0
   });
   await account.save(); //Saving the account to the database
   return res.status(201).json({ message: 'Account created' });
 } catch (error: any) {
   console.log(error.message); //Logging the error message if any
   return res.status(500).json({ message: 'Error creating account' });
 }
};
Above, we used the username and password that will be passed to the request body to create a new account. For the simplicity of this project, we did not hash out the password. This is not acceptable. All passwords must be hashed first using services like bcrypt or crypto before storing them in the database. Hashing your password helps to protect its content even when the database is accessed by unauthorized users.
Next, we will handle the login function.
//src/Controller/index.ts

export const login = async (req: Request, res: Response) => {
 const { username, password }: { username: string; password: string } =
   req.body; //Getting the username and password from the request body

 if (!username || !password) {
   //Checking if the username or password is missing in the request body
   return res
     .status(400)
     .json({ message: 'Username or password not provided' });
 }

 try {
   const lowerUsername = username.toLowerCase(); //Converting the username to lowercase
   const checkUsername = await Account.findOne({ username: lowerUsername });
   if (!checkUsername) {
     //Checking if the username exists in the database
     return res
       .status(400)
       .json({ message: 'Username or password is incorrect' });
   }
   if (checkUsername.password !== password) {
     //Checking if the password is correct
     return res
       .status(400)
       .json({ message: 'Username or password is incorrect' });
   }
   return res.status(200).json({ message: 'Login successful' });
 } catch (error: any) {
   console.log(error.message); //Logging the error message if any
   return res.status(500).json({ message: 'Error logging in' });
 }
};
We got the username and password from req.body and checked if the password in the database for that user matches the one provided. After handling the signup and login functionality, the deposit function comes next.
//src/Controller/index.ts

export const deposit = async (req: Request, res: Response) => {
 const {
   username,
   password,
   amount
 }: { username: string; password: string; amount: number } = req.body; //Getting the username, password and amount from the request body

 if (!username || !password || !amount || amount <= 0) {
   //Checking if the username, password or amount is missing in the request body
   return res.status(400).json({ message: 'Missing parameters' });
 }
 try {
   const lowerUsername = username.toLowerCase(); //Converting the username to lowercase
   const checkUsername: any = await Account.findOne({
     username: lowerUsername
   });
   if (!checkUsername) {
     //Checking if the username exists in the database
     return res
       .status(400)
       .json({ message: 'Username or password is incorrect' });
   }
   if (checkUsername.password !== password) {
     //Checking if the password is correct
     return res
       .status(400)
       .json({ message: 'Username or password is incorrect' });
   }
   const newAmount: number = parseInt(amount as any) + checkUsername.balance; //Calculating the new balance
   await Account.updateOne(
     //Updating the balance in the database
     { username: lowerUsername },
     { balance: newAmount }
   );
   return res.status(201).json({ message: 'Deposit successful' });
 } catch (error: any) {
   console.log(error.message); //Logging the error message if any
   return res.status(500).json({ message: 'Error depositing funds' });
 }
};
Based on the code above, we performed the login logic and then added the specified amount to the user’s account.
Now, we will handle the transfer function.
//src/Controller/index.ts

export const transfer = async (req: Request, res: Response) => {
 const {
   username,
   recipient,
   password,
   amount
 }: {
   username: string;
   password: string;
   recipient: string;
   amount: number;
 } = req.body; //Getting the username, password, recipient and amount from the request body

 if (!username || !password || !recipient || !amount || amount <= 0) {
   //Checking if the username, password, recipient or amount is missing in the request body
   return res.status(400).json({ message: 'Missing parameters' });
 }

 try {
   const lowerUsername = username.toLowerCase();
   const lowerrecipient = recipient.toLowerCase(); //Converting the username and recipient to lowercase
   if (lowerUsername === lowerrecipient) {
     //Checking if the username and recipient are the same
     return res.status(400).json({ message: 'Cannot transfer to self' });
   }
   const checkUsername: any = await Account.findOne({
     username: lowerUsername
   });
   if (!checkUsername) {
     //Checking if the username exists in the database
     return res
       .status(400)
       .json({ message: 'Username or password is incorrect' });
   }
   if (checkUsername.password !== password) {
     //Checking if the password is correct
     return res
       .status(400)
       .json({ message: 'Username or password is incorrect' });
   }
   if (checkUsername.balance < amount) {
     //Checking if the user has sufficient funds
     return res.status(400).json({ message: 'Insufficient funds' });
   }
   const checkrecipient: any = await Account.findOne({
     username: lowerrecipient
   });
   if (!checkrecipient) {
     //Checking if the recipient exists in the database
     return res.status(400).json({ message: 'recipient not found' });
   }
   const newAmount: number = checkUsername.balance - parseInt(amount as any); //Calculating the new balance for the user
   await Account.updateOne(
     { username: lowerUsername },
     { balance: newAmount }
   );
   const newAmount2: number = checkrecipient.balance + parseInt(amount as any); //Calculating the new balance for the recipient
   await Account.updateOne(
     { username: lowerrecipient },
     { balance: newAmount2 }
   );
   return res.status(201).json({ message: 'Transfer successful' });
 } catch (error: any) {
   console.log(error.message);
   return res.status(500).json({ message: 'Error transferring funds' });
 }
};
In the code above, we also performed the login logic and
- Ensured that users do not transfer to themselves.
- Ensured that the recipient is in the database.
- Converted the amount passed to an integer and performed the necessary arithmetic operations.
- Updated the user and recipient balance, respectively.
Lastly, we will handle the find function.
//src/Controller/index.ts

export const find = async (req: Request, res: Response) => {
 const { username }: { username: string } = req.params as any; //Getting the username from the request parameters

 if (!username) {
   //Checking if the username is missing in the request parameters
   return res.status(400).json({ message: 'Missing parameters' });
 }

 try {
   const lowerUsername = username.toLowerCase(); //Converting the username to lowercase
   const checkUsername: any = await Account.findOne({
     username: lowerUsername
   });
   if (!checkUsername) {
     //Checking if the username exists in the database
     return res.status(400).json({ message: 'Username not found' });
   }
   const response = {
     //Creating the response object with the username and balance
     username: checkUsername.username,
     balance: checkUsername.balance
   };
   return res.status(200).json({ user: response });
 } catch (error: any) {
   console.log(error.message); //Logging the error message if any
   return res.status(500).json({ message: 'Error finding user' });
 }
};
In the previous functions, we got the username from the request body, but in the find function, we got the username from the request parameter. We saved the username and then searched the database for the corresponding user to retrieve their balance.
Feel free to manually test out the route using Postman or Thunder Client in Visual Studio Code.
Testing the express routes
Once all the setups are done, it’s time to dive into the main cause of this article, which is Testing. To start testing the express routes, you need to get a separate database for your testing. It is not ethical to have the same database for your test and primary application.
You can follow the section where we set up the database to create a database for testing.
After you’ve created the database, add the test connection string to the .env file.
#./.env

#MONGO URI
MONGO_URI=mongodb+srv://yourUserame:yourPassword@clusterName.setOfStrings.mongodb.net/?retryWrites=true&w=majority
#TEST MONGO URI
TESTING_MONGO_URI=mongodb+srv://yourUserame:yourPassword@clusterName.setOfStrings.mongodb.net/testing?retryWrites=true&w=majority
#PORT: 5000
PORT=5000
Create a function in the db.ts file that will connect to the test database.
// src/config/db.ts

export async function testDB() {
   await connect(TESTING_MONGO_URI);
}
Open your terminal and run npm install @faker-js/faker --save-dev to install the faker package. Faker helps to generate realistic data that is employed in populating the database and in testing.
Next, create a file named jest.config.js in the root directory and add the code below to it. Jest makes use of this file to configure the E2E testing for the application.
/** @type {import('ts-jest').JestConfigWithTsJest} */
module.exports = {
 preset: 'ts-jest',
 testEnvironment: 'node',
 testTimeout: 10000,
 setupFiles: ['<rootDir>/.jest/setEnvVars.js']
};
Above, we indicated the duration (10,000 milliseconds) that Jest will pause for a API test to run before proceeding to subsequent tests. Create a folder in the root directory called .jest, create a file named setEnvVars.js in it, and add the following:
process.env.TESTING_MONGO_URI = 'mongodb+srv://yourUserame:yourPassword@clusterName.setOfStrings.mongodb.net/testing?retryWrites=true&w=majority';Following the setup of Jest, the next step involves creating a file designated for E2E testing in this application. You can choose to name this file as you please, but in this tutorial, it’s called app.test.ts.
Add the following to it:
// ./app.test.ts;
import { testDB } from './src/config/db';
import request from 'supertest';
import app from './src/app';

describe('Testing the express route', () => {
 beforeAll(async () => {
   await testDB().catch(err => {
     console.log('err', err.message);
   });
 }, 30000);
});
We imported the test database into the test file and then invoked the beforeAll method. This method initiates a connection with the test database before proceeding with the execution of other tests.
After the initialization of the database, we will create a test for the signup route. In this test, we will check for the route with both valid and invalid values.
This will help to ensure that the application runs as designed and detects errors, if any.
// ./app.test.ts
import { testDB } from './src/config/db';
import request from 'supertest';
import app from './src/app';
import { faker } from '@faker-js/faker';

const username = faker.internet.userName(); //Creating a random username
const recipient = faker.internet.userName(); //Creating a random recipient
const password = faker.internet.password(); //Creating a random password

describe('Testing the express route', () => {
 beforeAll(async () => {
   await testDB().catch(err => {
     console.log('err', err.message);
   });
 }, 30000);
 describe('Testing the signup route', () => {
   //Testing the signup route
   test('successful signup test', async () => {
     //Testing the successful signup
     await request(app)
       .post('/api/signup')
       .send({ username, password }) //Sending the username and password in the request body
       .then(res => {
         expect(res.status).toBe(201); //Checking if the status code is 201
       });
     await request(app)
       .post('/api/signup')
       .send({
         username: recipient,
         password
       }) //Sending the username and password in the request body for the second user
       .then(res => {
         expect(res.status).toBe(201); //Checking if the status code is 201
       });
   });
   test('failed signup test', async () => {
     //Testing the failed signup
     await request(app)
       .post('/api/signup')
       .send({}) //Sending an empty request body
       .then(res => {
         expect(res.status).toBe(400); //Checking if the status code is 400
       });
   });
 });
});
Based on the above code, we generated fake usernames and a password using the Faker library.
Once these fake credentials were created, we created two different tests. In the first API call test, we passed valid data to the request body, while in the second, we passed empty data.
With the creation of the register route now in place, we will test the login route.
// ./app.test.ts
import { testDB } from './src/config/db';
import request from 'supertest';
import app from './src/app';
import { faker } from '@faker-js/faker';
const username = faker.internet.userName(); //Creating a random username
const recipient = faker.internet.userName(); //Creating a random recipient
const password = faker.internet.password(); //Creating a random password
describe('Testing the express route', () => {
 //BeforeAll and Register route test

 describe('Testing the login route', () => {
   //Testing the login route
   test('successful login test', async () => {
     //Testing the successful login
     await request(app)
       .post('/api/login')
       .send({ username, password }) //Sending the username and password in the request body
       .then(res => {
         expect(res.status).toBe(200); //Checking if the status code is 200
       });
   });
   test('failed login test', async () => {
     //Testing the failed login
     await request(app)
       .post('/api/login')
       .send({ username: 'notInDB', password: 'Fred' }) //Sending a username that is not in the database
       .then(res => {
         expect(res.status).toBe(400); //Checking if the status code is 400
       });
   });
 });
});
Jest executes these tests in consecutive order; hence, the organization of your tests holds great significance. After testing the register route, we used the same username and password to test the login functionality. Next, we will test the deposit route.
// ./app.test.ts
import { testDB } from './src/config/db';
import request from 'supertest';
import app from './src/app';
import { faker } from '@faker-js/faker';
const username = faker.internet.userName(); //Creating a random username
const recipient = faker.internet.userName(); //Creating a random recipient
const password = faker.internet.password(); //Creating a random password
describe('Testing the express route', () => {
 //BeforeAll, Register, Login route test

 describe('Testing the deposit route', () => {
   //Testing the deposit route
   test('successful deposit test', async () => {
     //Testing the successful deposit
     await request(app)
       .put('/api/deposit')
       .send({ username, password, amount: 5000 }) //Sending the username, password and amount in the request body
       .then(res => {
         expect(res.status).toBe(201); //Checking if the status code is 201
       });
   });
   test('failed deposit test', async () => {
     //Testing the failed deposit
     await request(app)
       .put('/api/deposit')
       .send({ username, password, amount: '0' }) //sending an amount less than 1
       .then(res => {
         expect(res.status).toBe(400); //Checking if the status code is 400
       });
   });
 });
});
In the successful test, we deposited a specified amount of money to the same username, while in the invalid test, we passed 0 as the amount to be deposited.
Now that we have money in the user’s account, we will test out transferring this money to another user.
// ./app.test.ts
import { testDB } from './src/config/db';
import request from 'supertest';
import app from './src/app';
import { faker } from '@faker-js/faker';
const username = faker.internet.userName(); //Creating a random username
const recipient = faker.internet.userName(); //Creating a random recipient
const password = faker.internet.password(); //Creating a random password
describe('Testing the express route', () => {
 //BeforeAll, Register, Login and Deposit route test

 describe('Testing the transfer route', () => {
   //Testing the transfer route
   test('successful transfer test', async () => {
     //Testing the successful transfer
     await request(app)
       .put('/api/transfer')
       .send({
         username,
         password,
         recipient,
         amount: 1000
       }) //Sending the username, password, recipient and amount in the request body
       .then(res => {
         expect(res.status).toBe(201); //Checking if the status code is 201
       });
   });
   test('failed transfer test', async () => {
     await request(app)
       .put('/api/transfer')
       .send({
         username,
         password,
         recipient,
         amount: '10000'
       }) //Sending an amount greater than the one deposited
       .then(res => {
         expect(res.status).toBe(400); //Checking if the status code is 400
       });
   });
 });
});
5000was deposited into the user’s account in thedepositroute.
In the test marked as successful, we transferred 1000 to the recipient, while in the case of the invalid route, we attempted to transfer a sum exceeding the user’s balance.
Lastly, we will test the find route.
// ./app.test.ts
import { testDB } from './src/config/db';
import request from 'supertest';
import app from './src/app';
import { faker } from '@faker-js/faker';
const username = faker.internet.userName(); //Creating a random username
const recipient = faker.internet.userName(); //Creating a random recipient
const password = faker.internet.password(); //Creating a random password
describe('Testing the express route', () => {
 //BeforeAll, Register, Login and Deposit route test

 describe('Testing the find route', () => {
   //Testing the find route
   test('successful find test', async () => {
     //Testing the successful find
     await request(app)
       .get(`/api/find/${recipient}`) //Sending the username in the request parameters
       .then(res => {
         expect(res.status).toBe(200); //Checking if the status code is 200
       });
   });
   test('failed find test', async () => {
     //Testing the failed find route
     await request(app)
       .get(`/api/find/userNotInDB`) //Sending a username that is not in the database
       .then(res => {
         expect(res.status).toBe(400); //Checking if the status code is 400
       });
   });
 });
});
Now that all the tests for the express route have been written, we can now run the test command.
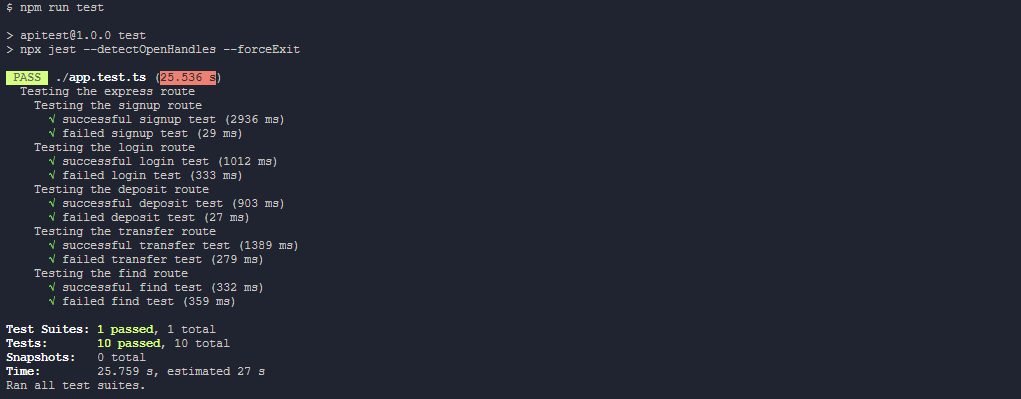
Launch your terminal and execute npm run test to initiate the testing process.
Verify that all the written tests have successfully passed. If needed, you can refer to the source code of the tutorial available here.
Conclusion
In this tutorial, we comprehensively covered the process of setting up and conducting tests for an express route. With this basic knowledge, you can conduct tests for complex applications.
Resources
Gain control over your UX
See how users are using your site as if you were sitting next to them, learn and iterate faster with OpenReplay. — the open-source session replay tool for developers. Self-host it in minutes, and have complete control over your customer data. Check our GitHub repo and join the thousands of developers in our community.